Table of Contents
Advertisement
Available languages
Available languages
Quick Links
Advertisement
Chapters
Table of Contents

Related Manuals for PRESIDIUM Synthetic Diamond Screener II


Summary of Contents for PRESIDIUM Synthetic Diamond Screener II
- Page 2 Language Contents Language 1. English 2. Chinese 3. French 4. German 5. Italian 6. Russian 7. Spanish...
-
Page 3: Table Of Contents
2. PERFORMING A TEST with your Synthetic Diamond Screener II 3. READING TEST RESULTS on your Synthetic Diamond Screener II 4. OVERVIEW OF BUTTONS & INDICATORS on your Synthetic Diamond Screener II 5. TAKING CARE of your Synthetic Diamond Screener II... -
Page 4: Disclaimers, Exclusions And Limitations Of Liability
The Synthetic Diamond Screener II (“SDS II”) by Presidium in this handbook is provided and/or sold on an “as is” basis. Except as required by applicable law, no warranties of any kind expressed or implied, including, but not limited to, the implied warranties of merchantability and fitness for a particular purpose. -
Page 5: About This Book
Limitation of Liability clauses stated above in Section I. III. About Presidium Synthetic Diamond Screener II (SDS II) The Synthetic Diamond Screener II (SDS II) is developed to help screen out the Type IIa colorless diamond, which could possibly be synthetic, from the natural Type Ia colorless diamond. - Page 6 Type I colorless natural diamond. Created with the user in mind, the Synthetic Diamond Screener II is designed to be a lightweight, portable, sturdy and non-slip unit that can be powered by 4 AAA batteries or through its USB port that connects to either an external power source or to the Presidium Universal Power Adaptor.
- Page 7 • Feature user-safe materials and user-friendly ergonomics that gives clear visibility of results, maximum sturdiness and grip, ease of use and portability The capabilities of the Synthetic Diamond Screener II are as follows: • Test on diamonds within a range of dimension from 1.5 mm in width and up to 5 mm in height.
- Page 8 • A 5mm metal bar to conveniently raise the test probe for successive testing on loose stones Included in your package: • Presidium Synthetic Diamond Screener II unit • Protective carrying case with interior pouch for gemstones and accessories • 5mm metal bar •...
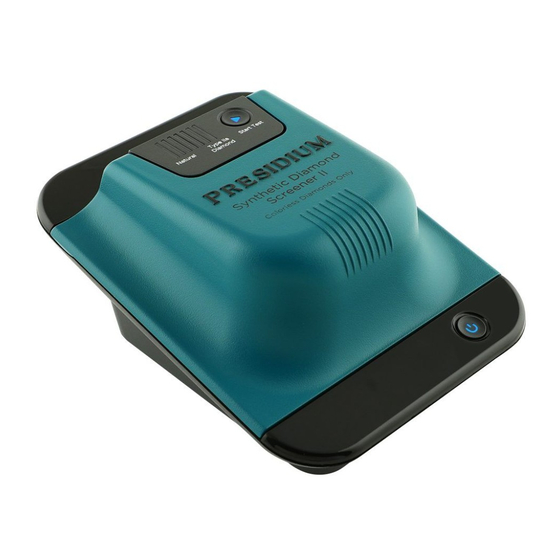
- Page 9 Fig.A Synthetic Diamond Screener II Unit Features/Functions (Fig.A) 1. Power button (On/Off and Low Battery Indicator) 2. Lid 3. Anti-slip platform with concentric markings to ensure correct placement of stone 4. A 5mm metal bar to conveniently raise the test probe for successive testing on loose stones 5.
-
Page 10: Important Notice
• Do not paint the device. Paint can clog the moving parts and prevent proper operation. If the device is not working properly, kindly contact Presidium Customer Service at service@presidium.com.sg or: Presidium Instruments Pte Ltd Unit 7, 207 Henderson Road... -
Page 11: Getting Started With Your Synthetic Diamond Screener
Synthetic Diamond Screener II 1.1 Powering up your device The Synthetic Diamond Screener II can be powered by batteries or an external power source through the USB cable connected to the Presidium Universal Power Adaptor (both are included in the... - Page 12 You may also connect the other end of the USB cable directly to an external power source (e.g. computer, laptop, etc). It is recommended you use only the USB cable and the Presidium Universal Power Adaptor provided with your product.
- Page 13 1.2 Switching on your device To switch on your Synthetic Diamond Screener II, press and hold the Power button located at the front of the unit. A blue light will blink for approximately 4 seconds to allow the product to warm up. (Fig 1.3) Once the blue light stops blinking and remains stable, the device is ready for use.
- Page 14 1.3 Switching off your device and Power-Saving Auto-Off To switch off your Synthetic Diamond Screener II, press and hold the Power button for approximately 2 seconds until the light goes off. To ensure that your Synthetic Diamond Screener II conserves power, the unit will automatically switch off 10 minutes after the last activity.
- Page 15 It is recommended that batteries should be removed when the device is expected to be stored for an extended period of time. Batteries do not have to be removed from the unit when the Presidium Power Universal Adaptor is used through the USB cable.
-
Page 16: Performing A Test With Your Synthetic Diamond Screener
2. Performing a test with your Synthetic Diamond Screener II The Synthetic Diamond Screener II works accurately with known colorless diamonds of color D to J. You should ascertain if your stone is a diamond first, before using this device. -
Page 17: Screener
Testing is performed under the lid of the Synthetic Diamond Screener II where a testing area is marked by a hole in the center and a protruding overhead UV light source (Fig 2.2). The stone is placed covering this hole and testing begins when the lid is closed and the “Start Test”... - Page 18 2.1 For testing on loose diamond Ensure your loose diamond stone is wide enough to cover the testing area. It should be approximately 1.5 mm in width. Your diamond should also not exceed 5 mm in height to ensure that the UV wavelength transmitted by the UV light source can be accurately measured.
- Page 19 Release the lever to lower the UV light source and secure the diamond in place for testing. (Fig 2.4) Fig.2.4 Adjust the UV light source with lever to secure the diamond in place If you are testing multiple loose stones, use the metal bar provided to hold the light source in place so that you do not need to keep adjusting the lever in order to position the loose stones (Fig 2.5).
- Page 20 2.2 For mounted diamonds Ensure that the stone is set with an open-back setting, meaning you can still see a clear view and colour of the stone when you view the back of it and it is not obscured by the jewelry metal or other stones. (Fig 2.7).
- Page 21 If your mounted open-back diamond is in a ring, place the ring in the centre of the cross-hair marking Ring Guide that is embossed on the UV light source. The table of the mounted diamond should be directly facing down on the testing area. With the ring hung within the Ring Guide area, use the lever to lower the UV light source to secure the stone over the testing area (Fig 2.8) Fig.2.8 Using the Ring Guide on the UV light source...
- Page 22 2.3 Start Test The “Start Test” button located at the top right corner of the device serves as an indication when the device is ready for testing and the interior UV light source is activated to begin the identification procedure. You should only begin to use the device for testing when the “Start Test”...
- Page 23 2.4 Important Notes about Performing a test • Ensure your tested gemstone does not exceed 5 mm in height and its width covers the Photo-detector completely. The carat equivalent of this is approximately 0.02 to 10 carats. • Conduct prior supporting tests to ascertain the stone for testing is a diamond.
-
Page 24: Reading Test Results On Your Synthetic Diamond
3. Reading Test Results with your Synthetic Diamond Screener II The SDS measures the UV absorption ability of the diamond and this measurement is communicated as ‘Natural’ or ‘Type IIa Diamond’. After the “Start Test” button is pressed, the button will start to blink in blue as testing is underway. - Page 25 Blue Bar of light/Natural The first bar on the left will indicate the ‘Natural’ reading and will be lit in blue (Fig 3.2). Fig.3.2 ‘Natural’ Reading The blue light labelled ‘Natural’ indicates the UV light absorption ability of the tested diamond stone is high as there are trace elements within the stone that has absorbed the UV light, thus allowing very little UV light through to the photo-detector.
- Page 26 Red Bar of light/Type IIa Diamond The first light bar on the right will indicate ‘Type IIa Diamond’ and will be lit in red (Fig 3.3). Fig.3.3 ‘Type IIa’ Reading A ‘Type IIa Diamond’ reading means the UV light absorption ability of the tested diamond stone is low and this is due to the lack of trace elements such as nitrogen within the colorless diamond, allowing the light to pass through the diamond with little obstruction.
-
Page 27: Overview Of Buttons & Indicators On Your Synthetic Diamond Screener
4. Overview of Buttons & Indicators on your Synthetic Diamond Screener II The table below summarizes the functions and representations of the buttons and lights on the Synthetic Diamond Screener II device. Power Button Description Light Function Press and hold the... - Page 28 Start Test Button Description Light Function No stone on the Blinking red Device is unable to detect photo-detector is any stones on the photo- detected detector. Ready for testing Steady blue Device lid is closed and ready for testing with the interior UV light source switched off.
-
Page 29: Taking Care Of Your Synthetic Diamond Screener
5. Taking care of your Synthetic Diamond Screener II The Synthetic Diamond Screener II should be handled with care. Always cover it or place it securely in its custom carrying case when the device is not in use. Caution should be taken so as not to damage the device. - Page 30 目录 中文版本 免责声明、例外情形以及责任范围 II. 关于本手册 III. 关于 Presidium 合成钻石筛选器II IV. 重要须知 1. 合成钻石筛选器II使用入门 2. 使用合成钻石筛选器II执行测试 3. 读取合成钻石筛选器II的测试结果 4. 合成钻石筛选器II指示灯概述 5. 合成钻石筛选器II的维护...
-
Page 31: 免责声明、例外情形以及责任范围
I. 免责声明、例外情形以及责任范围 请查阅并注意保修卡中说明的 保修条款和条件。 Presidium 对其设备的保修承诺仅适用于用户按照相关用户手册中所载 明的所有条款和条件的正确使用情况,并且只涵盖制造缺陷。 由于产品会受到不断改进,因此Presidium保留对所有文件进行修改的 权利,包括对本手册进行修改的权利,恕不另行通知。Presidium亦不 承担通知任何人此类修改或变更的义务。用户应定期查阅Presidium的 官方网站:http://www.presidium.com.sg/ Presidium对因使用本产品或本手册而导致的任何损害或损失概不负 责。 对于任何因使用本设备而导致的直接或间接的损失,Presidium、其制 造商或其任何附属公司、授权人、分销商、经销商、雇员和/或代理人 在任何情况下概不承担任何责任。 在适用法律允许的最大范围内,对于任何原因导致的任何特殊、偶然、 附带或间接损失,Presidium、其制造商或其任何附属公司、授权人、 分销商、经销商、雇员和/或代理人在任何情况下概不承担任何责任。 本手册中的Presidium合成钻石筛选器II(SDS II)是在“原样”的基础 上提供和/或出售的。除了按照适用法律要求之外,Presidium不提供任 何形式的明示或暗示的保证,包括但不限于针对特定用途的适销性和适 用性的默示保证。... -
Page 32: 关于本手册
II. 关于本手册 感谢您购买Presidium出品的合成钻石筛选器II(以下简称“SDS II” 或“设备”)。 本手册旨在帮助您设置设备,并介绍了所有您需要了解的信息,让您能 知晓如何正确使用该钻石筛选设备以及如何按照要求进行维护。请仔细 阅读这些说明,并妥善保管本手册以备日后参考。 本手册还包括与使用该设备有关的条款及条件,包括上文第一节中所述 的免责声明、例外情形以及责任范围。 III. 关于Presidium合成钻石筛选器II(SDS II) Presidium合成钻石筛选器II(“SDS II”)是一种为帮助在天然Ia型无 色钻石中筛选出IIa型无色钻石(可能是合成钻石)而开发的设备。 钻石可以分为两种类型。 I型钻石在所有的天然钻石中占了近98%。一般情况下, I型钻石所含的 主要杂质为氮原子,并通常呈无色、棕色、黄色或橙色,但也可能呈现 除蓝色以外的其他颜色。 II型钻石则在天然钻石中占了剩下的2% ,并含有极少或无法检测到的 氮原子。II型钻石还进一步分为IIa型和IIb型。IIa型钻石通常介于无色 到接近无色等纯净色泽,但也可能呈现黄色、棕色、橙色、粉色或紫 色。IIb型钻石则少有无色;这类钻石一般呈蓝色、棕色或灰色并且含 有硼原子。 目前,市面上已知的无色合成钻石通常属于IIa型钻石,即没有任何可检 测得到的氮原子的无色钻石。IIa型无色合成钻石可使用化学气相沉淀 (CVD)合成法或高压高温(HPHT)合成法制成的,也可能属于经高温高压 处理的CVD钻石。 该设备可帮助鉴别最终可能是合成钻石的IIa型无色钻石,但无法辨别合 成钻石是使用何种工艺制成的。 Verena Pagel-Theisen G.G. F.G.A《Diamond Grading ABC The Manual》(钻石分级基 础知识手册)第9版,2007年... - Page 33 当受到深紫外线照射时,Ia型和IIa型钻石将分别吸收不同分量的紫外 线,而两者在光吸收能力方面的差异将足以帮助区别Ia型和IIa型无色 钻石。 SDS II正是基于这一原理而进行开发和设计的一款设备。由于IIa型钻石 允许较多深紫外线穿过钻石体,因此其紫外线吸收能力较低。 该设备仅用于筛选无色钻石(颜色:D到J);它安装有一盏安全、由 用户激活的深波紫外线灯。该灯所发出的深波紫外线将透过测试的钻石 射向设备内部基座平台上的光检测器。之后,其盖子前方的彩色发光条 将提供一个便于理解的读数,表明所测试的钻石的紫外线光透射能力是 低(即表明属于IIa型钻石)还是高(表明属于天然钻石)。 如果所测得的紫外线吸收率较低,一个红色的指示灯条将亮起,提示所 测试的钻石属于IIa型钻石,而用户应当对其进行其他进一步的测试以鉴 定该钻石是否是合成钻石。 如果所测得的紫外线吸收率较高,一个蓝色的指示灯条将亮起,表明 所测试钻石的紫外线吸收率符合I 型天然无色钻石的一般紫外线吸收范 围。 这款合成钻石筛选器II在设计上处处为用户着想:它是一个重量轻、携 带方便、坚固耐用且配有防滑设计的装置,可通过4节AAA电池或将其 USB接口连接至外部电源或Presidium通用电源适配器来供电使用。...
- Page 34 该设备的设计目标如下: • 帮助指出某颗钻石可能是IIa 合成钻石 • 有助于快速地从IIa 无色钻石(通常为合成钻石)中筛选出天然的I型 无色钻石(最常见的天然钻石类型)。 • 在正确使用并充分理解其功能的条件下,提供一致且可靠的测试结果 • 采用确保用户安全的材料和人性化的人体工程学设计,提供明确的结 果、最佳的坚固性和抓取力、易用性和便携性 合成钻石筛选器II的功能如下: • 测试宽度最小为1.5毫米、高度最大为5毫米的钻石。(大约0.02-10 克拉大小) • 对打磨为常见形状的钻石进行测试,如圆形切割、椭圆形切割、公主 方形切割、圆钻型切割、祖母绿形切割、长阶梯形切割、方形明亮切 割、阶梯式切割及混合切割 • 能够用于未镶嵌的钻石和已经镶嵌在珠宝上的钻石(采用开背设置) • 测试速度快,时间仅需2秒 警告:用户不可在以下情况下使用合成钻石筛选器II,因为这样可能会 影响读数的准确性: ×高度超过5毫米的钻石(特定的紫外线波长无法完全穿过) ×鉴别除无色D到J以外的有色钻石 ×使用此设备鉴别其他钻石类似石(如莫桑石、立方氧化锆等) 合成钻石筛选器II具有以下特点: • 两个带有色码(蓝色/红色)的指示灯条,可清楚区分I型天然钻石和 IIa型钻石 • 如果该设备无法在光检测器上检测到任何钻石,则测试按钮将闪烁红 色 • 外部基座采用橡胶垫,确保防滑坚固,并防止划伤表面 • 流线型人体工学设计,提升便携性和稳定性 • 设备后部配备有外设USB端口,用来连接外部电源 •...
- Page 35 内部紫外线光源和测试区特点: • 紫外线光源预先设定在安全和最佳的波长,以精确地测量钻石的光吸 收能力 • 探头上的十字准线标记以指导戒指定位 • 使用蓝光来照亮测试垫 • 基座中心设有对光线敏感的光检测器,以用于检测透过钻石的光线分 量 • 防滑式平台,可将宝石固定在位 • 使用一根5毫米的金属棒,轻易地抬升测试探头,可连续测试未镶嵌 钻石 包装内包括: • Presidium合成钻石筛选器II • 带内部配件袋(用于装宝石矿石和附件)的保护套 • 5毫米金属棒 • USB连接线 • Presidium通用电源适配器 • 用户手册 • 保修卡...
- Page 36 图A. 合成钻石筛选器II 特色/功能(图 A) 1. 电源按钮(开/关和电池低电量指示灯) 2. 盖子 3. 带有同心圆标记的防滑平台,可确保钻石的正确定位 4. 一根5毫米金属棒,可方便地抬升测试探头,用来连续测试未镶嵌 钻石 5. 光检测器 6. 带有十字准线标记的紫外线光源(嵌于顶部作为戒指放置指导)和 光标 7. 用于调整光源的控制杆 8. “Start Test(开始测试)”按钮 9. 两个标有“Natural(天然钻石)”和“Type IIa Diamond(IIa型钻 石)”测量结果的指示灯 10. 微型USB接口...
-
Page 37: 重要须知
备已完全干燥。 • 切勿在有灰尘或肮脏的环境中使用、存放本设备、或是将本设备暴露 于此类环境中。设备的可拆卸部件和电子元件可能会在此类环境中受 到损坏。 • 切勿在高温区域使用、存放本设备、或是将本设备暴露于类似环境 中。高温会损坏设备或缩短设备的寿命、损坏电池、弄弯或熔化某些 塑料。 • 切勿在寒冷区域使用、存放本设备、或是将本设备暴露于类似环境 中。当设备返回到其正常温度时,设备内部会形成潮气,进而损坏电 路板。 • 切勿试图打开本手册中未指示的设备其他部分。 • 切勿掉落、敲打或摇晃设备,粗暴的对待设备会毁坏其内部电路板及 精密结构。 • 切勿使用腐蚀性化学品、清洗剂或强效洗涤剂清洗设备。 • 切勿为设备涂上颜料或油漆。颜料或油漆可能会阻塞活动零件并妨碍 设备正常操作。 如果设备无法正常操作,请发送电邮至service@presidium.com.sg 联系Presidium客户服务中心,或发送邮件至: Presidium Instruments Pte Ltd Unit 7, 207 Henderson Road Singapore 159550 Attn: Customer Service Executive... -
Page 38: 合成钻石筛选器Ii使用入门
1. 合成钻石筛选器II使用入门 1.1 启动设备 合成钻石筛选器II可以使用电池、通过USB线缆连接至Presidium通用电 源适配器(USB线缆与适配器都包含在该产品包装中)或通过USB线缆 连接至外部电源来供电。 如果使用电池供电,您可以在设备底部的电池槽中装入电池。您可松开 电池盖上的两个锁扣,取下电池盖,以露出电池槽。(图1.1) 该设备需要4节AAA电池供电。将电池插入设备时,请注意电池的正极 (+)和负极(-)方向。推荐使用碱性电池,因为碱性电池通常可以进行大 约2400次测试。 图1.1 取下电池盖,露出电池槽... - Page 39 如果使用外部电源,请将随附的微型USB线缆连接至位于设备背面的接 口(图1.2),并将线缆的另一端连接至随附的Presidium通用电源适配 器,然后将电源适配器连接至外部电源插座。 图1.2 将微型USB线缆插入位于设备背面的接口 您也可以将USB线缆的另一端直接连接到外部电源(如计算机、笔记 本电脑等)。 请仅使用本产品随附的USB线缆和Presidium通用电源适配器。...
- Page 40 1.2 开启设备 长按位于设备正面的电源按钮,以开启合成钻石筛选器II。其蓝色指示 灯将闪烁大约4秒,以提示产品正在预热(图1.3)。 一旦蓝色指示灯停止闪烁并保持稳定的蓝光,设备就可以使用了。 图1.3 按电源按钮开启合成钻石筛选器II 1.3 关闭设备和节能自动关闭 按住电源按钮大约2秒,直至指示灯熄灭,即可关闭合成钻石筛选器II。 为了节约合成钻石筛选器II的电量,设备将在最后一次活动操作10分钟 后自动关闭。...
- Page 41 1.4 电池低电量指示灯 当电池电量过低,不足以维持设备执行功能操作时,电源按钮指示灯会 变成红色。(图1.4) 图1.4 电源按钮上发红光的电池低电量指示灯 当电池低电量指示灯变成红色时,该设备将无法进行任何测试,并且设 备内部的紫外线光源也将无法开启。 必要时,请更换电池或切换为外部电源供电。 电池信息 切勿将电量耗尽的电池留在电池槽内,因为电量耗尽的电池可能会腐蚀 或漏液,进而损坏设备的电路。当设备预计将被存放较长时间时,建议 应将电池移除。 当通过USB线缆使用Presidium 通用电源适配器供电时,电池不必从设 备中取出。...
-
Page 42: 使用合成钻石筛选器Ii执行测试
2. 使用合成钻石筛选器II执行测试 合成钻石筛选器II能够精确检测已知的无色钻石(颜色:D到J)。在使 用该设备之前,您应当首先确定您的宝石是否是钻石。 您可利用盖子前部的指状夹,抬起设备的盖子,以露出内部测试区。 (图2.1) 图2.1 利用盖子前部的指状夹,抬起设备的盖子... - Page 43 合成钻石筛选器II将通过其盖子下方,利用中央的一个小孔标记出的测 试区和一个突出的顶部紫外线光源进行测试(图2.2)。将钻石放置于 测试区内的小孔上,合上盖子并按“Start Test(开始测试)”按钮, 即可进行测试。当“Start Test(开始测试)”按钮停止闪烁并亮起稳 定的白色光时,就可以从邻近的光条中读取测试结果。 图2.2 设备的内部测试区 下列说明将指导您完成对未镶嵌钻石和镶嵌钻石的测试。...
- Page 44 2.1 对于未镶嵌的钻石 请确保该未镶嵌的钻石的宽度足以覆盖测试区,即宽度应大约为1.5毫 米,而高度不能超过5毫米,以确保紫外线光源发射的紫外线波长可以 精确测量。 将钻石放到测试区(图2.3)。钻石的平坦面应朝下放在测试区上。请 确保测试区完全被钻石所覆盖,以便发射的波长能够透过钻石材料, 而不会错误地透过其他材料,否则可能会导致钻石紫外线吸收能力的 读数不准确。 图2.3 未镶嵌钻石在测试区内的位置...
- Page 45 释放控制杆以降低紫外线光源的高度并将钻石固定到位,以便进行测 试。(图2.4) 图2.4 利用控制杆调整紫外线光源的高度 以将钻石固定到位 测试多个未镶嵌钻石时,使用所提供的金属棒使光源定位,这样就无需 不断调整控制杆以将未镶嵌钻石固定到位(图2.5)。 在进行测试时,光源无需接触到钻石(图2.6) 图2.5 正确位置 图2.6 错误位置...
- Page 46 2.2 对于镶嵌钻石 请确保钻石使用开背设置,换句话说,当您查看它的背面时,您应仍 然可以清楚地看到钻石和它的颜色,而不是被金属饰品或其他钻石挡 住。(图2.7) 清晰的石头观 图2.7 一个采用开背设置的首饰范例...
- Page 47 如果您的钻石是采用开背式样镶嵌在戒指中,请将戒指放置于紫外线光 源上方的戒指指导压纹上十字标记的中心处。镶嵌钻石的平坦面应当朝 下放在测试区。 将戒指挂在戒指导架上,使用控制杆来降低紫外线光源以将钻石覆盖及 固定在测试区上(图2.8)。 图2.8 使用紫外线光源上的戒指导架并将钻石固定到位...
- Page 48 2.3 开始测试 位于设备右上角的“Start Test(开始测试)”按钮可用于指示设备已 准备好进行测试并且内部的紫外线光源已启动,可以开始筛选程序。 只有当“Start Test(开始测试)”按钮亮起稳定的蓝光时,才能使用 该设备进行测试。(图2.9) 图2.9 按“Start Test(开始测试)”按钮以进行测试 当测试正在进行时,“Start Test(开始测试)”按钮的指示灯将闪烁 蓝色光。当测试完成时,指示灯将保持稳定的白色光。 届时,您就可以从指示灯条上读取结果。 如需开始新测试,只需再次按“Start Test(开始测试)”按钮,将其 返回到就绪模式即可。到时候,按钮指示灯应保持蓝色光。 如欲了解您的测试结果,请参阅本手册第3节 - “读取合成钻石筛选器 II的测试结果”。...
- Page 49 2.4 关于执行测试的重要注意事项 • 请确保用于测试的钻石高度不超过6毫米,并且其宽度完全覆盖光检 测器。这类钻石相当于大约0.1至10克拉。 • 应事先进行相应测试,以确定所测试的宝石确实是钻石。 • 只有采用开背设置的钻石镶嵌首饰才能用于测试。 • 必须通过调整光源以将所测试的钻石或首饰固定到测试区上。 • 为了提高准确性,建议将钻石放置在检测区上至少4个不同的位置, 并检查读数是否一致。 • 为了防止结果不准确的情况出现,当电源按钮变成红色(表示电池 电量不足)时,切勿进行任何测试。 • 只有当 “Start Test(开始测试)”按钮亮起蓝光时,才能进行测 试。 • 当“Start Test(开始测试)”按钮停止闪烁并稳定的亮起白光时, 测试便已完成。 • 如欲重置设备并开始新的测试,请按下“Start Test(开始测试)” 按钮,使其重新亮起蓝光。...
-
Page 50: 读取合成钻石筛选器Ii的测试结果
3. 读取合成钻石筛选器II的测试结果 合成钻石筛选器II用于测量钻石的紫外线吸收能力,而其测量结果将显 示为“Natural(天然钻石)”或“Type IIa Diamond(IIa型钻石)” 。 按下“Start Test(开始测试)”按钮后,该按钮将在测试正在进行时 闪烁白色光。指示灯条将在2秒内亮起。蓝色指示灯条亮起时,即表示 读数为“Natural(天然钻石)”,红色指示灯条亮起时,则表示读数 为“Type IIa Diamond(IIa型钻石)”。(图3.1) 图3.1 从指示灯条读取结果 测试完成时,“Start Test(开始测试)”按钮将停止闪烁并亮起白色 光。... - Page 51 蓝色指示灯条/Natural(天然钻石) 左侧的第一个指示灯条代表“Natural(天然钻石)”并会亮起蓝色光 (图3.2)。 图 3.2“Natural(天然钻石)”读数 标有“Natural(天然钻石)”的蓝色指示灯表示被测钻石内部含有可 吸收紫外线的微量元素,因此紫外线吸收率较高,只有极少量的紫外光 能够透射至光检测器。这正是I型无色天然钻石的特征。...
- Page 52 红色指示灯条/Type IIa Diamond(IIa型钻石) 右侧的第一个指示灯条表示“Type IIa Diamond(IIa型钻石)”并会亮 起红色光(图3.3)。 图3.3“Type IIa Diamond(IIa型钻石)”读数 “Type IIa Diamond(IIa型钻石)”读数表示被测钻石的内部缺少微量 元素(例如氮),因此紫外光吸收率较低,能够轻易的透射出紫外线。 亮起红色光的“Type IIa Diamond(IIa型钻石)”读数将会提示您所测 试的钻石可能是由试验室制成的合成钻石。 如果您得出此结果,建议您通过其他方法对该钻石开展进一步的测试, 以辨明该钻石究竟是合成的IIa型钻石还是天然的IIa型钻石。...
-
Page 53: 合成钻石筛选器Ii指示灯概述
4. 合成钻石筛选器II按钮和指示灯概述 下表总结了合成钻石筛选器II上的按钮和指示灯的功能及说明。 电源按钮 描述 灯光 作用 按住电源按钮以开启 无灯光 设备正在开启并将开始预 该设备。 热。 设备预热大约4秒钟。 闪烁蓝色光, 设备正在启动。 然后保持稳定 的蓝色光 设备电源已开启并准 稳定的蓝色光 设备已接通电源并可开始 备就绪。 测试。 电池低电量指示灯。 红色光 设备不能在电池低电量情况 下运行。 连接不牢固/内部紫外 闪烁红色光 设备的紫外线光源未连接/操 线光源无法正常操作 作不正常 按住电源按钮两秒钟 无灯光 设备正在关闭。 以关闭该设备。... - Page 54 “Start Test(开始测试)”按钮 描述 灯光 作用 未在光检测器上检测 闪烁的红色光 设备检测不到光检测器上有 到钻石 任何钻石。 可进行测试 稳定的蓝色光 设备盖子被关闭、内部紫外 线光源未启动,已备好进行 测试。 测试正在进行 闪烁的蓝色光 设备内部紫外线光源启动, 正在进行测试。 测试完成 稳定的白色光 设备已经完成测试,并且测 试结果应在2个指示灯之间 显示。 禁止测试 无灯光 设备盖子被打开,禁止测 试。必须盖上盖子才可继续 进行测试。 2个指示灯显示 描述 灯光 作用 “Natural(天然钻 稳定的蓝色光 测试已完成并且被测钻石具 石)”标记上方的发 有较高的紫外线吸收能力, 蓝色光的指示灯条 因此可能是天然的Ia型钻石。 “Type IIa 稳定的红色光...
-
Page 55: 合成钻石筛选器Ii的维护
5. 合成钻石筛选器II的维护 用户应小心对待合成钻石筛选器II。不使用设备时,应将其遮盖起来或 是放置在定制的便携包中。用户应小心使用和保管设备,以免造成任 何损坏。 切勿将电量耗尽的电池留在电池槽内,因为电量耗尽的电池可能会腐蚀 或漏液,进而损坏设备的电路。当设备预计将被存放较长时间时,建议 应将电池移除。 此测试仪器是一款精心设计且做工精细的产品,请小心使用。 感谢您抽时间翻阅本用户手册。希望本手册已帮助您更好地了解所购 买的设备。 Presidium也建议您将随附的保修注册卡寄送给我们或是在 http://www.presidium.com.sg/为您的保修进行注册。... - Page 56 VERSION FRANÇAISE I. Avertissements, exclusions et limites de responsabilité II. À propos de ce guide III. À propos du DÉTECTEUR DE DIAMANTS SYNTHÉTIQUES II Presidium IV. Avis important 1. POUR COMMENCER avec votre DÉTECTEUR DE DIAMANTS SYNTHÉTIQUES II 2. EFFECTUER UN TEST avec votre DÉTECTEUR DE DIAMANTS SYNTHÉTIQUES II...
-
Page 57: Avertissements, Exclusions Et Limites De Responsabilité
Il est conseillé aux utilisateurs de visiter de temps à autre le site Web de Presidium http://www.presidium.com.sg/ Presidium n’assumera aucune responsabilité en cas de dommages ou de pertes résultant de l’utilisation de ce produit ou du présent guide. -
Page 58: À Propos De Ce Guide
II. À propos de ce guide Nous vous remercions d’avoir choisi le DÉTECTEUR DE DIAMANTS SYNTHÉTIQUES II Presidium (« SDS II » ou « appareil »). Le présent guide est conçu pour vous aider à configurer votre appareil et explique tout ce que vous devez savoir sur la façon d’utiliser votre DÉTECTEUR DE DIAMANTS SYNTHÉTIQUES II avec précision et... - Page 59 DIAMANTS SYNTHÉTIQUES II est conçu pour être un appareil léger, portable, robuste et antidérapant, pouvant être alimenté par 4 piles AAA ou par son port USB qui se connecte à soit une source d’alimentation externe ou à l’adaptateur secteur universel Presidium.
- Page 60 L’appareil a été conçu en fonction des objectifs suivants : • Alerter l’utilisateur sur la présence possible d’un diamant synthétique de type IIa • Différencier rapidement un diamant naturel incolore de type I (le type le plus commun de diamant naturel) d’un diamant incolore de type IIa, habituellement synthétique •...
- Page 61 • Barre métallique de 5 mm pour relever facilement la sonde de test pour des tests successifs sur des pierres non montées Vous trouverez dans la boîte : • Le DÉTECTEUR DE DIAMANTS SYNTHÉTIQUES II Presidium • Un étui de transport protecteur avec poche intérieure pour les pierres et les accessoires •...
- Page 62 Figure A DÉTECTEUR DE DIAMANTS SYNTHÉTIQUES II Caractéristiques/fonctions (Figure A) 1. Bouton d’alimentation (Marche/Arrêt et indicateur de charge des piles) 2. Couvercle 3. Plateforme de base avec marquages concentriques pour un bon positionnement de la pierre 4. Barre métallique de 5 mm pour relever facilement la sonde de test pour des tests successifs sur des pierres non montées 5.
-
Page 63: Avis Important
• N’essayez pas de peindre l’appareil La peinture peut bloquer les pièces mobiles et perturber le fonctionnement de l’appareil. Si l’appareil ne fonctionne pas correctement, adressez-vous au service clientèle de Presidium par courriel à service@presidium. com.sg ou à l’adresse suivante : Presidium Instruments Pte Ltd... -
Page 64: Pour Commencer Avec Votre Détecteur De Diamants Synthétiques
Le DÉTECTEUR DE DIAMANTS SYNTHÉTIQUES II peut être alimenté soit par des piles, soit au moyen du câble USB connecté à l’adaptateur secteur universel Presidium (les deux étant fournis avec l’appareil), soit en le raccordant à une source externe. Si vous utilisez des piles, vous trouverez le logement des piles sous l’appareil. - Page 65 Si vous utilisez une source d’alimentation externe, branchez le connecteur micro USB du câble fourni au port situé au dos de l’appareil (Figure 1.2) et l’autre extrémité du câble à l’adaptateur secteur universel Presidium, puis branchez l’adaptateur à une prise secteur. Figure 1.2 Branchement du connecteur micro USB au port situé...
- Page 66 1.2 Mise sous tension de votre appareilt Pour mettre votre DÉTECTEUR DE DIAMANTS SYNTHÉTIQUES II sous tension, appuyez longuement sur le bouton d’alimentation situé à l’avant de l’appareil. Un voyant bleu clignote pendant environ 4 secondes, afin de permettre à l’appareil de chauffer. (Figure 1.3) Lorsque le voyant bleu cesse de clignoter, l’appareil est prêt à...
- Page 67 1.3 Mise hors tension de votre appareil et économiseur d’énergie Pour mettre votre DÉTECTEUR DE DIAMANTS SYNTHÉTIQUES II hors tension, maintenez le bouton d’alimentation enfoncé pendant environ 2 secondes jusqu’à ce que le voyant s’éteigne. Pour économiser l’énergie, votre DÉTECTEUR DE DIAMANTS SYNTHÉTIQUES II s’éteint automatiquement au bout de 10 minutes d’inactivité.
- Page 68 Lorsque vous n’utilisez pas l’appareil pendant une période prolongée, nous vous recommandons de retirer les piles. Il n’est pas nécessaire de retirer les piles lorsque vous utilisez l’adaptateur secteur universel Presidium avec le câble USB.
-
Page 69: Effectuer Un Test Avec Votre Détecteur De Diamants Synthétiques
2. Effectuer un test avec votre DÉTECTEUR DE DIAMANTS SYNTHÉTIQUES II Le DÉTECTEUR DE DIAMANTS SYNTHÉTIQUES II fonctionne avec précision sur les diamants incolores connus de couleur D à J. Avant de l’utiliser, vous devez impérativement déterminer si votre pierre est bien un diamant. - Page 70 Le test est réalisé sous le couvercle du DÉTECTEUR DE DIAMANTS SYNTHÉTIQUES II, où une zone de test est marquée par un trou central, la source UV faisant saillie au-dessus (Figure 2.2). Placez la pierre de manière à couvrir le trou central, puis fermez le couvercle et appuyez sur le bouton «...
- Page 71 2.1 Test des diamants non montés Vérifiez que votre diamant non monté est suffisamment large pour couvrir la zone de test. Il doit être d’environ 1,5 mm de large. En outre, la hauteur du diamant ne devrait pas être supérieure à 5 mm afin d’être sûr que les UV transmis par la source lumineuse puissent être mesurés avec précision.
- Page 72 À l’aide du levier, abaissez la source UV pour fixer le diamant en place pour le test (Figure 2.4) Figure 2.4 Réglez la source UV à l’aide du levier pour fixer le diamant en place Si vous testez plusieurs pierres non montées, utilisez la barre métallique fournie pour maintenir la source lumineuse en place de sorte que vous n’ayez pas à...
- Page 73 2.2 Test des diamants montés Vérifiez que la pierre est montée en serti griffes, ce qui signifie que vous pouvez voir clairement la face inférieure et la couleur de la pierre et que celle-ci n’est pas masquée par le métal du bijou ou par d’autres pierres.
- Page 74 Si votre diamant est monté en serti griffes sur une bague, placez celle-ci au centre de la croix en relief du guide pour bague sur le dessus de la source UV. La table du diamant monté doit être tournée vers le bas en direction de la zone de test. La bague étant accrochée au guide pour bague, abaissez la source UV à...
- Page 75 2.3 Démarrage du test Le bouton « Start Test », situé dans l’angle supérieur droit de l’appareil, indique le moment où l’appareil est prêt pour le test et active la source UV à l’intérieur de l’appareil pour démarrer la procédure d’identification. Vous ne devriez commencer à...
- Page 76 2.4 Importantes remarques relatives à l’exécution d’un test • Veillez à ce que la hauteur de votre pierre ne dépasse pas 6 mm et qu’elle soit assez large pour recouvrir complètement le détecteur photosensible. Cela équivaut à une pierre d’environ 0,1 à 10 carats.
-
Page 77: Lire Les Résultats Du Test Sur Votre Détecteur De
3. Lire les résultats d’un test sur votre DÉTECTEUR DE DIAMANTS SYNTHÉTIQUES II Le SDS II mesure la capacité d’absorption des UV par le diamant et cette mesure se traduit par l’indication « Natural » ou « Type IIa Diamond ». Après avoir appuyé... - Page 78 Segment lumineux bleu/Naturel Le premier segment à gauche est allumé en bleu pour indiquer un diamant « Natural » (Figure 3.2). Figure 3.2 « Natural » Le segment lumineux bleu marqué « Natural » indique la capacité d’absorption de la lumière UV du diamant testé est élevée car la pierre contient des éléments traces qui ont absorbé...
- Page 79 Segment lumineux rouge/Diamant de type IIa Le premier segment lumineux à droite indique un « Type IIa Diamond » et s’allume en rouge (Figure 3.3). Figure 3.3 « Type IIa » L’indication « Type IIs Diamond » signifie que la capacité d’absorption des UV du diamant testé...
-
Page 80: Présentation Des Boutons Et Indicateurs De Votre
4. Présentation des boutons et des indicateurs de votre DÉTECTEUR DE DIAMANTS SYNTHÉTIQUES II Le tableau ci-dessous résume les fonctions et les états des boutons et des voyants du DÉTECTEUR DE DIAMANTS SYNTHÉTIQUES II. Bouton d’alimentation Description Voyant État Maintenez le bouton Aucun voyant L’appareil s’allume et d’alimentation... - Page 81 Start Test Button Description Voyant État Aucune pierre Rouge Le photodétecteur de détectée par le clignotant l’appareil ne détecte aucune photodétecteur pierre Prêt pour un test Bleu fixe Le couvercle de l’appareil est fermé et l’appareil est prêt pour un test ; la source lumineuse UV est éteinte.
-
Page 82: Prendre Soin De Votre Détecteur De Diamants Synthétiques
Nous vous remercions d’avoir pris le temps de lire ce guide pour mieux comprendre le produit que vous venez d’acheter. Presidium vous recommande également de valider votre garantie en nous retournant la carte de garantie fournie ou en enregistrant votre... - Page 83 DEUTSCH VERSION I. Haftungsausschlüsse, Ausschlüsse und Haftungsbeschränkungen II. Über dieses Buch III. Über den Synthetic Diamond Screener II von Presidium IV. Wichtiger Hinweis 1. ERSTE SCHRITTE mit dem Synthetic Diamond Screener II 2. DURCHFÜHRUNG EINES TESTS mit dem Synthetic Diamond Screener II 3.
-
Page 84: Haftungsausschlüsse, Ausschlüsse Und Haftungsbeschränkungen
Recht, Änderungen am Handbuch ohne Vorankündigung und ohne Verpflichtung vorzunehmen, irgendeine Person über solche Überarbeitungen oder Änderungen zu informieren. Benutzer sollten daher von Zeit zu Zeit auf der Website von Presidium http://www. presidium.com.sg/ nachsehen. Presidium übernimmt keine Verantwortung für Schäden oder Verluste, die aus der Verwendung dieses Produkts oder Handbuchs resultieren. -
Page 85: Über Dieses Buch
II. Über dieses Buch Vielen Dank, dass Sie den Synthetic Diamond Screener II („SDS II oder „Gerät“ gekauft haben). Dieses Handbuch soll Ihnen helfen, Ihr Gerät einzurichten. Es erklärt alles, was Sie über die präzise Verwendung und Pflege des Diamantenprüfgeräts wissen müssen. Bitte lesen Sie diese Anleitung aufmerksam durch und bewahren Sie sie zum späteren Nachschlagen... - Page 86 Lichtabsorption des geprüften Steins im Bereich der üblichen Absorptionseigenschaften eines farblosen, natürlichen Diamanten des Typs I liegt. Der Synthetic Diamond Screener II, der in Hinsicht auf den Benutzer entwickelt wurde, soll ein leichtes, tragbares, robustes und rutschsicheres Gerät sein, das mit 4 AAA-Batterien oder über...
- Page 87 Ergonomie, die eine klare Sichtbarkeit der Ergebnisse, maximale Robustheit und Halt, Benutzerfreundlichkeit und Tragbarkeit liefert Der Synthetic Diamond Screener II bietet die folgenden Funktionen: • Test bei Diamanten innerhalb eines Abmessungsbereichs von 1,5 mm in der Breite und bis zu 5 mm in der Höhe (ca. 0,02 bis 10 Karat) •...
- Page 88 • Rutschsichere Plattform, um den Stein an Ort und Stelle zu halten • Eine 5-mm-Metallleiste zum praktische Anheben des Testfühlers für aufeinanderfolgendes Testen bei losen Steinen Packungsinhalt: • Synthetic Diamond Screener II von Presidium • Schutzetui mit Innenbeutel für Edelsteine und Zubehör • 5-mm-Metallleiste • USB-Kabel •...
- Page 89 Abb. A Synthetic Diamond Screener II Merkmale/Funktionen (Abb. A) 1. Netztaste (Ein/Aus und Anzeige für schwache Batterie) 2. Deckel 3. Rutschsichere Plattform mit konzentrischen Markierungen, um die korrekte Platzierung des Steins sicherzustellen. 4. Eine 5-mm-Metallleiste zum praktischen Anheben des Testfühlers für aufeinanderfolgendes Testen bei losen Steinen...
-
Page 90: Wichtiger Hinweis
• Lackieren Sie das Gerät nicht. Lack kann die beweglichen Teile verstopfen und den ordnungsgemäßen Betrieb verhindern. Wenn das Gerät nicht richtig funktioniert, wenden Sie sich bitte an den Presidium Kundenservice unter service@presidium.com.sg oder: Presidium Instruments Pte Ltd Unit 7, 207 Henderson Road... -
Page 91: Erste Schritte Mit Dem Synthetic Diamond Screener
1. Erste Schritte mit dem Synthetic Diamond Screener II 1.1 Einschalten des Geräts Der Synthetic Diamond Screener II kann entweder durch Batterien oder über das USB-Kabel, das an das Presidium Universal-Netzteil angeschlossen wird (beides im Lieferumfang enthalten), oder eine externe Stromquelle mit Strom versorgt werden. - Page 92 Wenn eine externe Stromquelle verwendet wird, schließen Sie das mitgelieferte Micro-USB-Kabel an den Anschluss an der Rückseite des Geräts (Abb. 1.2) und das andere Ende an das mitgelieferte Presidium Universal-Netzteil zum Anschließen an eine externe Netzsteckdose an. Abb. 1.2 Anschließen des Micro-USB-Kabels an den Anschluss an der Rückseite des Geräts...
- Page 93 1.2 Einschalten des Geräts Um den Synthetic Diamond Screener II einzuschalten, drücken Sie die Netztaste an der Vorderseite des Geräts. Ein blaues Lämpchen blinkt ca. 4 Sekunden lang, solange sich das Gerät aufwärmt. (Abb. 1.3) Sobald das blaue Lämpchen nicht mehr blinkt, sondern leuchtet, ist das Gerät betriebsbereit.
- Page 94 1.3 Ausschalten des Geräts und automatische Abschaltung zum Energiesparen Um den Synthetic Diamond Screener II auszuschalten, halten Sie die Netztaste ca. 2 Sekunden lang gedrückt, bis das Lämpchen erlischt. Um sicherzustellen, dass der Synthetic Diamond Screener II Energie spart, schaltet sich das Gerät 10 Minuten nach der letzten Aktivität automatisch ab.
- Page 95 Batterien korrodieren oder auslaufen und den Schaltkreis des Geräts beschädigen können. Die Batterien sollten auch herausgenommen werden, wenn das Gerät längere Zeit aufbewahrt wird. Bei Verwendung des Presidium Universal-Netzteils und des USB- Kabels müssen die Batterien nicht aus dem Gerät herausgenommen werden.
-
Page 96: Durchführung Eines Tests Mit Dem Synthetic Diamond Screener
2. Durchführung eines Tests mit dem Synthetic Diamond Screener II Der Synthetic Diamond Screener II arbeitet genau mit farblosen Diamanten der Farbe D bis J. Sie sollten vor Verwendung dieses Geräts sicherstellen, dass es sich bei dem Stein um einen Diamanten handelt. - Page 97 Der Test wird unter dem Deckel des Synthetic Diamond Screener II durchgeführt, wo ein Testbereich durch ein Loch in der Mitte und eine hervorstehende UV-Lichtquelle darüber markiert ist (Abb. 2.2). Der Stein wird so platziert, dass er das Loch bedeckt, und der Test beginnt, wenn der Deckel geschlossen und die Taste zum Starten des Tests gedrückt wird.
- Page 98 2.1 Testen loser Diamanten Vergewissern Sie sich, dass der lose Stein breit genug ist, um den Testbereich abzudecken. Er sollte ca. 1,5 mm breit sein. Der Diamant sollte außerdem nicht höher als 5 mm sein, um sicherzustellen, dass die von der UV-Lichtquelle übertragene UV-Wellenlänge genau gemessen werden kann.
- Page 99 Lassen Sie den Hebel los, um die UV-Lichtquelle abzusenken und den Diamanten auf dem Testbereich zu befestigen. (Abb. 2.4) Abb. 2.4 Anpassen der UV-Lichtquelle mit dem Hebel, um den Diamanten zu befestigen Verwenden Sie beim Testen mehrere loser Steine die mitgelieferte Metallleiste, um die Lichtquelle zu befestigen, damit Sie den Hebel nicht anpassen müssen, um die losen Steine zu positionieren (Abb.
- Page 100 2.2 Für montierte Diamanten Vergewissern Sie sich, dass die Rückseite des Steins offen ist, das heißt, Sie haben eine klare Sicht und sehen die Farbe des Steins, wenn Sie ihn von hinten betrachten, und er wird nicht durch das Schmuckmaterial oder andere Steine verdeckt. (Abb. 2.7) Klare Sicht auf den Stein Abb.
- Page 101 Wenn der montierte Diamant mit offener Rückseite sich in einem Ring befindet, legen Sie den Ring in die Mitte der Fadenkreuzmarkierung auf die Ringführung, die auf der UV-Lichtquelle eingeprägt ist. Die flachste Seite des montierten Diamanten sollte auf dem Testbereich direkt nach unten zeigen.
- Page 102 2.3 Test starten Die Taste zum Starten des Tests oben rechts am Gerät gibt an, wenn das Gerät für das Testen bereit und die UV-Lichtquelle im Inneren aktiviert ist, um das Identifizierungsverfahren zu beginnen. Sie sollten das Gerät erst zum Testen verwenden, wenn die Taste zum Starten des Tests blau leuchtet.
- Page 103 2.4 Wichtige Hinweise zur Testdurchführung • Achten Sie darauf, dass der zu testende Edelstein nicht höher als 6 mm ist und dass seine Breite den Fotodetektor vollständig abdeckt. Das Karat-Äquivalent beträgt ca. 0,1 bis 10 Karat. • Führen Sie zuvor unterstützende Tests durch, um sicherzustellen, dass der zu testende Stein ein Diamant ist.
-
Page 104: Ablesen Der Testergebnisse Auf Dem Synthetic Diamond Screener
3. Ablesen der Testergebnisse auf dem Synthetic Diamond Screener II Der SDS II misst die UV-Absorption des Diamanten und diese Messung wird als „Natural“ (Natürlich) oder „Type IIa Diamond“ (Diamant des Typs IIa) angezeigt. Nach Drücken der Taste zum Starten des Tests beginnt die Taste weiß zu blinken. - Page 105 Blauer Lichtbalken/Natürlich Der erste Balken links leuchtet blau und gibt an, dass es sich um einen natürlichen Diamanten handelt (Abb. 3.2). Abb. 3.2 Natürlicher Diamant Das blaue Licht mit der Beschriftung „Natural“ (Natürlich) gibt an, dass die UV-Lichtabsorption des getesteten Diamanten hoch ist, da es Spurenelemente im Stein gibt, die das UV-Licht absorbiert haben und daher nur sehr wenig UV-Licht zum Fotodetektor durchgelassen wird.
- Page 106 Roter Lichtbalken/Diamant des Typs IIa Der erste Balken rechts leuchtet rot und gibt an, dass es sich um einen Diamanten des Typs IIa handelt (Abb. 3.3). Abb. 3.3 Diamant des Typs IIa Ein Diamant des Typs IIa bedeutet, dass die Lichtabsorption des getesteten Diamanten gering ist.
-
Page 107: Übersicht Der Tasten & Anzeigen Auf Dem Synthetic Diamond Screener
4. Übersicht der Tasten & Anzeigen auf dem Synthetic Diamond Screener II In der folgenden Tabelle sind die Funktionen und Darstellungen der Tasten und Lampen am Synthetic Diamond Screener II zusammengefasst. Netztaste Beschreibung Licht Funktion Halten Sie die Kein Licht Gerät wird eingeschaltet und... - Page 108 Taste zum Starten des Tests Beschreibung Licht Funktion Kein Stein am Rotes Blinken Gerät kann keine Steine am Fotodetektor erkannt Fotodetektor erkennen Der Gerätedeckel ist Bereit für das Testen Blaues Leuchten geschlossen und das Gerät ist für das Testen bereit und die UV-Lichtquelle im Inneren ist ausgeschaltet.
-
Page 109: Pflege Des Synthetic Diamond Screener
5. Pflege des Synthetic Diamond Screener II Der Synthetic Diamond Screener II sollte sorgsam behandelt werden. Decken Sie ihn immer ab oder stellen Sie es in den Transportkoffer, wenn Sie ihn nicht verwenden. Achten Sie darauf, das Gerät nicht zu beschädigen. - Page 110 VERSIONE ITALIANA I. Clausole di esonero, esclusioni e limitazione della responsabilità II. Informazioni sul manuale III. Informazioni sull’identificatore di diamanti sintetici II Presidium IV. Avviso importante 1. INTRODUZIONE all’identificatore di diamanti sintetici II 2. TEST DI FUNZIONAMENTO dell’identificatore di diamanti sintetici II 3.
-
Page 111: Clausole Di Esonero, Esclusioni E Limitazione Della Responsabilità
I nostri prodotti sono soggetti a miglioramenti costanti. Per tale motivo, Presidium si riserva il diritto di apportare modifiche a tutti i documenti, incluse le modifiche al manuale, senza preavviso e senza obbligo di notificare ad alcuno l’esecuzione di tali revisioni o modifiche. Per ulteriori informazioni, si raccomanda di visitare periodicamente il sito web di Presidium, accessibile dal link: http://www.presidium.com.sg/... -
Page 112: Informazioni Sul Manuale
II. Informazioni sul manuale Grazie per acquistato l’identificatore di diamanti sintetici II Presidium (d’ora in poi denominato “SDS II” o “Dispositivo”). Questo manuale è concepito per aiutare l’utente a configurare il dispositivo e illustra tutte le informazioni necessarie per un utilizzo e una manutenzione corretta del dispositivo di identificazione diamanti, in conformità... - Page 113 II è concepito come dispositivo leggero, portatile e robusto con involucro antiscivolo. L’unità può essere alimentata con 4 batterie AAA, oppure mediante l’apposita porta USB, che ne consente il collegamento a una fonte di alimentazione esterna o ad un adattatore di alimentazione universale Presidium.
- Page 114 Il dispositivo è stato progettato per i seguenti impieghi: • Supportare l’utente nell’identificare i potenziali diamanti sintetici di Tipo IIa • Distinguere in modo rapido i diamanti naturali incolori di Tipo I (la varietà più comune di diamante naturale), dai diamanti incolori di Tipo IIa, normalmente di tipo sintetico.
- Page 115 • Barra in metallo di 5 mm per sollevare comodamente la sonda di test per successivi test su pietre singole La confezione comprende: • Identificatore di diamanti sintetici II Presidium (SDS II) • Custodia di trasporto protettiva con tasca interna per pietre e accessori •...
- Page 116 Fig. A Identificatore di diamanti sintetici II Caratteristiche/Funzioni (Fig. A) 1. Pulsante di accensione (on/off e spia di batteria in esaurimento) 2. Coperchio 3. Piattaforma di base antiscivolo con marcature concentriche, per garantire il corretto posizionamento della pietra 4. Barra in metallo di 5 mm per sollevare comodamente la sonda di test per successivi test su pietre singole 5.
-
Page 117: Avviso Importante
• Non verniciare il dispositivo. La vernice può bloccare le parti mobili e impedire il corretto funzionamento. Se il dispositivo non funziona correttamente, contattare l’assistenza clienti Presidium all’indirizzo service@presidium.com.sg oppure: Presidium Instruments Pte Ltd Unit 7, 207 Henderson Road Singapore 159550... -
Page 118: Introduzione All'identificatore Di Diamanti Sintetici
L’identificatore di diamanti sintetici II può essere alimentato utilizzando batterie o attraverso il cavo USB collegato all’adattatore universale Presidium, entrambi in dotazione col prodotto, oppure può essere collegato ad una fonte di alimentazione esterna. Se si desidera alimentare l’apparecchio con batterie, queste devono essere inserite nell’alloggiamento posto sul lato inferiore dell’unità. - Page 119 USB nell’apposita porta di connessione posta sul retro del dispositivo (Fig. 1.2), collegando l’altra estremità all’adattatore di alimentazione universale Presidium fornito in dotazione, per il collegamento a una presa esterna. Fig. 1.2 Inserire il connettore micro USB in dotazione nella porta posta sul retro del dispositivo L’altra estremità...
- Page 120 1.2 Accensione del dispositivo Per accendere l’identificatore di diamanti sintetici II premere il pulsante “Power”, posto sul lato anteriore dell’unità. Una luce blu lampeggerà per circa 4 secondi, per consentire al prodotto di riscaldarsi. (Fig. 1.3) Quando la luce blu smette di lampeggiare e resta fissa, il dispositivo è pronto all’uso.
- Page 121 1.3 Spegnimento del dispositivo e spegnimento automatico per risparmio energetico Per spegnere l’identificatore di diamanti sintetici II, tenere premuto il pulsante “Power” per circa 2 secondi, fino a che la luce si spegne. Per minimizzare il consumo di energia, l’identificatore di diamanti sintetici II si spegne automaticamente 10 minuti dall’ultimo utilizzo.
- Page 122 Se il dispositivo deve restare inutilizzato per un lungo periodo, si consiglia di rimuovere le batterie. Non è necessario rimuovere le batterie dal dispositivo quando si utilizza l’adattatore universale Presidium attraverso il cavo USB.
-
Page 123: Test Di Funzionamento Dell'identificatore Di Diamanti Sintetici
2. Test di funzionamento dell’identificatore di diamanti sintetici II L’identificatore di diamanti sintetici II garantisce un’elevata accuratezza di funzionamento con le varietà note di diamanti incolori con tonalità comprese tra D e J. Pertanto, prima di utilizzare il dispositivo, è necessario assicurarsi che la pietra da analizzare sia un diamante. - Page 124 Il test viene eseguito sotto il coperchio dell’identificatore di diamanti sintetici II, dove è presente una zona marcata da un foro centrale e una fonte di luce UV che sporge (Fig. 2.2). La pietra deve essere posizionata in modo da coprire il foro. Il test viene avviato quando il coperchio viene chiuso e dopo aver premuto il pulsante “Start Test”...
- Page 125 2.1 Test di gemme singole Assicurarsi che il diamante singolo sia abbastanza largo da coprire l’intera area di test. La larghezza deve essere circa 1,5 mm. Inoltre il diamante non deve avere un’altezza superiore a 5 mm, per assicurare che la lunghezza d’onda UV trasmessa dalla sorgente di luce UV possa essere misurata accuratamente.
- Page 126 Rilasciare la leva per abbassare la sorgente di luce UV e fissare il diamante nella sua sede, per l’esecuzione del test (Fig. 2.4) Fig 2.4 Per fissare la gemma nella sua sede, regolare sorgente di luce UV mediante la leva Se si stanno testando più...
- Page 127 2.2 Test di diamanti montati Assicurarsi che le pietra sia dotata di una montatura a giorno, in quanto ciò consente di avere una visuale chiara della pietra e del colore quando se ne guarda il retro e che essa non sia coperta dal metallo del gioiello o da altre pietre.
- Page 128 Se il gioiello con montatura a giorno è un anello, posizionarlo al centro del reticolo di centraggio della guida dell’anello, inciso sulla sorgente di luce UV. Il lato piano della pietra deve essere posizionato rivolto direttamente verso il basso sull’area di test. Con l’anello adagiato sull’area della guida dell’anello, utilizzare la leva per abbassare la sorgente di luce UV e fissare la pietra sull’area di test (Fig.
- Page 129 2.3 Avvio del test Il pulsante “Start Test” (Inizio test), che si trova nell’angolo superiore destro del dispositivo, indica quando questo è pronto per il test, attivando la fonte luminosa UV interna per iniziare la procedura di identificazione. Bisogna iniziare a usare il dispositivo di test solo quando il pulsante “Start Test”...
- Page 130 2.4 Note importanti sull’esecuzione dei test • Verificare che la gemma oggetto del test non superi i 6 mm di altezza e che la sua larghezza copra interamente il fotorilevatore. La caratura equivalente per garantire la conformità a tale requisito è...
-
Page 131: Interpretazione Dei Risultati Del Test Dell'identificatore Di Diamanti Sintetici
3. Interpretazione dei risultati del test dell’identificatore di diamanti sintetici II L’unità SDS II misura la capacità di assorbimento della luce UV del diamante, consentendo di determinare se la pietra analizzata è un diamante “Naturale” o un diamante di “Tipo IIa”. Dopo aver premuto il pulsante “Start Test”... - Page 132 Barra indicatrice di colore blu/Diamante naturale La prima barra luminosa a partire da sinistra indica un diamante “Naturale”, ed è di colore blu (Fig. 3.2). Fig. 3.2 Lettura per un “Diamante naturale” La barra di colore blu, denominata “Natural” (Naturale), indica che la capacità...
- Page 133 Barra indicatrice di colore rosso/Diamante di Tipo IIa La prima barra luminosa a partire da destra indica un “Diamante di Tipo IIa” ed è di colore rosso (Fig. 3.3). Fig. 3.3 Lettura per un “Diamante di Tipo IIa” La lettura per un “Diamante di Tipo IIa” è determinata dal fatto che la capacità...
-
Page 134: Descrizione Generale Di Pulsanti E Indicatori Dell'identificatore Di Diamanti Sintetici
4. Descrizione generale di pulsanti e indicatori dell’identificatore di diamanti sintetici II La tabella che segue riepiloga le funzioni e le descrizioni di pulsanti e spie sull’identificatore di diamanti sintetici II. Pulsante “Power” Descrizione Spia Funzione Tenere premuto il Nessuna spia Il dispositivo si accende pulsante “Power”... - Page 135 Pulsante “Inizio test” Descrizione Spia Funzione Non si rileva Rossa Il dispositivo non riesce a alcuna pietra nel lampeggiante rilevare alcuna pietra nel fotorilevatore fotorilevatore Pronto per Spia fissa blu Il coperchio del dispositivo è l’esecuzione del test chiuso e pronto per il test, con la fonte luminosa UV interna attivata.
-
Page 136: Cura Dell'identificatore Di Diamanti Sintetici
Grazie per aver dedicato tempo a leggere questo manuale utente che aiuta a comprendere meglio le potenzialità dell’acquisto appena fatto. Presidium consiglia anche di registrare la garanzia inviando la scheda fornita o registrandosi on-line sul sito http://www.presidium.com.sg/. - Page 137 III. О детекторе синтетических бриллиантов Presidium Synthetic Diamond Screener II IV. Важное примечание 1. НАЧАЛО РАБОТЫ с детектором синтетических бриллиантов Presidium Synthetic Diamond Screener II 2. ДИАГНОСТИКА с помощью детектора синтетических бриллиантов Presidium Synthetic Diamond Screener II 3. СЧИТЫВАНИЕ РЕЗУЛЬТАТОВ на детекторе...
- Page 138 другие непрямые убытки (ущерб), понесенные в результате использования данного устройства, независимо от их причины. Детектор синтетических бриллиантов (Synthetic Diamond Screener II или «SDS II») Presidium, описываемый в данном руководстве, предоставляется и/или продается на условиях «как есть». Кроме случаев, прямо предусмотренных...
- Page 139 II. Информация о руководстве Спасибо за приобретение детектора синтетических бриллиантов Presidium Synthetic Diamond Screener II (далее именуется «SDS II» или «устройство»). Данное руководство призвано помочь вам настроить устройство и содержит всю необходимую информацию для его правильной эксплуатации и обеспечения надлежащего...
- Page 140 В свою очередь бриллианты типа II могут быть разделены на две подкатегории - тип IIa и тип IIb. Бриллианты типа IIa, как правило, являются наиболее бесцветными, так как цвет их варьируется от полностью до почти бесцветного, хотя они также могут быть желтыми, коричневыми, оранжевыми, розовыми, красными...
- Page 141 защиты от скольжения. Устройство может быть обеспечено электропитанием от 4 батарей AAA либо через USB-порт, через который его можно подключить к внешнему источнику питания либо к универсальному адаптеру Presidium. Назначение устройства: • Определение вероятности того, что диагностируемый камень является синтетическим бриллиантом типа IIa •...
- Page 142 Детектор синтетических бриллиантов имеет следующие возможности: • Диагностика бриллиантов в диапазоне от 1,5 мм в ширину до 5 мм в высоту (приблизительно от 0,02 до 10 карат) • Диагностика обработанных камней распространенных форм, таких как круглая огранка, овальная огранка, огранка “принцесса”, круглая...
- Page 143 • Соответствие международным стандартам напряжения в сети В комплект входят: • Базовый блок детектора синтетических бриллиантов Presidium • Защитный футляр с внутренним карманом для камней и аксессуаров • 5-мм металлическая пластинка • USB-кабель • Универсальный электроадаптер Presidium • Руководство пользователя • Гарантийная карта...
- Page 144 Рис. A Базовый блок детектора синтетических бриллиантов Характеристики/функции (рис. А) 1. Кнопка питания (включение/выключение и индикатор низкого заряда батареи) 2. Крышка 3. Противоскользящая платформа с круговой разметкой, обеспечивающей правильное размещение камня 4. Фотодетектор 5. 5-мм металлическая пластинка для удобного поднятия зонда и...
- Page 145 либо сильные чистящие средства для очистки устройства. • Не производите покраску устройства. Краска может застопорить движущиеся части и помешать корректной работе. Если устройство работает некорректно, пожалуйста, обратитесь службу поддержки Presidium по адресу service@presidium.com.sg либо: Presidium Instruments Pte Ltd Unit 7, 207 Henderson Road Singapore 159550...
- Page 146 электропитанию Питание детектора синтетических бриллиантов обеспечивается через батареи или USB-кабель, подсоединенный к универсальному адаптеру Presidium, оба из которых включены в комплект, а также через внешний источник энергии. Для использования батарей, в нижней части устройства имеется отделение для батарей. Для доступа к отделению для батарей...
- Page 147 Если используется внешний источник энергии, вставьте один конец кабеля micro-USBиз комплекта поставки в порт в задней части устройства (рис. 1.2), а второй – в универсальный адаптер Presidium для включения во внешнюю электрическую розетку. Рис 1.2 Вставьте разъем micro-USB в порт в задней части устройства...
- Page 148 1.2 Включение устройства Для включения детектора синтетических бриллиантов нажмите и удерживайте кнопку питания в передней части устройства. В течение приблизительно 4 секунд будет мигать синий световой индикатор, указывающий на разогрев устройства (рис. 1.3). Как только индикатор перестанет мигать и станет светиться постоянно, устройство...
- Page 149 1.3 Выключение устройства и автоматическое выключение с целью энергосбережения Для выключения детектора синтетических бриллиантов нажмите и удерживайте кнопку питания в течение примерно 2 секунд, пока не погаснет световой индикатор. Система энергосбережения автоматически выключит детектор синтетических бриллиантов через 10 минут после последней манипуляции.
- Page 150 Не оставляйте разряженные батареи в отделении для батарей, поскольку они могут деформироваться либо протечь и повредить электронные детали устройства. Рекомендуется извлекать батареи перед тем, как хранением устройства в течение длительного срока. При использовании универсального адаптера Presidium через USB-кабель нет необходимости извлекать батареи из устройства.
- Page 151 2. Диагностика с помощью детектора синтетических бриллиантов Presidium Детектор синтетических бриллиантов работает корректно на бесцветных бриллиантах (цвета от D по J). Перед использованием устройства убедитесь, что проверяемый камень является бриллиантом. Используйте место для упора пальцев на передней части крышки, чтобы поднять ее и открыть внутреннюю часть...
- Page 152 Диагностика осуществляется при закрытой крышке детектора синтетических бриллиантов, площадка для тестируемых материалов которого отмечена отверстием в центре и выдающимся наружу верхним источником УФ-излучения (рис. 2.2). Камень помещают непосредственно на отверстие, а процедура начинается сразу после закрытия крышки и нажатия кнопки начала диагностики. Как только кнопка начала диагностики...
- Page 153 2.1 Диагностика бриллианта без оправы Убедитесь в том, что ваш бриллиант достаточно широк, чтобы покрыть площадку для тестируемых материалов. Он должен быть приблизительно 1,5 мм в ширину. Кроме того, бриллиант не должен превышать 5 мм в высоту, чтобы длина передаваемых источником...
- Page 154 Используйте рычаг, чтобы привести источник УФ-излучения в нижнее положение и закрепить бриллиант на месте для проверки. (рис. 2.4) Рис 2.4 Настройте положение источника УФ излучения с помощью рычага, чтобы закрепить бриллиант на месте При проверке нескольких камней без оправы воспользуйтесь имеющейся...
- Page 155 2.2 Диагностика бриллианта в оправе Убедитесь в том, что камень находится в оправе с открытой задней частью, то есть, при взгляде сквозь камень сзади, можно увидеть цвет камня и как сквозь него проходит свет, так как он не закрыт металлом или другими камнями (рис 2.7). Четкий...
- Page 156 Если ваш бриллиант в оправе с открытой задней частью вставлен в кольцо, поместите кольцо в центр крестообразного обозначения разметки для расположения колец, которая выбита на источнике УФ излучения. Камень устанавливается на площадку для тестируемых материалов гранью вниз. Установите кольцо в середине области разметки для колец и...
- Page 157 2.3 Начать проверку Кнопка начала диагностики расположена в верхней правой части устройства и указывает на готовность устройства к работе, включение внутреннего источника УФ-излучения и готовность к началу диагностики. На готовность устройства к началу проверки указывает постоянное свечение кнопки начала диагностики синим cветом (рис...
- Page 158 2.4 Важные примечания по проведению диагностики • Убедитесь в том, что диагностируемый камень не превышает 6 мм в высоту и полностью покрывает фотодетектор по ширине. Этот размер соответствует приблизительно 0,1-10 каратам. • Проведите предварительную диагностику на предмет того, что проверяемый камень является бриллиантом. •...
- Page 159 3. Считывание результатов на детекторе синтетических бриллиантов SDS II измеряет способность бриллианта поглощать УФ- излучение, и результаты этих измерений сообщаются в виде категории камня – «натуральный» или «бриллиант типа IIa». После нажатия кнопка начала диагностики начнет мигать белым, указывая на начало проведения диагностики. В течение 2 секунд...
- Page 160 Синий сегмент шкалы/натуральный камень Если первый сегмент слева горит синим, то камень является натуральным (рис. 3.2). Рис 3.2 Результат проверки – «натуральный» Синий световой индикатор «Натуральный» обозначает, что способность УФ-светопоглощения проверяемого камня высока, и в камне имеются следы элементов, которые поглотили УФ- лучи, таким...
- Page 161 Сегмент красного цвета/бриллиант типа IIa Если первый сегмент справа горит красным цветом, то камень является «Бриллиантом типа IIa» (рис. 3.3). Рис 3.3 Результат проверки – «Бриллиант типа IIa» Результат проверки – «Бриллиант типа IIa» означает, что способность УФ-светопоглощения проверяемого камня низкая, что...
- Page 162 4. Обзор кнопок и индикаторов детектора синтетических бриллиантов Presidium В приведенной ниже таблице содержится сводная информация о состояниях кнопок и индикаторов устройства и их значении. Кнопка включения питания Описание Подсветка Значение Нажмите и Подсветка Устройство включается и удерживайте отсутствует сейчас начнется разогрев.
- Page 163 Кнопка начала диагностики Описание Подсветка Значение На фотодетекторе Мигает Устройство не может не обнаружен красным обнаружить камень на камень фотодетекторе Готово к началу Постоянный Крышка устройства проверки синий закрыта и устройство готово к проверке; внутренний источник УФ- излучения выключен Скоро начнется Мигающий...
- Page 164 Дисплей с 2 световыми индикаторами Описание Подсветка Значение Подсвеченный Постоянный Проверка завершена и синим столбец синий проверяемый бриллиант над надписью обладает высокой светопоглотительной «Натуральный» способностью, что свидетельствует о том, что он относится к бриллиантам типа I и, скорее всего, является натуральным.
- Page 165 и тщательного исполнения, пожалуйста, обращайтесь с ним осторожно. Спасибо за то, что уделили время чтению руководства для пользователя, которое поможет вам лучше понять характеристики приобретенного вами устройства. Presidium также рекомендует вам зарегистрировать свою гарантию, переслав нам прилагаемую карту регистрации гарантии, либо зарегистрировавшись онлайн по адресу: http://www.presidium.com.sg/...
- Page 166 VERSIÓN EN ESPAÑOL Pág. I. Descargos, exclusiones y limitaciones de responsabilidad II. Acerca de este manual III. Acerca del Analizador de diamantes sintéticos Presidium IV. Aviso importante 1. PRIMEROS PASOS con el Analizador de diamantes sintéticos II 2. REALIZACIÓN DE UNA PRUEBA con el Analizador de diamantes sintéticos II...
-
Page 167: Descargos, Exclusiones Y Limitaciones De Responsabilidad
LEA Y TENGA EN CUENTA LOS TÉRMINOS Y CONDICIONES DE LA GARANTÍA DE PRESIDIUM tal y como se exponen en la tarjeta de garantía. La garantía que Presidium ofrece de sus dispositivos está sujeta a un uso correcto por parte de sus usuarios, de acuerdo con todos los términos y condiciones expuestos en el manual de usuario... -
Page 168: Acerca De Este Manual
II. Acerca de este manual Gracias por comprar el Analizador de diamantes sintéticos II Presidium (el “SDS II” o el “dispositivo”). Este manual está diseñado para ayudarle a configurar su dispositivo, y describe toda la información que necesita saber sobre cómo utilizar su dispositivo de análisis de diamantes y cuidarlo, según sus... - Page 169 4 pilas AAA o a través de su puerto USB, que puede conectarse a una fuente de alimentación externa o al Adaptador de corriente universal Presidium.
- Page 170 El dispositivo se ha diseñado con los siguientes objetivos: • Alertar sobre la presencia de un diamante sintético Tipo IIa • Filtrar rápidamente los diamantes incoloros naturales Tipo I (el tipo de diamante natural más común) de los diamantes incoloros Tipo IIa, que suelen ser diamantes sintéticos •...
- Page 171 • Barra metálica de 5 mm para elevar la sonda de prueba con facilidad para realizar pruebas consecutivas en las piedras sueltas Qué incluye la caja: • Unidad del Analizador de diamantes sintéticos II Presidium • Funda protectora de transporte con bolsillo interior para gemas y accesorios •...
- Page 172 Ilustración A Unidad del Analizador de diamantes sintéticos II Características/funciones (Ilustración A) 1. Botón de encendido y apagado (encendido/apagado e indicador de poca carga de pilas) 2. Tapa 3. Plataforma antideslizante con marcas concéntricas para garantizar la correcta colocación de la piedra 4.
-
Page 173: Aviso Importante
• No pinte el dispositivo. La pintura puede bloquear las piezas móviles y evitar una ventilación adecuada. Si el dispositivo no funciona correctamente, póngase en contacto con el Servicio de atención al cliente de Presidium a través de service@presidium.com.sg o: Presidium Instruments Pte Ltd... -
Page 174: Primeros Pasos Con El Analizador De Diamantes Sintéticos
El Analizador de diamantes sintéticos II puede alimentarse mediante pilas o con el cable USB conectado al Adaptador de corriente universal Presidium que se incluyen con el producto, o conectado a una fuente de alimentación externa. Si se usan pilas, puede localizar el compartimiento de las pilas en la parte inferior de la unidad. - Page 175 USB incluido en el puerto situado en la parte trasera del dispositivo (Ilustración 1.2) y el otro extremo en el Adaptador de corriente universal Presidium incluido, para realizar la conexión a una toma de corriente externa. Ilustración 1.2 Conecte el cable micro USB al puerto situado en la parte trasera del dispositivo También puede conectar el otro extremo del cable USB directamente...
- Page 176 1.2 Encendido del dispositivo Para encender el Analizador de diamantes sintéticos II, mantenga pulsado el botón de encendido y apagado situado en la parte frontal de la unidad. Una luz azul parpadeará durante aproximadamente 4 segundos para permitir que el producto se caliente. (Ilustración 1.3) Cuando la luz azul deje de parpadear y se mantenga estable, el dispositivo estará...
- Page 177 1.3 Apagado del dispositivo y apagado automático de ahorro de energía Para apagar el Analizador de diamantes sintéticos II, mantenga pulsado el botón de encendido y apagado durante unos dos segundos, hasta que la luz se apague. Para garantizar que el Analizador de diamantes sintéticos II ahorre energía, la unidad se apagará...
- Page 178 Se recomienda extraer las pilas si el dispositivo va a permanecer guardado durante un periodo de tiempo prolongado. Si se utiliza el Adaptador de corriente universal Presidium con el cable USB, no tendrá que extraer las pilas.
-
Page 179: Realización De Una Prueba Con El Analizador De Diamantes Sintéticos
2. Realización de una prueba con el Analizador de diamantes sintéticos II El Analizador de diamantes sintéticos II funciona de forma precisa con diamantes incoloros conocidos que oscilan entre el color D y el color J. Antes de utilizar este dispositivo, debe asegurarse de que la piedra sea un diamante. - Page 180 La prueba se realiza bajo la tapa del Analizador de diamantes sintéticos II, en el que el área de prueba está marcada por un orificio en el centro y una fuente de luz ultravioleta elevada saliente (Ilustración 2.2). La piedra se coloca cubriendo este orificio y la prueba comienza cuando la tapa se cierra y se pulsa el botón “Start Test”...
- Page 181 2.1 Para pruebas de diamantes sueltos Asegúrese de que el ancho del diamante suelto sea lo suficientemente amplio como para cubrir el área de prueba. Debe tener aproximadamente 1,5 mm de ancho. El diamante suelto no deberá superar los 5 mm de alto, para garantizar que la longitud de onda ultravioleta transmitida por la fuente de luz ultravioleta pueda medirse con precisión.
- Page 182 Suelte la palanca para bajar la fuente de luz ultravioleta y fijar el diamante correctamente para realizar la prueba (Ilustración 2.4) Ilustración 2.4 Ajuste la fuente de luz ultravioleta con la palanca para fijar el diamante correctamente Si va a realizar pruebas de varias piedras sueltas, utilice la barra metálica incluida para sujetar la fuente de luz de modo que no tenga que ajustar la palanca para colocar las piedras sueltas (Ilustración 2.5).
- Page 183 2.2 Para diamantes engastados en joyería Asegúrese de que la piedra esté colocada con la parte posterior abierta, lo que significa que puede ver una vista y color claros de la piedra cuando visualiza su parte posterior, y que no está oscurecida por el metal de la joyería ni por otras piedras.
- Page 184 Si el diamante engastado con parte posterior abierta es un anillo, coloque el anillo en el centro de la marca de la cruceta de la guía de anillo grabada en la fuente de luz ultravioleta. La plataforma del diamante engastado debe colocarse boca abajo en el área de prueba. Con el anillo colgado de la zona de guía de anillo, utilice la palanca para bajar la fuente de luz ultravioleta y fijar la piedra sobre el área de prueba (Ilustración 2.8)
- Page 185 2.3 Start Test (Iniciar prueba) El botón “Start Test” (Iniciar prueba) situado en la esquina superior derecha del dispositivo indica que el dispositivo está listo para realizar la prueba, y la fuente de luz ultravioleta interior se activa para iniciar el procedimiento de identificación.
- Page 186 2.4 Notas importantes sobre la realización de la prueba • Asegúrese de que la gema de la que se realiza la prueba no supere los 6 mm de alto y de que su ancho cubra el fotodetector por completo. El equivalente en quilates aproximado es de 0,1 a 10 quilates.
-
Page 187: Lectura De Los Resultados De La Prueba Del Analizador De Diamantes Sintéticos
3. Lectura de los resultados de la prueba del Analizador de diamantes sintéticos II El SDS II mide la capacidad de absorción ultravioleta del diamante y esta medición se comunica como “Natural” o “Diamante Tipo IIa”. Después de pulsarse el botón “Start Test” (Iniciar prueba), el botón comenzará... - Page 188 Barra de luz azul/Natural La primera barra de la izquierda indicará la lectura “Natural” y se iluminará en azul (Ilustración 3.2). Ilustración 3.2 Lectura “Natural” La luz azul correspondiente a “Natural” indica que la capacidad de absorción de luz ultravioleta del diamante sometido a prueba es elevada, ya que existen elementos de traza dentro de la piedra que han absorbido la luz ultravioleta, permitiendo así...
- Page 189 Barra de luz roja/Diamante Tipo IIa La primera barra luminosa de la derecha indicará “Diamante Tipo IIa” y se iluminará en rojo (Ilustración 3.3). Ilustración 3.3 Lectura “Tipo IIa” Una lectura “Diamante Tipo IIa” significa que la capacidad de absorción de luz ultravioleta del diamante sometido a prueba es baja y esto se debe a la falta de elementos de traza, como el nitrógeno, dentro del diamante incoloro, lo que permite que la luz traspase el diamante con muy pocas obstrucciones.
-
Page 190: Descripción General De Los Botones Eindicadores Del Analizador De Diamantes Sintéticos
4. Descripción general de los botones e indicadores del Analizador de diamantes sintéticos II En la siguiente tabla se resumen las funciones y representaciones de los botones y luces del Analizador de diamantes sintéticos II. Botón de encendido y apagado Descripción Función Ninguna luz... - Page 191 Botón Start Test (Iniciar prueba) Descripción Función No se detecta Roja El dispositivo no detecta ninguna piedra en el parpadeante ninguna piedra en el fotodetector. fotodetector. Listo para realizar Azul fijo La tapa del dispositivo pruebas está cerrada y lista para pruebas, con la fuente de luz ultravioleta interior desactivada.
-
Page 192: Cuidados Del Analizador De Diamantes Sintéticos
Este documento le ayudará a entender mejor el funcionamiento de su reciente compra. Presidium le recomienda también que registre su garantía enviándonos la tarjeta de registro de garantía proporcionada o registrándose a través de Internet, en la dirección http://www.presidium.com.sg/...
Need help?
Do you have a question about the Synthetic Diamond Screener II and is the answer not in the manual?
Questions and answers