Table of Contents
Advertisement
Advertisement
Table of Contents

Related Manuals for Oase BioTec Premium 80000


Summary of Contents for Oase BioTec Premium 80000
- Page 1 BioTec Premium 80 000...
- Page 2 BTC0016 BTC0017...
- Page 3 BTC0030 BTC0032...
- Page 4 BTC0027 BTC0022 BTC0019...
- Page 5 ProfiClear0040 BTC0018 BTC0031 BTC0026 BTC0020...
- Page 6 BTC0021 BTC0025...
- Page 7 BTC0028 BTC0029 BTC0023 BTC0024...
-
Page 8: Table Of Contents
- EN - - EN - Table of Contents Information about these operating instructions ................33 Symbols used in these instructions ..................33 Product Description .......................... 34 Unit configuration ........................34 ... -
Page 9: Information About These Operating Instructions
Translation of the original Operating Instructions Information about these operating instructions Welcome to OASE Living Water. You made a good choice with the purchase of this product BioTec Premium 80000. Prior to commissioning the unit, please read the instructions of use carefully and fully familiarise yourself with the unit. -
Page 10: Product Description
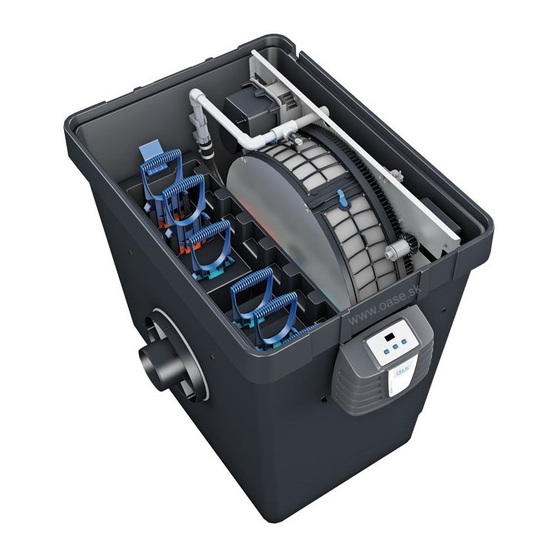
- EN - Product Description Unit configuration Description Container cover Level detection device − Signals the water level in the filter system Signal box with level detection device and temperature probe The signal box is connected to the control system. −... -
Page 11: Function Description
The clean water is returned to the pond through a pipe via gravity. The task of the BioTec Premium 80000 is to separate the dirt from the water. Screens (150 μm) remove all types of dirt particles and foam filters provide a surface for the colonisation of bacteria for biological filtration. -
Page 12: Hazards Encountered By The Combination Of Water And Electricity
- EN - Hazards encountered by the combination of water and electricity The combination of water and electricity can lead to death or severe injury from electrocution, if the ► unit is incorrectly connected or misused. Prior to reaching into the water, always switch off the mains voltage to all units used in the water. ►... -
Page 13: Installation And Connection
- EN - Installation and connection Important: If the planned installation deviates significantly from the recommendations contained in this manual: Have your specialist retailer check whether all technical specifications were adhered to. This is crucial ► for a problem-free operation. Installation planning Attention! Dangerous electrical voltage. -
Page 14: Connect The Unit
- EN - Connect the unit 4.2.1 Information regarding pipes Use suitable pipes. ► Do not use any right-angled bends. Bends with a maximum angle of 45° are very efficient. ► Standing water in pipes can freeze when there is a hard frost and cause pipes to burst. For this reason, ►... -
Page 15: Connecting The Dirt Outlet
- EN - 4.2.4 Connecting the dirt outlet The water in the container can be drained via the DN 75 dirt outlet with slide valve at the bottom of the container if required (for cleaning, repair, overwintering). Connect a suitable DN 75 pipe and drain the dirty water into the sewer system. ►... -
Page 16: Commissioning/Start-Up
Tighten both nuts. Biological filter starter The foam filters take several weeks to reach their full biological cleaning effect. We recommend the OASE filter starter Biokick to ensure fast growth of bacterial populations. Micro-organisms colonise the filter system, multiply and ensure an enhanced quality of the pond water by the decomposition of excess... -
Page 17: Order Of Starting Up Steps
- EN - Order of starting up steps How to proceed: 1. Close the slide valve for the dirt outlet at the bottom of the container. 2. Check that the entire filter system (pipes and hoses) is complete. 3. Remove the container cover. 4. -
Page 18: Operation
- EN - Operation Control system overview ProfiClear_0001 Display − for displaying the operating status − for displaying the menus and values for setting the drum filter − the current water temperature [°C] is displayed as standard On|Off button, Quit Error −... -
Page 19: Operating Modes
- EN - Operating modes Description Information Automatic mode: − The display indicates the water temperature as standard. − Operating mode for normal operation. − A cleaning cycle is automatically started if the level detection device signals an excessive deviation in the water level. −... -
Page 20: Ec: Extended Cleaning Time "Extra Cleaning
- EN - EC: Extended cleaning time "Extra Cleaning" 6.5.2 To prevent larger deposits from building up in the dirt channel or pipework, the unit performs a cleaning cycle with an extended cleaning time after every 20 cleaning cycles. This ensures that the pipework is flushed out at regular intervals. -
Page 21: Reading Out The Number Of Cleaning Cycles
- EN - Reading out the number of cleaning cycles 6.6.1 Cleaning cycles in 24 hours How to proceed Information The sum of the automatic and time-dependent cleaning cycles is saved. Menu Clean Press for 5 s. The 4-digit value is displayed by two groups of two digits that appear in succession in the display. -
Page 24: Remedy Of Faults
- EN - Remedy of faults Malfunction Possible cause Remedy No flow of water Filter pump not switched on Switch on the filter pump, connect the power plug Supply to filter system or return to pond Clean the supply and/or return blocked Water flow insufficient Bottom drain, pipe or hose blocked... - Page 25 The pond was not thoroughly cleaned before Thoroughly clean the pond initial start-up The bacteria of the biological filter system Use OASE Biokick filter starter are not sufficiently established The level detection device is clogged or Clean the level detection device...
-
Page 26: Maintenance And Cleaning
► or impair the function. Recommended cleaning agent for removing stubborn limescale deposits: ► − Pump cleaning agent PumpClean from OASE. − Vinegar- and chlorine-free household cleaning agent. After cleaning, thoroughly rinse all parts in clean water. ► Regular tasks The filter system is self-cleaning. -
Page 27: Replacing Foam Filters
- EN - How to proceed: 1. Pull up the foam holders five or six times. − This will compress the foam filters, washing out the dirt. 2. Open the DN 75 dirt outlet and allow the dirty water to drain out completely. 3. -
Page 28: Cleaning The Rinsing Device
The error messages Er33, Er55 or an excessive rise in the frequency of cleaning cycles (counter) indicate that there are limescale deposits on the screen elements. (→ Reading out the number of cleaning cycles) Oase recommends that you descale the unit every two to three months as a preventative measure if the water is very hard. -
Page 29: Removing/Fitting The Filter Drum
- EN - Removing/fitting the filter drum Remove a screen element to allow work to be carried out inside the filter drum. (→ Replacing a screen element) Removing How to proceed: 1. Pull the rinsing device out of the fastening clips and separating plate. 2. -
Page 30: Replacing The Rinsing Pump
The following components are wear parts and are excluded from the warranty: Foam filters ► Capacitor of the rinsing pump ► − Do not open the rinsing pump. Send the rinsing pump to OASE. You will be sent an immediate replacement. Safety fuse ► Screen elements ►... -
Page 31: Technical Data
- EN - Technical data Description Value Control system Rated voltage V AC Mains frequency Power consumption in idle state Power consumption during cleaning cycle Maximum power consumption (theoretical) Rinsing pump output voltage V AC Drum motor output voltage V DC Signal box output voltage V DC Ambient temperature... - Page 33 BTC0001...
- Page 34 BTC0003 BTC0002 BTC0004...
- Page 35 BTC0006 BTC0005 BTC0007...
- Page 36 BTC0009 BTC0010 BTC0011 BTC0008 BTC0012...
- Page 37 BTC0014 BTC0013 BTC0015...
Need help?
Do you have a question about the BioTec Premium 80000 and is the answer not in the manual?
Questions and answers
My filter shows Er 77. This code is not in the manual