S&C TripSaver II Installation And Operation Manual
Cutout-mounted recloser outdoor distribution
Hide thumbs
Also See for TripSaver II:
- Manual (132 pages) ,
- Installation, operation, and configuration (89 pages) ,
- Inspection manual (18 pages)
Table of Contents
Advertisement
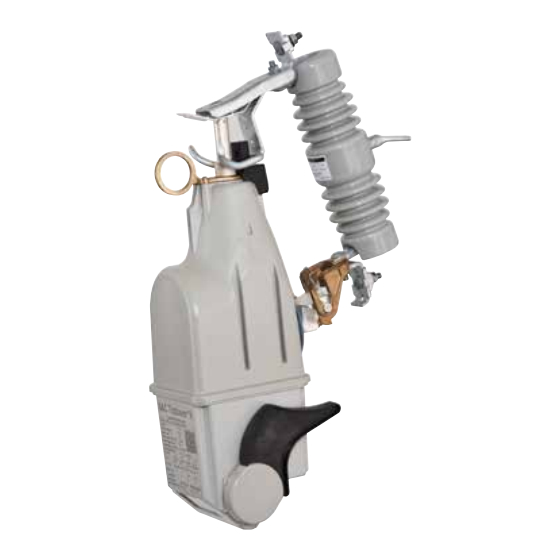
TripSaver
II Cutout-Mounted Recloser
®
Outdoor Distribution (15 kV and 25 kV)
Table of Contents
Section
Qualified Persons . . . . . . . . . . . . . . . . . . . . . . . . . . . 2
Read this Instruction Sheet . . . . . . . . . . . . . . . . . . . 2
Retain this Instruction Sheet . . . . . . . . . . . . . . . . . . . 2
Video . . . . . . . . . . . . . . . . . . . . . . . . . . . . . . . . . . . . . 2
Proper Application . . . . . . . . . . . . . . . . . . . . . . . . . . 2
Warranty Provisions . . . . . . . . . . . . . . . . . . . . . . . . . 2
Warranty Qualifications . . . . . . . . . . . . . . . . . . . . . . 3
Application Note . . . . . . . . . . . . . . . . . . . . . . . . . . . . 3
Understanding Safety-Alert Messages . . . . . . . . . . . 4
Following Safety Instructions . . . . . . . . . . . . . . . . . . 4
Replacement Instructions and Labels . . . . . . . . . . . 4
Location of Safety Label . . . . . . . . . . . . . . . . . . . . . 5
. . . . . . . . . . . . . . . . . . . . . . . . . 6
Packing . . . . . . . . . . . . . . . . . . . . . . . . . . . . . . . . . . . 7
Inspection . . . . . . . . . . . . . . . . . . . . . . . . . . . . . . . . . 7
Handling . . . . . . . . . . . . . . . . . . . . . . . . . . . . . . . . . . 7
Storage . . . . . . . . . . . . . . . . . . . . . . . . . . . . . . . . . . . 7
Returning . . . . . . . . . . . . . . . . . . . . . . . . . . . . . . . . . 7
Battery Shelf Life . . . . . . . . . . . . . . . . . . . . . . . . . . . 7
Cutout-Mounted Recloser . . . . . . . . . . . . . . . . . . 8
Recloser from Its Mounting . . . . . . . . . . . . . . . . .13
of a TripSaver II Recloser . . . . . . . . . . . . . . . . . . .14
Display Screen . . . . . . . . . . . . . . . . . . . . . . . . . . . . .15
Additional Screens . . . . . . . . . . . . . . . . . . . . . . . . . .18
Factory Default Settings . . . . . . . . . . . . . . . . . . . . . 20
The S&C Loadbreak Tool . . . . . . . . . . . . . . . . . . .21
Loadbreak Function . . . . . . . . . . . . . . . . . . . . . . 25
TripSaver II Recloser is in Remote Non-Reclose
(R-NR) Mode . . . . . . . . . . . . . . . . . . . . . . . . . . . 27
Communication Gateway . . . . . . . . . . . . . . . . . . 28
December 16, 2019
© S&C Electric Company 2012-2019, all rights reserved
Installation and Operation
Page
Section
In Mounting with Contacts Open . . . . . . . . . . . . . . 29
Manually Resetting a TripSaver II Recloser . . . . . . 29
Now Screen . . . . . . . . . . . . . . . . . . . . . . . . . . . . 30
Mounting . . . . . . . . . . . . . . . . . . . . . . . . . . . . . . . .31
Temperatures . . . . . . . . . . . . . . . . . . . . . . . . . . . .31
Battery Abnormality LCD Indicator . . . . . . . . . . . . . .31
Appendix A
Regulatory Information . . . . . . . . . . . . . . . . . . . . . . 32
United States of America - FCC . . . . . . . . . . . . . . . 35
Canada - ISED . . . . . . . . . . . . . . . . . . . . . . . . . . . . 35
Australia/New Zealand . . . . . . . . . . . . . . . . . . . . . . 35
Brazil . . . . . . . . . . . . . . . . . . . . . . . . . . . . . . . . . . . . 36
South Korea . . . . . . . . . . . . . . . . . . . . . . . . . . . . . . 36
Instruction Sheet 461-502
Page
Advertisement
Table of Contents

Related Manuals for S&C TripSaver II


Summary of Contents for S&C TripSaver II
-
Page 1: Table Of Contents
TripSaver II Recloser . . . . . . . . . . . . . . . . . . -
Page 2: Introduction
. Ratings for the TripSaver II Cutout-Mounted Recloser can be found in Specification Bulletin 461-33 . TripSaver II recloser ratings also are laser-etched on the recloser . Warranty Provisions The warranty and/or obligations described in S&C’s standard conditions of sale, as set... -
Page 3: Warranty Qualifications
Cutout mounting is shown in Figure 2 . The warranty set forth in S&C Price Sheet 150 does not apply to a TripSaver II recloser retrofitted in other than a present- production (“-R10” or “-R11”) S&C-provided Type XS Fuse Cutout mounting . -
Page 4: Safety Information
S&C’s website sandc.com, or call the S&C Global Support and Monitoring Center at 1-888-762-1100.. DANGER Read this instruction sheet thoroughly and carefully before installing or operating your TripSaver II Cutout-Mounted Recloser . Replacement If additional copies of this instruction sheet are needed, contact your nearest S&C Sales Office, S&C Authorized Distributor, S&C Headquarters, or S&C Electric Canada Ltd. -
Page 5: Location Of Safety Label
Safety Information Location of Safety Label DANGER TripSaver II may be energized from ® either side and in any position. Always consider all parts live until de-energized, tested, and grounded. G-9473-E Safety Alert Message Description Number TripSaver ® II may be energized from either side and in any position . Always consider all DANGER G-9473-E parts live until de-energized, tested, and grounded . -
Page 6: Safety Precautions
DO NOT disassemble a TripSaver II recloser . The control module inside the TripSaver II recloser housing is only intended for use inside the TripSaver II recloser and has not been approved for any other use . There are no customer- serviceable parts inside the recloser, and disassembling the recloser voids the warranty . -
Page 7: Shipping And Handling
4. File a claim with the carrier. If concealed damage is discovered: If for any reason a TripSaver II recloser is to be returned, place the TripSaver II recloser in the original shipping 1. Notify the delivering carrier within 15 days of receipt of carton to prevent damage during shipping. -
Page 8: Installation
Installation Installing a TripSaver II Cutout-Mounted Recloser Carriage-bolt Follow these steps to install a TripSaver II Cutout-Mounted Carriage bolt nut Recloser: External Lockwasher STEP 1. For Overhead Pole-Top Style TripSaver II tooth recloser: Attach the mounting to its mounting lockwasher bracket, as illustrated in Figure 3. - Page 9 4c. Guide the trunnion into the hinge of the cutout mounting, as shown in Figure 4c. Figure 4a. Inserting a 15-kV TripSaver II recloser into its mounting with an S&C Talon Handling Tool. Figure 4b. Inserting a 15-kV TripSaver II recloser into its mounting with gloved hands.
- Page 10 Figures 5b and 5c. Guide the trunnion into the hinge of the cutout mounting as shown in Figure 5c. Figure 5a. Inserting a 25-kV TripSaver II into its mounting with an S&C Talon Handling Tool. Figure 5b. Inserting a 25-kV TripSaver II into its mounting with gloved hands.
- Page 11 DO NOT use the curled prong of an S&C Talon Handling Tool to close a TripSaver II recloser . Using the curled prong of a Talon tool to close a TripSaver II Figure 6. Swing the TripSaver II recloser to within 45 degrees recloser can prevent full closure, resulting in arcing, of the fully Closed position before final closing.
- Page 12 The operational status of a TripSaver II recloser is indicated on a nonvolatile liquid-crystal display (LCD) screen. When the TripSaver II recloser is energized and Figure 9. Place the prong above the lever and pull down to the control is powered up, the display screen will show enter NR mode.
-
Page 13: Removing A Tripsaver
The hotstick should be positioned vertically as close to the body of the TripSaver II recloser as possible. Exert an upward force to lift the TripSaver II recloser out of the mounting. See Figure 13. Using gloved hands Figure 14. -
Page 14: Operation
After the cause of the fault has been resolved and any necessary repairs completed, repeat Steps 5 and 6 on page 11 to close the TripSaver II recloser back into the mounting. If Line Work Is to Be Performed Downstream... -
Page 15: Display Screen
S&C TripSaver® II Service Center Configuration Software. Note: To power a TripSaver II recloser from its sleep state, there must be enough load current available (1 A for 40-A continuous reclosers, 4 A for 100-A continuous reclosers, and 8 A for 200-A continuous reclosers). - Page 16 • Mode: AUTO or NR mode. In AUTO mode, the TripSaver II recloser will perform Open or Reclose operations according to the preselected TCC curves. In NR mode, the TripSaver II recloser will not reclose; Service Soon Mode Tripped on it will trip once and then drop open.
- Page 17 Sectionalizing Mode Counts: This screen displays the preset number of source-side circuit breaker or recloser operations that TripSaver II recloser will count up to before Figure 21. The Number of Open Operations screen. dropping open. This screen is automatically skipped if Sectionalizing mode is disabled.
-
Page 18: Additional Screens
Operation Additional Screens Figure 26 on pages 18 and 19 shows additional screens that can be added to the display screens using the TripSaver II Service Center Configuration Software. Screen Name Description Secondary Normal Three operating parameters are displayed: Vacuum interrupter status at Screen the upper left corner (symbol “O”... - Page 19 The rated maximum voltage of the recloser: either 15 .5 kV or 29 kV is displayed . System Frequency The frequency of the electrical system the TripSaver II recloser is configured for, in Hz, is displayed . NR #0 (NR/Remote NR TCC This is the Standard NR TCC curve .
-
Page 20: Factory Default Settings
Factory Default Settings Default NR Curve Settings • Standard NR: Microprocessor recloser: Definite All TripSaver II reclosers are shipped with the factory time; minimum trip current: 100 A; time: 0 seconds default settings shown below. These settings will protect the overhead power line in case an unconfigured TripSaver •... -
Page 21: Operation With Loadbuster
Talon Handling Tool or a distribution prong. WARNING DO NOT attempt to open a TripSaver II recloser without using a loadbreak tool such as S&C’s Loadbuster tool . An arc started by opening a TripSaver II recloser under load without a loadbreak tool can cause equipment damage, serious injury, or death . - Page 22 Operation WARNING DO NOT attempt to use a Loadbuster tool to open a TripSaver II recloser while climbing the pole . Engagement of a Loadbuster tool in this position is difficult and may result in an improper opening operation, leading to arcing, faults, equipment damage, serious injury, or death .
- Page 23 See Figure 32. Avoid jerking and hesitation. The resetting latch will keep it open. Generally, there is no indication of circuit interruption. Figure 31. The Loadbuster tool attached to a TripSaver II Cutout- The only sound is that of a Loadbuster tool Mounted Recloser.
- Page 24 To perform this operation easily and smoothly, always roll the Loadbuster tool so that it rotates in an upward direction. Figure 33. Detaching a Loadbuster tool from a TripSaver II recloser. STEP 5.
-
Page 25: Local Manual Open-Tripsaver
Operation Y-second window when the TripSaver II recloser is in the Local Manual Open—TripSaver II Loadbreak vertical position. Function Note: The trigger values for X (Operations count) and NOTICE Y (Operation Time window) are user-configurable using the TripSaver II Service Center Configuration Software. - Page 26 • If the TripSaver II recloser detects a fault while a user is Figure 37. Prompt screen for LMO cancellation. performing the LMO command, the command sequence...
-
Page 27: Understanding The Active Tcc Curve When The
R-NR Functions menu of the service center configuration ■ TripSaver II Recloser is “Warm” when the control is awake . (i .e ., seen software . This ONLY disables Temporary Auto mode when the switch is the appropriate “wake up” current and has not dropped below the “stay in R-NR mode with the lever in the Up position . -
Page 28: Understanding Gang Operation When A
TripSaver II recloser and the communications gateway cabinet. See Figure 41. A ga ng oper a t ion c a n be i n it i a t ed when one TripSaver II recloser opens in response to an overcurrent Figure 41. -
Page 29: Troubleshooting
LCD screen reads “VI Open” but the recloser appears closed . ) The trunnion of the TripSaver II recloser in this state is still loose and can cause the TripSaver II recloser to swing... -
Page 30: Initiating Display Screen Using A 9-Volt Battery
End of Interrupting Capability and Service Now Screen When a TripSaver II recloser is no longer capable of interrupting a fault (i.e., its remaining contact wear is at 0%), it will go into Service Now mode. It will drop... -
Page 31: Unable To Close A Tripsaver Ii Recloser Into Its
Troubleshooting • If the TripSaver II recloser LMO drop open is blocked • If the Gang operation drop open is blocked. Note: Blocked means iced to the cutout mounting or held upright by some other means. During testing on a bench with the TripSaver II recloser in a horizontal position: •... -
Page 32: Regulatory Information
The information is current as of the date of this publication but may be subject to change without notice. For the most recent version of this instruction manual with the most up-to-date regulatory information, visit sandc.com. Table 2. TripSaver II Cutout-Mounted Recloser Controller – TSII-CONTRL3 (Standard 5-Second Units) Country... - Page 33 Appendix A Table 3. TripSaver II Cutout-Mounted Recloser Controller – TSII-CONTRL2 (Extended Open Interval “-O” Option) Country Government Agency Certification or ID Number Issued/Compliance as of United States of America U3D-TSIICONTRL2 October 13, 2016 Argentina ENACOM C-22978 March 29, 2019...
- Page 34 Appendix A Table 4. TripSaver II Cutout-Mounted Recloser USB Transceiver – TSII-DONGLE2 Country Government Agency Certification or ID Number Issued/Compliance as of United States of America U3D-TSIIDONGLE2 October 13, 2016 Argentina ENACOM C-22980 March 22, 2019 Australia / New Zealand...
-
Page 35: United States Of America - Fcc
Appendix A United States of America – FCC (Federal Australia/New Zealand (ACMA) Communication Commission) The above -mentioned product complies w ith the This device complies with part 15 of the FCC rules and requirements of the relevant ACMA Standards made regulations regarding unlicensed transmissions. -
Page 36: Brazil
Appendix A Brazil (ANATEL): TSII-CONTRL2; TSII-CONTROL3; TSII-DONGLE2 Atendimento à Regulamentação Anatel Este equipamento não tem direito à proteção contra interferência prejudicial e não pode causar interferência em sistemas devidamente autorizados. Este produto está homologado pela ANATEL, de acordo com os procedimentos regulamentados pela Resolução 242/2000, e atende aos requisitos técnicos aplicados.
Need help?
Do you have a question about the TripSaver II and is the answer not in the manual?
Questions and answers
can a trip saver open and close itself by any fault and what are its mouths
Yes, the S&C TripSaver II recloser can open and close automatically in response to a fault. It is designed to provide overhead distribution protection by detecting faults and operating accordingly. Some of its features include:
- Automatic Reclosing: The device can attempt to reclose after a fault, preventing unnecessary outages.
- Service Now Mode: Older firmware versions (1.7 and previous) may enter this mode if tested or operated in an improper orientation.
- Loadbreak Capability: It must be opened using a loadbreak tool such as S&C’s Loadbuster to prevent arcing and equipment damage.
- Drop Open Mechanism: It can drop open during fault conditions unless blocked by ice or other factors.
- Testing and Operation Conditions: During testing, improper orientation can cause unintended entry into Service Now mode.
Thus, the TripSaver II functions as an automated recloser with specific operational requirements.
This answer is automatically generated