Table of Contents
Advertisement
Advertisement
Table of Contents

Summary of Contents for Bella 14915
- Page 1 2 LB BREAD MAKER Instruction Manual and Recipe Guide MÁQUINA PARA HACER PAN DE 900 g Manual de instrucciones y guía de recetas WWW.BELLAHOUSEWARES.COM Register your product and get support • Registrar y obtener asistencia de su producto 000090_14915_BELLA_Bread Maker_EN_IM.indd 1 2019-08-22 3:55 PM...
- Page 2 THANK YOU for your purchase REGISTER AND SIGN UP for special announcements trendy recipes! TELL US WHAT YOU THINK! Rate, review or ask us a question. bellahousewares.com GO TO : #myBELLAlife BellaLife BellaLifestyle 000090_14915_BELLA_Bread Maker_EN_IM.indd 2 2019-08-22 3:55 PM...
-
Page 3: Table Of Contents
Table of Contents Important Safeguards ..........................2 Additional Important Safeguards .......................3 Notes on the Plug ............................3 Notes on the Cord............................3 Plasticizer Warning ............................3 Electric Power..............................4 10 Minute Power Failure Backup ........................4 Getting to Know Your Bread Maker ......................4 Control Panel ..............................5 15 MENU Programs .......................... -
Page 4: Important Safeguards
IMPORTANT SAFEGUARDS When using electrical appliances, basic safety precautions should always be followed including the following: READ ALL INSTRUCTIONS. Do not touch hot surfaces; carry the unit by the housing. Always use oven mitts when handling hot material, and allow metal parts to cool before cleaning. -
Page 5: Additional Important Safeguards
ADDITIONAL IMPORTANT SAFEGUARDS CAUTION HOT SURFACES: This appliance generates heat and escaping steam during use. Proper precautions must be taken to prevent the risk of burns, fires, or other injury to persons or damage to property. CAUTION: During use, internal parts of the bread maker and the area around the steam vent are HOT. -
Page 6: Electric Power
Electric Power If the electrical circuit is overloaded with other appliances, your appliance may not operate properly. It should be operated on a separate electrical circuit from other appliances. 10 Minute Power Failure Backup In case of a power outage, the stage of bread-making Cycle is stored into memory. -
Page 7: Control Panel
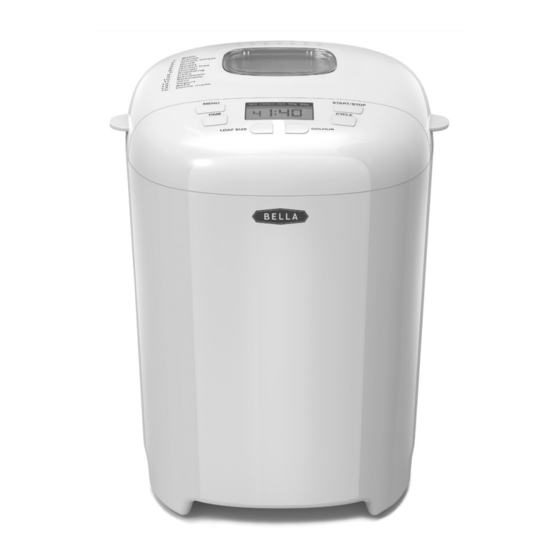
Control Panel Basic MENU START/STOP French light medium dark 1.5lbs 2lbs Whole wheat Quick Sweet TIME CYCLE Gluten free Dough Kneading Cake LOAF SIZE COLOR Sandwich Specialty Yogurt Bake Home made 1. LCD Display: Displays active Program, active Cycle, crust COLOR and LOAF size. Also view Delay Start Time. -
Page 8: Program Cycles
7. DOUGH: This Program is ideal for pizza dough and allows for the preparation of artisan doughs. It mixes ingredients, Kneads and takes the dough through the 2 Rise Cycles. Use almost any dough recipe (except gluten-free). Remove dough and use for making braided breads, rolls, pizza, etc. 8. -
Page 9: Program/Cycle Time Chart
Program/Cycle Time Chart TOTAL KNEAD RISE KNEAD RISE RISE KEEP DELAY LOAF BAKE PROGRAM TIME WARM TIMER SIZE (min) (hours) (min) (min) (min) (min) (min) (min) (hours) 1. BASIC 1.5 LB 2:53 13:00 2.0 LB 3:00 2. FRENCH 1.5 LB 3:40 13:00 2.0 LB... -
Page 10: Operating Instructions
Operating Instructions 1. Open the lid. Grasp the bread pan handle or and turn the pan Figure 2 counterclockwise. (See Figure 2.) 2. Attach the kneading paddle, insert onto the shaft with wide base facing down. (See Figure 3.) 3. Measure all ingredients and add to the bread pan. Always put liquids in first, dry ingredients next, and the yeast last. -
Page 11: Hints For Best Results
3. Press the TIME button to set the number of HOURS ahead that you want the loaf to finish. By pressing the TIME button you can set time for completion up to 13 hours later. Press to increase TIME in 10 minute increments or hold the TIME button to scroll faster. NOTE: TIME cannot be decreased once it is programmed. -
Page 12: Yeast / Yeast Conversion Chart
Yeast Yeast Conversion Chart 1 tsp. active dry yeast = .75 tsp. instant yeast 1.5 tsp. active dry yeast = 1 tsp. instant yeast 2 tsp. active dry yeast = 1.5 tsp. instant yeast 1. A 1/4 (.25) oz. package of yeast contains approximately 2.25 level teaspoons of yeast. 2. -
Page 13: Gluten-Free Ingredients
Sugar: DO NOT ADD MORE THAN LISTED IN THE RECIPE. Too much sugar will cause the yeast to over-react causing the loaf of bread to be small and dense. Dried fruits also contribute sugar to the bread dough. Honey may be substituted for sugar in equal proportions; reduce the liquid by the same amount. -
Page 14: Bread Baking In High Altitudes
Bread Baking in High Altitudes High elevations may make dough rise faster. We recommend that you first try the original recipe. The dough ball should be round, smooth-textured, soft and slightly tacky to the touch. If you find the results are unsuccessful, decrease yeast 1 teaspoon at a time. You may also have to increase the liquid because of the drier air;... -
Page 15: Trouble Shooting
TROUBLE SHOOTING Problem Solution When trying to make a second loaf of Allow at least 1 hour for the bread maker to cool down after baking. bread, bread maker MENU button will not register. Display window shows 0:00. After pressing START/STOP button, Temperature inside baking chamber is too hot. -
Page 16: Recipes
Recipes Water cups Conversion 1 1/2 Chart 1-7/16 1-1/3 1-1/4 1-1/8 Bread Mixes And Other Bread Maker Recipes Use mixes labeled for up to 2 pound loaves. For best results, use the BASIC program. For SWEET breads and CAKES that call for oil, place the oil in the bread pan first to aid in easy removal of the bread. - Page 17 Recipes Basic Measure all liquid ingredients and add to the bread pan. Next, measure and mix all dry ingredients and add on top of the wet ingredients. Do not stir. Lastly, add yeast. Yeast should never touch wet ingredients. (See Figure 4.). Close the lid and press BASIC button. 1.5 lb / 700g loaf 2 lb / 900g loaf Water 80°F/27°C...
- Page 18 Recipes Quick Measure all liquid ingredients and add to the bread pan. Next, measure and mix all dry ingredients and add on top of the wet ingredients. Do not stir. Lastly, add yeast. Yeast should never touch wet ingredients. (See Figure 4.). Close the lid and press QUICK button. 2 lb / 900g loaf Water 115°-125°F/45°-51°C 1 1/3 cups...
- Page 19 Recipes Dough Measure all liquid ingredients and add to the bread pan. Next, measure and mix all dry ingredients and add on top of the wet ingredients. Do not stir. Lastly, add yeast. Yeast should never touch wet ingredients. (See Figure 4.). Close the lid and press DOUGH button. 2 lbs / 900g Water 80°F/27°C 1 1/2 cups...
- Page 20 Recipes Sandwich Measure all liquid ingredients and add to the bread pan. Next, measure and mix all dry ingredients and add on top of the wet ingredients. Do not stir. Lastly, add yeast. Yeast should never touch wet ingredients. (See Figure 4.). Close the lid and press SANDWICH button. 1.5 lb / 700g loaf 2 lb / 900g loaf Water 80°F/27°C...
- Page 21 000090_14915_BELLA_Bread Maker_EN_IM.indd 19 2019-08-22 3:55 PM...
- Page 22 000090_14915_BELLA_Bread Maker_EN_IM.indd 20 2019-08-22 3:55 PM...
- Page 23 000090_14915_BELLA_Bread Maker_EN_IM.indd 21 2019-08-22 3:55 PM...
- Page 24 Dudas o comentarios contactar el departamento de servicio al cliente 1-866-832-4843 / help@bellahousewares.com BELLA is a registered trademark of Sensio Inc., Montréal, Canada H3C 4S9. All rights reserved. BELLA es una marca registrada de Sensio Inc., Montréal, Canada H3C 4S9.
Need help?
Do you have a question about the 14915 and is the answer not in the manual?
Questions and answers