Table of Contents
Advertisement
Quick Links
Advertisement
Table of Contents

Subscribe to Our Youtube Channel
Related Manuals for hadewe Hyperios4 CHROME

Summary of Contents for hadewe Hyperios4 CHROME
- Page 1 Manual Hyperios CHROME Art. No 0584 FB 04-293 Rev. 0 Date: 26.01.2018...
-
Page 2: Table Of Contents
Directory Foreword Safety instructions Cleaning and disinfection Getting to know the unit Before Use Area of application Operation Application Operation steps Work positioning Infilling the spray liquid Insert the bur Adjusting the speed Memory buttons m1, m2 Spray Drying / changing tool Foot switch Maintenance &... -
Page 3: Foreword
Foreword The Hyperios CHROME foot care unit was produced according to strict quality criteria and uses the latest technology in its design. The images in this manual may vary slight- ly from the product you have bought as we are constantly developing our products. This user manual includes a detailed description and explanation of how to use the Hyperios CHROME unit. -
Page 4: Safety Instructions
Safety Instructions The equipment should only be used by trained operators, who know the function of the unit well. The installation of the working area has to correspond to the relevant regulations. Set up the unit in such a way, that the louvers are not covered and the extracted air can escape well. - Page 5 Only use distilled water plus a sterilizing additive, e.g. hadewe AquaHy (art. no. 8555). If you use other brands, pay attention to their manuals if you can use them for this purpose.
- Page 6 Safety Instructions Before using the equipment, assure that: • the tool can be pushed far enough into the chuck (Test this with a dipstick and clean if necessary.) • the inserted tool will not can while clamping it • the tool stuck properly in the chuck the tool is approved for using it at the max.
-
Page 7: Cleaning And Disinfection
Safety Instructions Cleaning and disinfection The device is designed to be compatible with rotating instruments which do not penetrate the skin or mucosal or inadvertently may still cause injuries. For this application please adhere to the cleaning and disinfection instructions provided below. After every treatment please carry out these steps: •... -
Page 8: Getting To Know The Unit
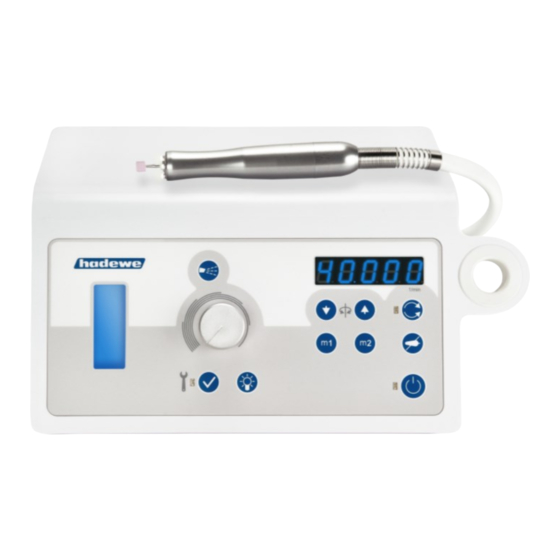
Getting to know the unit Gerät kennen lernen 10 11 12 13 1 spray regulator knob 2 turn OFF / ON spray 3 speed down 4 speed up 5 pilot lamp: shines during anticlockwise operation 6 changeover switch for clockwise or anticlockwise operation 7 turn off hand piece &... -
Page 9: Before Use
Before Use Please read through the instructions Operation carefully before using the unit and The working area must conform to carefully note the safety advice. the conditions described. Set up the Always keep this manual accessible unit in such a way, that the air slits to any users of the drill. - Page 10 Before Use If you have a foot switch, insert its plug into the port on the right of the device which displays this symbol Make sure, that the tank is filled with spray liquid. Ensure that the tool is fixed. On the back of the device you will find the main power switch.
-
Page 11: Application
Application Operation steps If you want to take a break or finish the job, press the standby button In the following section the order in (14). The hand piece motor and which you should use the device is spray will turn off. The hand piece described. -
Page 12: Work Positioning
Application Work positioning The following images are examples of how to work on various parts of the foot. Always make sure that the foot is firmly gripped and that you can work freely and without strain. -
Page 13: Infilling The Spray Liquid
Application Infilling the spray liquid Switch off the device. Pull out the spray tank on its handle. Hold the cover of the tank in hand and un- screw the tank. Now fill it with dis- tilled water and anti-germ liquid, e.g. -
Page 14: Insert The Bur
Application Insert the bur the requested spray stream while turning knob (1). Insert the bur until it stops. The hand piece is equipped with a When turning off the unit or the chuck which can hold all burs with a spray function, the spray liquid is diameter of 2.35 mm (confirm to pumped back completely into the... -
Page 15: Foot Switch
Application Foot switch Commencement of foot switch Only use the original hadewe foot switch (art. no. 0970) to avoid dam- ages. Insert the plug of the foot switch into the socket with this symbol Function of the foot switch Press foot switch long time:... -
Page 16: Maintenance & Care
Maintenance & Care Washer The top of the hand piece is equipped with a white washer (art. no. 4571). This washer has to be replaced by a new one every 50 operation hours, unless exchang- ing it, water could enter the hand piece and cause of damages of the internal parts. -
Page 17: Cleaning Function
Maintenance & Care Cleaning function Cleaning the chuck Use the cleaning function if the Cleaning the chuck is not intended nozzle is blocked. Turn the unit off for Hyperios CHROME. using button 14 (Standby). Remove the water filter at first. (For its in- Maintenance overview structions see paragraph above.) Fill the tank with distilled water. -
Page 18: Handling Instructions
A damage of the ball bearings, clamping tech- materials used nique or motor could be the conse- hadewe prevent a formation quence. of rust. In cases in which a rust infestation was found within the Working with high pressure... -
Page 19: Troubleshooting
Let cool down the unit for a bur/tool itself can be tested with the while. hadewe Bur Shaft Tester (art. no. 4990) to see if it is bent. The unit shows different sound levels at different sites of use. -
Page 20: Technical Details
Rated current: 0,5A fuse primary: 93/42/EEC Medical Device Directive F1/F2: 500 mA delay action fuse fuse Sec. Thermo fuse hadewe GmbH – Grambartstraße 10 – Protection class I 30165 Hannover – Germany Accuracy of speed display: ±10% Hand piece: Type B applied part... - Page 21 & spray / taken to public disposal plants turn on airflow (WEEE Reg. No. DE20392713, b2b device). For disposal of this unit out of Germany, please contact the site light ON / OFF where you bought this hadewe product. rotation...
- Page 22 Technical Details Compulsory registration 62353 (VDE 0751-1) are conducted among others: Operators, distributors and retailers Optical control, unit discharge cur- who were informed about the occur- rent < 1000 µA, discharge current at rences regarding §29 of the Medical applied part < 1000 µA. Devices law must report this.
-
Page 23: Emc
Guidance and Manufacturer's Declaration – Electromagnetic Emissions The device is suitable for use in the specified electromagnetic environment. The customer and/or the user of the pa-on should assure that it is used in an electromagnetic environment as described below: Emissions Test Compliance Electromagnetic Environ- ment –... - Page 24 Guidance and Manufacturer's Declaration – Electromagnetic Immunity IEC 60601-1-2 The device is suitable for use in the specified electromagnetic environment. The customer and/or the user of the device should assure that it is used in an electromagnetic environment as described below: Immunity IEC 60601 Test Compliance Level...
- Page 25 Guidance and Manufacturer's Declaration – Electromagnetic Immunity IEC 60601-1-2 The device is suitable for use in the specified electromagnetic environment. The customer and/or the user of the device should assure that it is used in an electromagnetic environment as described below: Immunity Test IEC 60601 Test Level Compliance...
- Page 26 a) Field strengths from fixed transmitters, such as base stations for radio (cellular/cordless) telephones and land mobile radios, amateur radio, AM and FM radio broadcast, and TV broad- cast cannot be predicted theoretically with accuracy. To assess the electromagnetic environ- ment due to fixed RF transmitters, an electromagnetic site survey should be considered.
- Page 28 GmbH Grambartstraße 10 30165 Hannover Germany info@hadewe.de www.hadewe.de...
Need help?
Do you have a question about the Hyperios4 CHROME and is the answer not in the manual?
Questions and answers