Advertisement
Quick Links
DOCUMENT TYPE = FITTING INSTRUCTIONS
80kg
About this document
This document addresses qualified personnel only. The mounting must be done by technically educated,
trained and qualified personnel. Electrical wirings have to be completed by suitably qualified specialists.
These instructions describe how to install the track & sliding door gear – for operation of the drive motor & Wiring detail
for the addition of switches & or sensors please refer the Evolve Motor and Wiring Fitting Instructions supplied
The manufacturer's specifications must be respected, in especially maximum weight restriction of the door leaf. Any
other use of this product is considered inappropriate use.
It is not guaranteed that this product will work in combination with fittings, motors or other electronic devices
supplied by other manufactures.
The appliance is only to be used with the power supply unit provided.
Before you commence work, please read through these instructions. Please store these instructions in a safe place
and pass them on to any future owners. Damage resulting from non – compliance with these instructions and safety
instructions will void the warranty. PC Henderson nor the motor unit manufacturer will assume liability for any
consequential damage.
Fixings required (Not supplied by PCH)
We recommend that suitable wall fixings and screws with a Safe Working Load of at least 80kg are used.
Contents of Kit
Maximum door weight = 40kg per leaf – total system 80kg
Maximum door width 2 x 2mtr Track = 760 - 1058mm (Up to 2035 mm clear opening)
Evolve – Glass SIM Kit
ORIGINAL LANGUAGE = ENGLISH
Advertisement

Subscribe to Our Youtube Channel
Related Manuals for Henderson Evolve Glass SIM Kit


Summary of Contents for Henderson Evolve Glass SIM Kit
- Page 1 Before you commence work, please read through these instructions. Please store these instructions in a safe place and pass them on to any future owners. Damage resulting from non – compliance with these instructions and safety instructions will void the warranty. PC Henderson nor the motor unit manufacturer will assume liability for any consequential damage.
- Page 2 Tools required Electricians Posi Head 3, 4 & 5mm Allen Electric Drill & Tape Measure Screwdriver Screwdriver keys twist drill Scissors Spirit Level 3, 10 & 13mm Torque Wrench Spanner and 6mm bit Installations – End elevations...
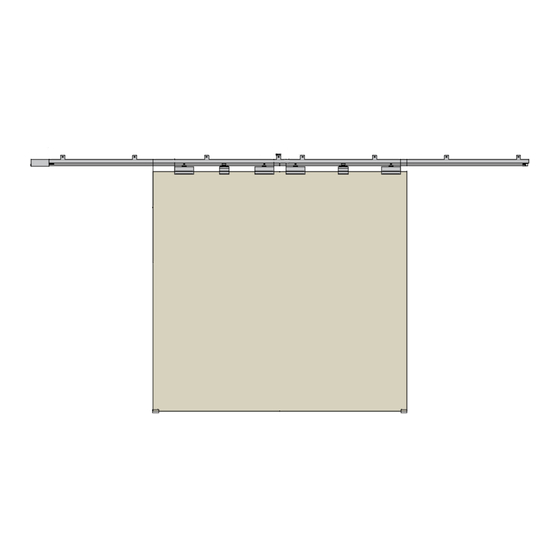
- Page 3 Installation - System layout CLOSED POSITION...
- Page 4 Quick overview – Wiring wall mounted socket For detailed operation and programming instructions please consult the separate Evolve Motor and Wiring Fitting Instructions supplied...
- Page 5 Fused Spur (Not PCH) Motor Unit 24V Transformer Transformer input Remote sensor or additional switch input Wall mounted control device inputs...
- Page 6 Quick overview – Wiring wall mounted socket For detailed operation and programming instructions please consult the Evolve Motor and Wiring Fitting Instructions supplied Initial Configuration The configuration is set via the potentiometer P1, the DIP switch and the reset button. The function of these elements is described in the following section.
- Page 7 Quick overview – Wiring wall mounted socket For detailed operation and programming instructions please consult the separate Evolve Motor and Wiring Fitting Instructions supplied Operation mode semi- automatic / automatic When semi-automatic mode is set the drive will not close automatically. The potentiometer is without function. When the automatic mode is set the drive closes automatically.
- Page 8 1. Secure motor unit to track by inserting block into track and tightening bolts to clamp over bottom of track Track Connector Block Connector block Track Spacer Motor...
- Page 9 2. Door and hardware preparation (overview) M6x25 Bolts 180mm Offset to accommodate door under motor unit 3. Attach glass clamps (Panel positioned under motor highlighted)
- Page 10 a. Position first half of glass clamp b. Locate second half of glass clamp over knee of first c. Secure glass clamp with screws 4. Attach belt clamp location clamp centrally (ensure correct belt clamp orientation see panel 2) a. Position first half of glass clamp b.
- Page 11 5. Secure track in face fixing installation – 6. Secure track soffit fix installation – spacing spacing between brackets is 600mm MAX between brackets is 600mm MAX (Use suitable wall anchors – NOT PCH) (Use suitable wall anchors – NOT PCH) 1/SS bracket Fit suitable wall anchors 7.
- Page 12 Tension wheel arrangement in track 8. Remove covers to allow toothed belt to be attached Toothed belt...
- Page 13 9. Hang glass door 10. Set door height...
- Page 14 11. Loosen belt clamp – Cut belt to length – Tighten to secure belt Tighten to clamp belt 12. Tension toothed belt – Push tension wheel assembly so that the belt is torte and secure assembly in position by tightening the M6 grub screw...
- Page 15 Tighten once position 13. Fit Door Guide using spirit level Adjust door stop if required before fixing to ensure door is vertical 14. Set track stops to limit travel...
- Page 16 The original language of these instructions are English. Disclaimer The airborne noise of the system under normal operating conditions PC Henderson nor the motor unit manufacturer take responsibility for does not exceed 70dB (A). failure to use Good Working Methods in building the frames to be motorized or for any deformation occurring during use.
- Page 17 19/10/17 Operating Instructions for Evolve Autom Manufacturers Declaration of Incorporation Manufacturer: PC Henderson Ltd Release Operat Durham road In the event of malfunction or these is no mains Bowburn General Safety Prec Durham The following precautions are an integral & essential part of the product...
- Page 19 EC Declaration of Conformity – Machinery Directive 200642/CE Schedule II Part 2 Manufacturer: PC Henderson Ltd Address: Durham Road, Bowburn, Durham, DH6 5EN Name and address of authorized Installer: Hereby Declare: Evolve – 80kg Evolve – SIM Kit Evolve - Glass...
- Page 20 Must be kept for ten years from installation date.
- Page 21 Markings Each installation must clearly show the identification details of the motorized door or gate. The installer should apply hazard area notices required by applicable regulations, such as that shown below. The installer must affix and complete the data tag supplied to the final installation in a suitable prominent position...
- Page 22 Maintenance schedule Turn off the power Clean the moving parts Check the belt tension Clean the sensors / remote fob (where applicable) Check the stability of the automatic system and make sure that all screws/ connections are correctly tightened. Check the alignment of the doors and the stop positions Turn on the power Check the stability of the door and that the movement is regular without friction Check that all command functions are operating correctly...
- Page 23 *= Or sooner dependent upon operating conditions. # = Replacement only recommended when apparent excessive wear affects the performance of the installation...
-
Page 24: Fitting Instructions
Motor/ Drive Unit: Switch: Remote fob: Motion detector: Sign off Check Sheet: Henderson & the motor unit manufacturer Declaration of conformity filled out Proof book filled out Fitting instructions All documents left with end user CE Label completed & installed in suitable location... - Page 25 Proof book Description of the work Installation Details: Start Up Adjustments Maintenance Repairs Alterations Installation Details: Start Up Adjustments Maintenance Repairs Alterations Installation Details: Start Up Adjustments Maintenance Repairs Alterations Installation Details: Start Up Adjustments Maintenance Repairs Alterations Installation Details: Start Up Adjustments Maintenance...
Need help?
Do you have a question about the Evolve Glass SIM Kit and is the answer not in the manual?
Questions and answers