Table of Contents
Advertisement
Available languages
Available languages
Quick Links
USE AND CARE GUIDE AND
INSTALLATION INSTRUCTIONS
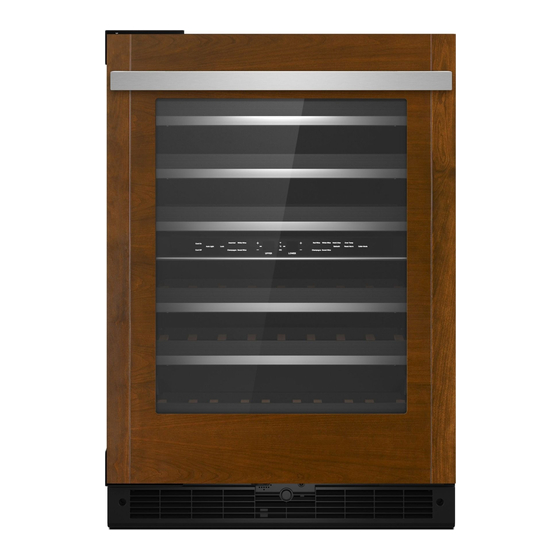
UNDER COUNTER WINE CELLAR
For questions about features, operation/performance, parts, accessories, or service, call:
1-800-JENNAIR (1-800-536-6247) or visit our website at www.jennair.com.
In Canada, call: 1-800-JENNAIR (1-800-536-6247), or visit our website at www.jennair.ca.
W11324867A
Advertisement
Chapters
Table of Contents

Subscribe to Our Youtube Channel
Related Manuals for Jenn-Air JUWFL242HX


Summary of Contents for Jenn-Air JUWFL242HX
- Page 1 USE AND CARE GUIDE AND INSTALLATION INSTRUCTIONS UNDER COUNTER WINE CELLAR For questions about features, operation/performance, parts, accessories, or service, call: 1-800-JENNAIR (1-800-536-6247) or visit our website at www.jennair.com. In Canada, call: 1-800-JENNAIR (1-800-536-6247), or visit our website at www.jennair.ca. W11324867A...
-
Page 2: Table Of Contents
TABLE OF CONTENTS INTRODUCTION Safety ........................3 Proper Disposal of Your Old Wine Cellar ........4 Features ......................4 INSTALLATION REQUIREMENTS Tools and Parts ....................5 Location Requirements ................5 Product Dimensions ..................6 Custom Overlay Panel ................6 Handle (Optional)..................7 Electrical Requirements ................8 INSTALLATION INSTRUCTIONS Unpack the Wine Cellar ................8 Custom Overlay Panel Installation ...........9 Installation and Door Closing ..............10 USING WINE CELLAR... -
Page 3: Introduction
INTRODUCTION SAFETY Your safety and the safety of others are very important. We have provided many important safety messages in this manual and on your appliance. Always read and obey all safety messages. This is the safety alert symbol. This symbol alerts you to potential hazards that can kill or hurt you and others. All safety messages will follow the safety alert symbol and either the word “DANGER”... -
Page 4: Proper Disposal Of Your Old Wine Cellar
PROPER DISPOSAL OF YOUR Stealth Flush Design with OLD WINE CELLAR Smooth Close Door Create an unbroken silhouette. Discreet 1/8" reveals WARNING envelop every side, without exposed hinges or trim pieces. Quiet, soft, secure. An articulating hinge discreetly ushers the door open and gently pulls it Suffocation Hazard closed. -
Page 5: Installation Requirements
Hushed Acoustics Emotive Controls Our internal compressor keeps your beverages Hold sway over every zone. Let your light-guided impeccably chilled, while running unobtrusively in touch coax out the distinct flavors and aroma of every the background. Brilliance doesn’t have to announce bottle. -
Page 6: Product Dimensions
PRODUCT DIMENSIONS SOLID DOOR OVERLAY PANEL — PREPARATION Create the custom overlay panel using the dimensions OVERALL PRODUCT shown in the illustration "Solid door overlay panel and Width (up to hinge cover) 237/8" (60.72 cm) hinge routing dimensions". Route shaded areas to a 1/2" (12 mm) depth as shown. -
Page 7: Handle (Optional)
HANDLE (OPTIONAL) GLASS DOOR OVERLAY PANEL — PREPARATION Create the custom overlay panel using the dimensions Custom handles are typically attached to the custom shown in the illustration " Glass door overlay panel and overlay door panel only. hinge routing dimensions". Route shaded areas to a 1/2" Refer instructions received with JennAir RISE ®... -
Page 8: Electrical Requirements
ELECTRICAL REQUIREMENTS Before you move your wine cellar into its final location, it is important to make sure you have the proper electrical connection. WARNING RECOMMENDED GROUNDING METHOD A 115 V, 60 Hz, AC only, 15 or 20 A fused, grounded electrical supply is required. -
Page 9: Custom Overlay Panel Installation
CUSTOM OVERLAY PANEL INSTALLATION Using two people, hold the custom overlay panel against the door. Be sure that the top and bottom IMPORTANT: hinges fit accurately into the routing on back of the custom wood panel. Create custom overlay panel according to the specifications in the “Custom Overlay Panel”... -
Page 10: Installation And Door Closing
INSTALLATION AND DOOR CLOSING Move the wine cellar into its final location. Turn the leveling legs to the right to lower the wine Your wine cellar has four leveling legs. If your wine cellar cellar, or turn the leveling legs to the left to raise it. It seems unsteady or you want the door to close more may take several turns of the leveling legs to adjust easily, adjust the wine cellar’s tilt using the instructions... -
Page 11: Using Wine Cellar
USING WINE CELLAR CONTROLS NOTE: Using Presets When the wine cellar is turned On for the first time, For your convenience, your wine cellar also has the temperature defaults to the recommended controls that are preset to recommended storage setting. -
Page 12: Normal Sounds
NORMAL SOUNDS Over Temp Alarm Helps avoid wine from spoiling by giving an audible Your new wine cellar may make sounds that your old and visual alert if the temperature in either zone rises one didn’t make. Because the sounds are new to you, above the preset range for 10 minutes. -
Page 13: Stocking The Wine Cellar
STOCKING THE WINE CELLAR TO STOCK THE WINE CELLAR - RACK 6 NOTE: For optimum wine storage, place white wines at Starting from left-hand side of the bottom rack, place the top of the wine cellar, light red wines in the center the first bottle with the neck of the bottle facing the and champagne/larger diameter wine bottles at the front of the wine cellar. -
Page 14: Care And Cleaning
CARE AND CLEANING Clean the condenser coils regularly. They are located CLEANING behind the base grille. Coils may need to be cleaned as often as every other month. This may help save WARNING energy. Remove the base grille to access condenser for cleaning. -
Page 15: Troubleshooting
TROUBLESHOOTING Try the solutions suggested here first in order to avoid the cost of an unnecessary service call. Is the control set correctly for the surrounding OPERATION conditions? Refer “Controls” section. Is the base grille blocked? For best performance, do WARNING not install the wine cellar behind a cabinet door or block the base grille. -
Page 16: Assistance
ASSISTANCE IF YOU NEED SERVICE IN CANADA Before calling for assistance or service, please check Call the JennAir Canada Customer eXperience Centre toll “Troubleshooting.” It may save you the cost of a service free: 1-800-JENNAIR (1-800-536-6247). call. If you still need help, follow the instructions below. OUR CONSULTANTS PROVIDE ASSISTANCE WITH: When calling, please know the purchase date and the Features and specifications on our full line of... -
Page 17: Warranty
ATTACH YOUR RECEIPT HERE. PROOF OF PURCHASE IS REQUIRED TO OBTAIN WARRANTY SERVICE. JENNAIR ® Please have the following information available when you call the Customer eXperience Center: REFRIGERATION Name, address, and telephone number LIMITED WARRANTY Model number and serial number A clear, detailed description of the problem Proof of purchase including dealer or retailer name and address IF YOU NEED SERVICE:... - Page 18 DISCLAIMER OF IMPLIED WARRANTIES IMPLIED WARRANTIES, INCLUDING ANY IMPLIED WARRANTY OF MERCHANTABILITY OR IMPLIED WARRANTY OF FITNESS FOR A PARTICULAR PURPOSE, ARE LIMITED TO ONE YEAR OR THE SHORTEST PERIOD ALLOWED BY LAW. Some states and provinces do not allow limitations on the duration of implied warranties of merchantability or fitness, so this limitation may not apply to you.
- Page 19 GUIDE D’UTILISATION ET D’ENTRETIEN ET INSTRUCTIONS D’INSTALLATION CAVE À VIN SOUS COMPTOIR Pour des questions à propos des caractéristiques, du fonctionnement/rendement, des pièces, accessoires ou service, composer le 1 800 JENNAIR (1 800 536-6247) ou visiter notre site Web au www.jennair.com. Au Canada, composer le 1 800 JENNAIR (1 800 536-6247) ou visiter notre site Web au www.jennair.ca.
- Page 20 TABLE DES MATIÈRES INTRODUCTION Sécurité .......................21 Mise au rebut de votre vieille cave à vin ........22 Caractéristiques ....................22 EXIGENCES D’INSTALLATION Outils et Pièces ....................23 Exigences d’emplacement ..............23 Dimensions du Produit ................24 Panneau Décoratif Personnalisé ............24 Poignées (Facultatif) ..................25 Spécifications électriques ..............25 INSTRUCTIONS D’INSTALLATION Déballage de la cave à...
-
Page 21: Introduction
INTRODUCTION SÉCURITÉ Votre sécurité et celle des autres est très importante. Nous donnons de nombreux messages de sécurité importants dans ce manuel et sur votre appareil ménager. Assurez-vous de toujours lire tous les messages de sécurité et de vous y conformer. Voici le symbole d’alerte de sécurité. -
Page 22: Mise Au Rebut De Votre Vieille Cave À Vin
MISE AU REBUT DE VOTRE VIEILLE Conception encastrée discrète avec CAVE À VIN porte à fermeture douce Créer une silhouette ininterrompue. Enveloppe AVERTISSEMENT discrète de 1/8 po sur chaque côté, sans charnières ni garnitures exposées. Porte à fermeture silencieuse, douce, sécurisée. Une charnière articulée ouvre Risque de suffoquer discrètement la porte et la ferme doucement. -
Page 23: Exigences D'installation
Acoustique silencieuse Contrôles émotifs Notre compresseur interne garde vos boissons Laissez votre regard vaciller sur chaque zone. Laissez impeccablement fraîches tout en fonctionnant votre touche guidée par la lumière dégager les discrètement à l’arrière-plan. Le génie n’a pas à saveurs et les arômes distincts de chaque bouteille. s’annoncer. -
Page 24: Dimensions Du Produit
DIMENSIONS DU PRODUIT IMPORTANT : L’épaisseur du panneau décoratif doit être de 3/4 po PRODUIT ENTIER (19 mm). Largeur (jusqu’au cache-charnière) 23 7/8 po (60,72 cm) Le poids du panneau décoratif plein personnalisé ne doit pas dépasser 20 lb (9,07 kg). Hauteur (jusqu’au cache-charnière) 34 3/8 po (87,32 cm) Le poids du panneau décoratif en verre personnalisé... -
Page 25: Poignées (Facultatif)
PANNEAU DÉCORATIF EN VERRE PERSONNALISÉ – POIGNÉE (FACULTATIF) PRÉPARATION Des poignées personnalisées sont habituellement fixées seulement sur le panneau de porte personnalisé. Fabriquer le panneau décoratif personnalisé en utilisant les dimensions indiquées dans l’illustration dimensions Consulter les instructions reçues avec la trousse de du panneau décoratif en verre personnalisé... -
Page 26: Instructions D'installation
INSTRUCTIONS D’INSTALLATION Retirer le joint d’étanchéité des coins de la porte en DÉBALLAGE DE LA CAVE À VIN tirant doucement jusqu’à ce que les deux trous vis AVERTISSEMENT dans chaque coin de la porte soient visibles. REMARQUE : Le joint d’étanchéité n’a pas besoin d’être enlevé... -
Page 27: Installation Et Fermeture De La Porte
Appuyer fermement sur le joint pour le remettre à sa place. Déplacement de votre cave à vin : Votre cave à vin est lourd. Lors du déplacement de la cave à vin pour le nettoyage ou un entretien ou réparation, veiller à recouvrir le plancher avec du carton ou un panneau de fibre dur pour éviter qu'il ne subisse tout dommage. -
Page 28: Utilisation De La Cave À Vin
UTILISATION DE LA CAVE À VIN COMMANDES REMARQUE : Utilisation des préréglages Lorsque l’on met en marche la cave à vin pour la Pour votre commodité, la cave à vin est également première fois, la température est réglée par défaut sur équipée de commandes préréglées à... -
Page 29: Sons Normaux
SONS NORMAUX Appuyer sur SABBATH (Sabbat) pendant 3 secondes pour activer la caractéristique. Il est possible que la cave à vin neuve émette des sons Après le compte à rebours de 3 secondes, que l’appareil précédent ne produisait pas. Comme ces la caractéristique s’active et tous les autres sons sont nouveaux, ils peuvent vous inquiéter. -
Page 30: Stockage Dans La Cave À Vin
STOCKAGE DANS LA CAVE À VIN Insérer le porte-bouteilles inférieur (le faire glisser) et tirer le porte-bouteilles suivant (4) vers l’extérieur. REMARQUE : Pour une conservation optimale du vin, Continuer à insérer les porte-bouteilles suivants un placer les vins blancs dans la partie supérieure de la cave à à un tel que décrit dans les étapes ci-dessus. -
Page 31: Entretien Et Nettoyage
ENTRETIEN ET NETTOYAGE IMPORTANT : NETTOYAGE Ce nettoyant doit être utilisé sur les pièces en AVERTISSEMENT acier inoxydable uniquement! Veiller à ce que le nettoyant et poli pour acier inoxydable n’entre pas en contact avec les pièces de plastique comme les garnitures, couvercles de distributeurs ou joints de porte. -
Page 32: Entretien Avant Les Vacances
ENTRETIEN AVANT LES VACANCES PRÉCAUTIONS À PRENDRE AVANT UN DÉMÉNAGEMENT Si vous choisissez d’arrêter la cave à vin avant votre absence, suivez ces étapes. En cas de déplacement de la cave à vin dans une nouvelle habitation, suivre ces étapes pour préparer Retirer toutes les bouteilles de la cave à... -
Page 33: Porte
Le réglage est-il correct pour les conditions PORTE existantes? Se reporter à la section “Commandes”. LA PORTE EST DIFFICILE À OUVRIR La grille de la base est-elle obstruée? Pour le meilleur rendement, ne pas installer la cave à vin AVERTISSEMENT derrière une porte d’armoire ni obstruer la grille de la base. -
Page 34: Assistance
ASSISTANCE SI VOUS AVEZ BESOIN DE SERVICE AU CANADA Avant de faire un appel pour assistance ou dépannage, Appelez sans frais le Centre pour l’eXpérience de la vérifiez la section “Dépannage”. Cette vérification peut clientèle canadienne de JennAir au : 1 800 JENNAIR vous faire économiser le coût d’une intervention de (1 800 536-6247). -
Page 35: Garantie
ATTACHEZ ICI VOTRE REÇU DE VENTE. UNE PREUVE D’ACHAT EST OBLIGATOIRE GARANTIE LIMITÉE POUR OBTENIR L'APPLICATION DE LA GARANTIE. Lorsque vous appelez le centre d'eXpérience de la clientèle, veuillez garder à DES APPAREILS DE disposition les renseignements suivants : Nom, adresse et numéro de téléphone RÉFRIGÉRATION Numéros de modèle et de série JENNAIR... - Page 36 CLAUSE D'EXONÉRATION DE RESPONSABILITÉ AU TITRE DES GARANTIES IMPLICITES LES GARANTIES IMPLICITES, Y COMPRIS LES GARANTIES APPLICABLES DE QUALITÉ MARCHANDE OU D'APTITUDE À UN USAGE PARTICULIER, SONT LIMITÉES À UN AN OU À LA PLUS COURTE PÉRIODE AUTORISÉE PAR LA LOI. Certains États et provinces ne permettent pas de limitation sur la durée des garanties implicites de qualité...
- Page 37 NOTES:...
- Page 38 NOTES:...
- Page 39 NOTES:...
- Page 40 /™ ©2019 JennAir. All rights reserved. Used under license in Canada. ® W11324867B 03/19 Tous droits réservés. Utilisé sous licence au Canada.
Need help?
Do you have a question about the JUWFL242HX and is the answer not in the manual?
Questions and answers