Table of Contents
Advertisement
Quick Links
Advertisement
Table of Contents

Related Manuals for ddrum BETA XP2


Summary of Contents for ddrum BETA XP2
- Page 1 BETA XP2 ELECTRONIC DRUM SET U S E R M A N U A L...
- Page 3 Operation Warning Warning & Caution Signs This sign indicates the risk of serious physical injury or even death. Please operate the machine according to WARNING instructions. This sign indicates the risk of serious physical injury and even death. Please operate the machine according to instructions.
- Page 4 WARNING WARNING Please only use the adapter that is in- Please read the following instructions cluded with the unit. Make sure that before operation. the voltage of the socket matches the voltage indicated on the unit. Do not open or in any way modify the machine or adapter.
- Page 5 WARNING CAUTION Always place the module and the If there are children in the household, adaptor in areas with good airflow. the adults should follow the safety precautions explained in the manual. When inserting or removing the power cable into/from the socket or the machine, always grab the plug instead of the cable.
-
Page 6: Power Supply
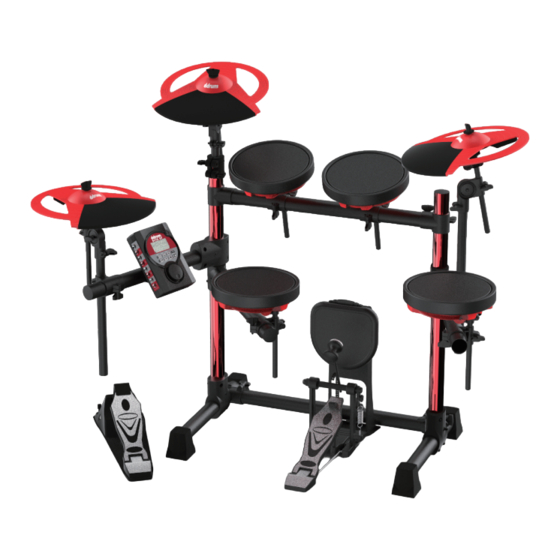
Precautions Please read the following precautions aside from the safety in- structions Power Supply Additional Precautions • Do not share the power supply with other • During operation, please handle with care to electronics that can produce cable statics, for prevent any damage. - Page 7 Accessories Sound Module Snare Pad Tom Pad Cymbal Hi-hat Kick Pedal Bass Drum& (1/4” jack) (3.5mm jack) Controller Double Slip Resistant Tape Connectors Accessories drum throne User Cable Tie Drum Stick Drum Key Headphones Velcro Adjustable Bar Manual (1 set) Connectors Parts Ø3.81 - Ø2.22...
- Page 8 Support Stand Ø3.81cm ×1 ×1 ×1 (Red) ×1 × × 1 (Red) ×1 ×1 ×1 ×1 Ø2.22cm ×3 Ø1.27cm ×4 Step 1 ×1 ×1 ×1 (Red) ×1 × × 1 (Red) ×1 ×1 ×1 ×1...
- Page 9 Step 1...
- Page 10 Step 2 Ø2.22cm ×3 Ø1.27cm ×4...
- Page 11 Step 3 13 15 12 14 A t t e n tio n : W h e n a s se m b l i n g th i s c o n n e c t o r , t i gh t en e a ch o f th e b o l t s i n a s q u a r e pat t e r n .
- Page 12 Step 4 Convex Depression Below are examples of wrong assembly.
- Page 13 SNARE 1/4" jack Convex Groove Match the convex side of pad with the groove side of connector .
- Page 14 Step 5 NOTE Loosen or tighten the nut to adjust cymbal. loosen tighten loosen loosen tighten...
- Page 15 Bass Drum The slip resistant tape compensate for varying kick pedal heights.
- Page 16 Mounting on the stand Position the sound module onto the bar and bring the U-Shape plate upwards around the bar. Secure the U-Shape plate to the back of the sound module with the screws provided. Remove the protective film from the display screen.
- Page 17 Controller Velcro (no provide) choke ① HI-HAT ④ CYMBAL 1 ⑦ CYMBAL 2...
- Page 18 Sound Cable Black ② SNARE 1/4" jack ③ TOM1 ⑧ TOM2 ⑨ TOM3 Black Black ① HI-HAT Connect the sound cables ④ CYMBAL 1 to the drum pads, pedals ⑦ CYMBAL 2 and sound module. Stereo cable (two black lines) ⑤...
- Page 19 ① ② ⑦ ③ ⑧ ④ ⑨ ⑤ ⑩ ① Hi-Hat ② Snare ⑦ Cymbal 2 ③ Tom 1 ⑧ Tom 2 ④ Cymbal 1 ⑨ Tom 3 ⑤ Hi-Hat Controller ⑩ Bass Drum ⑥ Bass Drum Controller (optional, controller only) ④...
- Page 20 Cable Tie Lead the cable along the mounting rack and stabilize it with the included cable tie.
- Page 21 ① Hi-Hat 2-zone ② Snare 1-zone+choke ④ Cymbal 1 ⑦ Cymbal 2 Head Rim Shot *Some snare sound are not supported. ⑤ Hi-Hat Controller Continuous Type More realistic Hi-Hat effects transition between open and closed, such as full open, half open, full closed, foot splash. Half open tone transition Full open Full close...
- Page 22 Step 10 1. Loosen the bolt and nut. 2. Adjust the pipe to the desired height 3. Tighten the bolt and nut to stabilize the throne.
- Page 24 For more information please visit our website www.ddrum.com...
Need help?
Do you have a question about the BETA XP2 and is the answer not in the manual?
Questions and answers