Table of Contents
Advertisement
Advertisement
Table of Contents

Related Manuals for ddrum DD3X


Summary of Contents for ddrum DD3X
- Page 1 DD3X OWNER’S MANUAL V1.0...
-
Page 2: Table Of Contents
Contents Panel & display Description …………………………………………………………1 Front Panel and buttons ………………………………………………………………..1 Rear Panel ………………………………………………………………………………….2 Side Jack …………………………………………………………………………………...2 Main Display Page …………………………………………………………………………2 Quick Start Connections Connecting Pads and Pedals ……………………………………………………………….3 Connecting a Headphone …………………………………………………………………..3 Connecting an Amplifier …………………………………………………………………...3 Connecting MIDI Equipment ………………………………………………………………4 Connecting to a Media Player ……………………………………………………………...4 Power Supply ………………………………………………………………………………4 Performing... -
Page 3: Panel & Display Description
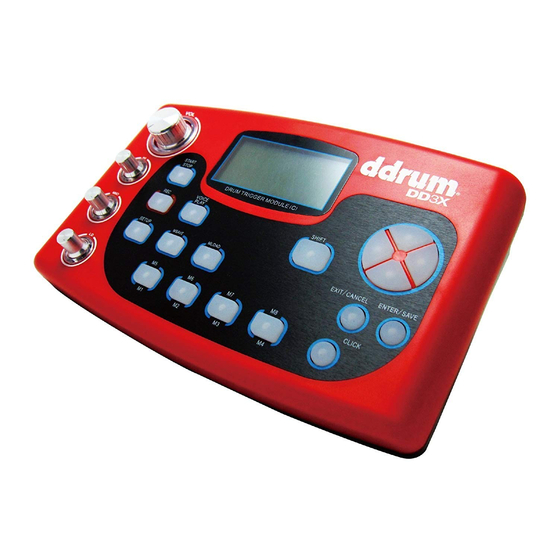
Panel & display Description Front Panel and Buttons Volume Knob This button is for quick adjustment of ● This knob is used to adjust the volume of the parameter value. (After pressing the shift unit. button the LED will light up, and the value Equalizer Knob can be increased/decreased by 10 each time. -
Page 4: Rear Panel
Panel & display Description Rear Panel 5. USB MIDI Jack 1. Pads/Pedal Jack 2. Audio Output Jack(Stereo split) 6. Power Supply Jack (9V~12V DC) 3. Audio Input Jack 7. Power Switch 4. 5pin MIDI Jack Side Jack Headphone Jack: at the left side of the module LCD Display Main Page After switching on the power, the module will display as shown above. -
Page 5: Quick Start
Quick Start Setup Connections Connecting Pads and Pedals Connect each pad and pedal to the jacks on the rear panel as labeled. Notice: We strongly recommend using the cables supplied by us to avoid any irregular operation while using the module. Please check the cable connection when below situation occurs: 1. -
Page 6: Connecting Midi Equipment
Quick Start Connecting a MIDI Equipment Connecting MIDI device There are 5 pin MIDI jacks (MIDI IN, MIDI OUT) and USB midi jack on the rear panel of this module. Users can use this module as a sound source to any midi device or computer by connecting the midi cable to these jacks. -
Page 7: Performing
Performing Selecting a Drum Kit Using the Metronome Press the CLICK button to start or stop the metronome. Now select the CLICK option in the main LCD display page and press the left/right button to change the beat. When switching the Power ON, the LCD display shows the main page, the DRUMKIT option will be highlighted. -
Page 8: Editing And Saving A Drum Kit
Editing and Saving a Drum kit Selecting the Drum Voice of the Pad Adjusting the Volume of a Pad To select the drum voice of a pad, highlight As illustrated in “Selecting the Drum Voice of the DRUM KIT option on the main LCD the pad”... -
Page 9: Adjusting The Midi In/Out Pitch Of A Pad
Editing and Saving a Drum kit Adjusting the MIDI in/out Pitch of a Pad MSAVE&MLOAD Function As illustrated in “Selecting the Drum Voice of To save or load a drum kit quickly, users can the pad” section, after entering the submenu use the MSAVE/MLOAD function in this press the UP/DOWN button to highlight the module). -
Page 10: Pad Sensitivity Setting
Pad Sensitivity Setting Trigger Gate Setting Velocity Curve Setting After entering the submenu of sensitivity In the main page of LCD display, highlight the setting as illustrated in the “Velocity Curve DRUM KIT option and press the SETUP Setting” section, the pad option shows the button to enter the submenu as below. -
Page 11: Demo Song Setting
Demo Song Setting In the main page of LCD display, press Press the UP/DOWN button to choose the UP/DOWN button to highlight the DEMO options to adjust and press the LEFT/RIGHT SONG option as below button to adjust the value. SONG VOLUME: To adjust the song volume of the DEMO song. -
Page 12: Selecting A Trigger Mode
Selecting a Trigger Mode Selecting a Trigger Mode To change trigger mode for the drum kit, highlight the DRUM KIT option on the main LCD display page and press the SETUP When the TRIGGER MODE 1 option is button to enter the submenu as illustrated highlighted, press the left/right button to below. -
Page 13: Appendices
Appendices Drum Kit List PRESET DRUMKIT USER DRUMKIT NAME NAME NAME NAME POP1 JAZZ6 POP1 ELEC1 POP2 ELEC1 POP2 ELEC2 POP3 ELEC2 POP3 ELEC3 POP4 ELEC3 ROCK1 ELEC4 POP5 ELEC4 ROCK2 ELEC5 ROCK1 ELEC5 ROCK3 ELEC6 ROCK2 ELEC6 FUNK1 ELEC7 ROCK3 ELEC7 FUNK2... -
Page 14: Drum/Percussion Voice List
Appendices Drum Voice List KICK HI-HAT ESN_01 BRSH_T1 ECRASH1 NAME NAME ESN_02 BRSH_T2 ECRASH2 ANLOGBD1 CHH_STD ESN_03 BRSH_T3 ECRASH3 ANLOGBD2 CHH1 ESN_04 ETOM01 LT_CRSH1 BD_DNCE1 CHH2 ESN_05 ETOM02 ORCCYM1 BD_DNCE2 CHH3 ESN_06 ETOM03 ORCCYM2 BD_STD1 CHH4 ESN_07 ETOM04 ORCCYM3 BD_STD2 CHH5 ESN_08 ETOM05... - Page 15 Appendices ECLAP11 COWBLL02 LOCNGA03 CNSCYMBL ECLAVE COWBLL03 LWBLK CNSDRM ECLICK1 COWBLL04 LWHSL1 CNSGONG ECLICK2 COWBLL05 LWHSL2 DYRH01 ECLICK3 COWBLL06 MCUICA DYRH02 ECLICK4 COWBLL07 MHCNGA01 DYRH03 ECLICK5 COWBLL08 MHCNGA02 DYRH04 ECOWBLL COWBLL09 MHCNGA03 DYRH05 ESHKR_01 COWBLL10 MHCNGA04 INDNDRM1 ESHKR_02 COWBLL11 MHCNGA05 INDNDRM2 ESHKR_03 COWBLL12...
-
Page 16: Midi Implementation List
Appendices Midi Implementation List FUNCTION TRANSMITTED RECOGNIZED REMARKS Basic Default 10 Ch 1~16 Channel Changed Default Mode Massages Altered Note ********** 0~127 Number :True Voice ********** 0~127 ○ 99H,V=1~127 ○ Velocity Note On ○ ○ Note Off after Key's Touch Ch's Pitch Bend ○... -
Page 17: Midi Note List
CENTER 51/53** RIDE OPEN Appendices HALF OPEN HI-HAT CLOSED PEDAL NOTE PITCH SPLASH CENTER KICK Midi Note List CENTER SNARE Note: * When you hit on the snare rim, the 37/38* note pitch is 37, when you hit hard or hit CENTER TOM1 together with snare center, the note pitch is 38. - Page 18 softly or mis-hit on this zone it will still trigger the first zone sound. Choke = The line on the pad is the choke zone. To choke the sound, you will have to press on the line after a hit. If you press below or above the choke line, the choke might not work...
Need help?
Do you have a question about the DD3X and is the answer not in the manual?
Questions and answers