Table of Contents
Advertisement
Quick Links
Advertisement
Table of Contents

Related Manuals for Optoma A16 UST Series


Summary of Contents for Optoma A16 UST Series
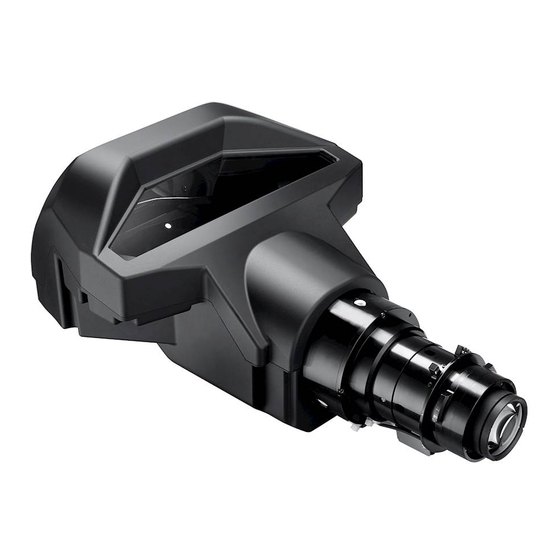
- Page 1 A16 UST Lens INSTALLATION INSTRUCTION...
-
Page 2: Table Of Contents
Attaching the lens supporter to the UST lens ..............13 Removing the UST lens ......................13 Change back to the non-UST lens after using the UST lens ..........14 Releasing the UST lens boresight module ................14 Optoma global offices ......................17 English... -
Page 3: Required Accessories And Tools
A16 UST LENS INSTALLATION INSTRUCTION This user manual is designed to assist with the installation of the BX-CTA16 UST lens in your Optoma projector. Before attempting to fit the UST lens, please read through this document in full order to ensure installation steps are made correctly. -
Page 4: Entering Ust Mode For Installation Setup
Entering UST mode for installation setup To complete the UST lens setup, follow the steps below. Use the hot keys “Exit, Input, Left, Right” on the keypad or Remote control to do UST lens calibration. After UST lens calibration, press “Exit“ to turn off the projector. Disconnect the AC cable. -
Page 5: Installing Ust Lens Boresight Module
Installing UST lens boresight module To install UST lens boresight module, complete the following steps. Remove the 3 screws with a Philips #2 screwdriver from the non-UST lens boresight module. Release the non-UST lens boresight module from the projector. Release the lens cable from the original holder on the plate. English... - Page 6 Insert the UST lens boresight module to the projector. After installing the UST lens boresight module, fasten the 3 srews with a Philips #2 screwdriver. Insert the cable back into the UST lens boresight module. Notee: Ensure the cable is not wrapped or pinched when fastening the UST lens boresight module. English...
-
Page 7: Installing The Lens Supporter
Installing the lens supporter An additional lens supporter is required for this lens. Complete the following steps to install the lens supporter. Place the lens and projector upside-down on the cushioned surface. Use a Philips #2 screwdriver to fasten the lens mount bracket on to the UST lens with two M3 x L8 screws. - Page 8 Use a 2.5 mm Allen key to attach the bracket on to the lens supporter with one M3 x L8 hex screw and one M3-3.7 x 0.8 x 18 washer. Notee: Do not fully tighten the screws until the lens has been installed. M3 x L8 hex screws M3-3.7 x 0.8 x 18 washer Bracket...
-
Page 9: Installing Ceiling Mount With Lens Supporter
Installing ceiling mount with lens supporter To install this lens in ceiling mount, complete the following steps. Notee: Due to thermal requirement, user needs to keep at least 30mm between the ceiling mount plate and bottom intake. Furthermore, user would need to prepare adapter A, adapter B, M6 ceiling mount screws and ceiling mount plate that are not included in the package list. -
Page 10: Installing The Ust Lens
Installing the UST lens Follow the steps below to install the UST lens. To fine-tune the boresight, insert the boresight extenders before installing UST lens. Insert the UST lens. Notee: Align the TOP mark with the top of projector when inserting the UST lens. Rotate the lens clockwise to lock UST lens. -
Page 11: Turning The Projector On
Turning the projector on To turn on the projector after UST lens has been installed, follow the steps below. Connect the AC cable and ensure the power is switched on. Ensure the lens correctly installed in the projector. Ensure no personnel or no object is in the beam path before projector turning on. Turn on the projector by pressing the power key on the remote controller or on the projector’s built-in keypad. -
Page 12: Boresight Adjustment
Boresight adjustment Notee: If further tuning is required, follow the steps below. Otherwise, move to the next section. To complete fine tuning of the image, adjust the boresight gears using the L shape tool. Make sure that the boresight extenders are installed. Adjust boresight gear B using the L shape tool to focus screen point 4 and 7. -
Page 13: Attaching The Lens Supporter To The Ust Lens
Attaching the lens supporter to the UST lens After image adjustment is completed, attach the lens supporter to the UST lens. Follow the steps below to complete the processes. Attach lens mount bracket to the bracket. Fasten the two M3 X L8 hex screws using the 2.5 mm allen key without putting excessive force on the UST lens, bracket and lens supporter. -
Page 14: Change Back To The Non-Ust Lens After Using The Ust Lens
Rotate the lens counter-clockwise by a quarter and remove the UST lens. Change back to the non-UST lens after using the UST lens To install non-UST lens, follow the steps below. In the proejctor menu, follow these steps to switch back to non-UST mode: Option > Service > UST Lens Install >... - Page 15 Remove 3 screws using a Philips #2 screwdriver on the UST lens boresight module. Release the UST lens boresight module from the projector. Insert the cable back into the lens shift plate. English 15...
- Page 16 Insert non-UST lens boresight module back into the projector. Fasten the module using 3 screws with a Philips #2 screwdriver. English...
-
Page 17: Optoma Global Offices
Optoma global offices For service or support, please contact your local office. Japan Optoma Technology, Inc. 888-289-6786 東京都足立区綾瀬3-25-18 47697 Westinghouse Drive. 510-897-8601 info@os-worldwide.com 株式会社オーエス Fremont, Ca 94539 services@optoma.com 0120-380-495 www.os-worldwide.com コンタクトセンター: Canada Taiwan Optoma Technology, Inc. 888-289-6786 12F., No.213, Sec. 3, Beixin Rd., +886-2-8911-8600 47697 Westinghouse Drive. - Page 18 www.optoma.com...
Need help?
Do you have a question about the A16 UST Series and is the answer not in the manual?
Questions and answers