Optoma 3D-RF System User Manual
Optoma 3d-rf glasses and optoma 3drf emitter
Hide thumbs
Also See for 3D-RF System:
- User manual (2 pages) ,
- User manual (24 pages) ,
- Quick start manual (1 page)
Table of Contents
Advertisement
Quick Links
User's Manual – Optoma 3D-RF System: Optoma 3D-RF Glasses and Optoma 3D-
RF Emitter
Contains Patent Pending software and technology from Bit Cauldron
Contient les logitiels de brevet en instance et la technologie de la compagnie Bit Cauldron
Optoma 3D-RF Emitter Manual
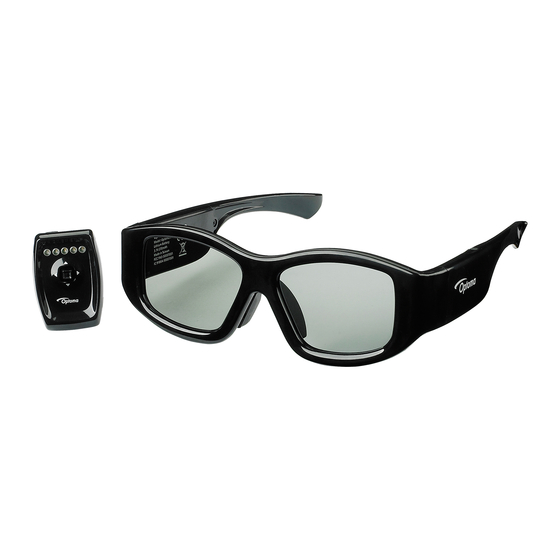
The Optoma 3D-RF Emitter connects Optoma 3D-XL converter box to the Optoma 3D-RF Shutter Glasses
for the ultimate in 3D stereoscopic viewing. This document describes the features, connection, setup,
and operation of the Optoma 3D-RF Emitter with Optoma 3D-XL converter box.
Features
RF synchronization for uninterruptable 3D glasses performance
Ready to watch compatibility with 3D Ready Optoma projectors with Optoma 3D-XL converter box
LED indicators assist with IR Sensor placement
Management Software enables Upgrade functionality for compatibility with future 3D TVs
Manual performance adjustment capability
Copyright 2011 Bit Cauldron Corporation
Page 1 of 24
Advertisement
Table of Contents

Subscribe to Our Youtube Channel
Related Manuals for Optoma 3D-RF System


Summary of Contents for Optoma 3D-RF System
- Page 1 Contient les logitiels de brevet en instance et la technologie de la compagnie Bit Cauldron Optoma 3D-RF Emitter Manual The Optoma 3D-RF Emitter connects Optoma 3D-XL converter box to the Optoma 3D-RF Shutter Glasses for the ultimate in 3D stereoscopic viewing. This document describes the features, connection, setup, and operation of the Optoma 3D-RF Emitter with Optoma 3D-XL converter box.
-
Page 2: Basic Features
Connections Optoma 3D-XL converter box with 3D Emitter Port 1: Connect the Optoma 3D-RF emitter to the Optoma 3D-XL converter box using the IR Emitter Port as shown below. Basic Features RF Communication of Synchronization Signal RF communications enables the Optoma 3D-RF System to provide an awesome and uninterruptable 3D viewing experience. - Page 3 The LEDs are located on the top of the emitter close to the joystick and display red, green, or orange. Joystick The Optoma 3D-RF Emitter uses a joystick to allow the user to enable various modes and change settings. The joystick has two axes and a center button function.
- Page 4 If sync signal is present either from VESA or IR Sensor, there will be at least one green LED on. Moving the joystick in any direction will not change emitter’s mode. You must press the joystick in any direction and release the joystick so that all LED are off.
- Page 5 Normal Operation Mode During normal operating mode, the Optoma 3D-RF Emitter interprets 3D signals from the 3D-XL converter box and controls the Optoma 3D-RF Series Shutter Glasses through RF. No LEDs are active. Signal Status (Strength) Indicator Mode The signal status (strength) indicator provides a visual signal status measurement. The number of lit green LEDs indicates the quality of the sync signal, with more green LEDs equating to better Sync signal.
- Page 6 Manual Performance Tuning Mode: Using the Joystick to Manually Tune Performance Mode During performance tuning, the Optoma 3D-RF Emitter continues to provide 3D sync to the Optoma 3D- RF Glasses. The joystick modifies parameters, while the LEDs display the current value of the parameter being adjusted.
- Page 7 Optoma 3D-RF Emitter will return to normal operating mode. See the appendix About Performance Tuning for a detailed explanation of shutter glass function and performance tuning. Delay Tuning Moving the joystick up and down will change the delay between when the “Open Left” signal is received by the emitter and when the left lens opens.
- Page 8 Reversal of polarity can be caused by the source, the content or the projector. The source equipment or the 3D ready projector may have an option to correct this. If not, the Optoma 3D-RF Emitter can be used to reverse polarity.
- Page 9 The Optoma 3D-RF Emitter will return to Normal Operation Mode. More information about Performance Tuning is found in the section About Performance Tuning. Polarity can also be changed in “Set Polarity mode”, see Accessing Modes section on page 4 to set this mode.
- Page 10 Optoma 3D-RF Emitter. The only indication that pairing is successful will occur at the glasses. When the Optoma 3D-RF Emitter cannot pair to any more devices, it will display the “all available pairs already memorized” signal indicated by five red LED’s blinking all-on and all-off for ten seconds.
- Page 11 Reversal of polarity can be caused by the source, the content or the projector. The source equipment or the 3D ready projector may have an option to correct this. If not, the Optoma 3D-RF Emitter can be used to reverse polarity.
- Page 12 The Optoma 3D-RF Emitter will return to Normal Operation Mode. More information about Performance Tuning is found in the section About Performance Tuning. Copyright 2011 Bit Cauldron Corporation Page 12 of 24...
- Page 13 2. Follow the instructions that come with the Optoma 3D-RF System Management and Utility. 3. The Optoma 3D-RF Emitter will upgrade the Optoma 3D-RF Glasses by way of the RF link as appropriate. The center LED of Emitter is RED then it is in FW download mode. If joystick is pushed to any direction when power is applied, the emitter will enter FW download mode.
- Page 14 Battery Charging To charge the Optoma 3D-RF, use the included Micro-USB cable. One end of the cable attaches to the MicroUSB port on the bottom of the left earpiece of the glasses. The other end of the cable may be attached to any USB A-type port, such as a port on a USB hub, a computer, or the back of 3D-XL converter box.
- Page 15 If the glasses do not detect an emitter, the LED will blink on and off once per second for five minutes and the Optoma 3D-RF Glasses will auto power off. If the emitter is activated (the emitter is only active when then TV is in 3D mode) before the five minute period expires, the glasses will stop blinking and remain on.
-
Page 16: Firmware Upgrade
Paired glasses will not use the signal from your friend’s emitter. Once paired, Optoma 3D-RF Glasses will only recognize and synchronize with the emitter the glasses are paired to. This is useful if there are multiple emitters within range and you want to be certain that a pair of glasses is always associated with the same emitter. -
Page 17: Restoring Factory Defaults
Any firmware or other settings on the glasses will be reapplied by the Optoma 3D-RF Emitter upon restart of the Optoma 3D-RF Glasses. To restore a pair of glasses to factory defaults, start with the glasses turned off. - Page 18 Open Figure 1: Ideal Shutter Glasses Behavior The Optoma 3D-RF shutter glasses contain lenses that are liquid crystal displays. Each lens alternates from clear-to-dark every other frame, thus making the left frame look dark to the right eye and vice versa.
- Page 19 Figure 2: Mitsubishi 3D DLP TV with a 3D Emitter port in the back (left) and alternating frame 3D image in the front (right) that match the timing described here. The emitter will work out-of-the box for this case with no performance tuning. Eliminate Ghosting or Fuzziness When the glasses are attached to certain 3D systems, some ghosting or fuzziness may appear.
- Page 20 In engineering terms, the total time of one left frame and one right frame can be measured as 360 degrees. The delay control is centered at no delay and can add zero to 90 degrees. To add 90 to 180 degrees of delay, push the joystick to reverse and then adjust delay again.
-
Page 21: Fcc Compliance
REGULATOR NOTICES Optoma 3D-RF Glasses Optoma 3D-RF Emitter FCC COMPLIANCE THIS DEVICE COMPLIES WITH PART 15 OF THE FCC RULES. OPERATION IS SUBJECT TO THE FOLLOWING TWO CONDITIONS: (1) THIS DEVICE MAY NOT CAUSE HARMFUL INTERFERENCE, AND Copyright 2011 Bit Cauldron Corporation... -
Page 22: Canada Compliance
Cet appareil numérique de la classe B est conforme à la norme NMB -003 du Canada. CE WARNING CAUTION: ESD Sensitive parts. The Optoma 3D-RF Glasses are is susceptible to electro-static discharge (ESD). Under negative ESD the device may shut down but will self-recover, or resume operation after the ESD event. - Page 23 WARNING - SAFETY INFORMATION & PRECAUTIONS FOR INDOOR USE ONLY. NOT FOR USE AS SUNGLASSES. THE 3D KIT CONTAINS ELECTRONIC DEVICES AND THE FOLLOWING PRECAUTIONS SHOULD BE FOLLOWED: Do not wear 3D glasses for any other activity except viewing 3D pictures. These glasses will degrade visual perception in normal situations and are only intended for 3D use.
- Page 24 above symptoms. Children and teenagers may be more susceptible than adults to experiencing these symptoms. o Do not watch 3D picture when you feel incoherent, sleepy, tired or sick. Avoid watching 3D pictures for long periods of time. Take regular breaks, especially during long periods of 3D viewing.
Need help?
Do you have a question about the 3D-RF System and is the answer not in the manual?
Questions and answers