
Related Manuals for Axis ME-03


Summary of Contents for Axis ME-03
- Page 1 ME-03 meter User manual File: 2018-01-29-DTR-ME-03 ML0018 GB AXIS, 80-125 Gdańsk, ul.Kartuska 375B, www.axis.pl...
-
Page 2: Table Of Contents
USER MANUAL Content: General information ................................3 Set ..................................... 3 Technical data ................................... 4 General view and meter’s mounting method ........................5 Keys and indicators ................................7 Security rules ..................................8 Rules proceeding with used up scales ..........................9 Assembly and connecting tensometric sensors ......................10 Meter connections description ............................ -
Page 3: General Information
USER MANUAL ME-03 1. General information ME-03/N/GLCD meter replaces standard meters produced by AXIS in order to extend functionality by cooperation with ZEBRA label printers (with EPL-2 and ZPL-2 protocol). Meter is equipped with hermetic housing made from stainless steel and graphical display. -
Page 4: Technical Data
USER MANUAL 3. Technical data Parameter ME-03/N/GLCD Designation to III class scales one and two-ranged with verification units number n 6000 Max verification units number 6000 Internal resolution 1:16 777 216 Power supply AC: 230V 50Hz DC: 12V or accumulator 6V ÷ 12 V... -
Page 5: General View And Meter's Mounting Method
USER MANUAL ME-03 4. General view and meter’s mounting method Basic version (on cable): Space for ~230V wire Space for sensor wire On column mounting version:... - Page 6 USER MANUAL Assembly ME-03/N/GLCD Meter grip assembly 3 ways to mount the meter to wall Mounting to wall or desktop 2 holes Ф5/10, spacing 256mm...
-
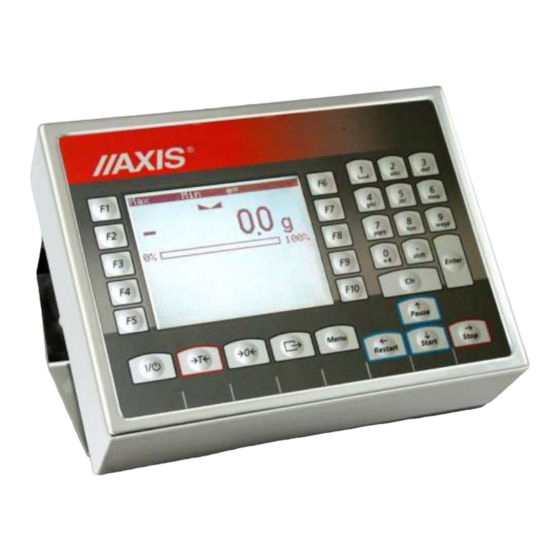
Page 7: Keys And Indicators
USER MANUAL ME-03 5. Keys and indicators - switch-on / switch-off (standby), " - tare, " - zeroing, " - label printout, " MENU - menu, " - label number selection; hold longer – temporary selection of other product for the actual label, "... -
Page 8: Security Rules
USER MANUAL " - pcs indication, " - scale turned off by key (standby) " - weighing result below threshold I (thr function), " - weighing result between I and II threshold, " - weighing result above II threshold, line Indicator - load indicator (0-100%) Additional... -
Page 9: Rules Proceeding With Used Up Scales
USER MANUAL ME-03 7. Rules proceeding with used up scales According to obligatory rules concerning environment protection used electronic devices should not be put in a container with normal waste. • After exploitation used scale should be given to special units authorized to collect used... -
Page 10: Assembly And Connecting Tensometric Sensors
USER MANUAL 8. Assembly and connecting tensometric sensors To build a scale basing on ME-03 indicator contact authorized manufacturer. Before connecting sensors to the indicator unplug the device from the mains to avoid damaging the indicator. To comply CE marking requirements, for connecting the wires use filtering core 20mm. - Page 11 USER MANUAL ME-03 Diagram of common wires and shields in the platform balances: Caution: The galvanic connection of sensors and adder housing is necessary. In normal conditions grounding is made only by using W conductor. In conditions of increased electrostatics grounding should be made with additional Z conductor (minimum 2,5 mm2).
-
Page 12: Meter Connections Description
P1-P3 (THRESHOLDS) outputs are used to connect dosing or signalling (option) devices. There are opto- isolators of an open collector type with 50mA / 24V maximum load. They can be connected directly to transmitters inputs or to MS3K/P board offered by AXIS separately or in ST 3K/P control box (3 transmitters, own power supply).. -
Page 13: External Keys
The input of external keys allows to place (make double) selected scale keys into control box or operator’s workstation. As a standard the input is taken out with a wire for direct connect to a control panel. ME-03 meters can be eqipped with external keys (option od demand). - Page 14 USER MANUAL External keys connecting: Standard Option with interface Scale External keys External keys Scale +24V +24V MENU MENU transoptor...
-
Page 15: Data Transmission Long Protocol
USER MANUAL ME-03 Data transmission LonG protocol Long protocol is used for communication with computer or standard receipt printer (AXIS C-001, Picco M, MEFKA-1 PDT). Transmission parameters: 8 bits, 1 stop bit, no parity, baud rate 9600bps, TxD (transmission) RS232C interface description... - Page 16 USER MANUAL Displaying a inscription on scale’s display (text communicate from computer): ComputerScale: SN n n X X X X X X CR LF, nn-displaying time in seconds; XXXXXX-6 signs to display ScaleComputer: MN CR LF (4Dh 4Eh 0Dh 0Ah), ...
-
Page 17: Data Transmission Epl Protocol
USER MANUAL ME-03 Data transmission EPL protocol Transmission parameters: 8 bits, 1 stop bit, no parity, baud rate 9600bps, After using key in scale: ScaleLabel printer : set of instruction in EPL-2 language that initialize label printing: - Steering instruction FR"0001"... -
Page 18: Exploitation General Rules
USER MANUAL 10. Exploitation general rules 1. Before each measurement make sure that zero indicator is displayed. If zero indicator does not display or “----“ communicate appears, press 0 key and wait until zero indication and zero indicator appears. 2. The scale is equipped with a tare equal to its range. To tare the scale press T key (left or right). Storing a tare value does not extend measuring range, but only subtracts it from a load placed on a pan. -
Page 19: Balance Checking And Adjustment
USER MANUAL ME-03 Balance checking and adjustment It is advised to check scale indication accuracy before and after series of measurement using any load with known weight. To check the scale with legal verification use a calibration weight with valid calibration certificate. In case permissible error is exceeded it is advised to contact the nearest service to calibrate the scale. -
Page 20: Start-Up
In scales with external supplier connect the supplier plug into meter and then (if scale is unloaded) plug it to wall socket. Scale turning on sequence AXIS AXIS Producer data. AXIS Sp. z o.o. AXIS Sp. z o.o. Ul.Kartuska 375B Ul.Kartuska 375B 80-125 Gdańsk 80-125 Gdańsk www.axis.pl www.axis.pl... -
Page 21: Weighing With Tare
(NET indicator shows that scale indicates net weight). 100% 14. Scale menu - diagram Scales with ME-03 meter besides basic metrological functions have also other user functions (labelling) and configuration options. Standard meter is equipped with one RS232C interface. On following pages diagram for meter with 2xRS232C 100% and THR out (threshold) is presented. - Page 22 USER MANUAL APPLICATIONS USER MENU Description on pages 24-25 Label Port 1 Printout Port 2 1. Applications Threshold 2. Setup Exit 3. Info 4. Exit CALIBRATION (only scales without leg.ver) CONFIGURATION 1. Calibration 1. Calibration 2. Calibration STP (step by step) 2.
- Page 23 USER MANUAL ME-03 LCD SETTINGS KONFIGURACJA 1. Calibration 1. Contrast: 2. Auto-zeroing 2. Backlig.:<OFF, ECO,BAT,ON> 3. Unit 3. Negative: <OFF,ON> 4. Interface 4. Exit 5. LCD settings 6. Language 7. Time&date 8. Keyboard LANGUAGE 9. Supply 1. Langua. : <ENG>...
- Page 24 APPLICATIONS APPLICATION\LABEL\PORT 1 Label Port 1 1. Label no. : PRINTOUT\ FIELD \PORT 1 Printout Port 2 2. Fields Label number Thresholds 3. Order Product ID Exit 4. Labels database Product name 5. Users base User ID 6. Show label User name 7.
- Page 25 USER MANUAL ME-03 LABEL\BASE U\PORT 1 BASE U\ADD\PORT 1 1. Add 1. Number : 2. Edition BASE U\ADD \PORT 1 2. Data 3. Delete 1. User ID 3. Exit 4. Print 2. User name 5. Exit 3. Exit PRINTOUT\PORT 2...
-
Page 26: Menu Navigation Rules
This mode can be used with Zebra ZT230 printers only with EPL / EPL-2 protocol. To connect with scale use WE-05 type AXIS cable (in set) and MM adapter (in set). In following chapters You can find description of all necessary actions needed to link scale with label printer. -
Page 27: Labels Database
- Print – sends to port (RS232C interface) labels list and labels parameters. By connecting computer to scale (and using Communication software) user can readout the list. Alternatively user can connect standard receipt printer (eg. AXIS C-001) and receive list printout . - Page 28 Data option can be omitted. User can also add labels database using Scale database computer program. The software is possible to download from our webpage www.axis.pl and is designed for users that will add big quantities of labels.
- Page 29 (if it is necessary eg. for product name or product code). This mode can be used with Zebra ZT230 printers only with EPL / EPL-2 protocol. To connect with scale use WK-1 type AXIS cable. - EAN variable – different EAN-13 barcode formats: ADD\MODE\\PORT 1 ...
- Page 30 USER MANUAL 16.2.2 Label edition Label edit enables to make changes in previously stored labels in memory. Changes are made in the same way as during adding new label. More information in chapter 16.2.1. 16.2.3 Delete label LABEL\BASE L\PORT 1 1.
- Page 31 USER MANUAL ME-03 16.2.6 Pieces counting (APW) If user wants to print pieces quantity on label then he must choose ADD\DATA\PORT 1 APW during adding/editing label. 1. Product ID 2. Product name User can also use shortcut F9 key (press and hold).
-
Page 32: Users Base
USER MANUAL 16.3 Users base Users database (max 100) enables to save in scale’s memory USER MENU user ID (max 8 signs) and user’s name (max 20 signs). 1. Applications The information can be printed. 2. Setup 3. Info Screens on left show how to add new user. 4. -
Page 33: Fields To Printout (Scale Mode)
USER MANUAL ME-03 16.4 Fields to printout (SCALE mode) Fields option enables to select fields, which are going to be send to printer. In SCALE working mode, selecting the fields is mandatory. 100% USER MENU 1. Applications After entering Menu, choosing Applications and then Label, enter 2. -
Page 34: Fields Order (Scale Mode)
USER MANUAL 16.5 Fields order (SCALE mode) After activation of selected fields user must set the order/sequence in which the fields are send to printer. To do that choose Order option. 100% List of activated fields (in previous option Fields) will show up. After entering selected field You will see sequence number. -
Page 35: Configuration
USER MANUAL ME-03 Configuration 17.1 Auto-zeroing Auto-zeroing special function ensures that balance’s indications close to zero will be corrected automatically and when the pan is unloaded zero indication will be maintained (regardless of environment conditions). CONFIGURATION 1. Calibration 2. Auto-zeroing 3. -
Page 36: Setting Serial Port Parameters (Interface)
USER MANUAL 17.3 Setting serial port parameters (Interface) The function allows setting independently communication parameters of serial ports (executed in RS232C, RS485, USB or LAN standard). If the scale is equipped with one serial interface (standard) then user is allowed to configure only one port. -
Page 37: Language Selection (Language)
USER MANUAL ME-03 17.4 Language selection (Language) Language option enables to change user menu language. User LANGUAGE 1. Langua. : <ENG> can choose: Polish (PL), German (DE), Spanish (ESP) or 2. Exit English (ENG 17.5 Setting date and time TIME&DATE Function enables setting actual time/date and displaying format. -
Page 38: Troubleshooting And Maintenance
5. Every repairs performed by unauthorized persons are forbidden. 6. To repair the scale, please contact nearest service centre. The list of authorised service centres is given in guarantee card and on www.axis.pl website. Failure messages: Message Possible cause Recommendation C-1 ... -
Page 39: Annex A
Afterwards the printer is connected to scale. Scale sends variable data (eg. net weight, tare, product id) which fills empty spaces in the designed project. In manual following set is descripted: Scale with ME-03 meter, Label printer Zebra ZT230, ZebraDesigner 2.5 software,... - Page 40 Afterwards Text Wizard window will appear. Inscribe text, which You need on label and press Finish. In case of our sample label we insert text 4 times (Product code, AXIS Sp. z o.o., Nett weight and Gross weight). b) Adding variable elements:...
- Page 41 ( File -> Send to printer ). If there are many types of memory choose Internal Flash. 5) Connect printer to ME-03 meter. Check if transmission speed (baud) is 9600bps in printer and scale.
-
Page 42: Annex B
Afterwards the printer is connected to scale. The label printer sends ‘questions’ to scale about data eg.: net weight, gross weight, product code etc. In manual following set is descripted: Scale with ME-03 meter, Label printer Zebra ZT230, ZebraDesigner 2.5 software,... - Page 43 Afterwards Text Wizard window will appear. Inscribe text, which You need on label and press Finish. In case of our sample label we insert text 4 times (Product code, AXIS Sp. z o.o., Nett weight and Gross weight). b) Adding variable elements:...
- Page 44 ( File -> Send to printer ). If there are many types of memory choose Internal Flash. 5) Connect printer to ME-03 meter. Check if transmission speed (baud) is 9600bps in printer and scale.
Need help?
Do you have a question about the ME-03 and is the answer not in the manual?
Questions and answers