
Related Manuals for Axis ATS60


Summary of Contents for Axis ATS60
- Page 1 USER MANUAL MOISTURE ANALYZER ATS and BTS series File: 2018-06-06-BTS_ATS-150 ATS117 GB...
-
Page 2: Table Of Contents
USER MANUAL Content: Security rules ____________________________________________________ 3 Set ____________________________________________________________ 3 Navigation – fast start _____________________________________________ 4 Moisture analyzer menu diagram _____________________________________ 6 General description _______________________________________________ 7 Technical data ___________________________________________________ 7 Keys and indicators _______________________________________________ 8 Preparation to work _______________________________________________ 9 Interfaces ______________________________________________________ 12 General working rules ____________________________________________ 12 Description of thermogravimetric analysis _____________________________ 12... -
Page 3: Security Rules
USER MANUAL 1. Security rules To avoid electrical shock or damage of the moisture analyzer or connected peripheral devices, it is necessary to follow the security rules below. To feed the analyser use only mains socket with ground contact. ... -
Page 4: Navigation - Fast Start
USER MANUAL 3. Navigation – fast start After turning on the moisture analyzer, after autotests and tare, moisture analyzer starts initial heating until the drying chamber heats up to 105°C. The moisture analyzer is now ready to measure density with inscribed earlier heating parameters. To set heating parameters use USER MENU and choose Drying settings. - Page 5 USER MANUAL Moisture analyzer can work in one of two modes, changed by key: 1) Drying (density measurement) formula evaluation drying inscribed drying sample time profile temperature actual temperature actual drying time mass on pan initial mass closed (CSD) /open(OPN) Weighing (mass measurement) scale stabilization mark...
-
Page 6: Moisture Analyzer Menu Diagram
14. Moisture 15. Quantity 16. Average 17. Remarks 1. Units 18. Performance Auto-zeroing 19. Signature 3. Interface 4. LCD settings <PL><ENG><DE><ESP><ITA><FRA> 5. Language 6. Time&Date 7. Keyboard 8. Defaults 9. Calibration 10. Info MODEL 11. Exit SOFT AXIS Sp. z o.o. -
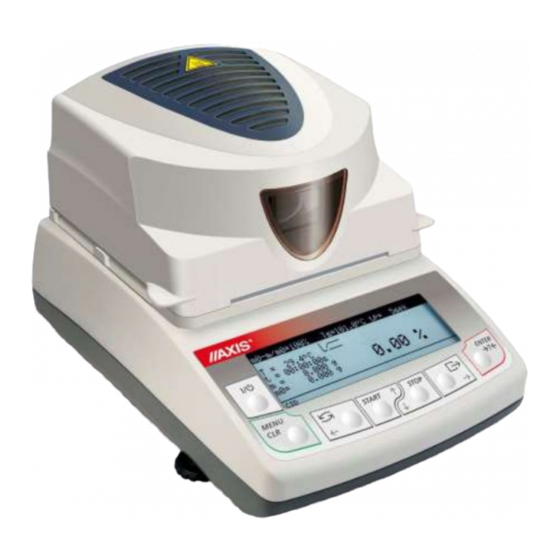
Page 7: General Description
USER MANUAL 5. General description Moisture analyzers ATS and BTS are designed for fast and precise moisture determination of a sample based on mass loss during heating process. Drying proces parameters are set by user on the basis of law norms, available chemical- physics data or they are matched experimentally. -
Page 8: Keys And Indicators
USER MANUAL 7. Keys and indicators m0-m/m0*100% Td=105C ts= 10s T = 32.23C 0.00 % t =0:00:00s m= 0.000g m0= 0.000g ______________________________________________________________________________________________________________________________________________________________________________________________________________________________________________________________________________________ 00:02:00s 00:02:00s ENTER ENTER START START STOP STOP - on / off (standby), MENU - enter to menu, - deleting operation, ... -
Page 9: Preparation To Work
USER MANUAL 8. Preparation to work During heating, the halogen heaters 1 warm up to very high temperature. When drying chamber is opened avoid touching the heaters as it may cause severe burns or damage the heaters! Dryer chamber cover 3 heats up to 60°C, but perforated cover may heat up over 100°C. - Page 10 USER MANUAL Take all contents out of a package: the moisture analyser and packed separately: the tin pan shield, single use pans, the pan handle and the pan support. It is recommended to keep the original scale package in order to transport the moisture analyzer safely in future.
- Page 11 USER MANUAL Removing the glass (to clean or remove radiators): Open the moisture analyzer chamber. Raise glass 13 until it will be released from lower glass supports 14 . Remove the glass by diverting lower limb (look at the picture above). When temperature during initial heating exceeds 105°C or heating time is longer than 3 minute, terminate initial heating with STOP key and check if the temperature sensor 2 works properly and if both halogen...
-
Page 12: Interfaces
USER MANUAL 9. Interfaces The moisture analyser is equipped with RS23C interface to connect a printer or a computer and with PS2 port to connect an external computer keyboard. RS232C Clock RxD (receive) TxD (transmission) mass Data housing 10. General working rules During transportation remove the pan, the pan support and the pan shield and place it in a separate package.. -
Page 13: Infrared Radiation Source
Absolute methods are based on simple relations, e.g. weight decline during drying. Thermogravimetric analysis used in AXIS moisture analyser is an example of this method. Deductive (indirect) methods measure physical quantity related with moisture, e.g. electromagnetic waves absorption, electrical conductance, acoustic wave speed. Some of these methods, unlike thermogravimetric analysis, enable to determine water content. -
Page 14: Tools Requirements
USER MANUAL – to draw few samples from different points in a substance, mix them and draw a sample from the mixed samples. Sampling method depends on the object of a research. For quality purpose many representative samples are analysed. In production control it is enough to assure sampling repeatability, which enables to study a tendency. -
Page 15: Glass Fibre Filter
USER MANUAL Due to temperature sensor localisation, max sample height is 10mm. When substance ply is too thick, surface layers will be heated too much and internal – not enough. This may result in burning the sample or surface incrustation, which will make drying process difficult and measuring result false. -
Page 16: Other Practical Notes
USER MANUAL 11.9 Other practical notes It is preferable to work with the same mass of the sample at each measurement to measure the size of the sample in a reproducible way. It is best to use the same instruments for the application of the sample. Put a sample on the pan as quickly as possible to avoid losing moisture. -
Page 17: Moisture Analyzer Start
USER MANUAL 12. Moisture analyzer start After switching-on the moisture analyser proceeds with self-tests and displays company logo. Next the moisture analyzer is taring (- - - - - -). After taring initial heating starts in order to create proper conditions inside drying chamber. m0-m/m0*100% Td=105C ts= 10s... - Page 18 USER MANUAL - Drying temperature (to 160 - Mode : time mode (ends after inscribed time) or short mode (ends after fulfilling drying criterion), - Calculation method – humidity calculation formula, - Samples quantity (only for short mode), - Sampling interval – interval between successive mass measurements (1180s.), - Drying time (1s.10h) (in short mode it’s the maximal drying time), - Drying profile (standard, slow, step or fast), - Settings storing–...
-
Page 19: Setting Drying Temperature
USER MANUAL 13.1 Setting drying temperature During setting drying temperature set successively values of individual digits. USER MENU 1. Drying settings 2. Memory settings 3. Drying options 4. Drying report 5. Configuration 6. Settings default 7. Exit DRYING SETTINGS 1. Drying temp. 60C 2. -
Page 20: Calculation Methods
USER MANUAL 13.2 Calculation methods Humidity may be calculated upon the basis of various mathematic formulas, defined in balance – drier as Calculation method: 1. Relative humidity, defined in relation to initial mass w [%] = m -m/m *100% , where m –... - Page 21 USER MANUAL 13.3 Drier working modes, drying time, sample time During the balance – drier operation sampling of the mass on the pan takes place. Sampling time is set by the user, according to drying process speed. As a result of sampling the current humidity value is calculated and displayed.
-
Page 22: Drying Profiles
USER MANUAL 13.4 Drying profiles Drying profile will be used to optimization of drying process by accommodation a process to physical properties of sample material. Oxidized materials or thickening on the surface need slow or step profile. Resistant materials can use fast profile . The choice of profile and his parameters should be a result of experience with examinated material. -
Page 23: Moisture Analyzer Memory
USER MANUAL 13.5 Moisture analyzer memory The moisture analyser enables to save 20 different drying settings. Saved settings are kept in the memory even after unplugging moisture analyzer from the mains. 13.5.1 Saving settings In order to store a few settings follow the instructions below: Set the necessary drying settings (as mentioned earlier), choose Settings storing and choose memory cell, where the sets will be saved USER MENU... -
Page 24: Loading Saved Settings
USER MANUAL 13.5.2 Loading saved settings In order to call earlier settings saved in memory, You enter the menu and choose option Memory settings and choose memory cell number where settings where earlier made. USER MENU 1. Drying settings 2. Memory settings 3. -
Page 25: Initial Moisture Analysis
USER MANUAL 13.6 Initial moisture analysis To determine optimal drying parameters for unknown sample, it is recommended to perform initial measurement with activated drying chart displaying. To do this, set the following drying parameters (see Drying parameters setting): - Operation Mode: Time mode - Calculation method: m0-m/m0*100% - Drying temperature: organic substances: 80 - 120... - Page 26 Observing drying process chart it is possible to evaluate its course and define time required for complete drying. The chart shows 160 time samples on the X axis (for longer times chart is scaled to 360 samples, 720, etc.) and humidity value according to selected formula on the Y axis (chart is automatically scaled to 10%, 30%, 50%, etc.).
-
Page 27: Proper Moisture
USER MANUAL 14. Proper moisture Before measurement carefully prepare the sample (as described in chapter Description of Thermogravimetric Analysis) and set correct drying parameters (see the diagram in chapter 11.6, description of the way of settting is in 11.4). Place an empty single-use pan and m0-m/m0*100% Td=120C ts= 1sek... -
Page 28: Connecting To A Printer Or Computer - Drying Report
USER MANUAL 15. Connecting to a printer or computer – drying report When drying process is finished measurement result can be send to printer or a computer via RS232C interface after using key. Measuring data can be also completed with text information. To enter text descriptions user can use moisture analyzer keys or connect a computer keyboard to PS2 port at the back of the device. - Page 29 USER MANUAL Using moisture analyzer keyboard user can inscribe signs: 0, 1, 2, 3, 4, 5, 6, 7, 8 and 9 (only digits). A set of characters available using computer keyboard (PS2) while you use Product name, Operator or Remarks: 1 .
-
Page 30: Moisture Analyzer Options
USER MANUAL 16. Moisture analyzer options Moisture analyzer options: - quantity of measurements () and average from series of humidity measurements displaying (X), USER MENU 1. Drying settings 2. Memory settings 3. Drying options 4. Drying report 5. Configuration DRYING OPTIONS 6. - Page 31 USER MANUAL - transmission of all successive weight measurements (samples) by serial connection (measurements are printed or saved on computer using PROMAS software). USER MENU 1. Drying settings 2. Memory settings 3. Drying options DRYING OPTIONS 4. Drying raport TRANSMISSION 5.
- Page 32 USER MANUAL The way of entering control thermometer probe to moisture analyzer drying chamber: 100 C 1 – control thermometer probe 2 – distance sleeves 2x20mm (2 sleeves ensure that position of control thermometer probe is the same as moisture analyzer internal temperature sensor, 1 sleeve –...
-
Page 33: Testing And Calibration
USER MANUAL Attention: Moisture analyzer internal thermometer correction is made with internal thermometer and control thermometer on the same level above the sample. The temperature indicated by thermometer situated on some level above the sample can differ from real temperature of the sample. In this case if there is a need for temperature indication correction simply lower the level of control thermometer by removing distance sleeve (picture on page 31 position 2). -
Page 34: Moisture Analyser As A Balance
USER MANUAL 18. Moisture analyser as a balance The moisture analyser may be also used as a normal balance. To switch between analyser / weighing mode press key. During moisture analyzer work as a normal balance essential influence on measurement result has the proper setting of moisture analyzer level (level indicator is at the back of the device) and precise balance calibration. -
Page 35: Auto-Zeroing
USER MANUAL 18.2 Auto-zeroing Auto-zeroing function causes that the close to zero indication will be corrected automatically and when the pan is unbiased zero indication will be hold independently even when environment conditions change (temperature, air density etc). USER MENU 1. -
Page 36: Calibration
USER MANUAL 18.3 Calibration Calibration with external weight standard should be performed in case indications exceed permissible error (for example more than 5 graduation overflow). To scale calibration use weight standard presented in technical data table (or more precise). Depending on the value of gravity acceleration the producer sets the scale to specific location of use. - Page 37 USER MANUAL CONFIGURATION 1. Units 2. Auto-zeroing 3. Interface 4. LCD settings 5. Language 6. Time&date 7. Keyboard 8. Defaults 9. Calibration 10. Info Exit CALIBRATION 1. Calibration: 2. Load 100g 3. Exit CALIBRATION Please wait ... CALIBRATION Taring CALIBRATION Put load Put the standard of mass on the pan...
-
Page 38: Maintenance And Repairs Of Small Defects
USER MANUAL 19. Maintenance and repairs of small defects 1. A moisture analyser should be kept clean. 2. Take care that no dirt gets between the casing and the pan. If found any, remove the pan (lift it up), remove dirt and then replace the pan. 3. - Page 39 USER MANUAL Troubleshooting: Display indication Possible cause Remedy Initial heating The temperature sensor is Contact an authorised service temperature exceeds damaged. point. 105°C, the sensor does not react when touched with a finger Initial heating The heater is damaged. Replace the heater. temperature does not reach 105°C during 3 minutes...
-
Page 40: Appendix
USER MANUAL Appendix Drying parameters for different substances (examples) Initial weight Temperature Substance Preparation Analysing time (min) (°C) Acrylate seal mix a sample Granulated sugar Icing sugar Butter tear up a foil Margarine Ketchup Mustard Peanuts grind into thick powder Nuts in shells grind into thick powder Nuts... - Page 41 USER MANUAL Skimmed milk mix a sample Skimmed milk powder Fat milk powder Whole milk mix a sample Concentrated orange juice mix a sample Dry chicken excrements Soap pinch some pieces Starch derivatives Starch glue mix a sample Detergent Textile separate fibres Materials for bricks distribute a sample...
Need help?
Do you have a question about the ATS60 and is the answer not in the manual?
Questions and answers