Table of Contents
Advertisement
Quick Links
Basic Manual
・ Descriptions in this manual are based on Android
・ The company names and product names appearing in this manual are
trademarks or registered trademarks of their respective holders.
・ For exemptions, refer to "Notes on Usage" available on the au homepage.
December 2019, 1st Edition
Sold by: KDDI CORPORATION,
OKINAWA CELLULAR TELEPHONE COMPANY
Manufactured by: SHARP CORPORATION
9 Pie.
TM
Advertisement
Table of Contents

Subscribe to Our Youtube Channel
Related Manuals for AU AQUOS sense3 plus SHV46


Summary of Contents for AU AQUOS sense3 plus SHV46
- Page 1 ・ The company names and product names appearing in this manual are trademarks or registered trademarks of their respective holders. ・ For exemptions, refer to “Notes on Usage” available on the au homepage. December 2019, 1st Edition Sold by: KDDI CORPORATION,...
- Page 2 “Notes on Usage” to ensure correct use. Store in a safe place for easy reference. Instruction Manual ■ “Basic Manual” (This Guide) The “Basic Manual” (this manual) available on the au homepage describe basic operations of major functions. ttps://www.au.com/english/support/manual/) ■ “Online Manual” (Japanese) You can check “Online Manual”...
-
Page 3: List Of Packaged Items
URL below. h ttps://jp.pioneer-audiovisual.com/support/purpose/manual_catalog/manualdl/ product_select_n.php?p_nm=1595) (Japanese) The following items are not included in the package. • au Nano IC Card 04 • AC adapter • microSD™ memory card • USB Type-C™ cable • Purchase a specified charger (sold separately). -
Page 4: Illustrations And Descriptions In This Manual
* Tapping is to select a key or icon displayed on the screen by lightly tapping it with your finger. • Screenshots and operations in this manual are based on attaching an au Nano IC Card 04 to the product. -
Page 5: Cell Phone Etiquette
• In this manual, “au Nano IC Card 04” are abbreviated as “au IC Card”. • In this manual, “microSD™ memory card (commercially available)”, “microSDHC™ memory card (commercially available)” and “microSDXC™ memory card (commercially available)” are abbreviated as “microSD memory card” or “microSD”. - Page 6 • Move to areas where you will not inconvenience others on bullet trains, in hotel lobbies, etc. • Refrain from talking in a loud voice. • Check whether sound from earphones, etc. is audible when near others on a train. •...
-
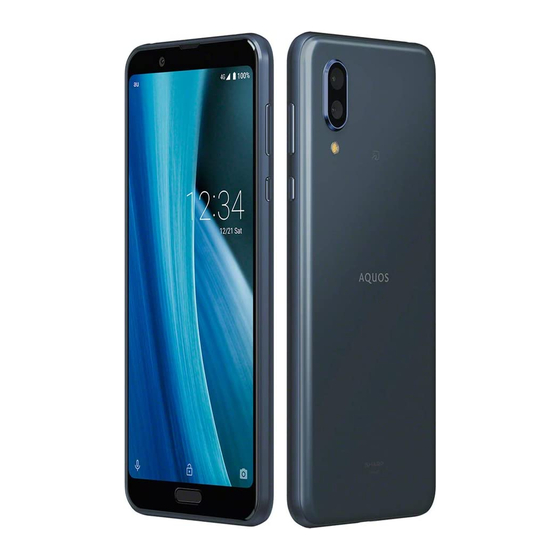
Page 7: Names And Functions Of Parts
Names and Functions of Parts ■ Front/Left Side/Right Side/Top and Bottom ① au IC Card/microSD memory card tray ② Earphone/Microphone jack ③ Mouthpiece (Microphone) ④ In camera lens ⑤ Earpiece (Receiver)/Speaker... - Page 8 ⑥ Proximity sensor/Light sensor Proximity sensor prevents inadvertent operations of the touch panel during a call. Light sensor adjusts the brightness of display to match the ambient brightness. ⑦ Charging/Incoming indicator While charging, it illuminates in red/green according to the battery level. Even after charging (battery level 100%), indicator remains lit in green if a specified charger (sold separately) is connected.
- Page 9 ■ Back ⑭ Wide-angle out camera lens The ornamental camera cover serves as an air vent to maintain product performance. ⑮ Standard out camera lens The ornamental camera cover serves as an air vent to maintain product performance. ⑯ Mobile light ⑰...
- Page 10 To force the power off, refer to “Turning the Power Off Forcibly” (▶P. 22) au IC Card/microSD memory card tray ◎ Note that pulling or applying excessive force on an au IC Card/microSD memory card tray may cause damage. Proximity sensor/light sensor, earpiece (receiver)/speaker, mouthpiece (microphone), speaker, air vent (ornamental camera cover) ◎...
- Page 11 IC Card/microSD memory card tray (side with no printing) in the hole in the IMEI plate from above, and pull out the IMEI plate. (Be sure to remove the au IC Card and microSD memory card from the tray beforehand.)
- Page 12 ◎ You can also operate the product to confirm the IMEI. On the home screen, swipe/flick up the screen and display the “App list screen” → [Settings] → [About phone] → [IMEI]. Charging/Incoming indicator Notify you of the battery level status while charging, and a missed call, receiving a mail, etc.
- Page 13 IC (metal) part Front Back ◎ Note the followings since using the au IC Card may cause a fault or damage easily. • Do not touch the IC (metal) part of the au IC Card. • Confirm the orientation for inserting.
-
Page 14: Attaching/Removing The Au Ic Card
Attaching the au IC Card Before attaching the au IC Card, turn the product off. Also, attach it with the display side turned up. With your finger on the groove, pull out the au IC Card/ microSD memory card tray. Groove... - Page 15 Check the direction of the au IC Card and put it securely. Not to let the au IC Card lift up from the card tray. If the au IC Card does not fit the card tray, may cause a fault. Notches...
- Page 16 • Inserting the card tray not deeply enough may cause impairment of the waterproof/dustproof property or prevent the product from functioning properly. • For details on closing the card tray, refer to “Closing the au IC Card/ microSD memory card tray” on the “Notes on Usage”.
- Page 17 With your finger on the groove, pull out the au IC Card/ microSD memory card tray. Take care not to let the au IC Card come off from the tray and be misplaced when pulling it out. Removing the au IC Card from the au IC Card/microSD memory card tray.
-
Page 18: Using A Microsd Memory Card
Before attaching a microSD memory card, make sure to turn the product off. Also, attach it with the display side turned up. • For details on attaching or removing the au IC Card/microSD memory card tray, refer to “Attaching the au IC Card” (▶P. 13). - Page 19 Before removing a microSD memory, make sure to turn the product off. Also, remove it with the display side turned up. • For details on attaching or removing the au IC Card/microSD memory card tray, refer to “Attaching the au IC Card” (▶P. 13).
- Page 20 ◎ If the charging/incoming indicator flashes in red, force the power off (▶P. 21) and turn the product on again. If the indicator continues to flash, stop charging the internal battery and contact an au shop or the Repair and Delivery Support Center.
- Page 21 Charging with the Specified AC Adapter (Sold Separately) The followings are the explanation of how to connect TypeC Common AC Adapter 02 (sold separately) to charge. For details on the specified AC adapter (sold separately), refer to “取扱説明書 (詳細版) (Full Instruction Manual)”...
-
Page 22: Turning The Power On/Off
Unplug the power plug of TypeC Common AC Adapter 02 (sold separately) from the outlet. ◎ Although you can charge the internal battery while the power is turned on, charging time lengthens. Turning the Power On/Off Turning the Power On f (hold down for at least 3 seconds) while the product is turned off. - Page 23 ■ Turning the Power Off Forcibly You can force the product to turn off if the screen freezes or you are unable to turn the product off. f (hold down for at least 8 seconds). ◎ If the power is turned off forcibly, unsaved data will be deleted. Do not turn the power off forcibly unless you cannot operate the product.
-
Page 24: Lock Screen
Lock Screen The lock screen is displayed if you turn the screen on. If you register your fingerprint, you can unlock the screen just by touching the fingerprint sensor. If you register your face, you can unlock the screen just by holding the in camera close to your face. -
Page 25: Initial Settings
Initial Settings The Google™ initial settings screen is displayed automatically when you turn the power on for the first time. Follow the on-screen instructions to set each function. ■ STEP1: Language Setting Select the language →[START]. - Page 26 ■ STEP2: Wi-Fi ® Connection/Data Transfer Settings ® You may skip the steps here for making Wi-Fi Connection/transferring data from another device settings. By using “Copy apps & data”, you can transfer data from an old device etc. [Use mobile network for [DON'T COPY] setup] *1 If a confirmation screen is displayed for data usage, follow the on-screen...
- Page 27 ■ STEP3: Google Account Settings You can use applications provided by Google Inc. such as “Play Store” and “Calendar” by setting up a Google account. You can use the product without a Google account set, but in such case some applications are not available. The main setting items are as follows.
- Page 28 Enter basic information [Create your own Gmail → [Next]. → Enter the Gmail address] address → [Next].
- Page 29 Enter the password Confirm the contents → [Next]. → [Yes, I'm in].
- Page 30 [Next]. Confirm the contents → [I agree]. *1 If you already have a Google account, enter the e-mail address. *2 You can also select a Gmail address you already have.
- Page 31 ■ STEP4: Google service Settings etc. Set other items such as Google service, screen unlock. Confirm the contents of [SKIP]. Google services → [ACCEPT].
- Page 32 Confirm the contents of Google Assistant → Tap “TURN ON” , then follow on-screen guidance. *1 To register face or fingerprints, select “Face authentication” / “Fingerprint” / “Set both face and fingerprint authentication” and follow the on-screen instructions. *2 If a settings screen for Google Pay™ or other service is displayed, follow the on-screen instructions.
- Page 33 ■ STEP5: au初期設定 (au Initial Setting) You can use various services provided by au such as au Smart Pass and “au Simple Payment Service” in which you can purchase applications displayed on Google Play™ by setting an au ID. • On the home screen, swipe/flick up the screen and display the “App list screen”...
- Page 34 Enter the security code Enter the password →[次へ] (Next). →[同意して次へ] (Agree).
- Page 35 *2 You cannot sign in while connected to Wi-Fi . Tap “SKIP” and go to step 6. *3 The input screen is displayed only when registering au ID for the first time. *4 The number of applications you can install may differ between the screenshot shown here and the actual screen.
- Page 36 ■ STEP6 : Other Setting Items [Review additional apps] Unmark applications not to → [OK].
- Page 37 [DONE FOR NOW] *1 To use other setting items, select an item and follow the on-screen instructions. *2 Tap an item for a description of the application.
- Page 38 Settings and Changing au-mail Address To use au-mail, application to LTE NET is required. If you did not apply at time of purchase, contact an au shop or Customer Center. • Make initial settings at a location within Japan where there is a good signal.
- Page 39 Check au-mail address → [閉じる] (Close).
- Page 40 ■ Checking the Usage Method of au-mail Address On the home screen, swipe/ flick up the screen and display the “App list screen” → “au-mail”...
- Page 41 [Operation guide] → Select the usage method to check.
- Page 42 [メールアドレスの変更へ] (To change mail address) → Enter the security code → [送信] (Send). Confirm the contents → [承諾する] (Accept). [ご希望のメールアドレスに変更する] (Change to your desired mail address) → Enter an au-mail address → [送信] (Send). [OK] → [閉じる] (Close). ■ Checking au-mail Address On the home screen, swipe/flick up the screen and display the “App list screen”...
-
Page 43: Making Calls
Making Calls Entering a Phone Number and Making a Call On the home screen → [ ] → [ The dial screen is displayed. Enter a phone number. When calling to a land-line phone, always enter the city code even when it is a local number. -
Page 44: Receiving Calls
Receiving Calls When receiving a call, followings are displayed. • If the other party's makes a call with a notified phone number, the phone number is displayed on the screen. If the phone number is registered in the phonebook, their name and phone number are displayed. •... - Page 45 (back up) data periodically to a microSD™ memory card or au server. • To return data using an au server, store data from the old au phone to the au server beforehand. To use the au server, you must set an au ID. (If the old au phone does not have au Settings Menu, use au Cloud application).
- Page 46 On the home screen, swipe/ [au Settings menu]. flick up the screen and display the “App list screen” → [Settings].
- Page 47 [Data Transfer]. Tap “機種変更はこちら” (If you have changed a model) and transfer data by following on-screen guidances. * If a confirmation screen is displayed for terms of use/privacy policy, follow the on-screen guidances.
- Page 48 ® Wireless LAN (Wi-Fi ) settings ® You can connect to an Internet service via a household wireless LAN (Wi-Fi environment or a public wireless LAN environment when out and about. ® To connect to an Internet via Wi-Fi , you need to register an access point to connect in advance.
- Page 49 [Wi-Fi]. Select an access point → Enter the password → [CONNECT] * When [Wi-Fi] is disabled, switch to enable it.
- Page 50 Increase the light duration of the backlight When the screen is dark/the backlight is quickly turned off, change the setting. On the home screen, swipe/ [Display]. flick up the screen and display the “App list screen” → [Settings].
- Page 51 [Sleep]. Select time.
-
Page 52: Updating Software
• If the software update fails, it may become impossible to operate the product. If this happens, bring it to an au shop or Toyota store (not accepted by some shops). • Charge the battery sufficiently before starting update. If the battery level is insufficient or the battery runs out during the update, the software update will fail. -
Page 53: Troubleshooting
Do not conduct the following operations during the software update • Do not move during software update. Troubleshooting If you think the product may be malfunctioning, first check the “トラブル診断 (trouble diagnostic)” on the au homepage. ( ttps://www.au.com/trouble-check/) (Japanese) Also refer to “Online Manual” (Japanese), or the section “故障とお考えになる... -
Page 54: After Sales Service
◎ Recycled parts that meet the Company's quality standards are sometimes used for repair. ◎ Your old au terminal collected by replacement mobile phone delivery service is serviced for reuse and recycled as a replacement terminal. Also, parts replaced through au after-sales service are collected and recycled by the Company. - Page 55 ◎ Warranty covers only the SHV46. Included accessories and complimentary samples are not covered by the free-of-charge repair warranty. For Pioneer-brand headphones (complimentary sample) warranty, see the quick start guide included with the headphones, or an instruction manual at the URL below. h ttps://jp.pioneer-audiovisual.com/support/purpose/manual_catalog/ manualdl/product_select_n.php?p_nm=1595) (Japanese)
- Page 56 ◎ Service contents are subject to change without notice. ■ au IC Card The au IC Card is lent to you by au. In case of loss or damage, the card will be replaced at your expense. When malfunction is suspected, or in case of theft...
-
Page 57: Regulatory Information
• Description of accessories φ3.5 audio jack, Bluetooth Headset, Handsfree USB cable For charging, peripherals, etc. microSD Card microSD/microSDHC/microSDXC nano IC card au Nano IC Card 04/non-au Nano IC Cards non-au Nano IC Cards can be used after SIM-unlocking the handset. - Page 58 • Frequency range of supported bands in EU GSM 900 Tx 880.2 to 914.8 MHz Rx 925.2 to 959.8 MHz DCS 1800 Tx 1710.2 to 1784.8 MHz Rx 1805.2 to 1879.8 MHz WCDMA FDD Ⅰ Tx 1922.4 to 1977.6 MHz Rx 2112.4 to 2167.6 MHz WCDMA FDD Ⅷ...
- Page 59 GNSS GPS: Rx L1 (1575.42 MHz) GLONASS: Rx G1 (1598.0625 to 1605.375 MHz) Galileo:Rx E1(1575.42MHz) BeiDou: Rx B1(1561.098 MHz) • Maximum transmit power GSM 900 +33 dBm (Power Class4) DCS 1800 +30 dBm (Power Class1) WCDMA FDD Ⅰ +24 dBm (Power Class3) WCDMA FDD Ⅷ...
- Page 60 The battery is embedded inside the product. Avoid removing the embedded battery since this may cause overheating or bursting. Do not dispose of the product with ordinary refuse. Take the product to an au Shop, or follow the local disposal regulations.
- Page 61 positioning the handset a minimum of 5 mm from the body. Use of other accessories may not ensure compliance with RF exposure guidelines. As SAR is measured utilizing the devices highest transmitting power the actual SAR of this device while operating is typically below that indicated above. This is due to automatic changes to the power level of the device to ensure it only uses the minimum level required to reach the network.
-
Page 62: Fcc Notice
FCC Notice - This device complies with part 15 of the FCC Rules. Operation is subject to the following two conditions: (1) This device may not cause harmful interference, and (2) this device must accept any interference received, including interference that may cause undesired operation. - Page 63 ■ FCC RF Exposure Information Your handset is a radio transmitter and receiver. It is designed and manufactured not to exceed the emission limits for exposure to radio frequency (RF) energy set by the Federal Communications Commission of the U.S. Government. The guidelines are based on standards that were developed by independent scientific organizations through periodic and thorough evaluation of scientific studies.
-
Page 64: For Inquiries, Call
For theft, loss, or malfunction (toll free) Business hours: 9:00 to 20:00 (7 days a week) From au mobile phones / non-au mobile phones / general subscriber phones: 0120-925-919 Cell phone and PHS operators collect and recycle unused telephones, batteries and battery chargers at stores bearing logo regardless of brand and manufacturer to protect the environment and reuse valuable resources.
Need help?
Do you have a question about the AQUOS sense3 plus SHV46 and is the answer not in the manual?
Questions and answers