Table of Contents
Advertisement
Quick Links
Advertisement
Table of Contents

Related Manuals for Motion R001


Summary of Contents for Motion R001
- Page 1 R12 Tablet PC Model R001 User’s Guide...
- Page 2 Motion. respective companies. The information in this document is provided “as is” The warranties for Motion products are set forth in the and is subject to change without notice. Motion is not express limited warranty statements accompanying liable for errors or omissions in this document.
-
Page 3: Table Of Contents
Using Motion Dashboard ............21 Accessing Motion tools from the Windows notification area ..... 22 Using touch . - Page 4 SnapWorks™ by Motion®........
- Page 5 Restoring your system ............57 Creating a system image.
-
Page 6: Chapter 1 Getting Started
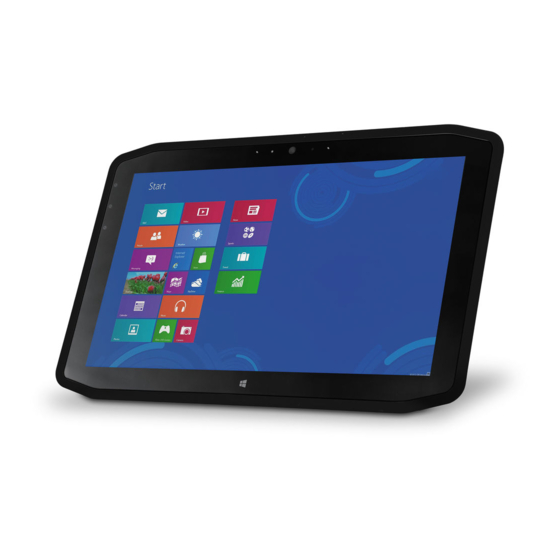
Getting Started The Motion R12 Tablet PC is a sleek and lightweight FHD 12.5” rugged tablet that provides robust computing power and a variety of integrated features to enable any mobile workflow. The R12 Tablet PC includes these features: •... -
Page 7: Optional Features
Optional features This section describes the optional features available when you purchase your R12. Mobile broadband with GNSS You can purchase an R12 Tablet PC with an optional embedded mobile broadband with Global Navigation Satellite System (GNSS) module that enables you to connect to a variety of mobile broadband networks for sending and receiving data wirelessly. -
Page 8: Tpm
With the built-in TPM 1.2 and Infineon Security Platform Tools, you can create and manage digital certificates, user and device authentication, full disk data encryption, and restricted network access. These features are most commonly used by enterprises and enabled by the system administrator. -
Page 9: Overview Of The R12
3 Touchscreen display Windows Home button Function button 1 Motion Dashboard (press), Windows Journal™ (press and hold) Function button 2 Motion SnapWorks™ (press), Pictures directory (press and hold) Tablet PC Settings or Barcode reader (if equipped with SlateMate) Function button 3... - Page 10 Web camera Interact with people online, stream video, or capture color images with a 2MP web camera. Web camera light Indicates that the web camera is active and provides lighting for images and video. Windows Home button Opens the Windows Start menu. Touchscreen display Use your finger or pen to access all the functions of the R12 on the 12.5”...
-
Page 11: Back
Back Volume buttons Documentation Microphone camera light Documentation camera Battery charge Battery Battery latch indicator light Battery charge indicator lights button Speakers Microphone Used for detecting sound when the documentation camera is in use. Documentation camera light Provides light for the documentation camera. Documentation camera 8MP auto-focus camera that takes photos you can save to your hard drive in BMP, JPG, and TIFF formats. -
Page 12: Right Side
Right side port Power HDMI SIM card slot Fingerprint reader port adapter Audio out port port Pen tether anchor SD card slot Power adapter port Connect the power adapter. Audio out port Supports external stereo speakers, a stereo headset, or a stereo headset with microphone using a standard TRS or TRRS 3.5mm plug. -
Page 13: Pen
The R12 digitizer pen includes a pressure-sensitive tip and a function button. The pen contains no batteries and requires no external power. Function button You can purchase additional pens from the Motion Computing Accessories page. For more information on using the pen, see Using touch on page 23. -
Page 14: Step 2: Connect To A Wireless Network
The R12 comes with built-in Wi-Fi and Bluetooth. Your Tablet PC may also be equipped with mobile broadband. To set up available wireless networks, follow these steps:. Step 1. Enable wireless from Motion Dashboard 1. From the Windows taskbar, tap the Motion Dashboard icon 2. Tap Wireless. 3. Enable the desired available wireless networks: •... -
Page 15: Step 3: Get Familiar With Your R12 Tablet Pc
For details, see Adjusting touch settings on page 25. • Use Motion Computing tools to customize your tablet according to your work style. See Using Motion Dashboard on page 21. • Open the writing pad and provide handwriting samples to improve handwriting recognition. -
Page 16: Lock And Unlock The Tablet Pc
Lock and unlock the Tablet PC To lock the Tablet PC, either: • Press the security button on the right side of the tablet. • If a keyboard is attached, press Ctrl+Alt+Delete. To unlock the tablet: • Press the security button or Ctrl+Alt+Delete again. -
Page 17: Optional Setup Tasks
Connect a display monitor to your R12 Tablet PC using either the VGA or HDMI port located on the docking station. After connecting the monitor, set up the external display from the Motion Dashboard as described in Setting up an external display on page 31. -
Page 18: For More Information
• Using your R12—Provides instructions for basic R12 tasks including how to customize your tablet to fit the way you work using Motion Dashboard, how to use the cameras, how to set up speech recognition, and more. • Caring for your R12—Provides suggestions for the care and maintenance of your Tablet... -
Page 19: Using Your R12
Using your R12 This chapter provides information about performing the following tasks: • Using Motion Dashboard on page 21 • Using touch on page 23 • Using handwriting recognition on page 28 • Using the Function buttons on page 29 •... -
Page 20: The R12 Desktop And Applications
The R12 desktop and applications When you start up your R12 for the first time, the desktop may look like the following illustration. Motion Computing applications appear in the taskbar and Windows® notification area. Getting Started document Motion Dashboard Motion OmniPass... -
Page 21: Using Motion Dashboard
Motion Dashboard is organized into categories, which are listed on the left of the Dashboard. Tap a category button to display its settings. The table on the following page lists some of the tasks you can perform using Motion Dashboard. -
Page 22: Accessing Motion Tools From The Windows Notification Area
You can access common Motion tools from the Windows notification area. Initially, the Motion icons don’t appear in the Windows notification area. Tap the arrow to view more icons. Tap Customize to have the icons appear in the Windows notification area. -
Page 23: Using Touch
Motion Dashboard—Opens the Motion Dashboard. • Options—Lists options you can set: – Show Hard Drive Activity—When selected, the Motion icon blinks when there is hard drive activity. – Automatic Display Rotation—When selected, the R12 automatically changes the viewing orientation (landscape to portrait or vice versa) when the tablet is physically rotated. -
Page 24: Calibrate Pen And Touch
You should do so when you first start using the Tablet PC and whenever the pointer doesn’t align with your pen or finger. To calibrate the digitizer: 1. Open Motion Dashboard. 2. Tap Pen & Tablet. 3. Under Pen & Tablet, tap Calibrate Digitizer. -
Page 25: Adjusting Touch Settings
Change the location of menus to appear to the right of your hand, which is helpful if you’re left-handed To change touch settings: 1. Open Motion Dashboard. 2. Tap Pen & Tablet. 3. Tap Pen & Input Devices. 4. Tap the Touch tab. -
Page 26: Adjusting Pen Settings
• Adjust how quickly the tablet responds when you press and hold the pen button To change pen settings: 1. Open Motion Dashboard. 2. Tap Pen & Tablet. 3. Tap Pen & Input Devices. 4. Tap the Pen Options tab. -
Page 27: Entering Text
3. Tap Tablet PC Settings. 4. Tap the Display tab. 5. Tap Setup next to “Configure your pen and touch displays. ” 6. Tap Touch Input. 7. Press the Enter key until you see the instructions appear on the display that you want to use for touch input. -
Page 28: Using Handwriting Recognition
To train the R12 to recognize your handwriting style: • Open Motion Dashboard. Tap Pen & Tablet, tap Pen & Input Devices, then tap the Handwriting tab. Select Use automatic learning (recommended). • Open the input panel. Tap Tools and select Personalize handwriting recognition from the drop-down menu. -
Page 29: Using The Function Buttons
To configure the Function buttons: 1. Open Motion Dashboard. 2. Tap Pen & Tablet. 3. Tap the Tablet PC Settings button. 4. In the Tablet PC Settings window, tap the Buttons tab. -
Page 30: Using The Windows Home Button
Windows Start menu. Windows Home button Setting display options You can use Motion Dashboard to customize your display settings such as the brightness level, display orientation and rotation, and setting up an external display. Adjusting the display brightness Changing the brightness of the display is useful when you want to conserve battery power. -
Page 31: Rotating The Display Orientation
2. Select or clear the Automatic Display Rotation check mark. Setting up an external display You can use your R12 with an external monitor or projector. Use Motion Dashboard’s Display scheme settings to choose the following types of display schemes: •... -
Page 32: Resetting Touch After Adding Other Monitors
After setting up an external monitor, touch might be disabled on your tablet because Windows 7 assumes that the external display is for touch input. You can enable touch on the correct display from the Motion Dashboard by following the procedure below. You’ll need a keyboard. -
Page 33: Using The Web Camera
BMP, JPG, and TIFF formats. The documentation camera is an 8MP, auto-focus camera. The camera lens is on the back of the tablet and includes a light to illuminate the subject. SnapWorks™ by Motion® The R12 includes an application called SnapWorks that enables you to shoot, save, edit, email, print, and copy your photos. - Page 34 The SnapWorks camera screen is displayed. 2. Point your camera at the subject you want to photograph. You can use the grid and center circle to help you line up your subject(s). 3. Tap the camera icon on the right side of the screen or press Function button 2 to take a picture.
- Page 35 Setting Description Camera Resolution Change the resolution of your photos (Note: These resolution values apply to the documentation camera only.) Image Storage Specify the location where your photos are stored. Default Saved Use to select the image format you want to use for your Image Type photos.
- Page 36 Editing a photo in SnapWorks 1. Tap the Gallery icon in the upper left-hand corner of the screen to open the directory where your photos are stored. You’ll see the most recent photos you have taken. 2. Double-tap the photo you want to edit. The photo opens and you’ll see two icons at the bottom left-hand corner of the screen that you can tap to open the SnapWorks photo editing tools.
- Page 37 Sending, printing, and copying your photos 1. To send your photo via email, tap the Gallery icon in the upper left-hand corner of the screen to open the directory where your photos are stored. 2. Tap your photo once to select it, then tap the Send icon You’ll see a pop-up window that tells you to choose a method to send your image.
-
Page 38: Using The Slatemate (Optional)
Using the SlateMate (optional) The R12-Series SlateMate is a 3-in-1 factory-installed personality module consisting of a Barcode Scanner (BCS), High Frequency RFID reader (HF RFID), and a serial port. The R12- Series SlateMate includes either a 3-in-1 module (BCS, HF RFID Reader, and Serial Port) or a 2-in-1 module (HF RFID Reader and Serial Port) configuration. - Page 39 QR Code Other barcode types can be enabled by using the EasySet application, which is available through Motion Computing Support. To use the barcode scanner: 1. Open the application that you want to receive the barcode data and place the insertion point in the appropriate field.
-
Page 40: Barcode Scanner Tips
• MiFare Classic To access the Motion sample RFID reader application: 1. From the Start menu, select All Programs > Motion Computing > Motion RFID Utility > MCRFID. To use the RFID reader: 1. Hold the R12 as shown in the photo. -
Page 41: Using The Battery
Guide packaged with the tablet. Checking tablet battery power You can check the remaining battery power by: • Opening the Motion Dashboard Power category and viewing the value under Remaining charge. • From the Windows Notification area, tapping the power indicator, which changes appearance depending on whether the Tablet PC is plugged in or running on battery. -
Page 42: Removing And Replacing The Battery
Removing and replacing the battery Before you remove the battery, ensure that the tablet is plugged in, turned off, or in Hibernate or Sleep mode. If you’re hot-swapping the battery (page 43), you can do so while the tablet is on and running on battery power. To remove the battery: 1. -
Page 43: Hot-Swapping The Battery
R12 will go into Sleep mode. To hot-swap the battery: 1. Remove the battery. 2. Insert the new battery. Important: Use only Motion Computing R12-Series batteries with the tablet. Chapter 2 Using your R12 Removing and replacing the battery 43... -
Page 44: Long-Term Battery Storage
Dynamic. Open Motion Dashboard, tap the Display tab and tap Dynamic. • Turn off wireless devices when they aren’t being used. Open Motion Dashboard, tap the Wireless tab, and clear the checkbox next to the wireless device you want to disable. -
Page 45: Changing The Power Plan
Changing the power plan By default, the R12 uses the Motion Optimized power plan that is designed specifically for Motion Computing tablets. It balances the need to save power while maximizing tablet performance. When the tablet senses no current activity, it goes into Power Saver mode automatically. -
Page 46: Using Wi-Fi (802.11A/G/N) And Bluetooth
Wireless cards consume battery power. To reduce power consumption when running on battery power and when Wi-Fi is not being used, disable Wi-Fi in the Motion Dashboard. Chapter 2 Using your R12... -
Page 47: Using Bluetooth
You can tap on this icon to get shortcuts to the Bluetooth Settings window and the Add New Connection Wizard. To reduce power consumption when running on battery power and when Bluetooth is not being used, disable Bluetooth in the Motion Dashboard. Enabling or disabling Bluetooth To enable or disable Bluetooth: 1. -
Page 48: Using Mobile Broadband With Gnss
Enabling Mobile Broadband with GPS Before you can establish a Mobile Broadband connection or use the Mobile Broadband GPS receiver, you must ensure that Mobile Broadband with GPS is enabled in Motion Dashboard. Wireless cards consume battery power. To reduce power consumption when running only on battery power and when Mobile Broadband is not being used, disable Mobile Broadband and GNSS in the Motion Dashboard. -
Page 49: Using The Gnss Receiver
Before you can connect to a mobile broadband network, you must have an active account with a cellular network provider and obtain a SIM card for mobile broadband access. To set up Mobile Broadband with GNSS (optional): 1. Start AirCard Watcher™. From the Start menu, select All Programs > Sierra Wireless > AirCard Watcher. -
Page 50: Using The Discrete Gps Receiver With Waas, Egnos, And Msas
Using the discrete GPS receiver with WAAS, EGNOS, and MSAS The discrete GPS receiver uses satellites to provide the current location, altitude, heading, and horizontal velocity of the tablet through a virtual communications port. The module supports the Wide Area Augmentation System (WAAS) for improved accuracy in the United States;... -
Page 51: Using Motion Omnipass
After enrolling as an OmniPass user, you can use your fingerprint to log on to Windows, secure files, applications, and websites. To enroll as a new OmniPass user: 1. Start the Motion OmniPass application by tapping the OmniPass icon in the Windows taskbar 2. Tap Get started. -
Page 52: Modifying Your Omnipass
You may have to swipe your finger over the sensor twice for it to be read completely. After you have successfully enrolled, you’ll be asked whether you want to log on to Windows. The next time you restart your Tablet PC, you’ll be able to log in with your fingerprint. Additionally, you’ll use your fingerprint to open OmniPass. -
Page 53: Omnipass Settings
Use your OmniPass to sign in to your password-protected websites. • Use your OmniPass to log in to Windows. • Use your OmniPass to automatically remember all of your websites. • Pin Motion OmniPass to the taskbar. Chapter 2 Using your R12 Using the fingerprint reader 53... -
Page 54: Using Winmagic® Securedoc
Using WinMagic® SecureDoc™ WinMagic SecureDoc is an application that enables you to encrypt your hard drive. This application is included with your R12, but you have to enable it to implement hard drive encryption. To enable WinMagic SecureDoc: 1. From the Start menu, select All Programs > SecureDoc Disk Encryption> SecureDoc Control Center. -
Page 55: Using The Sim Card Reader
4. After you have enabled encryption, reboot your Tablet PC, and manually restart SecureDoc to complete the encryption process. For more information about WinMagic SecureDoc, go to http://www.winmagic.com/ products/full-disk-encryption-for-windows. Using the SIM card reader The SIM card slot holds one SIM card. You need to use a SIM card only if you’re using mobile broadband on a GSM/UMTS/HSPA network. -
Page 56: Using The Sd Card Reader
2. Open the port cover. 3. Push the card in slightly until it pops out. Using the SD card reader The R12 includes an SD card slot that you can use with an SD memory card to play media files, view files from your camera or other devices, or to use for extra file storage. To insert an SD card: 1. -
Page 57: Backing Up Your System
Backing up your system To protect against loss or accidental deletion, schedule backups to occur automatically on a regular basis. Windows 7 includes a backup tool that you can use to configure what you want to backup and schedule backups on a regular basis. Restoring your system Windows 7 includes specialized tools for restoring your system in case of system failure. -
Page 58: Restoring Your System Image From Windows Control Panel
Restoring your system image from Windows Control Panel Use the Recovery tool from the Control Panel to restore your system if you can still access Windows 7 or if you’re restoring your system image onto a different computer. To restore your system from Windows Control Panel: 1. -
Page 59: Restoring Your System Without A System Image
Windows.old. 10.If you have Mobile Broadband, you’ll need to reinstall these drivers. Go to C:\Motion\Software\Sierra. Select the folder in this directory that corresponds to the card type that you have and open it to find the driver file. -
Page 60: Caring For Your R12
Caring for your R12 Proper care and maintenance will keep your R12 Tablet PC working and in good condition. For general information about care of the tablet and its components and accessories, see the Safety and Regulatory Guide included with your Tablet PC. WARNING: Follow the guidelines listed below when caring for your R12 Tablet PC and its components. -
Page 61: Caring For The Display
Make sure you wipe off the pen with a soft cloth to avoid scratching the display. • If you’ll be working in harsher environments, Motion recommends that you purchase the Rugged Digitizer Pen for your R12, which is available for purchase from the... -
Page 62: Replacing Pen Tips
To order pens or new pen tips, go to Motion Computing Accessories. Replacing pen tips Pen tips eventually wear down or get damaged, so the pen includes extra tips and a tool for replacing them. With typical use, you should change the pen tip every 90 days. If you use the pen in a dirty or dusty environment, you should change the pen tip every 30 days. -
Page 63: Traveling With Your R12 Tablet Pc
Use the following tips when you travel with your R12 Tablet PC: • Put the Tablet PC in a case to protect the display. Motion Computing sells a variety of cases for the R12. You can purchase one at the Motion Computing Accessories page. -
Page 64: Chapter 4 R12 Troubleshooting And Faqs
R12 Troubleshooting and FAQs Motion Computing Tablet PCs are thoroughly tested for performance and quality, but occasionally issues can still occur. If you don’t find the information you’re looking for in this section, go to Motion Computing Support. Enterprise users should contact their support organization for assistance with resolving tablet, application, or connectivity issues. -
Page 65: Battery Issues
Remove the accessory devices or use AC power if possible. • Use Motion Dashboard to enable the Power Saver Plan. Open Motion Dashboard, tap Power, then tap Power Options, and then select Power Saver from the list of plan choices. -
Page 66: Display Issues
Windows® may not assign touch to the correct display. To fix this issue, make sure a keyboard is attached to your tablet and then open Motion Dashboard. Tap Pen & Tablet, then tap Tablet PC Settings. Tap the Display tab, then tap Setup next to “Configure your pen and touch displays. -
Page 67: Touch Or Pen Issues
Run touch setup on the desired display. Make sure a keyboard is attached to your tablet and then open Motion Dashboard. Tap Pen & Tablet, then tap Tablet PC Settings. Tap the Display tab, then tap Setup next to “Configure your pen and touch displays. ” Tap Touch Input, then press the Enter key until you see the instructions appear on the display that you want to use for touch input. -
Page 68: Ports And Connectors Issues
Network and Internet. View your active networks. If no network is connected, tap Connect to a network and select a network from the list. • Wi-Fi must be enabled from the Motion Dashboard. Open Motion Dashboard, tap Wireless, and tap the checkbox next to Enable 802.11 Internal Wireless. •... -
Page 69: Bluetooth Issues
Bluetooth issues I can’t connect to a Bluetooth device • Ensure that Bluetooth is enabled.Open Motion Dashboard, tap Wireless, and tap the checkbox next to Enable Bluetooth Internal Wireless. • Your Bluetooth device must be paired. From the Windows® notification area, tap the Bluetooth icon and select Add a Device. -
Page 70: Bluetooth Wireless Tips
Bluetooth wireless tips Motion Computing and its Bluetooth partners have worked to ensure a positive experience with this technology and to ensure Bluetooth interoperability. In doing so, we have found the following issues: • Interference—If you’re running Bluetooth and Wi-Fi at the same time, interference can affect the Bluetooth performance. -
Page 71: Audio Issues
• The volume may be set too low or muted. You can use Motion Dashboard to increase the volume or turn mute off. Open Motion Dashboard, then tap Audio, and move the slider to the desired volume. - Page 72 Power saver power plan. Open Motion Dashboard, tap Power. Tap Power Options and select Power saver. • Use the Dynamic display setting. This automatically controls the display to conserve power. Open Motion Dashboard, tap Display, then tap Dynamic. • Set the display to the dimmest level you’re comfortable viewing. Open Motion Dashboard, tap Display, then move the Brightness slider to the desired level.
- Page 73 • You will need a travel plug adapter, which you can find in airports and travel stores. You don’t need to buy a voltage converter; the Motion AC adapter will automatically adjust to different voltages. Where can I learn more about my R12? •...
-
Page 74: Index
BIOS password 71 Getting Started doc 20 blinking power button 65 introduction 20 Bluetooth digitizer discovery 69 Motion Dashboard options 25 enabling 47 digitizer pen setting up 47, 70 calibrating 24 tips 70 Discrete GPS receiver with WAAS, EGNOS, troubleshooting 69... - Page 75 Function button 3 9, 29 touch 32 using 29 touch input 26 monitors, using multiple 31 Motion Dashboard 20, 21, 23 gestures 25 opening 14, 21 enable multi-touch 25 using 21–22 Getting Started 20 Motion Optimized power plan 45...
- Page 76 Pen & Input Devices 25 about 45 pen bay 12 Sleep mode 16 pen tether 17 SnapWorks™ by Motion® 33 pen tether anchor 12 configuring settings 34 portrait mode 31 copying a photo 37 portrait orientation 31 editing a photo 36...
- Page 77 optional features 7 shutting down 45 troubleshooting 68 software 59 USB port 12 training tutorials 73 using Tablet PC settings 802.11a/b/g 46 adjusting 26 Bluetooth 47 taking a photo 33 external monitors 31 taskbar 14, 21 microphones 32 text mobile broadband with GPS (option- entering 27 al) 49 touch...
Need help?
Do you have a question about the R001 and is the answer not in the manual?
Questions and answers