Table of Contents
Advertisement
Advertisement
Table of Contents

Subscribe to Our Youtube Channel
Related Manuals for Autel Robotics EVO 2


Summary of Contents for Autel Robotics EVO 2
- Page 2 These safety instructions will show you how to get started safely with your EVO 2. Only you can ensure that you fly your EVO 2 securely and never jeopardize the safety of yourself, other people, or their property.
- Page 3 WARNING! • Only use batteries and charging devices that came with the aircraft or are sold by Autel Robotics for use with the EVO 2. Do not tamper with the battery pack or its charger. • Battery electrolytes are highly corrosive. If any electrolyte comes in contact with your skin or your eyes, immediately flush the affected area with clean running water and seek medical attention.
- Page 4 explosion, leakage, or other hazards. • If the battery starts to swell, smoke, leak, or show any signs of damage, stop using or charging it immediately and submerge it in a container of salt water. • Do not expose the battery to temperatures below -10° C (14° F) or above 40° C (104°...
- Page 5 • All warnings and error messages displayed on the app have been addressed. Only use accessories that came with the aircraft or are sold or authorized by Autel Robotics for use with the aircraft. Using unapproved accessories presents serious risks to safety and will void the product’s warranty.
- Page 6 • Keep the aircraft away from moisture and heat sources. • The recommended storage temperature for the aircraft is 22° C to 28° C (72° F to 82° F). The Autel Robotics support team stands ready to help via chat, phone or email at www.autelrobotics.com/contact-us/.
-
Page 7: Table Of Contents
Contents Chapter 1 About This Manual 1.1 Legend 1.2 Before First Flight 1.2.1 Reading the Included Documents 1.2.2 Autel Explorer App Installation (Optional) Chapter 2 Getting to Know Your Smart Drone 2.1 Aircraft 2.1.1 Functionality Description 2.1.2 Flight LED Indicators 2.1.3 Aircraft Battery 2.1.4 Gimbal &... - Page 8 3.3 Aircraft Preparation 3.3.1 Unfolding the Aircraft 3.3.2 Propellers Installation 3.3.3 Compass Calibration Chapter 4 Flight Operations 4.1 Preflight Checklist 4.2 Remote Control & Flight Operations 4.2.1 Motor Start & Aircraft Takeoff 4.2.2 Command Stick Controls (Mode 2) 4.2.3 Landing & Motor Shutdown Chapter 5 Maintenance &...
-
Page 9: Chapter 1 About This Manual
Thank you for purchasing the EVO 2, and welcome to the Autel Robotics family. Use this manual to get a detailed look at the EVO 2’s features and how best to make use of them when operating the aircraft and remote control. Please read it in its entirety —... -
Page 10: Autel Explorer
Autel Explorer App Manual: If you plan to use our mobile app, download the manual for it at www.autelrobotics.com/support/downloads/. WARNING Make sure the aircraft and other components on the Packing List are accounted for in the box. Do not use unapproved components or attempt to modify the aircraft in any way inconsistent with the instructions in the official aircraft documentation. -
Page 11: Chapter 2 Getting To Know Your Smart Drone
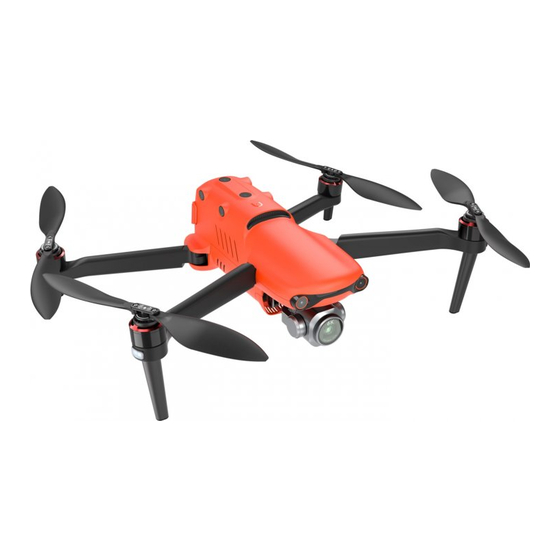
Getting to Know Your Smart Drone Now you can explore, discover and create like never before. The EVO 2 delivers not only advanced features like obstacle avoidance and intelligent flight modes, but also high-tech muscle that brings home a top speed of 44 mph, a 35-minute flight time and an operating distance of 16 miles. - Page 12 ③ Front LED Indicators ⑥ Camera Gimbal Right Side ⑦ Aircraft Battery ⑨ USB Port ⑧ Fan Exhaust ⑩ Remote Control Pairing Button/Pairing Indicator Rear Side ⑪ Power Button ⑬ Rear LED Indicators ⑫ Rear Vision System...
-
Page 13: Flight Led Indicators
NOTE There is a protector on the back designed to protect the Micro-USB Port and Remote Control Pairing Button/Pairing Indicator. Remember to put it back in place before flying the aircraft. Bottom Side ⑭ Downward Vision Lighting LED ⑮ Ultrasonic Sensor ⑯... -
Page 14: Aircraft Battery
Gesture command has been received 2.1.3 Aircraft Battery The EVO 2’s all-new, custom-designed rechargeable Li-Po battery features high energy density and capacity, and can provide up to 35 minutes of continuous flight with a full charge. It should be charged exclusively using the supplied charger. - Page 15 Aircraft Battery ① Removal Button ② Battery Level Indicators ③ Power Button Turning On the Battery Make sure the battery is off before attaching it to the aircraft. After attaching it, press and hold the Power Button for 3 seconds. The battery level indicators will display the current battery level.
- Page 16 The additional functions listed below protect and preserve the battery. Storage Self-Discharge Protection: If the battery is stored in a high- temperature environment or is idle for 6 days with a high power level, self- discharge protection will be activated. The battery will discharge automatically to a safe level.
-
Page 17: Gimbal & Camera
122° F). You can use the remote control's gimbal pitch dial or the Autel Explorer app to adjust the pitch axis to any angle from 0° to 90° . Three user-changeable gimbal modules are available for use with the EVO 2: 586 gimbal: provides an 8K video camera ... - Page 18 ⑦ Roll Motor ④ Camera IMPORTANT • The EVO 2 camera gimbal is held in place with a gimbal holder to protect the gimbal from the incidental rotation — and to avoid damage when stored. • Remember to remove the holder before powering on the aircraft.
- Page 19 Removing the Gimbal Place the aircraft on a level surface with the gimbal compartment facing upward. Using a small star screwdriver, unscrew the two screws securing the gimbal’s cover, and remove the gimbal cover. Then use a Phillips head screwdriver to unscrew the screws securing the FPC connector, and pull the head of the connector cable out of its slot.
- Page 20 Replacing the Gimbal Gently grasping the two vibration absorber tails with your thumb and forefinger, pick up the gimbal. Slide the gimbal down and forward in a straight line, following the gimbal compartment groove. Notes: 1) Ensure that the loops at the front of the gimbal align with the two pins in the gimbal compartment at the nose end of the aircraft.
- Page 21 Camera Three camera modules are available for use with the EVO 2: 8K camera: Takes photos with a resolution of up to 48 MP (8000 x 6000), and records 8K video at 25 fps, 6K video at 30 fps, or 4K video at either 30 or 60 fps, with a bit rate of up to 120 Mbps.
- Page 22 Before turning on the aircraft, insert a micro SD card into the port illustrated below. The EVO 2 supports SD card capacity up to 128 GB. If you plan to shoot HD video, we recommend using a Class 10 or UHS-1 micro SD card (such as the 32 GB SanDisk Extreme®...
-
Page 23: Built-In Smart Flight System
USB-C Port as shown below. 2.1.5 Built-in Smart Flight System The EVO 2 delivers stable and user-friendly flight control via its built-in Smart Flight System. The system enables a variety of advanced functions, including Go Home, Failsafe, and the Starpoint Positioning System, and operates using the modules described below. -
Page 24: Smart Flight Features
) for 3 seconds on the remote control. Once the aircraft receives this command, it will return automatically and land at the present home point. The EVO 2 can detect and avoid obstacles on its flight path using its Forward Vision System. The remote control’s function will be disabled while the aircraft... - Page 25 Failsafe The Failsafe function is designed to help the EVO 2 automatically return home or land in its current position when necessary. Failsafe will be activated in the two situations described below.
- Page 26 NOTES • If the aircraft is within 50 horizontal meters (150 feet) from the home point when your aircraft battery level reaches 25% (Low Battery Warning), the aircraft will not perform the Go Home procedure. • If GPS is unavailable when Failsafe is activated during a Low Battery Warning, the aircraft will not execute the Go Home procedure.
- Page 27 2.1.7 Omnidirectional Binocular Vision Sensing System The EVO 2’s front, rear, left, right, top, and bottom binocular vision sensing systems use image data to calculate the distance between the aircraft and potential obstacles. The system will halt the aircraft’s forward progress when an obstacle is detected.
- Page 29 Prerequisites Ensure that the aircraft is in GPS or visual positioning mode. Wait until the flight LED indicators are either slow flashing green or double flashing red before taking off. Exercise increased caution while flying if the GPS signal is weak or visual positioning requirements cannot be met —...
-
Page 30: Remote Control
2.2 Remote Control The EVO 2 has an unobstructed transmission range of up to 7 km under optimum conditions. The remote control supports live video downlink, and functions with or without a paired mobile device. The video downlink system and aircraft remote control system operate at 900 MHz or 2.4 GHz. -
Page 31: Functionality Description
2.2.1 Functionality Description Displays the flight status, warning messages and Flight Information Panel live video feed Command Sticks Control the orientation and movement of the aircraft Mobile Device Holder With a built-in USB connector and adjustable holder ... -
Page 32: Live View Panel
Indicate the remote control’s remaining battery level ⑩ Battery Level Indicators ⑪ Power Button Press and hold for 2 seconds to power on/off the remote control ⑫ Shutter Button Takes photos. When Burst Mode is turned on, several images will be taken with one press. For details, see the App Manual. - Page 33 ① Flight Altitude Aircraft altitude relative to the home point ② Flight Distance Horizontal distance between the aircraft and home point ③ Flight Speed Current speed of the aircraft The camera’s angle tilted by the gimbal (0° to 90°) ④ Tilt Angle ⑤...
- Page 34 Image Transmission Mode Press the Screen Navigation Button (DISP) on the remote control when you want to enter the Image Transmission Mode. Then follow these steps: Scroll the Screen Navigation Dial to highlight the different setting options. Press the Screen Navigation Dial to enter the highlighted option. Scroll the Screen Navigation Dial again to set different values.
- Page 35 the ISO and shutter speed, and is used when the camera is set to Auto. Adjust the EV to increase or decrease the exposure ⑨ Shutter Fast shutter speeds let you capture action in motion; slow shutter speeds are suitable for low-light scenarios ⑩...
- Page 36 Flight Control Settings • Turn Novice Mode on/off. • Choose the Speed Limit value. • Adjust the Go-Home Altitude, Altitude Limit, and Distance Limit. NOTE When Novice Mode is activated, the aircraft will operate with a fixed maximum Go-Home Altitude of 30 m (90 ft), a Speed Limit of 5 m/s (15 mph), an Altitude Limit of 30 m (90 ft), and a Distance Limit of 100 m (300 ft).
-
Page 37: Indicator Lights
General Settings Language: Select the displayed language. Units: Choose the unit of measurement displayed in Flight Control Settings: Metric (m/s), Metric (km/h) or Imperial. Format SD Card: Use this to ensure that your SD card is in an acceptable format. - Page 38 5 quick beeps every second for 5s, with Aircraft Critically Low Battery Warning 5 remote control vibrations (about 15%) Remote Control Low Battery Warning 1 quick beep every second for 5s (10%) Remote Control Critically Low Battery 5 quick beeps every second for 3s, with Warning (5%) two remote control vibrations Aircraft &...
-
Page 39: Chapter 3 Preflight Preparation
Chapter 3 Preflight Preparation The EVO 2 features a user-friendly design and comes fully assembled out of the box. In order to ensure safe drone operation, please read the instructions and warnings below before your first flight. 3.1 Battery Preparation 3.1.1 Aircraft Battery Installation... -
Page 40: Charging
3.1.3 Charging The aircraft battery and remote control can be charged simultaneously using the supplied charger. There are two connectors attached to the charger’s adapter block. As shown below, the fixed cable goes with the aircraft battery, and the USB cable is used to charge the remote control. ... -
Page 41: Remote Control Preparation
charging cycle, and will turn off when the battery is fully charged. Battery Level Indicator Statuses (While Charging) - Solid Green Light - Flashing Green Light During Charging: The Power Button ( ) on the remote control will be green when it is powered on, and red when it’s powered off. -
Page 42: Powering Up/Off The Remote Control
The antennas can be rotated 270 degrees as shown in the diagram. Positioning the Antennas Vertically align the antennas in parallel with each other, as shown below. 3.2.2 Powering On/Off the Remote Control Powering On Press and hold the Power Button ( ) for 2 seconds until you hear a short beep. -
Page 43: Pairing The Aircraft & Remote Control
dropped on the ground, or the aircraft’s flight direction does not match control inputs), it is recommended to calibrate the remote control. You can calibrate the remote control by using the Autel Explorer™ app (for details, see the App Manual) or according to the following steps. Turn off the remote control. - Page 44 Turn off the remote control. Remove the gimbal guard first, and then turn on the aircraft . Press and hold the Remote Control Pairing Button on the lower right side of the aircraft for 3 seconds. The Pairing Indicator will flash quickly, indicating the aircraft is ready to pair with the remote control.
-
Page 45: Aircraft Preparation
3.3 Aircraft Preparation 3.3.1 Unfolding the Aircraft Removing & Reinstalling the Gimbal Holder Always remove the gimbal holder before powering on the aircraft. Slowly pull out the attached gimbal holder, as shown below. After using the aircraft, reinstall the gimbal holder to protect the gimbal from damage. -
Page 46: Propellers Installation
first, and then the front arms. 3.3.2 Propeller Installation WARNING Power off the aircraft before attaching or detaching propellers. IMPORTANT Wear protective gloves when attaching or detaching propellers. Legend Lock Direction: Fasten the propeller by rotating it as indicated. Unlock Direction: Unfasten the propeller by rotating it as indicated. Black-coded propeller >... -
Page 47: Compass Calibration
• Always remove the propellers before testing the motors. 3.3.3 Compass Calibration Because the compass is calibrated out of the box, user calibration is typically unnecessary. If compass error messages appear, or the aircraft’s flight direction does not match control inputs, or you fly the aircraft at a very long distance from your calibration position, follow the steps below to calibrate it. - Page 48 Hold the aircraft vertically with the nose facing downward and rotate it until the Rear LED Indicators on the aircraft turn solid green. NOTES • If the calibration is unsuccessful, the Rear LED Indicators on the aircraft will turn solid red. In this case, repeat the above steps. •...
-
Page 49: Chapter 4 Flight Operations
Chapter 4 Flight Operations 4.1 Preflight Checklist Follow these steps to carry out a full preflight checkup: • Fully charge the aircraft battery, remote control, and your mobile device. • Remove the gimbal holder. • Verify that the propellers are in proper condition and are correctly attached. •... -
Page 50: Motor Start & Aircraft Takeoff
Start the motors and take off using the remote control. Pilot the aircraft carefully. Land the aircraft, and then shut down the motors. 4.2.1 Motor Start & Aircraft Takeoff NOTE The aircraft will not take off if the battery level is 15% or lower. ... -
Page 51: Command Stick Controls (Mode 2)
4.2.2 Command Stick Controls (Mode 2) TIPS If you are new to flying, move the Command Sticks slowly until you become familiar with operating the aircraft. Left Command Stick Ascend/Descend Control the ascent and descent of the aircraft by pushing the stick up or down. Left Side View Left Side View ... -
Page 52: Landing & Motor Shutdown
Rear View Rear View 4.2.3 Landing & Motor Shutdown The EVO 2 can be landed manually, automatically, or passively. Follow the steps below to land the aircraft by each of these methods. IMPORTANT Always land gently on a flat, level, open surface. - Page 53 When the aircraft reaches the target position, release the Command Sticks to let it hover. Push the Left Command Stick downwards slowly to land the aircraft. Shutting down the motors Choose one of the following methods to shut down the motors after the aircraft reaches the ground: Push the Left Command Stick to the Hold both Command Sticks toe-in...
- Page 54 NOTES • Automatic landing is also available in ATTI mode ( 12). However, the aircraft may drift in this mode, so you should monitor its altitude. • When the Low Battery Warning (25%) is displayed, the aircraft's rear LEDs will flash red and the remote control Power Button ( ) will turn solid yellow.
-
Page 55: Chapter 5 Maintenance & Service
Maintenance & Service 5.1 Firmware Updates To optimize the performance of your EVO 2, Autel Robotics will provide firmware updates on an ongoing basis. You can download the latest firmware in one package from our official website. When a firmware update is available, you will receive a prompt on the Autel Explorer app after connecting it to the aircraft. -
Page 56: Troubleshooting Tips
Q1. If the aircraft indicates a failure during self-check (Rear LED Indicators will turn solid red): • A hardware problem has been detected. Please contact Autel Robotics customer support here: www.autelrobotics.com/contact-us/ Q2. If the motors fail to start up, verify the following: •... -
Page 57: Storage & Maintenance
Initiate Go Home to command the aircraft to automatically return to the home point 5.3 Storage & Maintenance To ensure optimum EVO 2 performance, please read and follow the maintenance instructions in this section carefully. • Store the aircraft, the battery and the remote control in an environment that’s clean, dry, cool and ventilated. -
Page 58: Customer Service
5.5.1 Technical Support If you have any questions or concerns regarding our products, please contact Autel Robotics customer support: • Telephone: (844) 692-8835 (USA) • Email: support@autelrobotics.com • In person: local distributors or agents 5.5.2 Repair Service... - Page 59 • A complete description of the problem, with photo attachments • For warranty repairs: proof of purchase • For non-warranty repairs: Preferred method of payment Autel Robotics customer support will conduct a preliminary evaluation of the problem and contact you within 2 days.
-
Page 60: Chapter 6 Appendix
For EVO 2 Series with model EF8, SAR tests are conducted using standard operating positions accepted by the FCC/ISEDC with the device. When used, please keep the distance with a minimum of 10mm from the body. -
Page 61: Flight Restricted Area Illustration
20cm between the radiator & your body. For EVO 2 Series with model EF8, SAR tests are conducted using standard operating positions accepted by the FCC/ISEDC with the device. When used, please keep the distance with a minimum of 10mm from the body. - Page 62 NOTE The pilot is responsible for ensuring compliance with all relevant flight rules and regulations. Category I: Major airports & flight areas where drones operate at low altitudes • Take-off Restricted Zones (No-Fly Zones) These areas are set within 2.4 km (1.5 mi) (based on country-imposed rules) around the midway point of specified locations.
-
Page 63: Specifications
These areas are set within 1 km (0.5 mi) of the center of the specified locations where takeoff and flight are prohibited. • Warning Zone Once the aircraft enters a region within 2 km (1 mi) of the center of the Warning Zone site, the app will display a warning message. - Page 64 Storage Temperature -10° C to +40° C (14° F to 104° F) Weight 1050 g (2 lb 5 oz) (Battery & Propellers included) Aircraft Battery Specifications Battery Type Lithium-Polymer Capacity 7100 mAh Battery Voltage 11.55 V Charging Environment Temperature 5° C to 45° C (50° F to 113° F) Discharging Environment -20°...
- Page 65 Storage capacity 4 GB - 128 GB FAT32/exFAT File Formats Photo: JPG/DNG Video: MOV/MP4 Remote Control Specifications OLED Screen Nits Max. Operating Time 3.2 h RF Frequency 2400 - 2483.5 MHz 902 - 928 MHz Operating Temperature 0° C to 40° C (32° F to 104° F) 1 year: -20°...
Need help?
Do you have a question about the EVO 2 and is the answer not in the manual?
Questions and answers