CHIEF CMA347 Installation Instructions Manual
Vibration damper mount
Hide thumbs
Also See for CMA347:
- Selection manual (2 pages) ,
- Installation instructions manual (8 pages)
Table of Contents
Advertisement
Quick Links
I N S T A L L A T I O N I N S T R U C T I O N S
Instrucciones de instalación
Installationsanleitung
Instruções de Instalação
Istruzioni di installazione
Installatie-instructies
Instructions d´installation
Vibration Damper Mount
Spanish Product Description
German Product Description
Portuguese Product Description
Italian Product Description
Dutch Product Description
French Product Description
CMA347
Advertisement
Table of Contents

Related Manuals for CHIEF CMA347


Summary of Contents for CHIEF CMA347
- Page 1 I N S T A L L A T I O N I N S T R U C T I O N S Instrucciones de instalación Istruzioni di installazione Installationsanleitung Installatie-instructies Instruções de Instalação Instructions d´installation Vibration Damper Mount Spanish Product Description German Product Description Portuguese Product Description Italian Product Description Dutch Product Description French Product Description CMA347...
-
Page 2: Installation Instructions
Reinforce the structure as required before installing the component. Chief® is a registered trademark of Milestone AV Technologies. All rights reserved. WARNING: Exceeding the weight capacity can result in serious personal injury or damage to equipment! It is the installer’s responsibility to make sure the combined weight of... - Page 3 Installation Instructions CMA347 LEGEND Tighten Fastener Pencil Mark Apretar elemento de fijación Marcar con lápiz Befestigungsteil festziehen Stiftmarkierung Apertar fixador Marcar com lápis Serrare il fissaggio Segno a matita Bevestiging vastdraaien Potloodmerkteken Serrez les fixations Marquage au crayon Loosen Fastener Drill Hole Aflojar elemento de fijación...
-
Page 4: Tools Required For Installation
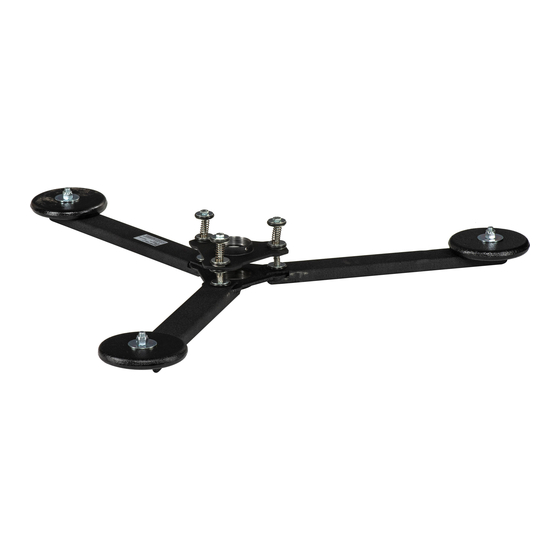
CMA347 Installation Instructions TOOLS REQUIRED FOR INSTALLATION 1/2" (12.7mm) 5/32" (included) PARTS A (1) [CMA347 mount] F (1) E (3) C (2) 5/32" D (6) [spring] [socket head set screw] B (3) [vibration bushing] [1/4" washer]... -
Page 5: Inspect Mount Before Installation
Secure NPT 1 1/2” upper mounting pipe to ceiling plate following the installation instructions provided with the ceiling plate (not included). (See Figure 1) Thread CMA347 mount top (A) onto NPT 1 1/2” upper mounting pipe. (See Figure 1) NOTE: Ensure there is no direct contact between mount and surrounding structure. -
Page 6: Set-Up For Over 15 Pounds
CMA347 Installation Instructions Set-Up Remove 0-15lb application hardware Set-up For Over 15 Pounds 1/4" tap bolt The mount is shipped pre-assembled for applications under 15 pounds. If the mount is set-up to accommodate a weight of up to 15lbs (as shipped), it needs to be reconfigured to work properly with group "A"... -
Page 7: Set-Up For 15 Pounds And Under
Installation Instructions CMA347 Set-up For 15 Pounds and Under Remove 35lb-15lb application hardware The mount is shipped pre-assembled for applications under 15 pounds. If the total combined weight of the projector, projector 1/4" tap bolt mount, and lower mounting pipe is 15lbs or below, proceed with mount installation. -
Page 8: Mount Removal
CMA347 Installation Instructions Mount Removal To remove the CMA 347 vibration mount: Disonnect power cables and wires from projector. Uninstall projector from projector mount. (See Figure 6) Uninstall projector mount from NPT 1 1/2” lower mounting pipe following the instructions provided with the projector mount. - Page 9 Installation Instructions CMA347...
- Page 10 CMA347 Installation Instructions...
- Page 11 Installation Instructions CMA347...
- Page 12 Europe A Fellenoord 130 5611 ZB EINDHOVEN, The Netherlands P +31 (0)40 2668620 F +31 (0)40 2668615 Chief Manufacturing, a products division Asia Pacific A Office No. 1 on 12/F, Shatin Galleria of Milestone AV Technologies 18-24 Shan Mei Street...
Need help?
Do you have a question about the CMA347 and is the answer not in the manual?
Questions and answers