
Related Manuals for Matador Radiant Pro


Summary of Contents for Matador Radiant Pro
- Page 1 Before using the BBQ, remove any packaging material within and around the BBQ supplied for protection during transit. radiant pro C H A R C O A L B B Q Retain manual for further reference.
-
Page 2: Table Of Contents
Smart device control 37-44 Warranty 45-47 Notes 48-49 CONTACT INFORMATION For spare parts, order from your nearest Bunnings Warehouse. For service and warranty queries, please contact Mayo Hardware at matador@mayohardware.com.au or call; 1300 360 211 (AUS) 09 415 6240 (NZ) -
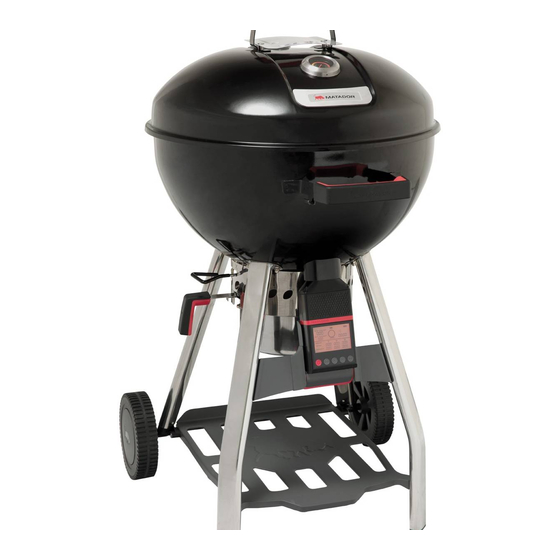
Page 3: Features & Benefits
Large Handles Bottom Shelf Lid Hanger Charcoal Grate Bottom Air directional Lid Air Vent Ash Catcher Damper Nozzle Temp Gauge Hinged Cooking Tool Charcoal Grate Hangers Baskets BARBECUE DIMENSIONS Length Width Height 620 mm 708 mm 1120 mm MATADOR INSTRUCTION MANUAL... -
Page 4: Important Safety Information
Important safety information Read the Instruction Manual thoroughly before assembling or using the BBQ. flame. Do not use water to extinguish grease CAUTION: FOR OUTDOOR USE ONLY. fires. • We recommend assembling this BBQ with • Use caution and common sense when operating another person. -
Page 5: Do's & Don'ts
• Always use oven gloves when handling the meat probes and pit probe to avoid accidental burns. • Do not expose device or components to open flames or temperature exceeding 300°C (or 572°F). MATADOR INSTRUCTION MANUAL... -
Page 6: Positioning The Bbq
Positioning The BBQ • This BBQ should only be used in an above communication between the phone and BBQ. ground, open air situation with natural • Any enclosure in which the BBQ is used shall ventilation. comply with one of the following: •... -
Page 7: Before You Cook
Instructions for reference only: NOTE: To extend the life of your BBQ, make sure that hot coals and wood DO NOT touch the walls Step 1 - Remove the cooking grate from the BBQ of BBQ. MATADOR INSTRUCTION MANUAL... -
Page 8: Using The Bbq
Your BBQ comes complete with charcoal baskets which The Radiant Pro comes with an Air Nozzle that can can be used for direct and indirect cooking. For be used to direct the air movement within the BBQ’s additional information and tips, we also recommend fire bowl. -
Page 9: Regulating Temperature
Manual Control The Radiant Pro comes with an Air Controller unit The Radiant Pro can also be used without the Air that has been designed to help you maintain a pre- Controller. To do this, remove the Nozzle from inside programmed cooking temperature. -
Page 10: Adding Fuel During Cooking
Adding Fuel During Cooking Additional charcoal may be required to maintain or Starter to light additional charcoal and add to increase cooking temperature. existing fire. Step 1 - Stand back and carefully lift off the BBQ lid. Warning: Never add charcoal lighting fluid to hot Use caution since flames can flare-up when natural or even warm coals as flashback may occur causing air suddenly comes in contact with fire. -
Page 11: After-Use Safety
If rust appears on the exterior surface of your the provided storage pouch to protect your grill, clean and buff the affected area with steel Controller. wool or fine grit emery cloth. Touch-up with a good quality high-temperature resistant paint to maintain the appearance. MATADOR INSTRUCTION MANUAL... -
Page 13: Part Diagrams
21. Wheel Cover x 2 22. Temperature Gauge 23. Lid Hook 24. Air Controller 25. Ash Shield 26. Air Inlet 27A. Air Nozzle 27B. Air Nozzle Stopper 28. Meat Probe x 3 29. Pit Probe 30. Pit Probe Clip MATADOR INSTRUCTION MANUAL... -
Page 14: Hardware List
Part Name Hardware Image Quantity BOLT - M6 X 30 BOLT SQUARE SHOULDER - M6 X 30 BOLT SQUARE SHOULDER - M6 X 12 BOLT - M6 X 12 WING NUT - M6 DOME NUT - M6 NUT - M6 WASHER - M8 X 16 WASHER - M6 X 12 “R’... -
Page 15: Assembly Instructions
Symbol: The following symbols will be shown in each procedure for indication of tightening the bolt and nut if necessary. Hand Tighten Only at this stage: Tighten with Tools at this stage: Pay Attention at this stage: MATADOR INSTRUCTION MANUAL... - Page 16 Hardware Needed BOLT SQUARE SHOULDER - M6 X 12 DOME NUT - M6 LEG LOCKING WASHER FIBRE WASHER...
- Page 17 Fire Bowl (7). 2.3 Place Front Leg onto the bolts protruding through the Fire Bowl (7). Place and hand tighten Dome Nuts (F) to loosely secure the leg tube. 2.4 Repeat for the other leg. MATADOR INSTRUCTION MANUAL...
- Page 18 Hardware Needed BOLT - M6 X 30 BOLT - M6 X 12 NUT - M6...
- Page 19 Hardware Needed R CLIP MATADOR INSTRUCTION MANUAL...
-
Page 20: Assembly Instructions
Assembly Instructions Step 5 - attach the docking assembly Hardware Needed NOTE: This stage will require a Phillips BOLT - M6 X 12 head screwdriver to tighten the securing hardware. SCREW - M4 x 8 5.1 Using the 4 M4 x 8mm screws attach the LH and RH Side Dock Supports (17B and 17B) to the Dock Cradle (17A) 5.2 Locate the Dock Cradle Assembly between the Front Legs (16) and align it with the four threaded mounting points. - Page 21 6.3 Slide the four location tabs on the Ash Catcher Holder (13) into the slot detail on the top of each leg to Step 7 - Tighten Fasteners 7.1 Now that you have located the Ash Catcher Holder, return and tighten the bolts assembled in Steps 1 & 2. MATADOR INSTRUCTION MANUAL...
- Page 22 Assembly Instructions Step 8 - Bottom air vent assembly 8.1 Place the bent tabs of the Fire Bowl Air Damper (8) through the hole in the bottom of the Fire Bowl (7). 8.2 Rotate the Damper (8) until the tab with the slotted hole is facing the opening in the Ash Catcher Ring (13) where the Air Vent Handle (9) will come through.
- Page 23 9.2 Take an M6 x 12 Bolts (C) and thread it through the Ash Catcher Handle (11) from the inside of the Ash Catcher Pan (12). Place the Spring Washer (R) onto the bolt and fasten with the Dome Nut (F) to secure. MATADOR INSTRUCTION MANUAL...
- Page 25 Hardware Needed BOLT - M6 X 12 DOME NUT - M6 HEX HEAD TOOL MATADOR INSTRUCTION MANUAL...
- Page 26 Hardware Needed NUT - M6 WASHER - M8 X 16 SPRING...
- Page 27 Hardware Needed BOLT - M6 X 30 WING NUT - M6 WASHER - M6 X 12 SPACER MATADOR INSTRUCTION MANUAL...
- Page 29 MATADOR INSTRUCTION MANUAL...
- Page 30 17.1 Thread the Pit Probe (29) through the two holes on Pit Probe Clip (30) 17.2 Squeeze the Pit Probe Clip (30) to insert between the Cooking Grate (5) bars to secure in place. 17.3 You can position the Pit Probe anywhere on the cooking surface where it best suits your cooking style and does not interfere with your food.
- Page 31 MATADOR INSTRUCTION MANUAL...
-
Page 32: Controller Overview
Controller Overview Overview of the Air Controller Your Radiant Pro Air Controller can be operated via the Radiant Pro App using your smart phone or by direct programming. Below is an overview of the Air Controller’s functions and display screen. -
Page 33: Controller Power
Controller Power Power source The Radiant Pro Air Controller is powered by a rechargeable 3.7V lithium Ion battery which allows your controller to operate independently of a power cord. For longer cooks you can connect the unit directly to a low voltage adaptor for constant power. -
Page 34: Setting The Controller
Setting The Controller Step 1 - Setting your temperature units 1.1 Before setting up your Air Controller with your desired settings you need to select your unit of temperature measure - Degrees Celsius or Fahrenheit. 1.2 By pressing and holding the ‘Enter’ button down you can toggle between C or F. 1.3 Select your preference. - Page 35 Press ‘Select’ to move to want to set. Countdown timer if needed. Use ‘Up’ and ‘Down’ arrow buttons to select desired meat temperature. Press ‘Select’ to move to next meat probe value if required. MATADOR INSTRUCTION MANUAL...
-
Page 36: Setting The Controller
Setting The Controller Step 4 - Setting the countdown timer 4.1 To set countdown timer press the ‘Select’ button 5 times until the hours start to flash. Set the desired number of hours required using the arrow buttons and then press ‘Select’ again to move to the minutes. 4.2 Using the arrow buttons set your desired number of minutes and when complete press ‘Enter’... -
Page 37: Smart Device Control
Step 1 - Download the Radiant Pro App 1.1 The free Radiant Pro App can be downloaded from either the Apple App Store or Google Play Store depending on the type of Smart Device you have. Install the App prior to turning on your device to pair. - Page 38 2.4 From the menu that appears select your Air Controller from the list, it will be called “Radiant Pro”. If the device does not appear we recommend trying to connect to the Controller using your devices standard Bluetooth connection process.
- Page 39 Select the preset can be adjusted cooking preference by 1 degree / temperature that is increments if desired. desired (up to 2 degrees either up When you have or down). selected your preference, press the ‘Preset Option’ to set. MATADOR INSTRUCTION MANUAL...
- Page 40 Smart Device Control Step 5 - Setting the meat probe timer Please follow the steps below to set and operate the three individual count down timers incorporated in the APP. 5.1 Select your appropriate meat probe and press the ‘Set Countdown Timer’ button to be taken to the time setting screen.
- Page 41 Chart will display up to 300 minutes of historical cooking data. NOTE: Temperature in Chart will always be displayed in degrees Celsius (even if settings changed to Fahrenheit). MATADOR INSTRUCTION MANUAL...
- Page 42 7.1 Press the ‘Options’ button from the Home screen to access the Options menu. 7.2 From the Options menu you can access the App Settings, view the Instruction Manual in PDF format and also register you Matador Pro BBQ for warranty purposes. Option Screen...
- Page 43 BBQ after approximately 5 minutes and you may need to add more fuel. MEAT ALARM - This alarm will sound when your meat has reached your desired cooking temperature. TIME ALARM - When any of your APP set countdown timers have expired this alarm will sound. MATADOR INSTRUCTION MANUAL...
-
Page 44: Smart Device Control
Step 10 - Register your Radiant Pro BBQ 10.1 To finalise your warranty we ask you to complete the registration process for your new Radiant Pro BBQ. This will allow you to more easily make any warranty claims in the future. (Please also retain your Owner’s... -
Page 45: Warranty
Thank you for purchasing one of our quality Matador BBQs. YOUR MATADOR BBQ IS COVERED AGAINST BURN THROUGH AND RUST THROUGH OF THE FIRE BOWL AND LID FOR A PERIOD OF 10 YEARS, FOR PARTS AND LABOUR, REPAIR OR REPLACEMENT. - Page 46 To make a claim under warranty, take the product (with proof of purchase) to any Bunnings store (see www. bunnings.com.au for store locations) or contact Mayo Hardware Pty Ltd matador@mayohardware.com.au. Mayo Hardware Pty Ltd bears reasonable, direct, expenses of claiming under warranty. You may submit details and proof to Mayo Hardware Pty Ltd for consideration.
-
Page 47: Warranty
Refer to the troubleshooting section of this operating manual or contact the Mayo Hardware through the below details: Phone (Aus) 1300 360 211 Phone (NZ) 09 416 6240 Email: matador@mayohardware.com.au FOR SPARE PARTS Contact Mayo Hardware through the below details: Phone (Aus) 1300 360 211 Phone (NZ) 09 416 6240 Email: matador@mayohardware.com.au MATADOR INSTRUCTION MANUAL... -
Page 48: Notes
Visit www.matadorbbqs.com.au For technical and warranty support call 1300 360 211 (AUS) 09 415 6240 (NZ) Your purchase receipt will be required for warranty claims. For spares parts contact your local Bunnings Warehouse. PB0055d...
Need help?
Do you have a question about the Radiant Pro and is the answer not in the manual?
Questions and answers