
Related Manuals for Matador HS-18MAK600


Summary of Contents for Matador HS-18MAK600
- Page 1 PALLADIUM 4 BURNER KITCHEN BBQ Model: HS-18MAK600 Retain manual for future reference. Retain manual for future reference.
-
Page 2: Table Of Contents
CONTENTS FEATURES AND BENEFITS IMPORTANT SAFETY WARNINGS GAS LEAK TEST GAS EMERGENCY PROCEDURE GENERAL INFORMATION EXPLODED PARTS VIEW PARTS LIST HARDWARE PACK ASSEMBLY STEPS BBQ LOCATION – OUTDOOR AREA CONNECTION TO LPG LIGHTING PROCEDURE USING THE BBQ USING THE SMOKER BOX BBQ TIPS BBQ MAINTENANCE SPECIFICATIONS... -
Page 3: Features And Benefits
FEATURES & BENEFITS Overall Barbecue Dimensions Length Height Depth 2135 mm 1195 mm 654 mm Freestanding Gas Output Burner Gas Type Side LPG / U-LPG 15 MJ/h 15 MJ/h Natural Gas 15 MJ/h 15 MJ/h MATADOR INSTRUCTION MANUAL 3... -
Page 4: Important Safety Warnings
IMPORTANT SAFETY WARNINGS FOR OUTDOOR USE ONLY DO NOT OPERATE THIS APPLIANCE BEFORE READING THE INSTRUCTION BOOKLET. DO NOT PLACE ARTICLES ON OR AGAINST THIS APPLIANCE. DO NOT STORE CHEMICALS OR FLAMMABLE MATERIALS OR SPRAY AEROSOLS NEAR THIS APPLIANCE. DO NOT OPERATE THIS APPLIANCE INDOORS. DO NOT ENCLOSE THIS APPLIANCE. -
Page 5: Gas Leak Test
Note: If there is a leak anywhere on the gas cylinder, do not use the cylinder. Locate the leaking cylinder outdoors away from sources of ignition, then contact your local gas authority or cylinder exchange provider to arrange disposal. MATADOR INSTRUCTION MANUAL 5... -
Page 6: Gas Emergency Procedure
GAS EMERGENCY PROCEDURE A strong gas smell or hissing sound indicates a serious problem with your BBQ or the LPG gas cylinder. Failure to immediately follow the steps listed below could S S T T O O R R A A G G E E result in property damage, serious bodily injury, or even death. -
Page 7: General Information
You must have the correct gas cylinder, regulator and hose for this BBQ to operate safely and efficiently. Use of an incorrect gas cylinder, regulator or hose is dangerous and will void the warranty on this product. MATADOR INSTRUCTION MANUAL 7... -
Page 8: Exploded Parts View
EXPLODED PARTS VIEW Exploded View... -
Page 9: Parts List
M M A A T T A A D D O O R R I I N N S S T T R R U U C C T T I I O O N N M M A A N N U U A A L L 8 MATADOR INSTRUCTION MANUAL 9... - Page 10 PARTS LIST 17. Right side 18. Side cabinet 19. Magnet plate 20. Castor without 17 Right side panel of cabinet 18 Side panel support of 19 Magnet plate 20 Castor without lock x 17 Right side panel of cabinet 17 Right side panel of cabinet 18 Side panel support of 18 Side panel support of 19 Magnet plate...
- Page 11 32 Right door hinge cabinet -Down -Upper 33 Right door hinge -Down 34 Base weight 13 Back panel of cabinet 14 Separation panel of 15 Left door cabinet Bolt:M6*12 Washer:M6 MATADOR INSTRUCTION MANUAL 11 Spring washers:M6 Bolt:M5*10 MATADOR INSTRUCTION MANUAL 10...
-
Page 12: Hardware Pack
HARDWARE PACK H H A A R R D D W W A A R R E E P P A A C C K K H H A A R R D D W W A A R R E E P P A A C C K K H H A A R R D D W W A A R R E E P P A A C C K K H H A A R R D D W W A A R R E E P P A A C C K K H H A A R R D D W W A A R R E E P P A A C C K K... -
Page 13: Assembly Steps
(E) 3pcs and Nut (F) 3pcs as shown. shown. Assemble the plastic backing board (22) on the bottom panel of cabinet (12) by screw (E) 3pcs and Nut (F) 3pcs as shown. MATADOR INSTRUCTION MANUAL 13 MATADOR INSTRUCTION MANUAL 12... - Page 14 STEP 2 Assemble the castor with lock (21) on the bottom cabinet panel (12) by bolt (A), spring washer (C), washer (B) each 16pcs as shown. S S T T E E P P 2 2 Assemble the castor with lock (21) on the bottom panel of cabinet (12) by bolt(A), spring washer (C), washer (B) each 16pcs as shown...
- Page 15 Assemble left door hinge-Upper (6) and left door hinge-Down(7) on the left side panel of cabinet (10) and assemble right door hinge-Upper (8) and right door hinge-Down (9) on the right side panel of cabinet (17) by bolt (H) 12pcs. MATADOR INSTRUCTION MANUAL 15...
- Page 16 STEP 4 Assemble left side of main cabinet panel (10), back cabinet panel (13) and right side of main cabinet panel (17) on the bottom cabinet panel (12) by bolt (A) 14pcs as shown. S S T T E E P P 4 4 Assemble left side panel of main cabinet (10), back panel of cabinet (13) and right side panel of main cabinet (17) on the bottom panel of cabinet (12) by blot (A) 14pcs as shown.
- Page 17 Assemble crossbeam (11) on the cabinet by bolt (A) 4pcs as shown. S S T T E E P P 6 6 Assemble crossbeam (11) on the cabinet by bolt (A) 4pcs as shown. MATADOR INSTRUCTION MANUAL 17 MATADOR INSTRUCTION MANUAL 16...
- Page 18 STEP 7 Assemble cabinet separation panel (14) on the cabinet by bolt (A) 4pcs as shown. S S T T E E P P 7 7 Assemble separation panel of cabinet (14) on the cabinet by bolt (A) 4pcs as shown.
- Page 19 S S T T E E P P 9 9 Assemble handle of hood (28) on the hood by bolt (A) 4pcs as shown. Assemble handle of hood (28) on the hood by bolt (A) 4pcs as shown. MATADOR INSTRUCTION MANUAL 19 MATADOR INSTRUCTION MANU MATADOR INSTRUCTION...
- Page 20 STEP 10 S S T T E E P P 1 1 0 0 Assemble firebox (4) on the cabinet by bolt (A) 4pcs as shown. Assemble firebox (4) on the cabinet by bolt (A) 4pcs as shown. S S T T E E P P 1 1 0 0 Assemble firebox (4) on the cabinet by bolt (A) 4pcs as shown.
- Page 21 (9) on the right side panel of left cabinet (17) by bolt (H) 12pcs. cabinet (38) and assemble right door hinge-Upper (8) and right door hinge-Down (9) on t side panel of left cabinet (17) by bolt (H) 12pcs. MATADOR INSTRUCTION MANUAL 20 MATADOR INSTRUCTION MANUAL 21 MATADOR INSTRUCTION MAN...
- Page 22 STEP 14 Assemble left side panel of left side cabinet (38), back panel of left side cabinet (41) and right side panel of left cabinet (39) on the bottom panel of left cabinet (40) S S T T E E P P 1 1 4 4 Assemble left side panel of left side cabinet (38), back panel of left side cabinet (41) and rig by bolt (A) 14pcs as shown.
- Page 23 Assemble the water pipe (44) on the sink as shown. S S T T E E P P 1 1 7 7 Assemble the water pipe (44) on the sink as shown. MATADOR INSTRUCTION M MATADOR INSTRUCTION MANUAL 23 MATADOR INSTRUCTION MANUAL 22...
- Page 24 STEP 18 Assemble the left side table (37) on the left side cabinet by bolt (A) 6pcs as shown. STEP 18 Assemble the left side table (37) on the left side cabinet by bolt (A) 6pcs as shown. STEP 19 STEP 19 Assemble the left door(15) and right door (16) on the cabinet as shown.
- Page 25 Assemble the tap (43) on the granite table (42) as shown. STEP 21 Assemble the granite table and sink on the cabinet as shown. STEP 21 Assemble the granite table and Sink on the cabinet as shown. MATADOR INSTRUCTION MANUAL 25...
- Page 26 STEP 22 Assemble the plastic backing board (22) on the bottom panel of right side cabinet S S T T E E P P 2 2 2 2 (33) by bolt (E) 3pcs and nut (F) 3pcs as shown. Assemble the plastic backing board (22) on the bottom panel of right side cabinet (33) by bolt (E S S T T E E P P 2 2 2 2 3pcs and Nut (F) 3pcs as shown.
- Page 27 Assemble left side panel of right side cabinet (31), back panel of right side cabinet (35) a shown. side panel of right cabinet (32) on the bottom panel of right cabinet (33) by bolt (A) 1 (33) by bolt (A) 14pcs as shown. shown. MATADOR INST MATADOR INSTRUCTION MANUAL 27 MATADOR INSTRUCTION MAN...
- Page 28 STEP 26 Assemble crossbeam (34) on the right side cabinet by bolt (A) 4pcs as shown. S S T T E E P P 2 2 6 6 Assemble crossbeam (34) on the right side cabinet by bolt (A) 4pcs as sho S S T T E E P P 2 2 6 6 Assemble crossbeam (34) on the right side cabinet by bolt (A) 4pcs as sho S S T T E E P P 2 2 7 7...
- Page 29 Assemble the right door (16) on the right side cabinet as shown. S S T T E E P P 1 1 7 7 Assemble the right door (16) on the right side cabinet as shown. MATADOR INSTRUCTION MANUAL 29 MATADOR INSTRUCTIO...
- Page 30 STEP 29 Put the regulator and side valve into right side cabinet square hole as below shown. S S T T E E P P 2 2 9 9 Put the regulator and side valve into right side cabinet square hole as below shown.
- Page 31 STEP 30 Assemble the left side cabinet and main body and right side cabinet by bolt (I) 8pcs as shown. MATADOR INSTRUCTION MANUAL 31...
- Page 32 STEP 31 Assemble control knob seat (24) on the side valve by bolt (E) 2pcs as shown, put the control knob (23) on the valve bar as shown. S S T T E E P P 3 3 1 1 Assemble control knob seat (24) on the side valve by bolt (E) 2pcs as shown, put the control knob (23) on the valve bar as shown.
- Page 33 Assemble the fixed regulator plate (36) on the right side cabinet by bolt (E) 4pcs as shown. S S T T E E P P 3 3 2 2 Assemble the fixed plate of regulator (36) on the right side cabinet by bolt (E) 4pcs as shown. MATADOR INSTRUCTION MANUAL 33...
- Page 34 STEP 33 Insert the grease cup (27) and smoker box (26) on the control panel and insert the flame tamer (5) into the firebox as shown. STEP 33 Insert the grease cup (27) and smoker box (26) on the control panel and insert the flame tamer (5) into t firebox as shown.
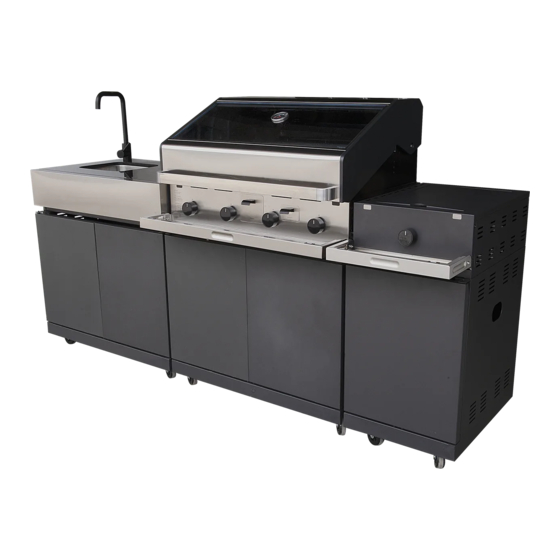
- Page 35 Insert the warming rack(3)and side burner trivet (29) as shown. Insert the warming rack (3) and side burner trivet (29) as shown. Insert the warming rack(3)and side burner trivet (29) as shown. MATADOR INSTRUCTION MANUAL 35 Fully assembled BBQ Fully assembled BBQ...
- Page 36 FULLY ASSEMBLED BBQ...
-
Page 37: Bbq Location - Outdoor Area
. . Examples of the correct appliance outdoor setups can be seen below. OUTDOOR AREA EXAMPLE 1 OUTDOOR AREA-EXAMPLE 1 MATADOR INSTRUCTION MANUAL 37... - Page 38 OUTDOOR AREA-EXAMPLE 2 OUTDOOR AREA-EXAMPLE 2 OUTDOOR AREA EXAMPLE 2 OUTDOOR AREA-EXAMPLE 2 OUTDOOR AREA-EXAMPLE 2 Both ends open Both ends open Both ends open OUTDOOR AREA Both ends open OUTDOOR AREA-EXAMPLE 3 Both ends open EXAMPLE 3 OUTDOOR AREA-EXAMPLE 3 OUTDOOR AREA-EXAMPLE 3 OUTDOOR AREA-EXAMPLE 3 OUTDOOR AREA-EXAMPLE 4...
-
Page 39: Connection To Lpg
M M A A T T A A D D O O R R I I N N S S T T R R U U C C T T I I O O N N M M A A N N U U A A L L 24 In the case of a problem arising with the hose and regulator please contact your BBQ supplier for a list of approved replacement parts. MATADOR INSTRUCTION MANUAL 39... -
Page 40: Lighting Procedure
LIGHTING PROCEDURE BEFORE STARTING Lighting the BBQ is easy, but must be done with due care. Make sure the LPG cylinder is filled. Make sure that gas is turned on at the cylinder, or that gas is available to the BBQ. -
Page 41: Using The Bbq
IMPORTANT: Please add sand or fat absorption granules to the grease tray before first use. We recommended you wash the cooking surfaces with soap and warm water before use. The cooking plates are vitreous enamel coated and they do not require seasoning like most other BBQs. MATADOR INSTRUCTION MANUAL 41... -
Page 42: Using The Smoker Box
USING THE SMOKER BOX The following steps are guide to getting good lasting smoke from the wood chips in your smoker box. With the hood open and the burners off, slide out the smoker box and fill with your favourite wood chips. Ensure the smoker box is not over filled and the lid can close fully before sliding back into the BBQ. -
Page 43: Bbq Tips
MATADOR INSTRUCTION MANUAL 43 M M A A T T A A D D O O R R I I N N S S T T R R U U C C T T I I O O N N M M A A N N U U A A L L 28... -
Page 44: Bbq Maintenance
BBQ MAINTENANCE PERIODIC CLEANING Your BBQ will look better and last longer if you keep it clean. You should check the burners periodically for any sort of blockage. To do this, remove and inspect them. If any of the holes are clogged, gently tap the burner BBQ MAINTENANCE P P E E R R I I O O D D I I C C C C L L E E A A N N I I N N G G Your BBQ will look better and last longer if you keep it clean. - Page 45 MATADOR INSTRUCTION MANUAL 45 M M A A T T A A D D O O R R I I N N S S T T R R U U C C T T I I O O...
- Page 46 GLASS HOOD REPLACEMENT Always wear gloves during replacement of the hood glass. The following steps outline the procedure to replace the glass hood. Remove the Temperature Gauge. Disassemble the four M5 screws on the side of the unit...
- Page 47 M M A A T T A A D D O O R R I I N N S S T T R R U U C C T T I I O O N N M M A A N N U U A A L L 32 MATADOR INSTRUCTION MANUAL 47...
- Page 48 According to the arrow directions, assemble all the parts onto the replacement glass as shown. S S t t e e p p 5 5 According to the arrow directions, assemble all the parts onto the replacement glass as shown. S S t t e e p p 6 6 Place the assembly onto the hood as shown.
- Page 49 BBQ before cooking. The Matte black panels inside the BBQ are Pyrolytic self- cleaning panels and they don’t require wiping. Always keep the solid plate on the right, directly above the smoker/flavour tray to ensure the smoker/flavor tray is always free of fat and grease residue. MATADOR INSTRUCTION MANUAL 49...
- Page 50 GENERAL CARE AND MAINTENANCE INFO Note: Remember to turn off and disconnect the gas before any maintenance is carried out. If your BBQ uses a flexible hose to connect to the gas cylinder, check the rubber O-ring on the regulator end of the hose assembly at least once a year. If it appears worn or cracked, have it replaced.
-
Page 51: Specifications
PRESSURE 15 MJ/h (per burner) 1.00 kPa 1.8mm Side 15 MJ/h 1.00 kPa 1.8mm Tap Specifications WATERMARK LICENSE NUMBER WM-022545 WELS REGISTRATION NUMBER T30270 LICENSE NUMBER 1547 NOMINAL FLOW RATE 4.47 LPM WATER EFFICIENCY STAR RATING MATADOR INSTRUCTION MANUAL 51... -
Page 52: Connection To Natural Gas
CONNECTING TO NATURAL GAS This BBQ has been configured for use with LPG from a gas cylinder. If you want to connect this BBQ to a permanent Natural Gas supply, the following steps must be undertaken. Contact a licensed plumber or gas fitter and arrange a quote to convert this BBQ to Natural Gas, install any pipework necessary to bring a natural gas supply to the installation area and commission the BBQ. - Page 53 Instruct the consumer on correct use of the BBQ and the location of the gas supply isolation valve which shall be closed after each use. If the BBQ is supplied with a duplicate data label, apply this label in the immediate vicinity of the BBQ in an easily accessible area. MATADOR INSTRUCTION MANUAL 53...
-
Page 54: Warranty
PRODUCT WARRANTY Thank you for purchasing one of our quality MATADOR products. Your MATADOR product is covered against defects for a period of 5 years for parts and labour, repair or replacement. This warranty excludes surface rust and damage caused by abuse or neglect. - Page 55 If you experience any technical issues with your Scratches, dents, corrosion or discolouration caused MATADOR product, in the first instance review the by heat, abrasive chemical cleaners or chipping. instruction manual or call the warranty service agent Corrosion or damage caused by exposure to the below.
- Page 56 Visit www.matadorbbqs.com.au For technical and warranty support call 1300 793 978 (Aus) 09-9780 000 (NZ) Your purchase receipt will be required for warranty claims. For spare parts contact Pacific Gas & Heating Pty Ltd.
Need help?
Do you have a question about the HS-18MAK600 and is the answer not in the manual?
Questions and answers