Table of Contents
Advertisement
Advertisement
Table of Contents

Subscribe to Our Youtube Channel
Related Manuals for Matador Outdoor Entertainer HS-KC003A


Summary of Contents for Matador Outdoor Entertainer HS-KC003A
-
Page 2: Contact Information
New Zealand: For service and warranty queries please go to your local Bunnings Warehouse or call 09 978 2200, fax 09 978 2222 or email marketing@bunnings.co.nz your purchase receipt is required for all warranty claims. www.matadorbbqs.com.au MATADOR KC003 BBQ manual.indd 2 1/07/2011 10:37:46 AM... -
Page 4: Safety Instructions
Do not store or use gasoline or other flammable vapours or liquids in the vicinity of this or any other appliance. an lp cylinder not connected for use must not be stored in the vicinity of this or any other appliance. MATADOR KC003 BBQ manual.indd 4 1/07/2011 10:37:47 AM... - Page 5 RegulatoR and hose FoR gRIll to opeRate saFely and eFFIcIently use oF an IncoRRect gas cylIndeR, RegulatoR oR hose Is dangeRous and WIll InvalIdate the WaRRanty on thIs pRoduct. MATADOR INSTRUCTION MANUAL MATADOR KC003 BBQ manual.indd 5 1/07/2011 10:37:47 AM...
- Page 6 Figure 5 - open side at least 25% of total wall area. 30 percent or more in total of the remaining wall area is open and unrestricted. MATADOR KC003 BBQ manual.indd 6 1/07/2011 10:37:47 AM...
- Page 7 Total Gas Type of Burners BBQ Burner Side Burner Rotisserie Burner Consumption Mj/h Pressure kPa Ø 0.90mm Ø 0.90mm Ø 0.90mm 86.0mJ/h 2.75kpa u-lpg mJ/h each 10.7mJ/h (x6) 10.3mJ/h 11.5mJ/h MATADOR INSTRUCTION MANUAL MATADOR KC003 BBQ manual.indd 7 1/07/2011 10:37:47 AM...
-
Page 8: Operating Procedure
WIth coveR on. applIance. do not stoRe chemIcals oR FlammaBle mateRIals oR spRay aeRosols neaR thIs applIance. MATADOR KC003 BBQ manual.indd 8 1/07/2011 10:37:48 AM... - Page 9 MATADOR INSTRUCTION MANUAL MATADOR KC003 BBQ manual.indd 9 1/07/2011 10:37:48 AM...
-
Page 10: Trouble Shooting
In the event of a strong smell of gas that is persistent, turn off gas cylinder and perform leak test. For further trouble shooting apart from the listed examples, please contact the support hotline. MATADOR KC003 BBQ manual.indd 10 1/07/2011 10:37:49 AM... -
Page 11: Cooking Tips
Replace the gRIll WIth all hotplates as thIs may cause the BaRBeque to oveRheat. It Is alWays necessaRy to have at least one gRIll plate to alloW FoR pRopeR ventIlatIon. MATADOR INSTRUCTION MANUAL MATADOR KC003 BBQ manual.indd 11 1/07/2011 10:37:49 AM... - Page 12 • clean with clogged ports wire, such as open month in late summer or early fall when spiders are paper clip. most active or when your grill has not been used for a period of time. MATADOR KC003 BBQ manual.indd 12 1/07/2011 10:37:49 AM...
- Page 13 3. store the grill in a cool dry place. 4. always disconnect the gas cylinder and store it in Burner Insert hook to clean burner tube. (hook not included) Burner port Burner tube MATADOR INSTRUCTION MANUAL MATADOR KC003 BBQ manual.indd 13 1/07/2011 10:37:50 AM...
- Page 14 It is recommended that the carton is cut protective surface during assembly. Refer to the assembly diagrams as necessary. grill body before assembling. D. bOLT M4×10mm 2 Pieces ground level. Use only the pressure regulator and hose supplied. MATADOR KC003 BBQ manual.indd 14 1/07/2011 10:37:51 AM...
-
Page 15: Parts Diagram
14. RIGHT SIDE 15. RIGHT SIDE 16. RIGHT SIDE CART FRONT CART SHELF CART PLATE - R CART PLATE - M PLATE PANEL 1 Piece 1 Piece 1 Piece 1 Piece MATADOR INSTRUCTION MANUAL MATADOR KC003 BBQ manual.indd 15 1/07/2011 10:37:52 AM... - Page 16 TAbLE bOARD 1 Piece 1 Piece 1 Piece 29. SINK 30. WATER PIPE 31. bACK 32. LEFT SIDE 1 Piece CONNECTION SUPPORT CART DOOR L 1 Piece PLATE 1 Piece 1 Piece MATADOR KC003 BBQ manual.indd 16 1/07/2011 10:37:54 AM...
- Page 17 38. KEEP WARM 39. COOKING ASSEMbLy 1 piece DISH PLATE 1 piece 1 piece 1 piece 41. MOTOR 42. ROTISSERIE 43. KNOb SUPPORT 1 piece HANDLE 1 piece 1 piece MATADOR INSTRUCTION MANUAL MATADOR KC003 BBQ manual.indd 17 1/07/2011 10:37:55 AM...
-
Page 18: Assembly Instructions
(part 1) Right side as shown. A×2 STEP 2 assemble left side cart back panel (part 3) on to the left side cart bottom panel as shown, use bolt A (×2) to tighten. A×2 MATADOR KC003 BBQ manual.indd 18 1/07/2011 10:37:55 AM... - Page 19 A×2 STEP 3 Assemble Left Side cart pipe R (with label B) as shown, use STEP 4 A×2 Assemble Left side cart plate L (part B×6 MATADOR INSTRUCTION MANUAL MATADOR KC003 BBQ manual.indd 19 1/07/2011 10:37:55 AM...
- Page 20 STEP 5 Assemble the Left side cart front plate (Part 7) as tighten. A×4 STEP 6 Assemble left side cart plate R (part 6) as shown, use Bolt B×10 BX10 MATADOR KC003 BBQ manual.indd 20 1/07/2011 10:37:56 AM...
- Page 21 (part 8) as shown, use B x 4 B×4 STEP 8 Assemble Right cart bottom panel (part 11) onto the Right side cart front framework (part 10) as shown. A×3 MATADOR INSTRUCTION MANUAL MATADOR KC003 BBQ manual.indd 21 1/07/2011 10:37:56 AM...
- Page 22 STEP 9 Assemble Right side cart back plate(part 9) as shown, A×3 STEP 10 Assemble Left side cart pipe L (part 5) (with label A) as tighten. A×2 MATADOR KC003 BBQ manual.indd 22 1/07/2011 10:37:56 AM...
- Page 23 STEP 11 Assemble Right side cart plate R (part 15) as shown, A×2 B×6 STEP 12 Assemble right side cart M- plate to tighten. A×1 B×2 B×2 MATADOR INSTRUCTION MANUAL MATADOR KC003 BBQ manual.indd 23 1/07/2011 10:37:57 AM...
- Page 24 Right side cart front plate (part 13) as shown, use Bolt A (×4) to tighten. A×4 STEP 14 assemble Right side cart front plate (part 13) as shown, use Bolt B (×10) to tighten. B×10 MATADOR KC003 BBQ manual.indd 24 1/07/2011 10:37:57 AM...
- Page 25 2 (part 17) as shown, use Bolt B (x4) to tighten. B×4 STEP 16 assemble right side cart shelf panel (part 14) as shown, use Bolt B (×4) to tighten. B×4 MATADOR INSTRUCTION MANUAL MATADOR KC003 BBQ manual.indd 25 1/07/2011 10:37:57 AM...
- Page 26 STEP 17 Attach left side cart with main body (part 18) as shown, use bolt B (x4) to tighten. B×4 STEP 18 Connect the side burner Insert ice box frame (part connection onto the side 19) as shown and use burner control unit.Ensure bolt B (x2) to tighten.
- Page 27 STEP 20 Insert the side burner grill Insert ice box (part 22) as ( part 24) and knob shown. (part 25) as shown. MATADOR INSTRUCTION MANUAL MATADOR KC003 BBQ manual.indd 27 1/07/2011 10:37:58 AM...
- Page 28 STEP 22 Insert the left lid(part 21) Attach right side cart with as shown Main Body (part 18) as shown, use Bolt B (x4) to tighten. B×2 MATADOR KC003 BBQ manual.indd 28 1/07/2011 10:37:58 AM...
- Page 29 (part 26),use nut to tighten. cart as shown, use bolt B (x2) to (x4) tighten. B x 4 MATADOR INSTRUCTION MANUAL MATADOR KC003 BBQ manual.indd 29 1/07/2011 10:37:59 AM...
- Page 30 (part 30) to sink(part 29) as shown. cart table 27) to the right side table board (part 26), use nut to Assemble sink(part 29) to the tighten. right side table-board, and the water pipe from behind as shown. MATADOR KC003 BBQ manual.indd 30 1/07/2011 10:37:59 AM...
- Page 31 (part 29) as shown. 28B: Assemble Right side burner lid (part 28), sink (part 29) to the right side table board, and the water pipe from behind as shown. MATADOR INSTRUCTION MANUAL MATADOR KC003 BBQ manual.indd 31 1/07/2011 10:37:59 AM...
- Page 32 Bolt B (x4) to tighten. shown. STEP 30 Assemble the bricks(part Assemble the left side cart 35) and iron heating plate door (part 32) as shown. (part 36) as shown. 3 5 3 6 MATADOR KC003 BBQ manual.indd 32 1/07/2011 10:38:00 AM...
- Page 33 (part 42) onto the Rotisserie 35) and Iron heating plate assembly (part 40) as shown. (part 36) as shown. 35, 36 P r o n g s W e ig h t MATADOR INSTRUCTION MANUAL MATADOR KC003 BBQ manual.indd 33 1/07/2011 10:38:00 AM...
- Page 34 STEP 33 Now latch the motor(part Assemble the cooking grid 41) onto the motor support, 37, 38, 39 (part 37), keep warm dish insert the pointed end of (part 38) and cooking plate the shaft into the motor. (part 39) as shown. Tighten the screw to lock the Rotisserie base into place(after assenbly).
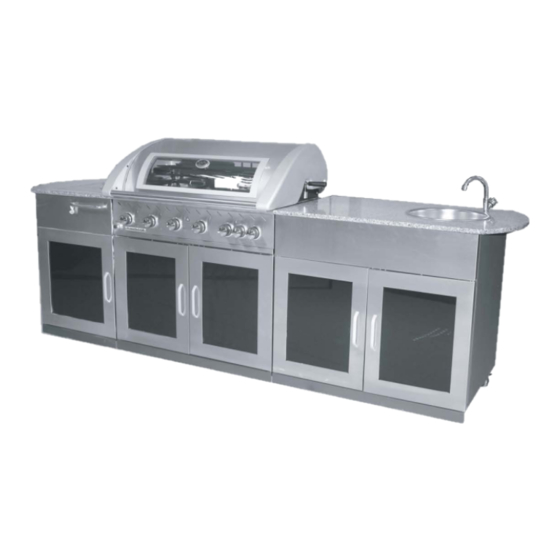
- Page 35 FULLY ASSEMBLED MATADOR INSTRUCTION MANUAL...
- Page 36 NOTES MATADOR INSTRUCTION MANUAL MATADOR KC003 BBQ manual.indd 37 1/07/2011 10:38:01 AM...
- Page 37 MATADOR WARRANTY For Australian Customers Thank you for purchasing one of our quality Thank you for purchasing one of our quality Matador For New Zealand customers Matador BBQs. BBQs. To make a claim under the warranty please contact To make a claim under the warranty please contact YOUR MATADOR BBQ IS COVERED service@genesiscorp.com.au...
- Page 38 Removal or re-installation costs. This warranty contact the warranty service agent first instance review the instructions manual or Thank you for purchasing one of our quality Matador contact the warranty service agent For New Zealand customers service...
- Page 39 For technical and warranty support call 08 9248 9822 (AU) 09 978 2200 (NZ) your purchase receipt will be required for warranty claims. For spare parts contact your local Bunnings Warehouse MATADOR KC003 BBQ manual.indd 40 1/07/2011 10:38:03 AM...
Need help?
Do you have a question about the Outdoor Entertainer HS-KC003A and is the answer not in the manual?
Questions and answers