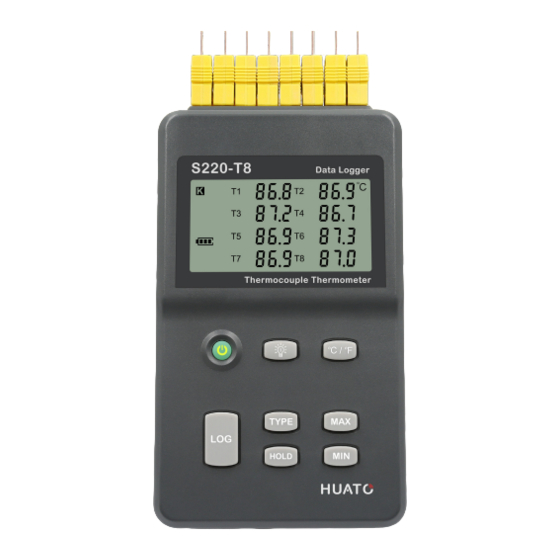
Summary of Contents for Huato S220-T8 Series
- Page 1 User’s Guide Shop online at www.huato.com E-mail: sales@huato.com For latest product manuals: www.omegamanual.info S220-T8 Series Multi-channel Handheld Thermocouple Temperature Data Logger...
- Page 2 Engineering Service: 0755-29977605 Fax: +86-755-29748856 E-mail: sales@huato.com For Other Locations Visit www.huato.com The information contained in this document is believed to be correct, but HUATO accepts no liability for any errors it contains, and reserves the right to alter specifications without notice.
-
Page 3: Table Of Contents
Table of S220-T8 Series Contents Table of Contents Section ..................Page ..................1 Section 1 Introduction 1.1 Introduction ................. 1 1.2 Features ..................1 1.3 Applications ................. 1 1.4 Series Data Logger Model ............1 1.5 Temperature Data Logger Appearance ........2 1.6 Temperature Data Logger Screen .......... -
Page 4: Section 1 Introduction
Section 1 - Introduction S220-T8 thermocouple temperature data logger is a kind of high precision instrument, developed and manufactured by HUATO company, which have pass all strict calibrations and professional testing via high precision instrument. Support 8 types thermocouples(K、J、E、T、R、S、N、B), including thermocouple temperature compensation function and can measure temperature from -200 to 1800°C. -
Page 5: Temperature Data Logger Appearance
Introduction 1.5 - Temperature Data Logger Appearance Section ℃ LCD Screen MAX: Displaying maximum recorded Power On/Off value for all channels LOG:Recording function button MIN: Displaying minimum recorded HOLD:Lock the Value. value for all channels Screen Backlight USB & 9V DC power interface °C/°F Switch Wall-mount hole... -
Page 6: Button Function Instructions
Introduction 1.7 - Button function instructions Section :Power ON/OFF (1)When logger power is off, push this button will turn on the logger. (2)When logger power is on, push this button will turn off the logger. :Recording Function (1)When logger power is on, press this button, the LCD screen will show “LOG” a sign which indicates that the logger is recording data. -
Page 7: Section 2 Installation And Instruction
Installation and Instruction Section 2 - Installation and Instruction This section will explain how to use the software to upload, read, configure and synchronize the settings, how to turn on/off the logger & enter/exit the logging mode, and how to delete and download the logging data. 2.1 - Software Installation Section 2.1.1 - The Requirement of the Computer Hardware... -
Page 8: How To Read And Configure The Logger
Installation and Instruction 2.2 - How to Read and Configure the Logger Section 2.2.1 Read and Configure the Logger's Settings 1. Turn on and Insert the data logger to the computer¹. 2. Start LogPro software on the PC. 3. From the toolbar select Connect. 4. -
Page 9: Setting Parameters Description
Installation and Instruction 2.2.2 - Setting Parameters Description A.System E.Channel Name Name S220-T8 Name1 HS220CW001 Name2 Type Data Logger Name3 Model S220-T8 Name4 Firmware H 1103 Name5 B.Sampling Name6 Logging Interval(Secs) Name7 Sampling Interval (Secs) Name8 C.Storage Logs Total 86000 D.Offset Setting Parameter Text... -
Page 10: Turn On/Off Logger & Start/Stop Logging
Installation and Instruction Section 2.3 - Turn On/Off Logger & Start/Stop Logging Under Button to Start Mode Turn On the Logger - Push “ON / OFF” Button for pressing the switch button momentaril then LCD display is on. ℃ Start Logging - When the Logger is on and on stand-by (LCD does not have “LOG” logo display), press "LOG "... - Page 11 Installation and Instruction Turn Off the Logger - Push the“ON / OFF” Button for short pressing then LCD display is off. ℃ LOG Full -The device won't record data while the memory is full, that you have to download the data and delete it by Logpro software, then device can record again. ℃...
-
Page 12: Download The Logging Data
Installation and Instruction Section 2.4 Download the Logging Data 10. Insert the data logger into the computer. 11. Start LogPro software on the PC. 12. From the toolbar select Connect. 13. From the toolbar select Download. Once the data is downloaded from the logger to the PC, the log graph will be displayed. Tips:Press and hold the left mouse button to drag a box, when the left mouse button is released, the graph will be redrawn with the data in the selected rectangle area. -
Page 13: View Data Sheet
Installation and Instruction Section 2.5 View Data Sheet Click “Data List” button on the toolbar, and then the data listing window is shown below. The data pane lists the data samples collected by the logging device. The column width of each column is adjustable by using the left mouse button and dragging the column to the desired width. -
Page 14: Delete Records In The Logger
Installation and Instruction Section 2.7 Delete Records in the Logger 14. From the toolbar select Delete. LogPro - HS220CW001_20181121_0918.logp Logs Graph (SN:HS220CW001) - Check the Save File in File list Section 2.8 15. From the toolbar select File List. 16. Click to open the file. •... -
Page 15: Section 3 Attention
Attention Section 3 Attention • Plastic shell is ABS, should be retardant, not resistant to acid and alkali. • If repair is needed, only authorized technician can do the repair. • The instrument configuration by 9V block battery is not rechargeable. •...


Need help?
Do you have a question about the S220-T8 Series and is the answer not in the manual?
Questions and answers