Advertisement
Quick Links
allation
n instruc
5 Domestic
Sewage Sy
ystems
nts describe
ed in these
ns must be
observed u
mstances. A
All warranty
re invalid in
n the event o
servance. S
Separate ins
tructions an
nd manuals
ed in the con
ntrol cabine
et.
instruction
s must be r
d from us im
mmediately.
k must be c
checked for
e prior to ins
stallation un
mstances.
instruction
s can be do
on www.gra
af.info or ca
an be
ed from GR
RAF AU.
te instructio
ons for start-
on and main
ntenance of
supplied in
control cab
ction fo
or Graf E
EPro wa
system
m
C
Contents
in-
under
1
1.
Genera
y
of
2
2.
stalla-
3
3.
are
4
4.
5
5.
Assemb
re-
6
6.
7
7.
r any
nder
own-
-up,
f the
binet.
astewat
ter treat
l
components
s
bly of switch
h cabinet
tment
2
3
4
6
13
3
24
4
25
5
Advertisement

Subscribe to Our Youtube Channel
Related Manuals for Graf EPro Series


Summary of Contents for Graf EPro Series
-
Page 1: Table Of Contents
Graf E EPro wa astewat ter treat tment system 5 Domestic 8 Commerc cial Sewage Sy ystems Contents nts describe ed in these ns must be observed u under Genera mstances. A All warranty ... - Page 2 1. Gener eneral The installat tion of the t tank must fo ollow the dir rections in th he enclosed installation instructions These instru uctions also c contain furth er informatio on on the ins stallation con nditions for th he tanks and how to conne ect up the in...
-
Page 3: Commerc Cial
2. Dimensi ions mensions 5-340 to irrigation / infiltration system 1655 Htot Epro o15 Domestic Epro18 mmercial Tank 4800 L 6500 L Max. hy ydraulic load 1500 L/d 800 L/d Length 2280 mm 390 mm Width 1985 mm 190 mm Height Inlet Outlet... - Page 4 System d esign stem desi Carat Tank Irrigat tion Pump Tank Dome M Mini Highle evel Alarm F Float Tele Lid Mini Pump p Platform Riser Extens Intern nal Alarm Pla Baffle Air Di ffusor Air Lift / Aera ation Cabin net Ventilatio on Fan...
-
Page 5: System Design
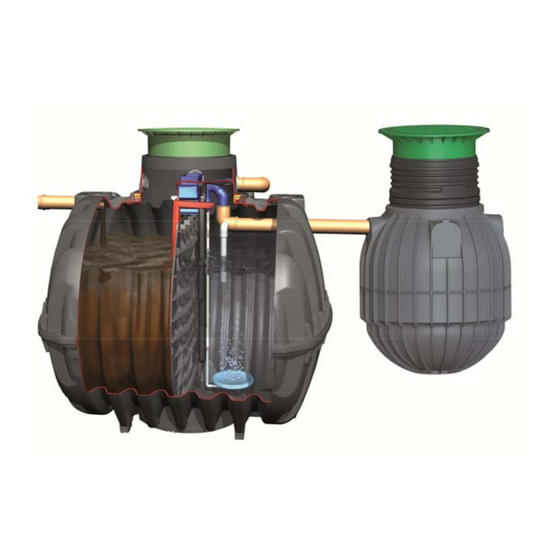
3. System design EPro15 systems are available in 4 different versions: EPro15 One with chlorination and effluent pump in additional Sapphire 900 L tank EPro15 Two with effluent pump in additional Sapphire 900 L tank EPro15 Three w/o additional tank. Outflow free slope. EPro15 Three +O according to EPro15 Three, but with additional effluent pump inside the treatment plant Figure 2: Epro15 Two... -
Page 6: Assemb Bly Of Tank C
4. Assemb bly of tank k compone ents sembly of f tank com mponents Carat S tank has to be installed according to o instruction manual. Bef fore installing g the baffle d drill a hole in the top p part of the ba affle for emer rgency overfl... - Page 7 Holes fo or DN 100 in nlet and drain n pipes are t to be drilled in all tanks and fitted w with GRAF D DN 100 edge e seals. A core drill (Ø 124 mm) is required for drilling.
- Page 8 5. Ins stallation s set-up kit stallation set-up kit nstallation o f the outflow w pipe Drain pip pe (pipe DN 110 (pipe a and bow can n be grey For fixing dra ain pipe, DN 100 pipe cla amp, thread- instead orange)) is installed fro...
- Page 9 5. Ins stallation s set-up kit By Epro 18 Commer rcial, the two o disc aerato ors are connecte ed to the dow wnpipe with a a Y-piece. nstallation o f the aeratio on unit to th he set-up kit The stai nless steel d downpipe is...
- Page 10 5. Ins stallation s set-up kit nserting/Inst tallation set -up kit Set-up k kit has to be s set on the m iddle of the b baffle. Disc a aerator must be installed on side of ou utflow. nstallation o f drain (U B end) The U-be...
- Page 11 5. Ins stallation s set-up kit ir hose conn nection Colored mar rking at the EPro set- up-kit Air hose es have to be e drawn thro ugh the emp pty pipe. Col lored hoses have to be c connected a nd fixed with hose cla amps accordi...
- Page 12 5. Ins stallation s set-up kit omponents of Sapphire e disinfectio on (as option n) and pump p-out tank Chlorine Tab blet Feeder Press sure Pipe 40 High Water L Level Alarm F Float Lip Se eal DN50 rrigation Pum 12 / 25...
- Page 13 6. Assem mbly of sw witch cabin sembly of f switch ca abinet omponents Piston Air Co ompressor Coolin ng Fan Control Unit K KL24plus Powe er Supply Manifold with h Step Motor Valves Remo ote Alarm Pla Auxiliar Alarm m Unit Alarm m LED (not fig...
- Page 14 6. Assem mbly of sw witch cabin Gra a f plastic ext terior cabin et for EPro1 Plastic ca binet for EP Pro18 Comm mercial Insta allation depth 600- -640 Assemb ble bottom p part and fix to o top part accordi ng to instruc ctions include...
- Page 15 Filling up the insid de of bottom m part with prevent the c cabinet from damage filling granulate ( (GRAF 107 7607). The granula ate reduces humidity co oming from soil wh hich can lead d to corriosi on damage in long run.
- Page 16 6. Assem mbly of sw witch cabin Insert th he hoses fro m the thin s side of the s sealing sh the hoses s through th e thin top la ayer. A plug of m material rema ains stuck in n the end of t he hose.
- Page 17 6. Assem mbly of sw witch cabin uxiliary con ntroller System Fault t Input from K KL24plus Work load (option for additiona al float) Power output t for irrigation n pump Acces ssory Fault (option for r additional alarm m input) Power Input Pump p Run, set to...
- Page 18 6. Assem mbly of sw witch cabin back front Remote al larm plate The 2 core c connecting c cable should be run in a separate co onduit to the system pow wer supply to avoid possib ble interferen ...
- Page 19 7. Cl lear Water r Pump M odule (as option) ear Water Pump Mo odule (as o option) affle height + XXX X mm min. le evel when float s switch off Concr rete, 10 EP Carat 4800, 10 EP Carat 6500, 10 EP The br...
- Page 20 7. Cl lear Water r Pump M odule (as option) ounting the e brackets train relief 20 / 25...
- Page 21 7. Cl lear Water r Pump M odule (as option) ower pump socket and clip mounti nstallation in n the tank The clea ar water mod dule is hung u up on the pa rtition baffle. 21 / 25...
- Page 22 7. Cl lear Water r Pump M odule (as option) lectrical con nnection for r clear water r pump up t o 2A Pumps t that takes m maximum 2 A Ampere can connected d directly to th he control sy ystem using a 3-pin plug g connecto...
- Page 23 7. Clear Water Pump Module (as option) Programming the control unit For running a submersible clear water pump, we are using the control unit's UV power outlet and UV setting. Program settings in the Service Menu need to be changed for T09, T10, T11 and UV: EPro15 EPro18 Com.
-
Page 24: Commis Ssioning
8. C Commissi ioning ommission ning Finish all ins stallation wor rk described in this install lation instruc ction Fill up the tr eatment tan k with fresh water; other rwise no test t run and sys stem check a are possible You can stop p filling up w... -
Page 25: Notes
9. Note otes 25 / 25 www.graf.info 2017-07 7...
Need help?
Do you have a question about the EPro Series and is the answer not in the manual?
Questions and answers