NEC Univerge SV9300 Series User Manual
Hide thumbs
Also See for Univerge SV9300 Series:
- Networking manual (364 pages) ,
- System maintenance manual (192 pages) ,
- User manual (141 pages)
Table of Contents
Advertisement
Quick Links
Advertisement
Table of Contents

Related Manuals for NEC Univerge SV9300 Series


Summary of Contents for NEC Univerge SV9300 Series
- Page 1 UNIVERGE IP Phone DT820 USER’S GUIDE GVT-002707-001 Issue 3.1 May, 2017...
-
Page 2: Notice
NEC Corporation has prepared this document for use by its employees and customers. The information con- tained herein is the property of NEC Corporation and shall not be reproduced without prior written approval from NEC Corporation. All brand names and product names on this document are trademarks or registered trade- marks of their respective companies. -
Page 3: The Terms And Conditions Of Software
UNIVERGE SV9300 communication server (SLA). The software contains certain third party open source software components which are provided under the terms and conditions designated at https://mind.bcom.nec.co.jp/customernet/soft-license/DT820_OSS.html The terms and conditions of SLA are not applied to such third party open source software components. -
Page 4: Preface
PREFACE PREFACE This manual describes operating procedures of UNIVERGE IP Phone DT820 Multiline Terminal to be connected to UNIVERGE SV9300 communication server. OUTLINE OF THIS MANUAL This manual consists of; INTRODUCTION Please read through this chapter before use for your understanding and proper use of this product. TERMINAL SETUP This chapter describes the operations to be performed on the Menu Screen, such as speaker volume control and LCD contrast adjustment. - Page 5 PREFACE TERMS DESCRIPTION Dial Tone You will hear the dial tone from handset when you hang up the hand set. If you press speaker key, you will hear the dial tone from speaker. Special Dial Tone If you press the transfer key while you are in conversation with calling party, you will hear the special dial tone.
-
Page 6: Table Of Contents
CONTENTS CONTENTS IMPORTANT NOTICE......................i LIABILITY DISCLAIMER........................i NOTICE............................i THE TERMS AND CONDITIONS OF SOFTWARE................ii PREFACE..........................iii OUTLINE OF THIS MANUAL......................iii ABOUT THE MARKS USED IN THIS MANUAL..................iii TERMS IN THIS MANUAL........................ iii CONTENTS........................v ● ● ● ● ● ● ● ● INTRODUCTION.................... -
Page 7: Contents
CONTENTS MAKING A CALL......................56 ANSWERING A CALL..................... 56 HOLDING A CALL (USING CALL HOLD)............... 57 HOLDING A CALL (USING EXCLUSIVE CALL HOLD)..........58 TRANSFER A CALL......................59 LAST NUMBER REDIAL....................61 ONE-TOUCH SPEED CALLING KEYS................61 STATION SPEED DIALING..................... 62 ORIGINATING A VOICE CALL..................63 THREE/FOUR-PARTY CONFERENCE................64 PRESET ANSWER......................64... - Page 8 CONTENTS PRIVACY RELEASE......................85 RETURN MESSAGE SCHEDULE...................86 WHISPER PAGE......................87 SYSTEM CLOCK SETUP BY STATION DIALING............88 DAY/NIGHT MODE CHANGE BY STATION DIALING............ 89 CALL HISTORY....................... 90 TO SET REVERSING CONTRAST ON LCD..............93 DIAL BY NAME (DIRECTORY SEARCH)............95 TO MAKE A CALL USING DIAL BY NAME..............95 TO REGISTER PERSONAL DIRECTORY..............
-
Page 9: Introduction
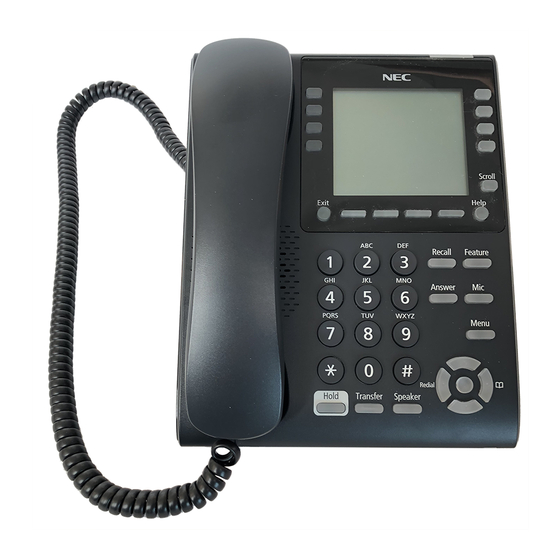
INTRODUCTION INTRODUCTION ABOUT TERMINAL FACE LAYOUT The terminal model and external appearance are shown below. The model number varies depending on the following features and its combinations. • Type of Ethernet LAN port for external device connection. (Fast Ethernet (Max.100Mbps) or Gigabit Ethernet (Max.1,000Mbps)) •... -
Page 10: Specifications
INTRODUCTION SPECIFICATIONS ITEMS CONTENTS ITY-6D/6DG: Monochrome. (STN Type), 168 x 41 [dots], with back light ITY-8LDX/32LDG: Monochrome. (STN Type), 168 x 128 [dots], with back light LCD color Gray scale (8 scales) Programmable line/ 6/8/32 keys feature key Fixed feature key 13 keys (with Menu key and Cursor key) Back light LCD (lit for 10 seconds when operating) -
Page 11: Keys And Parts
For details, please contact the system administrator. When a PoE (Power over Ethernet) HUB supports NEC Proprietary Protocol is used for central power supply, ILPA-R UNIT, which is an adapter for converting IEEE802.3af to NEC Proprietary Protocol is needed. - Page 12 INTRODUCTION NAME FUNCTION (3) Speaker Originating a call with handsfree. (4) Dial keypad Dial the called party number or feature access code. Hold key To place a call on hold. Transfer key Allows the terminal user to transfer established calls to another termi- nal, without attendant assistance.
- Page 13 INTRODUCTION PROGRAMMABLE KEYS WITH LCD DISPLAY The DT820 series offers a type of terminal that supports programmable keys which have LCD display information area corresponding to each key. Since the key information is shown on the LCD screen, the identification of paper based "DESIGNATION"...
- Page 14 INTRODUCTION Key Type Display Information Maximum digits Line Key Name or number of station or outside line. Feature Key Name of service feature. One-Touch Speed Calling Key Name or number of called party. (c) Page Icon When the terminal supports more than 8 programmable keys, the page icon is displayed at the center of screen. Each page is provided 8 programmable keys and the page icon shows the corresponding key number and its status as follows.
- Page 15 INTRODUCTION Press line key 22 for answering the incoming call. Incoming Page 3 Call Key No. 21 Key No. 17 PETER Key No. 22 Key No. 18 MICHAEL JULIA Key No. 23 Key No. 19 POWELL Key No. 24 Key No. 20 JAMES Scroll Press line Key 22 on Page 3 to...
-
Page 16: Installation Procedure
INTRODUCTION INSTALLATION PROCEDURE ADJUSTING ANGLE OF TILT LEGS The terminal provides adjustable legs for angling it to best suit each user. The legs can be set for two different heights (Low/High). LOW POSITION SETTING Turn the terminal over (key side down). Adjust the legs to desired height. - Page 17 INTRODUCTION Pull up the Leg Stoppers. Leg Stopper (1) Tilt Legs Adjust the legs to desired height. < High position > (1) Tilt Legs Turn the terminal over (key side up). ATTACHING HANDSET Insert the modular jack of curled code into the HANDSET connector on the backside of the terminal until “click”...
- Page 18 INTRODUCTION Fit the curled cord into the groove to be fixed. (1) Terminal (2) HANDSET Connector (3) Modular Plug (4) Curl Cord (5) Groove CONNECTING LAN CABLE Connect LAN cable to the terminal following steps. Connect LAN cable to LAN cable connector (LAN (=)) of the terminal. Press the LAN cable into the groove.
-
Page 19: Connecting Headset
The headsets which can be connected to the telephone are wired headset and wireless headset with EHS (Electronic Hook Switch) cord. For the headset that is supported, please contact the NEC's dealer or NEC. HOW TO CONNECT HEADSET Plug the modular plug of headset into the HEADSET connector on the bottom of terminal. -
Page 20: About Screens
INTRODUCTION ABOUT SCREENS STARTING OF TERMINAL SCREEN The screen displayed after starting up the terminal varies depending on whether URL of the external XML application is registered or not. This section provides sample screen displays for both cases and explains how to start up the Menu Screen. -
Page 21: Menu Screen
INTRODUCTION STARTING UP TERMINAL (WHEN EXTERNAL APPLICATION IS NOT REGISTERED) When the terminal starting up, it displays the Phone Screen. MARY SMITH [200] 4:26 PM MON 2015 HIST. >>>> Press key to display the Menu Screen. Menu ITY-6D ITY-8LDX MENU SCREEN By pressing key, you can use various application features such as Setting etc. - Page 22 INTRODUCTION ITY-8LDX ICON DESCRIPTION (1) History To view Call History; the history data stored in the system memory (refer to “CALL HISTORY” on page 90), such as the histories of missed calls, dialed numbers and received calls. Not supported for ITY-6D (2) Directory To use Directory features;...
-
Page 23: Phone Screen
INTRODUCTION ICON DESCRIPTION (5) XML Appli- When the Home URL is registered, a screen icon of XML application which is registered as cation with the Home URL and the application name are displayed. registered in When the Home URL is not registered, the Phone Screen icon is displayed. Home URL/ Phone The URL of external XML application server is registered at the initial... -
Page 24: Soft Keys
INTRODUCTION DISPLAY Displays LCD information sent from the system. (Extension number, calendar, time, soft key etc.) SOFT KEYS Soft keys provide a set of functions on the LCD that adapts to the changing state of the terminal. Patterns and names of Soft keys to be displayed are set at initial installation. -
Page 25: Soft Key Features
INTRODUCTION • CALL IS ON HOLD HOLD 4:26 PM MON 11 MAY 2015 SOFT KEY FEATURES The following table describes features supported by Soft key. Also, service description is displayed on the screen key. DISPLAY FEATURE DESCRIPTION Microphone On/Off To turn the microphone on and off for handsfree calling. Dial By Name To search for a desired number in system directory by name. -
Page 26: How To Use Soft Keys
INTRODUCTION HOW TO USE SOFT KEYS This section provides some sample operations of features using Soft keys. SETTING DO NOT DISTURB Press Speaker key, press Soft key (>>>>) and press Soft key (DND). 4:26 PM MON 11 MAY 2015 >>>> “SET”... - Page 27 INTRODUCTION Dial the station number to be transferred. 4:26 PM MON 11 MAY 2015 After 4 seconds,return back to the idle screen automatically. (or Press Speaker Key) Speaker key lamp goes off. → CANCELING CALL FORWARDING - BUSY LINE While setting Call Forwarding - Busy Line. Press the Soft key (>>>>) repeatedly until display shows “FDN”.
- Page 28 INTRODUCTION MULTI-WINDOWS SERVICE This terminal can use multiple XML applications at the same time. Maximum four (ITY-8LDX)/two (ITY-6D) applications can be run simultaneously, including Phone Screen and other application that is registered in Home URL. SWITCHING XML APPLICATIONS You can use this screen to switch windows to display. Press key to display the Menu Screen.
- Page 29 INTRODUCTION EXITING XML APPLICATIONS Press key, while displaying the XML application on the screen. If you exit the XML application, other applications running on the Menu Screen will be displayed in aligned at the top. ITY-6D ITY-8LDX LAUNCHING THE FIFTH APPLICATION You can launch up to four (ITY-8LDX)/two (ITY-6D) XML applications.
- Page 30 INTRODUCTION Try to launch a fifth (ITY-8LDX) or a third (ITY-6D) application. An error message to ask you to exit one of the currently running applications is displayed. • Press Soft key (Next). ITY-6D ITY-8LDX If you do not operate anything for 10 seconds after an error message is displayed, the trial of launching the new application is automatically canceled.
- Page 31 INTRODUCTION Select an application to exit and press Soft key ( ITY-6D ITY-8LDX Now you can launch a new application. ITY-6D ITY-8LDX ICON DISPLAY AT XML APPLICATION UPDATE The same application icon ( ) is displayed on the Menu Screen for all XML applications. The icon is shown for the XML applications that are not displayed on the Menu Screen even once.
- Page 32 INTRODUCTION ITY-8LDX flash every second. is replaced is replaced POP-UP WINDOW SERVICE If there is an incoming call while the terminal is displaying an XML application, the applications are suspended and confirming incoming call status is possible. LAUNCHING A POP-UP WINDOW There are several ways to display a Pop-up Window as follows.
- Page 33 INTRODUCTION XML applications are being launched. Call Indicator Lamp lights red. Line key lamp flashes red. → Answer key lamp lights red. → Press key. Phone Screen is pop up and confirming the calling number is possible. (1) LCD-3 Line Display Select one of the following operations.
-
Page 34: Terminal Setup
TERMINAL SETUP TERMINAL SETUP TO ADJUST LCD CONTRAST It is possible to adjust the LCD contrast when the ADJUSTING VOLUMES terminal is in idle status. Press (Up) or (Down) when the terminal is TO ADJUST HANDSET not used or ringing, etc. RECEIVER VOLUME It is possible to adjust the volume level of handset receiver during a call in progress using handset. -
Page 35: To Set Ringing Of Headset
TERMINAL SETUP TO SET RINGING OF Select whether to ring the headset ringer. HEADSET Select one of the following operations. • Highlight an item by using , and press Following explains how to enable/disable the ringing of headset. or Soft key (OK). •... -
Page 36: To Set Ringer Tone
TERMINAL SETUP TO SET RINGER TONE Select “ Incoming Call”. Select one of the following operations. This section explains how to set a ringer tone. • Highlight an item by using , and press or Soft key (OK). WHEN DISTINCTIVE RINGING •... - Page 37 TERMINAL SETUP Select a desired tone type. MENU FRE- FRE- You can preview the designated ringer tone. ITEM QUEN- QUEN- MARKS Select one of the following operations. • Highlight an item by using , and press (Hz) (Hz) or Soft key (OK). Automat- •...
-
Page 38: To Enable/Disable Rtp Alarm
TERMINAL SETUP TO ENABLE/DISABLE RTP Tone Type 1 to Tone Type 8: In the preview function, each ringer tone ALARM sounds continuously. However when “ Automatic” is selected, each ringer pattern of Following explains how to enable/disable RTP internal and external incoming calls is Alarm. -
Page 39: To Set Key Touch Tone
TERMINAL SETUP Select whether to ring the RTP TO SET KEY TOUCH TONE Alarm. Following explains how to set Key Touch Tone. Key Select one of the following operations. Touch Tone is a tone generated when the digit keys • Highlight an item by using , and press are pressed while terminal is offhook. -
Page 40: To Set Music On Hold
TERMINAL SETUP Select desired mode of Key Touch TO SET MUSIC ON HOLD Tone. Following explains how to set Music on Hold to be Select one of the following operations. heard by terminal user oneself. • Highlight an item by using , and press or Soft key (OK). -
Page 41: To Enable/Disable Volume Level Display
TERMINAL SETUP Select a desired Music on Hold. TO ENABLE/DISABLE Select one of the following operations. VOLUME LEVEL DISPLAY • Highlight an item by using , and press or Soft key (OK). Determines whether or not to display the following volume levels: handset receiver volume, speaker •... -
Page 42: To Set Screen Saver
TERMINAL SETUP Select whether to display the TO SET SCREEN SAVER volume level. To set whether starting the Screen Saver when the Select one of the following operations. terminal is idle for a certain period of time. • Highlight an item by using , and press or Soft key (OK). -
Page 43: To Enable/Disable Lcd Back Light
TERMINAL SETUP TO ENABLE/DISABLE LCD Select “ Screen Saver Mode”. Select one of the following operations. BACK LIGHT • Highlight an item by using , and press Following explains how to turn On/Off of the LCD or Soft key (OK). Back light. -
Page 44: To Enable/Disable Lcd Backlight Fade Control
TERMINAL SETUP Select whether to turn On/Off of the TO ENABLE/DISABLE LCD LCD Back light. BACKLIGHT FADE Select one of the following operations. CONTROL • Highlight an item by using , and press or Soft key (OK). Following explains how to set Backlight Fade •... -
Page 45: To Set A Language
TERMINAL SETUP TO SET A LANGUAGE Select “ Backlight Fade Control”. Select one of the following operations. • Press or Soft key (OK). The language is set by system data setting at initial installation. • Press Therefore, it is not required to change the language on the terminal from default setting Backlight Fade Control Automatic). -
Page 46: To Change Password
TERMINAL SETUP TO CHANGE PASSWORD Enter the old password. After entering the old password, press Following explains how to change an existing Soft key (Set). password. The password is used for the following occasions. Old Pass • To lock/unlock the terminal. New Pass •... -
Page 47: To Set Usability
TERMINAL SETUP TO SET USABILITY Press or Soft key (OK). The password entry completes successfully. Following explains how to set the Pop-up operation key. Complete. Press key to display the Menu Menu Screen. • When the password entry in failure, the Select “Setting”. -
Page 48: To Reset Terminal Settings
TERMINAL SETUP TO RESET TERMINAL Select a desired mode of key. Select one of the following operations. SETTINGS • Highlight an item by using , and press Following explains how to clear the personal data or Soft key (OK). of the terminal. •... -
Page 49: To Download A File
TERMINAL SETUP TO DOWNLOAD A FILE Press or Soft key (OK). You can download files for Music on Hold and Are you sure? Ringer Tone. When downloading these files, the terminal needs to be connected to the network that Back has FTP, TFTP or HTTPS server. - Page 50 TERMINAL SETUP Select a protocol type of the server Enter a User ID with digit keys. which stores the download file. Please refer to “APPENDIX B INPUT Select one of the following operations. CHARACTERS” on page 102 for how to •...
- Page 51 TERMINAL SETUP Enter the folder name where the Enter an IP address/address (URI) of download file is stored. the FTP/TFTP/HTTPS server which stores the download file. Please refer to “APPENDIX B INPUT Enter the IP address of FTP/TFTP/HTTPS CHARACTERS” on page 102 for how to server with digit keys.
- Page 52 TERMINAL SETUP Enter the file name with digit keys. Select “ Download Files”. The default file name is displayed. Select one of the following operations. • Highlight an item by using , and press Input a file name. or Soft key (OK). MOH.wav •...
-
Page 53: To Backup Or Restore The Setting Data Of Terminal
TERMINAL SETUP Press Soft key (Exit). TO BACKUP OR RESTORE The display goes back to the [Download THE SETTING DATA OF Menu] screen. TERMINAL When the downloading process ends in failure, “Downloading Failed!” is displayed on This section explains how to make a backup of the the LCD. - Page 54 TERMINAL SETUP Select “ Protocol”. Select “ User ID”. Select one of the following operations. Select one of the following operations. • Highlight an item by using , and press • Highlight an item by using , and press or Soft key (OK). or Soft key (OK).
- Page 55 TERMINAL SETUP Enter the IP address of FTP/TFTP/ Select “ Folder”. HTTPS server with digit keys. Select one of the following operations. for separator of IP address. • Highlight an item by using , and press or Soft key (OK). ‘*‘For‘.‘...
- Page 56 TERMINAL SETUP Press Soft key (Exec). Select “ Data Backup”. A Backup is started. Select one of the following operations. • Highlight an item by using , and press Uploading… or Soft key (OK). • Press Data Backup A backup is completed. Data Restore ↓...
- Page 57 TERMINAL SETUP Select “Setting”. Select “ Account Settings”. Select one of the following operations. Highlight an item by using , and press • Highlight an item by using , and press or Soft key (OK). Select “ Data Backup/Restore”. • Press Select one of the following operations.
- Page 58 TERMINAL SETUP Enter a password with digit keys. Select “ Server Address”. Select one of the following operations. Please refer to “APPENDIX B INPUT • Highlight an item by using , and press CHARACTERS” on page 102 for how to or Soft key (OK).
- Page 59 TERMINAL SETUP Enter the IP address of FTP/TFTP/ Select “ Data Restore”. HTTPS server with digit keys. Select one of the following operations. for separator of IP address. • Highlight an item by using , and press or Soft key (OK). ‘*‘For‘.‘...
- Page 60 TERMINAL SETUP Enter the file name with digit keys. Press Soft key (Exec). The default file name is displayed. Downloading is started. Downloading… Input a file name. PersonalData.tgz Cancel Exec • Press Soft key (BK) once to delete the default file name. •...
-
Page 61: To Use Headset
TERMINAL SETUP Press Soft key (Exit). TO USE HEADSET The display goes back to the [Backup/ Restore] screen. TO MAKE/ANSWER A CALL When the downloading process ends in WITH HEADSET failure, “Download Failed!” is displayed on the LCD. Check to see the following points By using optional headset, it is possible to originate and retry download. - Page 62 TERMINAL SETUP Press Headset/Handset feature key once again, after finishing a call. Headset/Handset feature key lamp goes off. → Line key lamp lights off. → During a call in progress using handset, you can switch to the headset by pressing the Headset/Handset feature key.
-
Page 63: Feature Operation
FEATURE OPERATION FEATURE OPERATION Enter a password. As initial setting, enter the extension number This chapter describes how to login/logout, how to as password. input characters and how to make a call/hold, etc. From 4 to 10 characters can be entered for LOGIN/LOGOUT a password. -
Page 64: Making A Call
FEATURE OPERATION MAKING A CALL ANSWERING A CALL This section explains Preset Dialing. Before This section explains how to answer a call with making a call, the terminal user can verify the Answer key. dialed number displayed on the LCD. When a wrong number is entered, the user can correct the TO ANSWER AN EXTERNAL number before originating the call. -
Page 65: Holding A Call (Using Call Hold)
FEATURE OPERATION Lift the handset to answer the call. HOLDING A CALL (USING CALL HOLD) 4:26 PM MON 11 MAY 2015 This feature allows a terminal user to hold a call in progress by pressing the Call Hold key. This line can then be used for originating another call or returning to a previously held call. -
Page 66: Holding A Call (Using Exclusive Call Hold)
FEATURE OPERATION Press Line key that is placed on HOLDING A CALL (USING hold. EXCLUSIVE CALL HOLD) Line key lamp lights green. → This feature allows a terminal user to place a call on Hold and to exclude all other station users from 4:26 PM MON 11 MAY 2015 retrieving the held call. -
Page 67: Transfer A Call
FEATURE OPERATION TRANSFER A CALL TO RETRIEVE THE HELD CALL TO TRANSFER A CALL (WITH Following explains how to retrieve the held call. ANNOUNCEMENT) While holding a call. This feature allows a terminal user to transfer Line key that is placed on hold flashes green. incoming or outgoing calls to another terminal →... - Page 68 FEATURE OPERATION Dial the destination extension ANSWER TO A TRANSFERRED number. CALL (BY EX. 210) You will receive a dial tone. The dialed extension number is displayed Ringing is heard. with flash. Call Indicator Lamp flashes. Line key lamp flashes red. → 4:26 PM MON 11 MAY 2015 The extension number that initiates call transfer is displayed on the LCD.
-
Page 69: Last Number Redial
FEATURE OPERATION LAST NUMBER REDIAL ONE-TOUCH SPEED CALLING KEYS It is possible to search and redial the phone number up to 60 calls previously dialed. This feature allows a terminal user to dial frequently-called numbers by pressing a One- Press or Soft key (OG) after press touch key assigned for Station Speed Dialing. -
Page 70: Station Speed Dialing
FEATURE OPERATION STATION SPEED DIALING When a phone number has been already registered in One-touch key, that number is displayed on the LCD. The previous number This feature allows a terminal user to dial long-digit will be cleared when you register a new or frequently-called numbers by pressing feature number. -
Page 71: Originating A Voice Call
FEATURE OPERATION ORIGINATING A VOICE TO MAKE A CALL USING STATION SPEED DIALING CALL Instead of ringing, this feature informs the Press (Redial). incoming call by voice. Speaker key lamp lights red. → This feature is set by Soft key or feature key. 11 MAY 4:26 JOHN SMITH The feature key is set by system data setting... -
Page 72: Three/Four-Party Conference
FEATURE OPERATION THREE/FOUR-PARTY PRESET ANSWER CONFERENCE It is possible to respond by simply lifting up the handset of the terminal as usual telephone. This feature provides a terminal user the ability to add-on another party to a call already in progress. TO SET PRESET ANSWER This feature is set by Soft key or feature key. -
Page 73: Receiving A Voice From Speaker
FEATURE OPERATION RECEIVING A VOICE FROM TALKING HANDSFREE SPEAKER Dialing or answering a call is possible without lifting the handset. It is possible to change the terminal to “listen-only” during the call in progress. You can hear the TO SET HANDSFREE caller's voice from the speaker on the terminal with putting the handset on the hook. -
Page 74: Call Pickup - Group
FEATURE OPERATION Press Speaker key. CALL PICKUP - GROUP Speaker key lamp lights red. → This feature permits a terminal user to answer any Line key lamp lights green. → calls directed to other extensions in their preset Talk toward the mic. pickup group. -
Page 75: Call Pickup - Direct
FEATURE OPERATION CALL PICKUP - DIRECT MULTILINE APPEARANCE This feature permits a terminal user to pickup a call This feature allows you to accommodate the lines to any other terminal in the system. (another terminal number) other than My Line on the Programmable line/feature keys. -
Page 76: Dnd (Do Not Disturb)
FEATURE OPERATION DND (DO NOT DISTURB) Press Soft key (>>>>) when Soft key is used. This feature restricts incoming calls to a terminal. 4:26 PM MON 11 MAY 2015 This feature is set by Soft key or feature key. The feature key is set by system data setting >>>>... -
Page 77: Save And Repeat Anumber
FEATURE OPERATION SAVE AND REPEAT A Lift the handset to start a conversation. NUMBER Speaker key lamp goes off. → This feature allows a terminal to save a specific dialed number and then redial that number. 4:26 PM MON 11 MAY 2015 Mute This feature is set by Soft key or feature key. -
Page 78: Trunk Queuing - Outgoing
FEATURE OPERATION TRUNK QUEUING - WHEN TRUNK IS AVAILABLE OUTGOING Ringing of external incoming call is heard. This feature allows a terminal user, upon Call Indicator Lamp flashes red. encountering a busy signal on a trunk, to set a call and enter a first-in, first-out queue. -
Page 79: Call Back
FEATURE OPERATION CALL BACK WHEN THE BUSY TERMINAL BECOMES IDLE This feature allows a calling party to set an automatic Call Back when a busy or no answer The terminal which has set Call Back condition is encountered. When the busy terminal is alerted by ring. -
Page 80: Timed Queuing (Outside Line Only)
FEATURE OPERATION Press Call Back feature key. TIMED QUEUING (OUTSIDE You will receive a service set tone. LINE ONLY) Call Back feature key lamp goes off. → When a user originates an outgoing trunk call and CANCEL the called party is busy or does not answer, the 4:26 PM MON 11 MAY 2015 caller can set the Timed Queuing. -
Page 81: To Make/Answer A Call During Call In Progress
FEATURE OPERATION TO MAKE/ANSWER A CALL STATION HUNTING DURING CALL IN When a busy terminal which is assigned Station Hunting pilot number is called, this feature permits PROGRESS the incoming call to be routed to another terminal within the hunt group. This feature permits a user to hold a call in progress by pressing the Call Hold feature key. -
Page 82: Step Call
FEATURE OPERATION STEP CALL CALL WAITING This feature allows the terminal user, after calling This feature allows a terminal to camp itself on to a busy terminal, to call an idle terminal by simply a busy terminal. dialing an additional digit. This feature is available only for the terminal that is set by system data setting at initial The feature is set by system data setting at... -
Page 83: Executive Override
FEATURE OPERATION Press Answer key again. EXECUTIVE OVERRIDE Return to the original party and another party This feature allows selected users to override a is placed on hold. (It is possible to change the busy condition on a called terminal. connection as many times.) The feature key is set by system data setting at initial installation. -
Page 84: Call Forwarding - Busy Line
FEATURE OPERATION CALL FORWARDING - TO CANCEL BUSY LINE While being set the Call Forwarding - Busy Line, This feature permits a call to a busy extension to be routed to a designated terminal. Press the Soft key (>>>>) repeatedly until display shows “FDN”... -
Page 85: Call Forwarding - No Answer
FEATURE OPERATION CALL FORWARDING - NO TO VERIFY ANSWER Press Soft key (FDN) or Call Forwarding - No Answer feature key. When a call is placed to a terminal that does not The terminal number of the forwarding answer, this feature forwards the call to another destination is displayed on the LCD. -
Page 86: Call Forwarding - All Calls
FEATURE OPERATION CALL FORWARDING - ALL TO CANCEL CALLS While being set the Call Forwarding - All Calls, This feature allows all calls directed to a particular extension to be rerouted to an alternate Press the Soft key (>>>>) repeatedly destination, regardless of the busy or idle status of until display shows “FDA”... -
Page 87: Call Forwarding - Destination
FEATURE OPERATION CALL FORWARDING - CID (CALLER ID) CALL DESTINATION DISPLAY This feature allows a station user to set Call Without answering incoming calls or held calls that Forwarding - All Calls from another station within terminate to the Line keys of a terminal, the calling the system. -
Page 88: Voice First/Tone First
FEATURE OPERATION VOICE FIRST/TONE FIRST Dial extension number. Wait for voice page alert tone. This feature allows incoming calls to your terminal VOICE CALL to either ring or go to voice announcement. 4:26 PM MON 11 MAY 2015 The feature access code/feature key is set by R-TONE system data setting at initial installation. -
Page 89: Answer A Voice Call Handsfree
FEATURE OPERATION ANSWER A VOICE CALL AUTOMATIC INTERCOM HANDSFREE Automatic Intercom provides a path for voice announcement calls between two terminals using This feature allows the terminal user to answer a a Line key. Private conversations can be held. The Voice Call without lifting the handset. -
Page 90: Manual Intercom
FEATURE OPERATION MANUAL INTERCOM If called terminal is engaged in a non-intercom call, the terminal may The Manual Intercom groups have up to six press Manual Intercom feature key terminals sharing a common signal path. Users after placing original caller on hold can call other members of the Manual Intercom (with Hold key). -
Page 91: Dial Intercom
FEATURE OPERATION DIAL INTERCOM INTERNAL ZONE PAGING WITH MEET-ME PAGE Dial Intercom comprises up to 10 terminals that can call each other using a dedicated Dial Intercom This feature allows terminal users to page over the feature key with abbreviated dialing. Dial Intercom built-in speakers of the terminals within the calls can be voice announce with ringing calls. -
Page 92: Boss/Secretary Calling
FEATURE OPERATION BOSS/SECRETARY IF BOSS REFUSES CALL CALLING Secretary presses Transfer key to return to calling party. A secretary with a terminal can use an appearance of the boss' extension to screen calls for that extension, and announce and/or transfer calls to that extension. -
Page 93: Timed Reminder
FEATURE OPERATION TIMED REMINDER PRIVACY RELEASE This feature allows the system to be programmed A terminal is engaged in a conversation, and to automatically call terminals at specified times. allows another terminal to enter the call in Upon answering, the terminal is connected to a progress. -
Page 94: Return Message Schedule
FEATURE OPERATION RETURN MESSAGE Dial the number corresponding to desired message. SCHEDULE Message Patterns This feature allows terminal user to register a DIAL MESSAGE return schedule when leaving the office and have the schedule display on the calling terminal LCD. IN: BACK HH: MM OUT: BACK... -
Page 95: Whisper Page
FEATURE OPERATION WHISPER PAGE Listen to conversation and speak to boss terminal only. This feature allows a secretary to interrupt the boss CALL WAITING in a private way. By pressing a feature key or dialing an access code, the secretary terminal can 4:26 PM MON 11 MAY 2015 interrupt the conversation between the boss and CONF... -
Page 96: System Clock Setup By Station Dialing
FEATURE OPERATION Press Answer key. SYSTEM CLOCK SETUP BY Answer key lamp goes off. → STATION DIALING Return to original call. This feature enables a terminal user to adjust the system clock. 4:26 PM MON 11 MAY 2015 CONF Recall The feature access code/feature key is set by system data setting at initial installation. -
Page 97: Day/Night Mode Change By Station Dialing
FEATURE OPERATION DAY/NIGHT MODE Press Speaker key. Speaker key lamp goes off. → CHANGE BY STATION If a programmable key is used lamp DIALING indication will be, • Night Mode = Red lamp on This feature allows selected terminals to activate a •... -
Page 98: Call History
FEATURE OPERATION CALL HISTORY Display the target outgoing call history. This feature records information such as numbers Select one of the following operations. you have dialed or ones received from other • Press parties. And also it allows a terminal user to make •... - Page 99 FEATURE OPERATION Display the outgoing call history of Press or Soft key (<<<<). the number you want to delete. 11 MAY 3:26 JOHN JOHNSON Select one of the following operations. • Press <<<< Entry DelAll • Press Soft key (↑Prev) or Soft key (↓Next).
- Page 100 FEATURE OPERATION Display the target incoming call Display the incoming call history of history. the number you want to delete. Select one of the following operations. Select one of the following operations. • Press • Press • Press Soft key (↑Prev) or Soft key •...
-
Page 101: To Set Reversing Contrast On Lcd
FEATURE OPERATION TO SET REVERSING Press or Soft key (<<<<). CONTRAST ON LCD 5/11 4:26 This feature allows the LCD display to reverse the <<<< Entry DelAll contrast black-and-white. Press Soft key (Entry). TO SET REVERSING Registered = Person 01 CONTRAST FROM NORMAL SCREEN <<<<... - Page 102 FEATURE OPERATION Press Reverse Contrast feature key. The display is changed normal screen. MARY SMITH [200] 4:26 PM MON 2015 HIST. >>>>...
-
Page 103: Dial By Name (Directory Search)
DIAL BY NAME (DIRECTORY SEARCH) DIAL BY NAME Select the directory database. (Common or Personal directory) (DIRECTORY SEARCH) Press Softkey (Common) or Soft key (Person) • Display example of when you pressed This feature is a common/personal directory Soft key (Common) service which is supported by UNIVERGE SV9300 communication server. -
Page 104: To Register Personal Directory
DIAL BY NAME (DIRECTORY SEARCH) TO REGISTER PERSONAL Press or Soft key (NAME) and then register the name. DIRECTORY Up to 16 characters can be registered for Following explains how to register the called party each name. into the personal directory. Press Soft key (DIR). - Page 105 DIAL BY NAME (DIRECTORY SEARCH) Press or Soft key (OK). SMIT NAME NUMBER Press key. Return back to the idle screen. MARY SMITH [200] 4:26 PM MON 11 MAY 2015 HIST. >>>>...
-
Page 106: Appendix A Menu List
APPENDIX A MENU LIST APPENDIX A MENU LIST This chapter shows the Terminal Menu List. This manual does not describe menus that are displayed in grayout on the LCD. It is not possible to set the menus that are displayed in grayout. MENU Press key to display the Menu Screen. -
Page 107: User Setting
APPENDIX A MENU LIST SETTING It is possible to set and manage the terminal setting data. USER SETTING Select this option to configure the user setting. MENU ITEM DESCRIPTION DEFAULT VALUE Incoming Call Select this option to set up for incoming calls. (Refer to “INCOMING CALL”... - Page 108 APPENDIX A MENU LIST DISPLAY MENU ITEM DESCRIPTION DEFAULT VALUE Calendar Format Select this option to change calendar and time display. (This feature does not work even if it is set. This feature is set by system data setting at initial installation.) Calendar Select this option to change the display order of date, day of the week,...
- Page 109 APPENDIX A MENU LIST MENU ITEM DESCRIPTION DEFAULT VALUE Protocol Select this option to specify a protocol of the server (either FTP, TFTP or HTTPS). Account Settings Select this option to set necessary data when using FTP/HTTPS service. User ID Select this option to enter a user ID for downloading via server.
-
Page 110: Appendix B Input Characters
APPENDIX B INPUT CHARACTERS APPENDIX B INPUT CHARACTERS HOW TO INPUT CHARACTERS SYSTEM/STATION SPEED DIALING FEATURE Press the dial key to display the character. The character will be changed by repeatedly pressing the dial. After displaying the desired character, press Example: When inputting with “MARY SMITH”, 6# 2# 777# 999# 0# 7777# 6# 444# 8# 44# The following two input mode can be specified. -
Page 111: Table Of Input Characters
APPENDIX B INPUT CHARACTERS • : “English Character (capital letter)” • : “English Character (lowercase)” is shown on the right side of the LCD. The following shows the characters that can be input for each menu. TERMINAL PASSWORD INPUT Input mode “ Number”... - Page 112 APPENDIX B INPUT CHARACTERS INPUT DIAL ‘ & INPUT (1 - 10): Showing number of times pressing the key. SP: Showing blank space. CHARACTER CODE TABLE FOR MENU CONTENTS PASSWORD INPUT INPUT DIAL...
- Page 113 APPENDIX B INPUT CHARACTERS INPUT (1 - 10): Showing number of times pressing the key. SP: Showing blank space. When inputting password characters, “*” are displayed on the screen. INPUT THE USER ID, PASSWORD (FTP/HTTPS SERVER), FOLDER NAME, FILE NAME, ADDRESS (URI) &...
- Page 114 APPENDIX B INPUT CHARACTERS & < > & INPUT (1 – 29): Showing number of times pressing the key. SP: Showing blank space. Input mode switches over by pressing the repeatedly. (“ English Character (capital letter)”→“ English Character (lowercase)”→“ number”→“...
- Page 115 APPENDIX B INPUT CHARACTERS INPUT DIAL (1) For separator of IP address. INPUT (1 - 10): Showing number of times pressing the key.
- Page 116 UNIVERGE SV9300/UNIVERGE IP Phone DT820 USER’S GUIDE GVT-002707-001 May, 2017 Issue 3.1 NEC Corporation ©2015-2017 NEC Corporation...
Need help?
Do you have a question about the Univerge SV9300 Series and is the answer not in the manual?
Questions and answers