Table of Contents
Advertisement
Available languages
Available languages
Advertisement
Table of Contents

Related Manuals for Partex MK10


Summary of Contents for Partex MK10
- Page 1 Quick Start MK10 2009-11-27...
-
Page 2: Table Of Contents
QUICK START MK10 CONTENT / INNEHÅLL English Installation Unpacking and Setting-up the Printer. Install the printer driver. Install the WinSign software. Profiles and ribbon Loading continuous profiles. Loading ribbon Printing example WinSign: Start WinSign: Type in text information Winsign: Print out... -
Page 3: Installation
2. Check printer for damage which may have occurred during transport. 3. Set up printer on a level surface.. 4. Remove foam transportation safeguards near the printhead. 5. Check delivery for completeness. Contents of delivery: (MK10-KIT1) • Printer • Power cable •... -
Page 4: Profiles And Ribbon
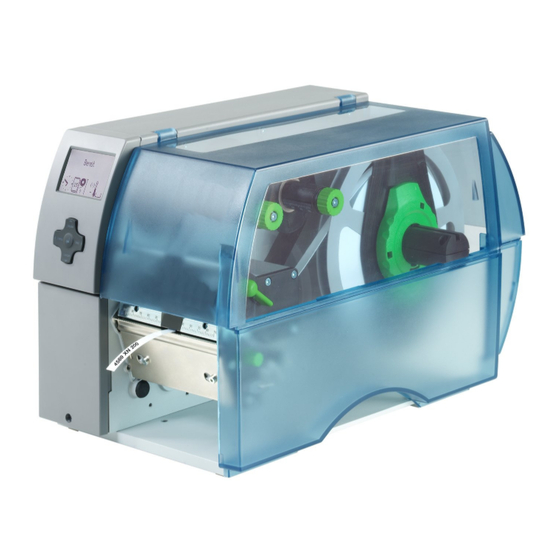
QUICK START MK10 2. Profiles and ribbons 2.1 Loading continuous profiles. • Open cover (13) • Turn lever (12) counterclockwise to lift the printhead • Feed the profile into the printer according to the pictures below. Move guides (8) apart with the green knob (11) until the profile can pass between them.. -
Page 5: Loading Ribbon
QUICK START MK10 2.2 Loading ribbon. • Turn lever (6) counterclockwise to lift the printhead • Slide ribbon roll (1) onto the ribbon supply hub (3) so that the color coating of the ribbon faces downward when being unwound. •... -
Page 6: Printing Example
- Inlay Tags - Terminal Blocks - Component markers - Selfadhesive Labels Product: Look at the label on the Partex reel. Choose the same profile under the choice Product Name/Number: Give your work file a name or num- ber so that you can find it again if you want to print it again or change something in it. -
Page 7: Winsign: Type In Text Information
QUICK START MK10 3.2 WinSign: Type in text information You can see 5 different columns at the middle of the page • Product type - Shows what type of product you choose before. • Length - Here you can set the length on your marker. -
Page 8: Winsign: Print Out
”Direct print”. Here you will find printer icons for most of PARTEX different printers. Click on the icon for MK10 A printer dialog will now appear for the MK10 printer. Here you can do som adjustments. In this section we will only show you the basic settings. -
Page 9: Read This
QUICK START MK10 4. Read this It is important that you read the manuals for the printer and the software. In those ma- nuals you will get some hints etc. how the work, how to maintenance the printer so that minimize the chance of getting any problems in the future. -
Page 10: Uppstart
QUICK START MK10 1. Uppstart 1.1 Packa upp och ställa upp skrivaren. 1. Lyft upp skrivaren i öglorna från kartongen. 2. Kontrollera om skrivaren har transportskador. 3. Ställ skrivaren på ett jämnt underlag. 4. Ta bort transporsäkringarna av skumgummi vid skrivarhuvudet. -
Page 11: Profiler Och Färgband
QUICK START MK10 2. Profiler och färgband 2.1 Mata in profil i skrivaren. • Öppna locket på skrivaren (13) • Släpp på skrivhuvudet genom att vrida spaken motsols (12) • Mata in profilen i skrivaren så som skisserna visar nedan. Ev. kan du behöva justera bredden på... -
Page 12: Montera Färgband I Skrivaren
QUICK START MK10 2.2 Montera färgbandet i skrivaren. • Vrid spaken (6) moturs för att lyfta upp skrivarhuvudet. • Skjut färgbandsrullen (1) på avlindaren (2) så att foliens färgbeläggning är nedåt när folien rullas av. • Placera färgbandsrullen (1) på avlindaren så att rullens båda ändar ligger på... -
Page 13: Utskriftsexempel
QUICK START MK10 3. Utskriftsexempel 3.1 Winsign: Start Starta WinSign på din dator Välj den gula blixten för att skapa en direktmärkning. System: Välj MK10 Produktgrupp: Här väljer du vilken typ av märken du vill skriva ut. - Heat Shrink... -
Page 14: Winsign: Mata In Textinformation
QUICK START MK10 3.2 WinSign: Mata in textinformation I arbetsytan som nu är synlig kan man skriva in sin märkesinformation. Mitt på sidan finns det fem olika kolumner. • Produkttyp - Visar vilken produkt du valde tidigare. • Längd - Här kan du sätta längden som du vill ha på ditt märke. -
Page 15: Winsign: Skriva Ut
(se skrivarens manual om du vill se hur man ändrar det värdet). Med hjälp av WinSign så kan du plussa på det värdet (1-10) så att MK10 skrivaren klipper märkena mycket djupare än det värdet som sats i skrivaren. -
Page 16: Läs Detta
QUICK START MK10 4. Läs detta Det är viktigt att du läser manualerna för både skrivaren och mjukvaran. Där får du tips om hur de fungerar, hur de ska skötas och minimerar chanserna för att få problem i framtiden. Även klippenheten kräver ett visst underhåll. Läs manualen för klippenheten så du vet vad som bör göras.
Need help?
Do you have a question about the MK10 and is the answer not in the manual?
Questions and answers