
Related Manuals for Leister SEAMTEK 900 AT


Summary of Contents for Leister SEAMTEK 900 AT
- Page 1 ® SEAMTEK 900 AT Leister Technologies AG Galileo-Strasse 10 CH-6056 Kaegiswil/Switzerland Tel. +41 41 662 74 74 +41 41 662 74 16 www.leister.com sales@leister.com...
-
Page 2: Table Of Contents
4.8 Commissioning the Machine ..........................9 4.8.1 Power Supply ............................9 4.9 Connecting the Compressed-Air Supply ......................10 5. Your SEAMTEK 900 AT ............................... 10 5.1 Type Plate and Identification ..........................10 5.2 Scope of Delivery (standard model in transport box) .................... 10 6. - Page 3 9. Welding Sequence and Tips ............................33 9.1 Welding Sequence ............................33 9.2 Tips for a Better Weld Result ..........................33 10. Seamtek 900 AT Warning and Error Messages ....................... 34 10.1 Error Levels ..............................34 10.2 Error List ................................34 11.
-
Page 4: Seamtek 900 At
AG in Kägiswil, Switzerland. It describes the setup, installation, operating sequences, nature, and tasks of the various modules that are available for using your SEAMTEK 900 AT. This documentation also comprises a list outlining troubleshooting tips as well as warranty information, and a table of contents. -
Page 5: Overview Of Important Safety Instructions
2. Overview of Important Safety Instructions 2.1 Important Safety Instructions Warning Danger to life, high voltage! Before opening the device, pull the mains plug out of the socket, because volt- age-bearing components and connections will be exposed when it is opened! Danger of fire caused by improper use of the welding machine (e.g., material overheating) and particularly in the vicinity of combustible materials! Risk of burning! -
Page 6: Intended Use
filter gases and smoke. If the extracted air is not filtered internally, the exhaust gases can also be conducted out of the building. We recommend the Leister Airpack (119.358) as an external blow-off unit. Local laws and regulations must be observed for this purpose. -
Page 7: Technical Data
3. Technical Data Seamtek 900 AT Nominal voltage 230/240 (US) Frequency 50/60 (US) Nominal current Nominal voltage 4,500 Temperature °C 120 – 700 Maximum temperature °C Airflow range l/min 80 – 170 Drive speed m/min 0 – 30 Electronics PC panel with PLC Blowers Volumetric flow controlled... -
Page 8: Moving The Machine Outside Of The Company's Premises
Only move the well-secured machine in the transport box provided for this purpose. 4.5 Work Environment Danger: Never use the Seamtek 900 AT in readily inflammable surroundings and maintain a sufficient dis- tance from combustible materials or explosive gases at all times! The hot-air welding machine must only be used in well-ventilated rooms. -
Page 9: Securely Positioning The Machine
Power Supply Connector Plug The Seamtek 900 AT is supplied without a connector plug. Connect a plug that guarantees the specifications of the machine and complies with all statutory requirements specified in the respective country. -
Page 10: Connecting The Compressed-Air Supply
The type designation and serial number are specified on the type plate on your device. Transfer this information to your operating instructions; in the event of any inquiries to our representatives or authorized Leister service center, please always refer to this information. -
Page 11: Overview Of Machine Elements
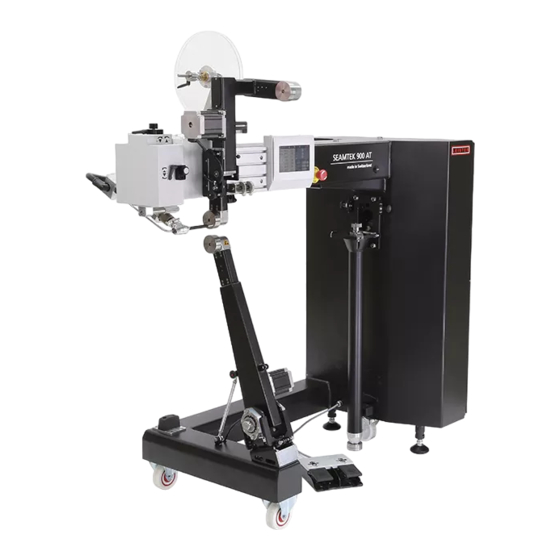
6. Overview of Machine Elements 6.1 Front View 1. Adjusting screws for nozzle position (Chapter 7.1) 8. Welding arm (pedestal) (Chapter 7.8) 2. Touch panel (Chapter 7.2) 9. Transport rollers (Chapter 7.9) 3. Emergency stop button (Chapter 7.3) 10. Upper pressure roller (upper wheel module, UWM) 4. -
Page 12: Back View
26. Pneumatic cabinet 6.3 Outlets The outlets (15 and 20) on the machine are only approved for use with Leister accessories. The electrical connection is supplied with mains voltage. Leister is not liable for any non-approved use. 6.4 Optional Accessories 6.4.1... -
Page 13: Quickarm
The machine can be equipped with the quickarm (28) in two different ways. The quickarm (28) is either fitted to the machine directly by Leister or mounted on the machine afterwards by the customer. 6.4.3 Tape Delivery System The tape delivery system (29) is suitable for supplying tape during the joining process. -
Page 14: Welding Nozzle Position And Heat Input
Now set the welding nozzle (12) to the welding position under the “welding conditions” tab (set everything to “Automatic” mode). Each time an arm, the transport rollers (9), or welding nozzle (12) are changed, the position of the nozzle must be sub- sequently readjusted. -
Page 15: Changing The Welding Nozzle
These elements may still be warm even following the cool-down mode. The Seamtek 900 AT is a hot-air welding machine. Depending on the respective process, some components can become incredibly hot. Always operate the machine with due caution. -
Page 16: Air Outlet
7.1.6 Air Outlet Air from the pump that is not required in the machine is discharged from the machine via a bypass. This is why hot air can escape from the back of the machine. (Refer to the figure for residual air outlet) In addition, warm air can be blown out of the machine from the cooling air outlet (see figure), which is required to cool the pneumatic cabinet. -
Page 17: Emergency Stop Switch
7.5 USB Connection Use the USB connection (4), to externally backup your saved formulas or to use the formulas on several Seamtek 900 AT machines at the same time. 7.6 Main Switch Caution: As the machine does not execute the cool-down mode if it is switched off via the main switch (5), this switch must only be activated following the cool-down process. -
Page 18: Feet
7.7 Feet Turn the feet (6) clockwise (seen from above), to turn the feet downward and turn the feet anticlockwise, to turn the feet upward. Ensure that the machine is suitably and securely positioned before it is commissioned. 7.8 Pedal Unit Danger: Take care not to confuse the two ped- als (7 A + 7 B) of the pedal unit –... -
Page 19: Welding Arm Options (P, S, Q), Arm Replacement
7.10 Welding Arm Options (P, S, Q), Arm Replacement Caution: To select the active arm, the motor icon (M) must be switched off . Make sure that the correct arm is selected to prevent damage to the drive. Danger of crushing! When the nozzle is retracted, there is a risk of crushing because of pneumatically mo- ving parts. -
Page 20: Quickarm
7.10.3 Quickarm Activating the Quickarm Make sure that the upper transport roller (9) is open. (See point 7.8.1) Pull the upper retaining pin (28 A) out, to disengage the locking mechanism for the quickarm (28). Now carefully fold the arm downward and fit the lower retaining pin (28 B) until it fully engages. -
Page 21: Transport Rollers
7.11 Transport Rollers 25 mm wide transport rollers (9) are mounted as standard. The powered transport rollers (9) clamp and transport the material. The maximum roller speed for original Leister accessory rollers is 30 m/min. 7.11.1 Changing the Transport Rollers Caution: Fully execute the cool-down mode so that any operating personnel that unintentionally come into contact with hot components when changing the rollers do not suff er burns. -
Page 22: Guide Holder
The SEAMTEK 900 AT features two different pressure modes. Using clamp pressure, the material can be positioned prior to the welding process. By default, this pressure is considerably lower than the weld pressure and is intended to protect the operating person from crushing injuries. -
Page 23: Mounting And Adjusting The Guide
Different guides are available as accessories. Ask your distribution partner about the various options available. 8. The Seamtek 900 AT Control Panel The touch panel (2) consists of a high-quality touchscreen display. Any machine settings can be adjusted on the screen. 8.1 Start screen After starting up, the start screen is shown on the display together with a number of languages to choose from. -
Page 24: Tab For Changing Views
Tab for changing the view Welding parameters Periphery 8.3 Tab for Changing Views At the upper edge of the screen, tabs for individual screen views can be selected. The view you currently see is indicated by the tab selected. The tab for the current view is in white. Symbol Designation Home view... -
Page 25: Welding Parameters
8.4 Welding parameters The welding parameters are located on the left-hand side of the Home view. Press the respective value to change it. Alterna- tively, you can increase or decrease the value by selecting Designation Symbol Speed The roller speed can be set from 0 m/min to 30 m/min. Upper The upper roller can be operated with a differential speed to the lower roller. -
Page 26: Periphery
8.5 Periphery The air pump is The air pump is switched on switched off Heating element The heating element is The heating element is switched off switched on Cool down When the air pump and heating element are switched on, the cool-down mode can be activated by switching off the air pump. -
Page 27: User
Now enter the old password. You will then need to enter the new password two times. When entering the password for a second time, make sure that it is identical to the password you entered the first time. Ideally, make a note of the password so that you do not lose it. To reset the password, please contact Leister Technologies AG. - Page 28 Individual users have different authorizations. The table below gives an overview of the authorizations of individual users. Admin: Full range of functions for commissioning and any repairs to the machine User: Supervisor, standard functions for machine start Guest: Shop worker, significantly restricted operation User Screen Guest...
-
Page 29: Machine Settings
8.7 Machine Settings In this view, you can change the machine settings. Depending on the user logged in, certain settings are locked or not visible. To display or change all settings, log in as “Admin”. (See also the table of authorizations for individual users). The following adjustments can be made: Setting Description... -
Page 30: Formulas
In this view, you can save your welding parameters as formulas in order to use these again at a later date. You can also save your formulas on an external storage medium for data back-up or load the formulas onto other Seamtek 900 AT welding ma- chines. -
Page 31: Test Mode
8.9 Test Mode The test mode enables the optimal welding speed to be determined. To do this, select the “Test” tab in the upper area of the screen. The test mode will guide you through the test step by step. View 1 For the test, the welding nozzle (12) and transport rollers (9) must be switched to “Auto”. -
Page 32: Add-Ons Screen
8.10 Add-Ons Screen In the Add-ons view, additional devices, such as a puller or tape cutting unit, can be switched on or off and parameterized. To operate these devices, please observe the operating instructions separately enclosed with the product. 8.11 Information The Information view enables users to see the process data for simplified troubleshooting or fault localization. -
Page 33: Welding Sequence And Tips
Use the guides that are available as accessories. Correctly adjusted guides guide the material and enable a consistent weld seam. Ask your distributor for information on the various guides available. Regular Breaks Working on the Seamtek 900 AT requires a level of concentration – if you feel stressed, take a break. -
Page 34: Seamtek 900 At Warning And Error Messages
Error List The error number is shown for the Leister Support team in the information text. Error numbers using a basis of 100 indicate the error level, e.g., 201 is a level 2 error. Error 01 is a level 1 error. - Page 35 Error 208: Cannot open Backup Source File. Recipe File on PLC corrupted. Do recover your Data from your Memory Stick. Error 209: Can not open Backup Destination File. Missing Memory Stick. Error 210: Can not read Backup Source File. Recipe File on PLC corrupted. Do recover your Data from your Memory.
- Page 36 Error 270: Air Temperature Setpoint not reached. Air Temperature during Heat-Up (slow Controller) Lower Airvolume or Temperature Setpoint, restart can not be reached. Setpoint is too high, Air Heater Volume is too high. Ambient Temperature or Inlet Air Temperatur of Seamtek 900 AT is too low.
-
Page 37: Frequently Asked Questions
Setpoint is too high, Air Volume is Setpoint, restart Heater too high. Ambient Temperature or Inlet Air Temperatur of Seamtek 900 AT is too low. Error 275: Air Temperature Setpoint too high. Air Temperature of fast Controller can not be Heat Controller Restart initiated reached for long Time. -
Page 38: Maintenance
Display of temperature values remains When connecting the thermocouple, the connecting wires are unchanged (usually around 40 – 65 °C). short-circuited. Check the connection. Rapid and repeating heating-up phases At the point of measurement, the thermocouple short circuits. Replace the thermocouple. After replacing the thermocouple, the The thermocouple was not connected or is interrupted. - Page 39 Time period Monitoring and maintenance work Spare parts Tools As Necessary • Clean the welding nozzle (12) with a brass Air filter Brass brush brush designed for this purpose • Clean or replace the air filter Daily before Start-Up • Check the stability of the machine –...
- Page 40 No. Designation Text Figure Filter Before using the machine, always clean the filter maintenance element with isopropanol to prevent damage. unit The filter must be replaced every two years. The filter is included in the filter set (156.777). • Before removing the filter reservoir, the pres- sure must be removed from the system.
- Page 41 6. Separate the heating element (150.581) from the holder (24, F) and insert the new heating element. 7. Re-assemble the elements following the disassembly steps in reverse. CAUTION: There is a risk of burning when changing the heating element. This process must only be performed after the cool-down mode.
- Page 42 Inductor unit In the case of significant differences in tem- perature or extended periods of use, the axis movement of the welding nozzle and pressure roller can shift. To compensate for these changes, fine adjust- ments can be made using the inductor unit. Axis control: 1A, 1B Z-axis of roller 2A, 2B Z-axis of nozzle...
- Page 43 1.2 Use the screws (8, B) to adjust the angle of the welding arm. Caution: Following the adjustment process, tighten the nuts. 2.1 Detach the screws (8, C) 2.2 Adjust the welding arm using the screws (8, D) Caution: Following the adjustment process, tighten the screws.
- Page 44 3.2 Now use the rod to adjust the height of the welding roller. Caution: Following the adjustment process, tighten the nuts. 4.1 Detach the screws (8, G) on both sides. 4.2 Manually move the welding arm backward or forward. Caution: Following the adjustment process, tighten the screws.
-
Page 45: Machine Fault
13. Accessories Find out about the extensive range of accessories available at www.leister.com. Use only Original Leister spare parts and accessories since otherwise, no warranty or guarantee claims can be asserted. You can find more information at www.leister.com. 14. Add-ons 14.1... -
Page 46: Monitoring The Welding Parameters
14.1.1 Monitoring the Welding Parameters The monitoring of both the air volume and temperature welding parameters can be activated via the On/Off button in the Add- ons/Monitoring tab. The monitoring of both the air volume and temperature welding parameters is deactivated. The monitoring of both the air volume and temperature welding parameters is activated. -
Page 47: Operating Hours Counter
Repairs must only be carried out by authorized Leister service centers. Leister service centers guarantee a professional and reliable repair service with original spare parts in accordance with circuit diagrams and spare parts lists. You will find the address of your authorized service center on the last page. -
Page 48: Declaration Of Conformity
18. Declaration of Conformity Leister Technologies AG, Galileo-Strasse 10, CH-6056 Kägiswil, Switzerland confirms that in the model made available for purchase, this product fulfills the requirements of the following EU directives. Guidelines: 2006/42, 2014/30, 2014/35, 2011/65 Harmonized standards: EN 12100, EN 55014-1, EN 55014-2, EN 61000-6-2, EN 61000-3-2,... -
Page 49: Appendix
21. Appendix Quelle Bilder: SMC... - Page 56 ® © Copyright by Leister Your authorised Service Centre is: Leister Technologies AG Galileo-Strasse 10 CH-6056 Kaegiswil/Switzerland Tel. +41 41 662 74 74 +41 41 662 74 16 www.leister.com sales@leister.com...
Need help?
Do you have a question about the SEAMTEK 900 AT and is the answer not in the manual?
Questions and answers