Table of Contents
Advertisement
Quick Links
(For microscope operation only. Camera operation covered in separate instructions)
HOW TO USE YOUR MICROSCOPE SERIAL NUMBERS
1. Microscope serial number: This number (etched on back arm of microscope) is
the number under which your warranty is registered.
2. Microscope DM number: This number (found on a white sticker on the bottom
of the microscope) is used for logging on the Motic web site, which gives you the
ability to download free software upgrades.
Copyright © 10/19/04
National Optical & Scientific Instrument Inc.
National Optical & Scientific Instrument Inc.
6508 Tri-County Parkway
Schertz, Texas 78154
Phone (210) 590-9010 Fax (210) 590-1104
INSTRUCTIONS FOR
MODEL DC4-156-S
COMPOUND BIOLOGICAL MICROSCOPE
WITH DIGITAL CAMERA
Advertisement
Table of Contents

Subscribe to Our Youtube Channel
Related Manuals for National DC4-156-S


Summary of Contents for National DC4-156-S
- Page 1 National Optical & Scientific Instrument Inc. 6508 Tri-County Parkway Schertz, Texas 78154 Phone (210) 590-9010 Fax (210) 590-1104 INSTRUCTIONS FOR MODEL DC4-156-S COMPOUND BIOLOGICAL MICROSCOPE WITH DIGITAL CAMERA (For microscope operation only. Camera operation covered in separate instructions) HOW TO USE YOUR MICROSCOPE SERIAL NUMBERS 1.
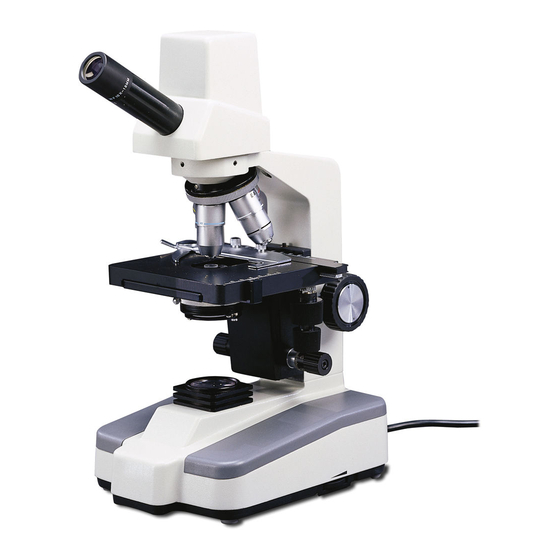
- Page 2 LED indicator light Eyepiece Eyepiece locking set screw Head Eyepiece tube Revolving nosepiece Rack stop adjustment screw Objective lenses Knurled locking screws (for securing specimen Specimen holder holder to stage) (mechanical stage) Tension adjustment Stage collar (behind focus knob on left side) Abbe condenser 1.25 N.A.
- Page 3 About the Digital Microscope Your new digital microscope incorporates a built in camera that utilizes ultra high-speed data transmission made possible through a simple plug and play USB 2.0 cable. In order to achieve optimum results, it is important that you carefully read both this and the software instructions located on Motic disc before operating your microscope or camera.
- Page 4 10. SAFETY RACK STOP: When properly adjusted, controls maximum upward travel of stage. Prevents higher power objectives from breaking specimen slides, prevents damage to objective lenses. This stop has been pre-adjusted at the factory. 11. FOCUSING KNOBS: Coarse focusing knobs (larger knobs) located on each side of arm, raise or lower stage to bring specimen image into focus.
- Page 5 OBJECTIVE DIAPHRAGM OPENING From fully closed to 1/8 open 1/8 to 1/4 open 1/4 to 1/2 open 100x 1/2 to 3/4 open F. Usage of filters (one 32mm O.D. transparent blue filter and one frosted neutral filter has been provided with your microscope) a) Placing a filter into the optical path will absorb some of the light from the illuminator base, limiting the light output.
- Page 6 Before having costly servicing done, or before returning to National for “warranty repair”, make certain to examine the front lens element with a magnifying glass or eye loupe for the presence of such contaminants. If a microscope is returned to National for warranty repair, and it is determined that such contaminants are the problem, this is not covered under warranty and National will submit a cost estimate for cleaning.
- Page 7 3. ELECTRICAL MAINTENANCE A. The extent of electrical maintenance, by other than a qualified technician, should be bulb replacement. BE CERTAIN TO TURN SWITCHES OFF AND REMOVE PLUG FROM POWER SOURCE OUTLET BEFORE CHANGING BULBS. B. To replace bulb, gently lay microscope on side. Using a Phillips (cross-head) type screwdriver, remove 5 each 3mm Phillips screws from bottom of base.
Need help?
Do you have a question about the DC4-156-S and is the answer not in the manual?
Questions and answers