Table of Contents
Advertisement
Quick Links
Advertisement
Table of Contents

Subscribe to Our Youtube Channel
Related Manuals for National DC5-169 Series


Summary of Contents for National DC5-169 Series
- Page 1 National Optical & Scientific Instruments Inc. 6508 Tri-County Parkway Schertz, Texas 78154 Phone (210) 590-9010 Fax (210) 590-1104 INSTRUCTIONS FOR DC5-169 Series DIGITAL COMPOUND BIOLOGICAL MICROSCOPE Copyright © 11/4/2016 National Optical & Scientific Instrument Inc.
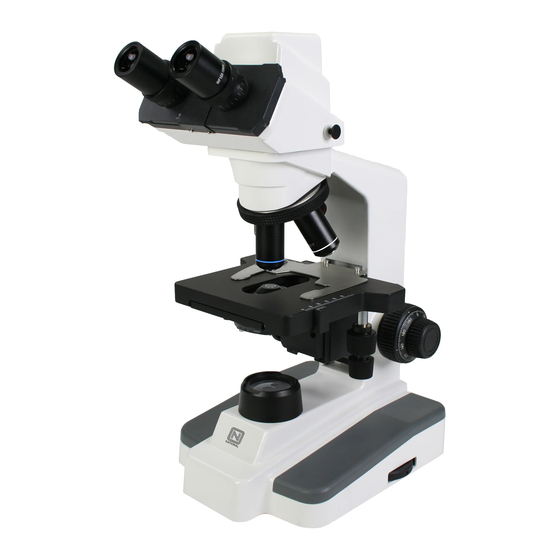
- Page 2 LED indicator light Eyepiece Sliding interpupillary adjustment grips located on both left and right side of diopter scale Interpupillary scale Three position sliding rod Viewing head of Mark on side of eyepiece tube microscope for indexing diopter reading Revolving nosepiece Objective lenses Knurled locking screws for securing specimen...
-
Page 3: Operation
Thank you for your purchase of a National microscope. It is a well built, precision instrument carefully checked to assure that it reaches you in good condition. It is designed for ease of operation and years of carefree use. The information in this manual probably far exceeds what you will need to know in order to operate and maintain your microscope. - Page 4 Before operating microscope, adjust intensity control located on side of base to the minimum position. This should be done prior to each time light is turned on or off. This will extend bulb life. Insert power plug into 12VDC switching power converter, then insert plug on other end of converter into power jack on back of microscope base.
- Page 5 Place standard specimen slide (cover slip up) on top of stage surface.Swing moveable finger on slide holder outward. Place specimen slide against fixed side of slide holder. Slowly release moveable finger until it makes contact with specimen slide. Rotate coarse focusing controls until specimen comes into focus. Adjust fine focus controls until specimen is in sharp focus.
-
Page 6: Electrical Maintenance
Tension adjustment knob is located between stand and coarse focus knob of microscope, on the right side. To tighten tension of coarse focus knobs, turn control in a counter-clockwise direction. It is advisable to leave controls as loose as possible, tightening only enough to keep stage from drifting down and out of focus. - Page 7 Click on Help and then select the help option: This will open the Motic Images help file contents, containing the full help menu: Motic Live Imaging Module – PC Full Help Menu The full Live Imaging Module manual is accessible within the live Imaging main page. To begin, open the Motic Images Software.
-
Page 8: Motic Images Software - Mac Full Help Menu
Once the Motic Live Imaging Module has opened, click on Help: This will open the Motic Live Imaging Module help file, containing the full help menu: MOTIC IMAGES SOFTWARE – MAC Full Help Menu The full software manual for Motic Images is accessible within the software’s main page. To begin, open the Motic Images Software. - Page 9 This will open the Motic Images Help Manual: MOTIC IMAGES 3.0 SOFTWARE The Motic Images 3.0 software, like the Motic Images 2.0 software will allow you to view, capture, annotate and save your images. For further assistance in using the Motic Images 3.0 software please refer to the Motic Help files.
- Page 10 MOTIC IMAGES 3.0 HELP GUIDE To access the Motic Images 3.0 help menu, click on Help, located at the top of the Motic Images software screen. Once the Help window open you will find the help guide within. Motic Live Imaging Module Help To access the Motic Images Live Imaging help menu, click on Help located at the top left hand side of the screen.
- Page 11 specimens that are usually destroyed by staining or fixing reagents. The phase turret control has five positions; one for standard brightfield illumination and four different annuli positions for phase contrast illumination. COMPONENTS Plan 10X Ph/0.25 phase din objective. Plan 20X Ph/0.40 phase din objective. Plan 40X Ph/0.65 phase din objective.
-
Page 12: Cleaning Your Microscope
Rotate the phase turret annuli control until the number 10 can be seen at front of phase turret condenser assembly. Annuli must click into position to assure proper centering. Using condenser focusing control knob, focus the bright annuli ring located in phase turret annulus condenser. Observe the two rings in the field of view. - Page 13 National microscopes are designed to function with minimal maintenance, but certain components should be cleaned frequently to ensure ease of viewing. The power switch should be turned off or the microscope should be unplugged when not in use. Do not disassemble your microscope Disassembly may significantly affect the performance of the instrument, and may result in electric shock or injury and will void the terms of the warranty.
-
Page 14: Troubleshooting
If the dirt persist you can either contact us or you can contact your National Optical supplier. Mechanics The mechanical components of the microscope require less maintenance than the optical components. - Page 15 ELECTRICAL PROBLEM REASON FOR PROBLEM SOLUTION Light fails to operate Outlet inoperative. Have qualified service technician repair outlet AC power cord not connected. Plug into outlet. Lamp burned out. Replace lamp. Fuse burned out. Replace fuse. Fuse burns out too soon. Replace with proper fuse (Time delay).
-
Page 16: Optional Accessories And Parts
OPTIONAL ACCESSORIES AND PARTS: #610-160 WF10X Eyepiece #704-160SP DIN 4X objective lens, 0.10 N.A. #710-160SP DIN 10X objective lens, 0.25 N.A. #740-160SP DIN 40X objective lens, 0.65 N.A. #799-160SP DIN 100X objective lens, 1.25 N.A. #704-160ASC DIN 4X Super High Contrast objective lens, 0.10 N.A. #710-160ASC DIN 10X Super High Contrast objective lens, 0.25 N.A.
Need help?
Do you have a question about the DC5-169 Series and is the answer not in the manual?
Questions and answers