Table of Contents
Advertisement
Quick Links
Microscope serial number: This number is on a label located under the base of the microscope.
Copyright © 6/13/2013
National Optical & Scientific Instrument Inc.
National Optical & Scientific Instruments Inc.
6508 Tri-County Parkway
Schertz, Texas 78154
Phone (210) 590-9010 Fax (210) 590-1104
INSTRUCTIONS FOR
MODEL DCX-213-RLED
MODEL DCX-214-RLED
COMPOUND BIOLOGICAL MICROSCOPE
WITH WIFI CAMERA
(Manual for microscope and WiFi camera operation only)
It is the number under which your warranty is registered.
Advertisement
Table of Contents

Subscribe to Our Youtube Channel
Related Manuals for National DCX-213-RLED


Summary of Contents for National DCX-213-RLED
- Page 1 National Optical & Scientific Instruments Inc. 6508 Tri-County Parkway Schertz, Texas 78154 Phone (210) 590-9010 Fax (210) 590-1104 INSTRUCTIONS FOR MODEL DCX-213-RLED MODEL DCX-214-RLED COMPOUND BIOLOGICAL MICROSCOPE WITH WIFI CAMERA (Manual for microscope and WiFi camera operation only) Microscope serial number: This number is on a label located under the base of the microscope.
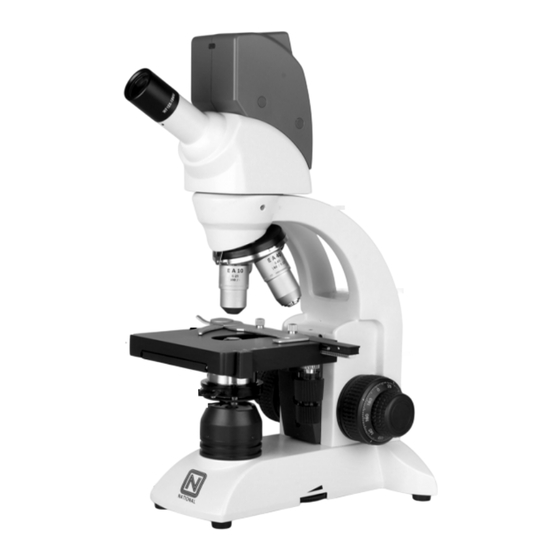
- Page 2 Camera housing Widefield 10x/18 eyepiece Viewing head of microscope Head locking screw Arm of microscope Objective turret (nosepiece) Objective lenses Rack stop adjustment screw Specimen holder (mechanical stage) Stage Tension adjustment collar (behind focus knob on left side) Abbe Condenser Iris diaphragm lever Swing-out filter holder Coaxial focus knob...
- Page 3 These instructions are covered in WiFi Camera Operation section of this manual. 4. If you would like to connect the WiFi camera to a wireless enabled laptop or computer, go to the National Optical website. On the website, you will need to register your product first and then you will be able to download the Motic Images software.
-
Page 4: Operation
10. FOCUSING KNOBS Coaxial focusing system combines both the coarse and fine focus knobs on same shaft located on each side of arm. Raise or lower stage to bring specimen into focus. 11. ILLUMINATION Built-in substage electric LED illuminator provides constant, reliable, pre-focusing illumination equal to a 20 watt tungsten bulb. - Page 5 5. Position the objective turret until the 4x (smallest) objective lens “clicks” into position in the optical path. Note that each time you change from one objective lens to another you should turn the turret until you hear the “click”, which indicates that the lens is properly indexed in the optical path.
-
Page 6: Maintenance
Before having costly servicing done, or before returning to National for “warranty repair”, make certain to examine the front lens element with a magnifying glass or eye loupe for the presence of such contaminants. If a microscope is returned to National for warranty repair, and it is determined that such contaminants are the problem, this is not covered under warranty and National will submit a cost estimate for cleaning. -
Page 7: Mechanical Maintenance
2. MECHANICAL MAINTENANCE a. The rack stop screw has been pre-adjusted at the factory and should not require re-adjustment. However, if you do attempt re-adjustment, note the following procedure. Using a 2mm “L” type hex key wrench, loosen rack stop hex socket set screw by rotating in a counterclockwise direction. -
Page 8: Troubleshooting
TROUBLESHOOTING PROBLEM REASON FOR PROBLEM SOLUTION Light fails to operate. Batteries fully discharged. Recharge batteries. Rheostat control not turned far Turn rheostat to increase light enough. intensity. Light switch in ‘off’ position. Turn light switch on. LED “bulb” burned out. Replace LED “bulb”.
Need help?
Do you have a question about the DCX-213-RLED and is the answer not in the manual?
Questions and answers