Table of Contents
Advertisement
User Manual
This manual describes the setup and operating procedures for the
NA10 Network Adapter for the Canon imageFORMULA DR series.
To use this device, read this manual together with the instructions for
the scanner to be connected.
Procedures and Example Screens
This manual describes operations using Windows 7 as examples.
Table of Contents
About This Device ...............................................................4
Setup.....................................................................................5
Connecting to the Wired Network ......................................7
from a Smart Device ............................................................9
the CaptureOnTouch Job Tool .........................................16
Using the Web Menu .........................................................21
Troubleshooting ................................................................27
Specifications ....................................................................28
NA10
Advertisement
Table of Contents

Subscribe to Our Youtube Channel
Related Manuals for Canon NA10


Summary of Contents for Canon NA10
-
Page 1: Table Of Contents
User Manual Table of Contents This manual describes the setup and operating procedures for the NA10 Network Adapter for the Canon imageFORMULA DR series. To use this device, read this manual together with the instructions for About This Device ...............4 the scanner to be connected. - Page 2 Trademarks FCC REGULATIONS (For North America) ● Canon and the Canon logo are registered trademarks of Canon Inc. Network Adapter, Model 6830030, 6830050 in the United States and may also be trademarks or registered This device complies with Part 15 of FCC Rules and Industry Canada trademarks in other countries.
- Page 3 This product should be handed over to a Canon U.S.A. Inc. designated collection point, e.g., on an authorized One Canon Park, Melville, NY 11747, U.S.A. one-for-one basis when you buy a new similar product or to an Tel. No. 1-800-OK-CANON (1-800-652-2666)
-
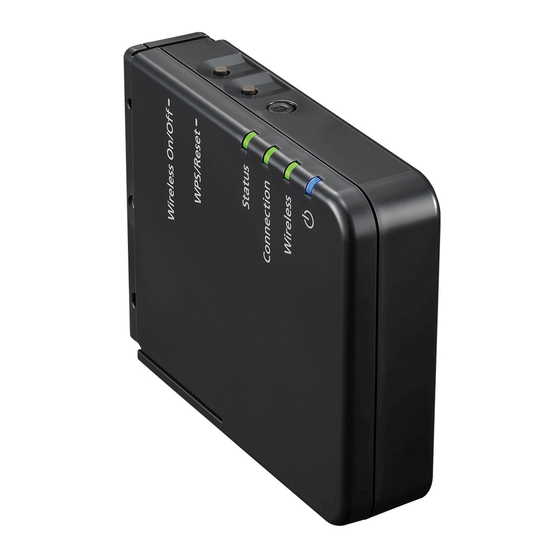
Page 4: About This Device
About This Device This device allows you to connect LAN-compatible computers to a When DHCP is disabled, holding this button while turning on the scanner via a network. By connecting a scanner to the device with a device lights the DHCP lamp and enables DHCP. USB cable, you can perform scanning operations from a computer via Depending on the connection environment, it may take up to 2 the network. -
Page 5: Setup
The scanner driver is available on the downloads page of the Canon When connecting the device to a scanner that supports USB 3.0/ website. For details on acquiring and installing the driver, visit the 3.1, use the USB cable supplied with the scanner. - Page 6 Cord Cover and Stand You can attach the supplied cord cover to protect the connected cable’s connector. You can attach the stand to set the device upright. In addition, placing the scanner on the stand will stabilize the device. Place the scanner here.
-
Page 7: Connecting To The Wired Network
When using a different model, replace any instance of the model name with that of the model you are using. Click [All Programs] — [Canon <scanner name>] — [Driver Setting Tool] in the start menu. Driver Setting Tool starts. - Page 8 Specifying a Static IP Address for the Device Perform the following when specification of a static IP address for the device is necessary, such as when the network does not include a DHCP server. Turn on the device while holding the DHCP On/Off button. The power lamp will light.
-
Page 9: Scanning With The Captureontouch Job Tool From A Smart Device
(such as smart phones and tablet devices) for controlling scan operations via this device (NA10). Install the CaptureOnTouch Job Tool on your smart device, connect the NA10 to a computer, and connect your smart device to the network. Install the CaptureOnTouch Job Tool application on your smart device. - Page 10 Granting Access Permission Job Scanning from the App When saving scanned data in a specific location, a screen asking for You can register a job in the CaptureOnTouch Job Tool and execute permission to access the smart device is displayed. You can save scanning according to the job's scan settings.
- Page 11 Hint Register the job. You can register multiple jobs. Up to 99 jobs can be registered. A Tap [Add new]. Tap the registered job's icon. Scanning is executed and the scanned data is saved in the shared folder of the specified computer. B On the [Add] screen, set the [Job name] and [Scan setting], then tap [SAVE].
- Page 12 Editing job settings Change the settings in [Job name] and [Scan setting], and You can edit the settings of registered jobs. tap [SAVE]. The settings are saved. Press and hold the icon of the job you want to edit. ] appears to indicate the job is editable. Hint Deleting jobs To cancel editing, tap the job icon again or tap [ ] –...
- Page 13 Tap [OK]. the scanner's start button. All registered jobs are registered in the scanner at once. In this scanning method, since the NA10 controls the scanner, the CAUTION smart device is not needed to execute scanning. The number of jobs that can be copied depends on the scanner.
- Page 14 To Delete Jobs Copied to the Scanner Job Scanning from a PC Jobs copied to the scanner can be deleted. When there is one or more computer on the same network, you can use the CaptureOnTouch Job Tool to select and execute jobs registered by CaptureOnTouch on each computer.
- Page 15 Select the scanner. Tap the job number to execute, and tap [Scan]. A Tap [ Scanning executes according to the scan settings of the selected job number. B Select the scanner on the [Select Scanner] screen. Select a computer. A Tap [ Hint •...
-
Page 16: Scanning From A Computer With The Captureontouch Job Tool
Scanning from a Computer with the CaptureOnTouch Job Tool CaptureOnTouch Job Tool for Windows is an application to control Preparation Before Scanning scanning via the NA10 by computer operation. Install the CaptureOnTouch Job Tool on the computer, and connect it and the NA10 to the network. - Page 17 Register the job. Click the registered job's icon, then click [Scan]. A Click [Add]. Scanning is executed and the scanned data is saved in the shared folder of the specified computer. B On the Add screen, set the [Job name] and [Scan setting], then click [Save].
- Page 18 Deleting all jobs Change the settings in [Job name] and [Scan setting], and You can delete all registered jobs at once. click [Save]. The settings are saved. Click [Delete All]. A confirmation message appears. Deleting jobs Click [OK]. You can delete registered jobs. All jobs are deleted.
- Page 19 Select the job number on the scanner and press the start the scanner's start button. button. In this scanning method, since the NA10 controls the scanner, the Scanning executes according to the scan settings of the selected computer is not needed to execute scanning.
- Page 20 B Select the scanner on the [Select Scanner] screen. Click [ ], or click [ ] — [Copy job registration settings]. Enter the administrator password. Enter the same password as for the Web menu. For details, see “Displaying the Web Menu of This Device” (p. 21). Click [OK].
-
Page 21: Using The Web Menu
IMPORTANT Click [All Programs] — [Canon <scanner name>] — • We recommend the following web browsers: [Driver Setting Tool] in the start menu. Driver Setting Tool starts. - Page 22 Specifying the Device’s IP Address to Select the scanner from the list, and click [Property]. Display the Web Menu The device’s web page opens, and the login screen is displayed. Enter the device’s IP address in the address bar of the web browser, and press the Enter key.
-
Page 23: Network Setting
Network Setting Web Menu Settings If you click [Network Setting] on the left menu, the page below is This section describes the setting items on each of the pages of the displayed. web menu. Scanner Name Setting If you click [Scanner Name Setting] on the left menu, the page below is displayed. - Page 24 mDNS Setting Item Description Default Value If you click [mDNS Setting] on the left menu, the page below is Set the gateway IP address of the displayed. device. If DHCP is enabled, the default gateway obtained from it will be applied.
-
Page 25: Password Setting
Update the device’s firmware. Click [Version up], and New Password Used to confirm the password. None Version up then specify the firmware file in the screen that (Confirmation) appears. Visit the Canon support page for instructions on out to obtain the firmware. http://www.canon-elec.co.jp/products/ims/softwareDownload/ index.html... - Page 26 Software License The device includes software that is licensed under GNU GENERAL PUBLIC LICENSE (GPL), GNU LESSER GENERAL PUBLIC LICENSE (LGPL), or proprietary licenses. You can view the original text of a software license via the device’s web menu. Follow the steps in “Displaying the Web Menu of This Device”...
-
Page 27: Troubleshooting
Troubleshooting Problem 5 The scanner automatically turns itself off, making Problem 1 Scanning is not possible. the connection unavailable. Solutions • Confirm that the scanner and the device are turned on. Solution When the scanner has its Auto Power Off function •... -
Page 28: Specifications
Specifications Main Unit Type Network Adapter Scanner connection interface USB 2.0 Hi-Speed (Type A) Network interface IEEE802.3 10Base-T/100Base-TX/ 1000Base-T Dimensions 116 mm x 93.6 mm x 28.8 mm (4.57" x 3.69" x 1.13") (W x D x H; without cord cover) Mass Approx. - Page 29 Safety-related markings on the machine Marquages de sécurité sur la machine Marcature di sicurezza sulla macchina Sicherheitshinweise auf der Maschine Marcas de la máquina relacionadas con la seguridad Veiligheidsmarkeringen op de machine Makine üzerindeki güvenlik i aretleri Power on [English] Switch (On) [Français] Commutateur (Marche)
- Page 30 [English] Switch (Push-On/Push-Off) Power on/off (no standby current) [Français] Commutateur (Appuyer pour Sous/hors tension (pas de courant de veille) mettre en marche/Appuyer pour arrêter) [Italiano] Interruttore a pulsante Alimentazione on/off (nessuna corrente di standby) bistabile (On/Off) [Deutsch] Schalter (Ein- und Ausschalten Ein- und Ausschalten (ohne Ruhestromaufnahme) durch Drücken) [Español]...
- Page 31 [English] DC symbol Indicates direct current [Français] Symbole CC Indique qu’il s’agit de courant continu [Italiano] Simbolo corrente continua (C.C.) Indica la corrente continua [Deutsch] Gleichstrom-Symbol Kennzeichnet Gleichstrom [Español] Símbolo CC Indica corriente continua Geeft gelijkstroom aan [Nederlands] DC-pictogram [Türkçe] DC sembolü...
- Page 32 CANON ELECTRONICS INC. 3-5-10 SHIBAKOEN, MINATO-KU, TOKYO 105-0011, JAPAN CANON U.S.A. INC. ONE CANON PARK, MELVILLE, NY 11747, U.S.A. CANON CANADA INC. 8000 MISSISSAUGA ROAD, BRAMPTON, ONTARIO L6Y 5Z7, CANADA CANON EUROPA N.V. BOVENKERKERWEG 59, 1185 XB AMSTELVEEN, THE NETHERLANDS CANON AUSTRALIA PTY.
Need help?
Do you have a question about the NA10 and is the answer not in the manual?
Questions and answers