Table of Contents
Advertisement
Advertisement
Table of Contents

Related Manuals for Keysight E3630A


Summary of Contents for Keysight E3630A
- Page 1 Triple Output Power Supply Keysight Model E3630A Operating and Service Manual...
-
Page 2: Copyright Notice
Conformity. understood and met. where in the EULA. Keysight shall be under no obligation to update, revise or otherwise modify the Software. With WARNING respect to any technical data as defined by FAR 2.101, pursuant to FAR... -
Page 3: Certification
(defined as destination local currency price, or U.S. or Geneva Export price). If Keysight is unable, within a reasonable time, to repair or replace any product to condition as warranted, the Customer shall be entitled to a refund of the purchase price upon return of the product to Keysight. -
Page 4: Limitation Of Warranty
The above statements apply only to the standard product warranty. Warranty options, extended support contacts, product maintenance agreements and customer assistance agreements are also available. Contact your nearest Keysight Technologies Sales and Service office for further information on Keysight's full line of Support Programs. Keysight E3630A Operating and Service Manual... -
Page 5: Safety Symbols
Warning or Caution information) In position of a bi-stable push control Protective earth (ground) terminal Out position of a bi-stable push control Earth (ground) terminal Positive binding post Negative binding post Keysight E3630A Operating and Service Manual... -
Page 6: Safety Considerations
Failure to comply with these precautions or with specific warnings elsewhere in this manual violates safety standards for design, manufacture, and intended use of the instrument. Keysight Technologies assumes no liability for the customer’s failure to comply with these requirements. - Page 7 Because of the danger of introducing additional hazards, do not install substitute parts or perform any unauthorized modification to the instrument. Return the instrument to a Keysight Technologies Sales and Service Office for service and repair to ensure that safety features are maintained.
-
Page 8: Regulatory Markings
NMB-001 du Canada. This instrument complies with the WEEE Directive (2002/96/EC) marking requirement. This affixed product label indicates that you must not discard this electrical or electronic product in domestic household waste. Keysight E3630A Operating and Service Manual... -
Page 9: Waste Electrical And Electronic Equipment (Weee) Directive 2002/96/ Ec
To return this unwanted instrument, contact your nearest Keysight Service Center, or visit http://about.keysight.com/en/companyinfo/environment/takeback.shtml for more information. Sales and Technical Support To contact Keysight for sales and technical support, refer to the support links on the following Keysight websites: – www.keysight.com/find/powersupply (product-specific information and support, software and documentation updates) –... - Page 10 THIS PAGE HAS BEEN INTENTIONALLY LEFT BLANK. Keysight E3630A Operating and Service Manual...
-
Page 11: Table Of Contents
..........24 Installation Keysight E3630A Operating and Service Manual... - Page 12 ......... 38 Output current measurement......38 Keysight E3630A Operating and Service Manual...
- Page 13 ........59 Keysight E3630A Operating and Service Manual...
- Page 14 THIS PAGE HAS BEEN INTENTIONALLY LEFT BLANK Keysight E3630A Operating and Service Manual...
-
Page 15: List Of Figures
......43 Figure 5-6 Ripple and noise rms measurement test setup ..45 Figure 5-7 Load transient response time waveform ...47 Keysight E3630A Operating and Service Manual... - Page 16 THIS PAGE HAS BEEN INTENTIONALLY LEFT BLANK. Keysight E3630A Operating and Service Manual...
-
Page 17: List Of Tables
....... .24 Table 5-1 Test equipment required ..... . .34 Keysight E3630A Operating and Service Manual... - Page 18 THIS PAGE HAS BEEN INTENTIONALLY LEFT BLANK. Keysight E3630A Operating and Service Manual...
-
Page 19: General Information
Keysight E3630A Triple Output Power Supply Operating and Service Manual General Information Introduction Safety Considerations Safety and EMC Requirements Instrument And Manual Identification Options Accessory Description Specifications... -
Page 20: Introduction
General Information Introduction This section contains general information concerning the E3630A triple output power supply. Included are safety considerations, safety and EMC requirements, instrument and manual identification, option and accessory information, instrument description, and specifications. Safety Considerations This product is a Safety Class I instrument, which means that it is provided with a protective earth ground terminal. -
Page 21: Instrument And Manual Identification
(3=1993, 4=1994, and so forth), and the second two digits indicate the week. For Malaysia, the first two digits indicate Keysight year and the second two digits indicate the work-week. The remaining digits of the serial number are a unique, five-digit number (Korea) or four-digit number (Malaysia) assigned sequentially. -
Page 22: Description
Rack Kit for mounting one or two 3 1/2" high supplies in a 5063-9767 standard 19" rack The rack mount kit is needed for rack mounting of the E3630A power supply. Description This constant-voltage/current-limiting triple output power supply combines two 0 to ±20 V tracking outputs rated at 0.5 amps with an additional single output... -
Page 23: Line Fuse
The line fuse is located by the AC line receptacle. Check the rating of the line fuse and replace it with the correct fuse if necessary as indicated below. These are slow-blow fuses. Line vol tage Fuse Keysight part no. 100/115 VAC 1.6 A 2110-0918 230 VAC 1.0 A 2110-0599 Keysight E3630A Operating and Service Manual... -
Page 24: Specifications
Meter accuracy: ± (0.5% of output + 2 counts) at 25 °C ± 5 °C Meter resolution All output: Voltage 10 mV, Current 10 mA Keysight E3630A Operating and Service Manual... - Page 25 212.3 mmW x 88.1 mmH x 269.2 mmD Dimensions (8.354 inW x 3.469 inH x 10.591 inD) Weight 3.8 kg (8.4 lbs) net, 5.1 kg (11.3 lbs) shipping This instrument is intended for indoor use. Keysight E3630A Operating and Service Manual...
- Page 26 General Information THIS PAGE HAS BEEN INTENTIONALLY LEFT BLANK. Keysight E3630A Operating and Service Manual...
-
Page 27: Installation
Keysight E3630A Triple Output Power Supply Operating and Service Manual Installation Initial Inspection Installation Data Input Power Requirements... -
Page 28: Initial Inspection
Save all packing materials until the inspection is completed. If damage is found, a claim should be filed with the carrier. The Keysight Technologies Sales and Service office should be notified as soon as possible. -
Page 29: Installation Data
To protect operating personnel, the supply should be grounded. This supply is equipped with a three conductor power cable. The third conductor is the ground conductor and when the cable is plugged into an appropriate receptacle, the supply is grounded. Keysight E3630A Operating and Service Manual... - Page 30 Installation The power supply is equipped at the factory with a power cord plug appropriate for the user's location. Notify the nearest Keysight Sales and Service Office if the appropriate power cord is not included with the supply. Figure 2-1...
-
Page 31: Operating Instructions
Keysight E3630A Triple Output Power Supply Operating and Service Manual Operating Instructions Introduction Turn-On Checkout Procedure... -
Page 32: Introduction
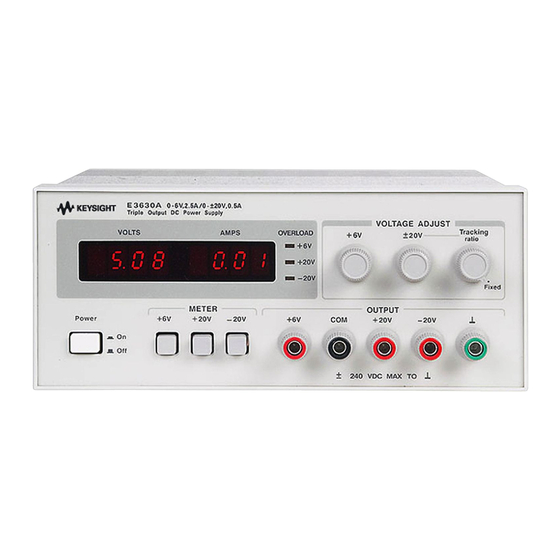
Follow this checkout procedure or the more detailed performance test of service information section when the instrument is received and before it is connected to any load equipment. Figure 3-1 Front-panel controls and indicators Keysight E3630A Operating and Service Manual... -
Page 33: Turn-On Checkout Procedure
Tracking Ratio control on the voltage of the –20 V output. The –20 V output should be adjustable from less than 0.5 volts to a maximum of 19 to 21 volts. Keysight E3630A Operating and Service Manual... -
Page 34: Operation
0.55 A ± 5%. (This is 110% of the maximum rated output.) If a single load is connected between the +20 V and –20 V outputs, the circuit set for the lesser current limit will limit the output. No deterioration of Keysight E3630A Operating and Service Manual... - Page 35 If the line voltage is maintained in the upper end of the input voltage range, however, the supply probably will operate within its specifications. Keysight E3630A Operating and Service Manual...
-
Page 36: Connecting Load
Keysight E3630A Operating and Service Manual... -
Page 37: Parallel Operation
When this connection is used, the output voltage is the sum of the voltages of the individual supplies. Each of the individual supplies must be adjusted in order to obtain the total output voltage. Keysight E3630A Operating and Service Manual... - Page 38 Operating Instructions THIS PAGE HAS BEEN INTENTIONALLY LEFT BLANK. Keysight E3630A Operating and Service Manual...
-
Page 39: Load Considerations
Keysight E3630A Triple Output Power Supply Operating and Service Manual Load Considerations This section provides information on operating your supply with various types of loads connected to its output. Pulse Loading Reverse Current Loading Output Capacitance Reverse Voltage Protection... -
Page 40: Pulse Loading
A high-current pulse may damage load components before the average output current is large enough to cause the current limiting circuit to operate. Keysight E3630A Operating and Service Manual... -
Page 41: Reverse Voltage Protection
When operating supplies in parallel, these diodes protect an unenergized supply that is in parallel with an energized supply. Figure 4-1 Reverse current loading solution Keysight E3630A Operating and Service Manual... - Page 42 Load Considerations THIS PAGE HAS BEEN INTENTIONALLY LEFT BLANK. Keysight E3630A Operating and Service Manual...
-
Page 43: Service Information
Keysight E3630A Triple Output Power Supply Operating and Service Manual Service Information Maintenance Performance Tests General Measurement Techniques Troubleshooting Adjustment And Calibration... -
Page 44: Maintenance
Current range : 10 ADC Measure load and line Electronic load Keysight 6063A regulation. Open and short switches Transient on/off Resistive loads (R 40 Ω 20 W, 2.4 Ω 20 W Measure ripple and noise. Keysight E3630A Operating and Service Manual... - Page 45 For Option OE3, use a slow-blow 1.0-amp fuse. For standard and Option OE9, use a slow-blow 1.6-amp fuse. 3 Mark the instrument clearly with a tag or label indicating the correct line voltage to be used. Keysight E3630A Operating and Service Manual...
- Page 46 Service Information Figure 5-1 Line voltage selector (set for 115 VAC) Keysight E3630A Operating and Service Manual...
-
Page 47: Performance Tests
(A). Connecting the measuring device at (B) would result in a measurement that includes the resistance of the leads between the output terminals and the point of connection. Keysight E3630A Operating and Service Manual... -
Page 48: Selecting Load Resistors
Output current measurement For accurate output current measurements, a current sampling resistor should be inserted between the load and the output of the supply. To simplify grounding Keysight E3630A Operating and Service Manual... -
Page 49: Rated Output, Tracking, Meter Accuracy, And Current Limit
To check that all supplies will furnish their maximum rated output voltage and current, that the ±20 V outputs track each other, that the front panel meters are accurate, and that the current limit circuits function, proceed as follows: Keysight E3630A Operating and Service Manual... - Page 50 0.5 volts to between 19 to 21 volts. Return the TRACKING RATIO control to the FIXED position. Leave the TRACKING RATIO control in the FIXED position throughout the rest of NOTE the performance test. Keysight E3630A Operating and Service Manual...
- Page 51 +6 V output. Close the switch, set the total resistance of R and the current sampling resistor to an initial value of 2.4 Ω or greater, and set the output voltage to 6 volts. Keysight E3630A Operating and Service Manual...
-
Page 52: Load Regulation (Load Effect)
1 Connect the test equipment across the output of the +20 V supply as shown in Figure 5-5. Operate the electronic load in constant current mode and set its current to the full rated value of the +20 V supply. Input off the electronic load. Keysight E3630A Operating and Service Manual... -
Page 53: Line Regulation (Source Effect)
2 Connect the test equipment across the output of the +20 V supply as shown in Figure 5-5. Operate the electronic load in constant current mode and set its current to the full rated value of the +20 V supply. Input off the electronic load. Keysight E3630A Operating and Service Manual... -
Page 54: Ripple And Noise
2 Turn on the supply and push +20 V METER switch. 3 Turn up output voltage to the full rated value. 4 Check that the rms noise voltage at the true rms voltmeter is less than 0.35 5 Repeat for the remaining supply outputs. Keysight E3630A Operating and Service Manual... -
Page 55: Peak-To-Peak Measurement
3 Turn up output voltage to the full rated value. 4 Set the oscilloscope to AC mode and bandwidth to 20 MHz. 5 Check that the peak-to-peak noise is less than 1.5 mV. 6 Repeat for the remaining supply outputs. Keysight E3630A Operating and Service Manual... -
Page 56: Common Mode Current (Cmi)
1 KHz rate with 50% duty cycle. 5 Set the oscilloscope for AC coupling, internal sync and lock on either the positive or negative load transient. 6 Adjust the oscilloscope to display transients as in Figure 5-7. Keysight E3630A Operating and Service Manual... - Page 57 7 Check that the pulse width (t ) of the transients at 15 mV from the base line is no more than 50 μsec as shown. 8 Repeat for the remaining supply outputs. Figure 5-7 Load transient response time waveform Keysight E3630A Operating and Service Manual...
-
Page 58: Stability (Drift)
5 After a 30-minute warm-up, note the voltage on DVM. 6 The output voltage reading should deviate less than 0.1% plus 5 mV from the reading obtained in step e over a period of 8 hours. 7 Repeat for the remaining supply outputs. Keysight E3630A Operating and Service Manual... -
Page 59: Troubleshooting
The rating of the correct replacement fuse depends on the line voltage option of the instrument: for Option OE3, use a slow-blow 1.0-amp fuse and standard and Option OE9, use a slow-blow 1.6-amp fuse. Keysight E3630A Operating and Service Manual... -
Page 60: Adjustment And Calibration
Panel Ammeter. To calibrate ammeter for +20 V output and –20 V output, proceed as follows: 1 Connect R between +20 V output terminal and COM terminal and connect DVM across R 2 Push +20 V meter switch and turn ±20 V VOLTAGE control fully clockwise. Keysight E3630A Operating and Service Manual... - Page 61 4 To calibrate the ammeter for +6 V output, select +6 V meter switch and turn +6 V VOLTAGE control fully clockwise. 5 Adjust R61 on the main board until front panel AMPS display reads exactly DVM value divided by R Keysight E3630A Operating and Service Manual...
- Page 62 Service Information THIS PAGE HAS BEEN INTENTIONALLY LEFT BLANK. Keysight E3630A Operating and Service Manual...
-
Page 63: Component Locator Diagrams
Keysight E3630A Triple Output Power Supply Operating and Service Manual Component Locator Diagrams Main Board — Top Main Board — Bottom Display Controller — Top Display Controller — Bottom 7-Segment — Top 7-Segment — Bottom... -
Page 64: Main Board - Top
Component Locator Diagrams Main Board — Top Keysight E3630A Operating and Service Manual... -
Page 65: Main Board - Bottom
Component Locator Diagrams Main Board — Bottom Keysight E3630A Operating and Service Manual... -
Page 66: Display Controller - Top
Component Locator Diagrams Display Controller — Top Keysight E3630A Operating and Service Manual... -
Page 67: Display Controller - Bottom
Component Locator Diagrams Display Controller — Bottom Keysight E3630A Operating and Service Manual... -
Page 68: 7-Segment - Top
Component Locator Diagrams 7-Segment — Top Keysight E3630A Operating and Service Manual... -
Page 69: 7-Segment - Bottom
Component Locator Diagrams 7-Segment — Bottom Keysight E3630A Operating and Service Manual... - Page 70 Component Locator Diagrams THIS PAGE HAS BEEN INTENTIONALLY LEFT BLANK. Keysight E3630A Operating and Service Manual...
- Page 71 This information is subject to change without notice. Always refer to the Keysight website for the latest revision. © Keysight Technologies 2002 - 2019 Edition 13, January 2019 Printed in Malaysia *5959-5329* 5959-5329 www.keysight.com...
Need help?
Do you have a question about the E3630A and is the answer not in the manual?
Questions and answers