Table of Contents
Advertisement
Quick Links
Advertisement
Table of Contents

Related Manuals for Bartscher BGH 600-520


Summary of Contents for Bartscher BGH 600-520
- Page 1 0539CT02 BGH 600-520 1519811 Original-Gebrauchsanleitung V1-1/1218...
-
Page 2: Table Of Contents
GB/UK ENGLISH Table of contents 1.Safety ........................36 1.1 Key to symbols ..................... 36 1.2 Safety instructions ....................37 1.3 Use as intended ....................42 1.4 Use against the intended purpose ................ 42 2. General information ....................43 2.1 Liability and Warrantees ..................43 2.2 Copyright protection ..................... -
Page 3: Safety
Read this instruction manual before using and keep them available at all times! This instruction manual contains information about the installation, operation and maintenance of the device and should be consulted as an important source of information and reference guide. Awareness of the safety instructions and instructions for use in this manual will ensure the safe and correct use of the device. -
Page 4: Safety Instructions
HOT SURFACE! This symbol is a warning that the device surface is hot when in use. Ignoring this warning may result in burns! CAUTION! This symbol highlights dangerous situations which could lead to light injuries, or damage, malfunction, and/or destruction of the device. NOTE! This symbol highlights recommendations and information aimed for effective and trouble-free device operation. - Page 5 Prevent access of children to the package materials like plastic bags and foamed polystyrene elements. Suffocation hazard! Only a qualified technician and using original spare parts and accessories should carry out repairs and maintenance of the device. Do not attempt to repair the device yourself. ...
- Page 6 Check the power cord regularly for damage. Do not use the appliance if the power cord is damaged. If this cable is damaged, it must be replaced by customer service or a qualified electrician in order to avoid dangers. ...
- Page 7 In case of a smell of gas immediately close all gas control knobs (set to “0“ position) and close the main gas valve. Do not use open flame! Do not smoke cigarettes! Do not activate any electrical switches! Do not use any electrical appliances! Do not make any phone calls from this building –...
- Page 8 WARNING! Risk of fire or explosion! To avoid the hazard please follow the safety instructions below: Never use the device near flammable materials (e.g. petrol, spirits, alcohol). High temperature may cause their evaporation and as a result of contact with sources of ignition there may occur a deflagration resulting in personal injury or property damage.
-
Page 9: Use As Intended
1.3 Use as intended Every use of the device for a different purpose and/or in a way that diverges from the intended use is not allowed and is assumed as the use against the intended purpose. Any claims against the manufacturer or their authorized representatives as a consequence of experiencing damage resulting from the use against the intended purpose are inadmissible. -
Page 10: General Information
2. General information 2.1 Liability and Warrantees All the information and instructions in this manual take into account standard safety regulations, current levels of technical engineering as well as the expertise and experience we have developed over the years. The instruction manual was translated with all due care and attention. However, we do not accept liability for any translation errors. -
Page 11: Transport, Packaging And Storage
3. Transport, packaging and storage 3.1 Delivery check Please check the delivery upon completeness and transport damage immediately after receipt. In case of visible damage do not accept or accept the delivery with reservation only. Note the extent of damage on the carrier’s bill of delivery. Trigger off the complaint. Hidden damages should be reclaimed immediately after notice, as claims for damages can only be asserted within the effective period for complaints. -
Page 12: Technical Data
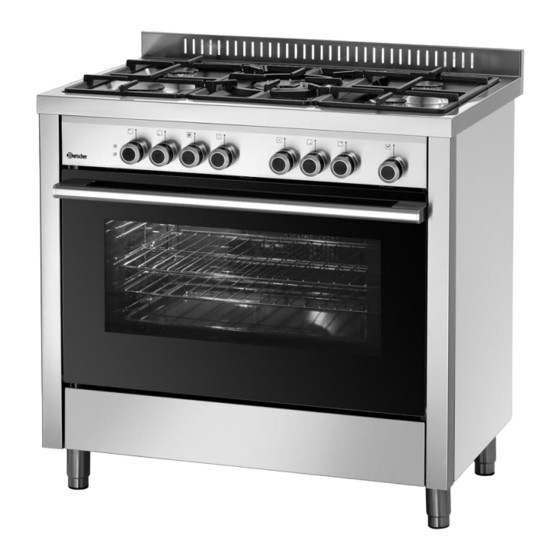
4. Technical data 4.1 Overview of parts Fig. 1 Height-adjustable feet (4x) Control panel Baking tray (1x) Oven light Grilles (2x) Shelf guides (4x) Oven glazed doors Body Glass door handle Gas burner (5x) Storage compartment - 45 -... -
Page 13: Technical Specification
4.2 Technical specification Description Gas stove BGH 600-520 1519811 Code-no.: Material: Stainless steel, cooking chamber: enamelled Type of power supply: gas / electric Gas stove: Type of hobs: gas Number of hobs: 5 Distribution of hobs: 1 x 1 kW, 1 x 3 kW, 2 x 1,75 kW, 1 x 3,8 kW ... - Page 14 Name Gas stove BGH 600-520 1519811 Code-no.: Oven properties: - Double glazed doors - Timer (5 - 55 min.) - Oven light Equipment properties: Extraction connection Model: Type: Upright unit Height-adjustable feet: yes Height-adjustable: 850 x 900 mm ...
- Page 15 Tab. 1 Gas categories in selected countries Gas pressure Country Categories Gas type (mbar) 20 – 30/30 Albania G20 - G30/G31 2H3B/P Austria Belgium G20/G25 - G30/G31 20/25 - 28-30/37 2E+3+ Bulgaria G20 - G30/G31 20 - 30/30 2H3B/P Switzerland G20 - G30/G31 20 - 28-30/37 2H3+...
- Page 16 Gas pressure Country Categories Gas type (mbar) G20 - G30/G31 20 - 28-30/37 2H3+ Macedonia G20 - G30/G31 20 - 30/30 2H3B/P Malta G30/G31 30/30 3B/P Niederlande G25 - G30/G31 25 - 30/30 2L3B/P G20 – G25.3 - G30/G31 20 - 25 – 30/30 2EK3B/P Norwegen G20 - G30/G31...
-
Page 17: Installation And Operation
Burner Gas type Nozzle Power (Ø in mm) pressure marking consump- (kW) (mbar) (1/100 mm) tion Liquefied G30/G31 127 g/h Standard 28-30/37 burner 1,75 0,44 167 dm³/h Ø 75 Natural gas 194 dm³/h 75 S Liquefied G30/G31 218 g/h Strong 28-30/37 burner 3,00... -
Page 18: Moving Of The Device
5.1.1 Moving of the device Fig. 3 The device may be lifted and moved only by two persons working together. Do not lift the device by gripping the oven handle, but open the oven doors and lift the device by gripping the upper part of the oven chamber (fig. 3). ... -
Page 19: Stabilizer
Before starting operations remove the protective film from the appliance. Remove the film slowly in order not to leave the glue residues. Any glue residues may be removed with use of a suitable solvent. CAUTION! Never remove the rating plate or any warning signs from the appliance. 5.1.3 Stabilizer NOTE! To avoid tilting of the device forward, install the rear stabilizer. -
Page 20: Room Ventilation
Now, mount both bracket spacers 400 mm apart (200 mm from the marked centre), each with 2 screws and place the gas stove at the wall below two brackets (D). Fig. 7 5.1.4 Room ventilation CAUTION! In accordance with regulations, the device can only be installed in spaces equipped with permanent ventilation, which prevents the accumulation of exhaust products harmful to health. -
Page 21: Electrical Connections
5.1.5 Electrical connections DANGER! Electric shock hazard! The device can cause injuries due to improper installation! Before installation and connecting the local power grid specification should be compared with that of the device (see rating plate). Connect the device only in case of compliance! ... -
Page 22: Adaptation For Another Gas Type
Connection with a metal hose The metal hose is connected to the threated coupling at the rear of the device which includes a gasket (Fig. 9). The maximum hose length is 2 metres. Make sure that the hose does not touch hot elements of the oven. - Page 23 When changing the jets, observe the following instructions: Burner shield Burner Thermal element Fig. 10 remove the grill from the cooking surface; remove the burner shield from the burner; remove the jet using a 7 mm wrench; ...
-
Page 24: Setting Of The Minimum Power Of Gas Burners
5.1.8 Setting of the minimum power of gas burners The reduced (minimum) power is factory set. After replacing the nozzle to adjust to the available gas or particular pressure conditions in the supply network, it may be necessary to change the minimum power settings. ... -
Page 25: Tips For The User
5.2 Tips for the user CAUTION! Carefully read this operation manual as it contains instructions for safety and operation of the device. Keep the operating manual handy, to allow access to it at any moment. The defective installation, operation errors and maintenance and cleaning mistakes as well as any modifications may cause the incorrect operation, damages and injuries. -
Page 26: Gas Cooker
5.2.2 Gas cooker Position of burners on the hob ① ② Strong burner ④ ③ ② ② Standard burner ① ③ Triple ring burner ④ Auxiliary burner Fig. 14 Ignition of gas burners In order to ignite a gas burner, press the appropriate burner control knob and turn it counterclockwise to the position with the maximum gas flow (big flame symbol). -
Page 27: Electric Multifunction Oven
Use only cooking pots with flat bottom. Place the cooking pot on the grate in such a way that the flame is located in the centre. To reduce the gas consumption and utilize burners in a more optimum way, use the cooking pots and pans of the appropriate diameter corresponding to individual gas burners, as presented in the table below. - Page 28 Temperature adjustment Use the temperature control knob to set the required temperature for cooking / baking for a given dish within the range from 60 °C to 250 °C / MAX. The red heating indicator on the control panel comes on and stays on during heating of the device and goes off after reaching the set temperature.
- Page 29 Grill + upper heat + fan Optimum for grilling meat and fishes. Grill + upper heat For grilling large surface dishes. Grill For roasting and toasting of dishes. Circulating air Fan ensures the air circulation inside the oven chamber and allows for even heat treatment on all levels without transfer of smell.
-
Page 30: Cleaning And Maintenance
Tips and advice Times given in recipes may be adjusted depending on the size of portions and use of cookware made of various materials and thicknesses (glass, aluminum, steel, etc.). When preparing delicate dishes or when using cultivators, avoid opening the glass oven door to prevent drops in internal temperature. - Page 31 o The grills and gas burner shields can be cleaned with a soft cloth or sponge and a mild cleaning agent (e.g. washing-up liquid). A brass-wire brush can be used for tough dirt or grease. Rinse the grills and gas burner shields thoroughly with clean water, then dry.
- Page 32 Inner pane of the oven glazed doors o If necessary, you may take out the inner pane of the oven glazed doors. This action may be performed only when the device is cold. o To remove the inner pane from the oven cover, perform the following steps (Fig. 22): slightly open the oven glazed doors;...
- Page 33 Housing o To clean the stainless steel surface (housing and cooking surface), use only special stainless steel cleaning substances. Using inappropriate substances may cause corrosion. o Do not use substances containing chlorine (bleach, hydrochloric acid, etc.). o After cleaning, dry and polish with a dry cloth. Instructions for maintenance o Inspect all of the device's control and safety mechanisms regularly.
-
Page 34: Malfunction
7. Malfunction o In case of damage or malfunction disconnect the device from the power supply and close the main gas valve. o Do not open the device housing. o Notify the technical service or contact the sales agent, by providing the following data: ... -
Page 35: Waste Disposal
Electric devices should be used and disposed of properly to prevent the impact on the environment. Disconnect the device from the power supply and remove the power cord from the device. Bartscher GmbH phone: +49 5258 971-0 Franz-Kleine-Str. 28 fax: +49 5258 971-120...
Need help?
Do you have a question about the BGH 600-520 and is the answer not in the manual?
Questions and answers