Webasto Thermo Pro 90 Series Service Installations
Diesel adr transport of dangerous goods
Hide thumbs
Also See for Thermo Pro 90 Series:
- Workshop manual (47 pages) ,
- Installation instructions manual (35 pages)
Table of Contents
Advertisement
Advertisement
Chapters
Table of Contents

Subscribe to Our Youtube Channel
Related Manuals for Webasto Thermo Pro 90 Series


Summary of Contents for Webasto Thermo Pro 90 Series
- Page 1 Water heater Service Installations Thermo Pro 90 Thermo Pro 90 HDD Thermo Pro 90 12 V Diesel - ADR (Transport of dangerous goods) Thermo Pro 90 24 V Diesel - ADR (Transport of dangerous goods) Thermo Pro 90 HDD 24 V Diesel - ADR (Transport of dangerous goods)
- Page 2 Only genuine Webasto parts may be used. See also Webasto air and water heaters accessories catalogue. NEVER try to install or repair Webasto heating or cooling systems if you have not completed a Webasto training course, you do not have the necessary technical skills and you do not have the technical documentation, tools and equipment available to ensure that you can complete the installation and repair work properly.
-
Page 3: Table Of Contents
Webasto Thermo Test computer diagnostics ........ - Page 4 Thermo Pro 90 Table of Contents Function checks ..............601 General information .
- Page 5 Thermo Pro 90 Table of Contents Packaging/storage and shipping ........... . . 1001 10.1 General information.
- Page 6 Thermo Pro 90 Table of Illustrations Table of Illustrations Fig. 201 Heater components..............201 Fig.
-
Page 7: Introduction
"General safety requirements" that extend beyond the frame- Webasto. The same shall apply if repairs are carried out incor- work of these regulations are specified in the following. rectly or with the use of parts other than genuine spare parts. -
Page 8: Spare Parts
CAUTION Carefully read the operating instructions before operating the heater. Spare parts The identity numbers of the available spare parts can be found: • in the Webasto spare parts catalogue • online in the dealer portal (http://dealers.webasto.com) -
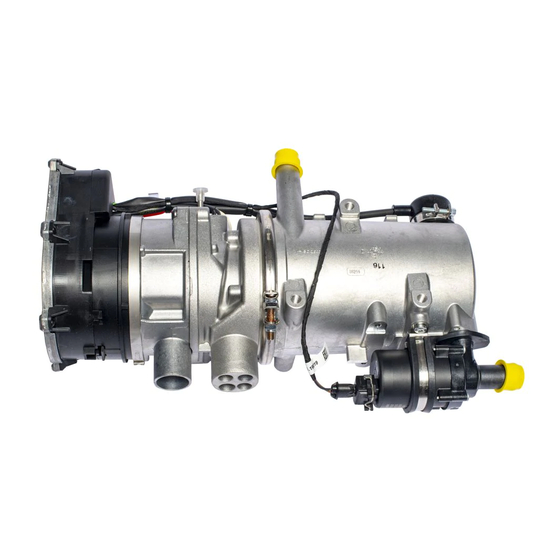
Page 9: Fig. 201 Heater Components
Thermo Pro 90 2 General description General description The water heater has been designed for installation in com- The heater switches off burner operation automatically mercial vehicles. Depending on equipment, the ADR function (pause) when the setpoint is exceeded and switches it back on is provided for the 12 V and 24 V variant. -
Page 10: Fig. 202
Thermo Pro 90 2 General description Combustion air fan Glow plug and burner unit Fig. 202 Combustion air fan The combustion air fan supplies the air necessary for the com- Fig. 204 Burner unit bustion process to the burner unit. The fuel is evaporated and precombusted in the burner unit. -
Page 11: Fig. 206
Thermo Pro 90 2 General description Exhaust gas temperature sensor Control unit Fig. 206 Exhaust gas temperature sensor The exhaust gas temperature sensor detects the flame as well as impermissible exhaust temperatures. U4840 coolant pump Fig. 208 Control unit The control unit controls the functional sequence and moni- toring of burner operation. -
Page 12: Fig. 301 Thermo Pro 90 Functional Sequence
Thermo Pro 90 3 Functional description Functional description Glow plug Fuel pump Combustion air fan Exhaust gas tempe- rature sensor Operation indicator lamp U4840 coolant pump Vehicle blower Possible coded control temperatures Switching on Afterrunning finished Heater Preheating 15 to 20 s Preheating 40 s Fuel pump / partial load (1/4) Fuel pump / partial load (1/4) -
Page 13: Start And Control Mode
Thermo Pro 90 3 Functional description OFF state will be assumed if the conditions a) or c) are met The disconnector (emergency off switch) may only be actu- when activating residual heat utilization or during residual ated in the event of danger since the heater will be switched heat utilization. -
Page 14: Technical Data
Thermo Pro 90 4 Technical data Technical data Thermo Pro 90 Diesel Heater 12 V 24 V Approval mark ECE R122 (heating) E1 00 0320 ECE R10 (EMC) E1 04 6196 Design Water heater Heat flow Max. 9.1 kW Control range 1.8 to 7.6 kW Fuel Diesel DIN EN 590... -
Page 15: Malfunctions And Troubleshooting
Select W-Bus under "Diagnostics" => "Device Selection" in This chapter describes how to identify and remedy faults in Webasto Thermo Test PC Diagnostics. It is recommended to the Thermo Pro 90 heater. print out the operating and fault data as well as the extended fault conditions. -
Page 16: Deleting Fault Code
With Webasto Thermo Test computer diagnostics: Switch on the heater (via control element) See Chapter "5.3.1 Without Webasto Thermo Test PC Diag- nostics" on page 502. There is a fault and it is detected by the control unit as a relevant malfunction Heater shuts down due to the fault, i.e. -
Page 17: Fault Code Table (Fault Codes, Flash Codes)
Thermo Pro 90 5 Malfunctions and troubleshooting Fault code table (fault codes, flash codes) *: Indicator lamp of control element flashing: Number of long flash pulses after 5 short flash pulses Fault Fault code code Error message Possible causes Recommended action in workshop (ana- (hexa- logue) - Page 18 Thermo Pro 90 5 Malfunctions and troubleshooting *: Indicator lamp of control element flashing: Number of long flash pulses after 5 short flash pulses Fault Fault code code Error message Possible causes Recommended action in workshop (ana- (hexa- logue) decimal) Glow plug / flame mo- Wiring Check wiring for damage, break and short-circuit...
- Page 19 U4840 coolant pump – Check coolant level – Connect Webasto Thermo Test and evaluate. Switch on component test via Webasto Thermo Test, touch pump with your hand, the pump is operating if slight vibration can be felt – Check wiring –...
- Page 20 – Disconnect fuel line from heater, hold hose in a collection container and operate the fuel pump with Webasto Thermo Test PC Diagnostics. (Measured fuel delivery rate 115 ml/h*Hz) Fuel should be free of bubbles –...
- Page 21 Thermo Pro 90 5 Malfunctions and troubleshooting Symptom Possible cause Corrective measures Excessive smoke from DP42 fuel pump See symptom B, DP42 fuel pump heater during heating Fuel See symptom C, fuel integration phase integration Exhaust system and air See symptom C, exhaust system and air intake system intake system Burner unit See symptom C, burner unit...
- Page 22 Thermo Pro 90 5 Malfunctions and troubleshooting...
-
Page 23: General Information
Checking and setting the CO content 3. Make sure that the coolant circuit and fuel system have • Using the Webasto Thermo Test PC diagnostics, set the been carefully bled according to the vehicle manufac- heater to "CO Setting" mode. The heater start up turer's regulations. -
Page 24: Fig. 601
Thermo Pro 90 6 Function checks 747 mbar 2500 = 7,6 kW = 9,1 kW 2000 795 mbar 1500 845 mbar 1000 899 mbar 954 mbar 1013 mbar 14,5 10,5 11,5 12,5 13,5 Fig. 601 CO altitude correction... -
Page 25: Testing Individual Components
This is due to the sensors in the control unit that are required for speed control. The test is performed with the Webasto Thermo Test PC diag- nostics. Specified speed 5500 rpm Listen for grinding noise and start-up noise. - Page 26 Thermo Pro 90 6 Function checks...
-
Page 27: Servicing
Thermo Pro 90 7 Servicing Servicing This section describes the servicing jobs that can be carried Checks out on the heater and its components when installed. To maintain the functional reliability of the heater, the follo- wing servicing jobs should be carried out before and after Working on the heater each heating period: •... -
Page 28: Fig. 701 Visual Check, Burner Back Plate
Thermo Pro 90 7 Servicing Removing and installing heater Visual inspection to assess the burner unit CAUTION Hot coolant leaking out can cause burn injuries. Pay attention to the specific features of the burner unit when it needs to be replaced or is faulty. 7.5.1 Removal The criteria for a thorough check are listed in the following. -
Page 29: Fig. 702 Combustion Chamber
The coolant temperature must be < 60 °C before the heater starts up otherwise burner operation may not take place. The heater is to be placed into operation with Webasto Thermo Air holes Test PC diagnostics. If completely empty, the fuel line should be filled by means of Webasto Thermo Test PC diagnostics: press the "Fill Line"... -
Page 30: Fig. 801 Component Layout
Thermo Pro 90 8 Repairing and replacing components Repairing and replacing components General information This section describes the repair jobs that can be carried out on the heater after it has been removed from the vehicle. Any further dismantling will invalidate the warranty. For assembling the heater only use the spare parts from the corresponding spare parts kits. -
Page 31: Fig. 802 Control Unit Cover
Thermo Pro 90 8 Repairing and replacing components Work on stripped down components Control unit NOTE Seals should generally be renewed before reassembling the heater. Cleaning Clean all stripped down components. Visual inspection Fig. 802 Control unit cover • Check all components for damage (cracks, deformation, wear, etc.) and replace as required. -
Page 32: Fig. 804 Replacing The U4840 Coolant Pump
Thermo Pro 90 8 Repairing and replacing components U4840 coolant pump 8.7 Overheating protection Fig. 805 Removing overheating protection sensor Removal NOTE • The overheating protection should only be removed when it is to be renewed. • It must be checked in installed state. 1. -
Page 33: Fig. 806 Coolant Temperature Sensor Removal
Thermo Pro 90 8 Repairing and replacing components Coolant temperature sensor Combustion air fan Fig. 807 Combustion air fan removal Fig. 806 Coolant temperature sensor removal Removal 1. Remove heater (see section 7.5), depending on space Removal requirements. 2. Unplug electrical connections (see section 8.4). 1. -
Page 34: Fig. 809 Burner Unit And Glow Plug
Thermo Pro 90 8 Repairing and replacing components 8.10 Burner unit and glow plug 8.11 Burner head Fig. 809 Burner unit and glow plug Fig. 811 Burner head Removal 1. Remove heater (see section 7.5). 2. Remove combustion air fan (see section 8.9). 3. -
Page 35: Fig. 812 Heat Exchanger
Thermo Pro 90 8 Repairing and replacing components 8.12 Heat exchanger 8.13 Exhaust gas temperature sensor Fig. 812 Heat exchanger Fig. 813 Exhaust gas temperature sensor with clip Removal Removal 1. Remove heater (see section 7.5). 1. Unplug electrical connections (see section 8.4). 2. -
Page 36: Fig. 814 Burner Head And Exhaust Gas Temperature Sensor
Thermo Pro 90 8 Repairing and replacing components ATTENTION • Take particular care when handling the exhaust gas temperature sensor - as it is a sensitive electronic/ceramic component! Avoid pulling the cable of the exhaust gas temperature sensor at the sensor head during installation and while the heater is in operation. -
Page 37: Fig. 901 Thermo Pro 90 Hdd Heater Components
Thermo Pro 90 9 Thermo Pro 90 HDD Thermo Pro 90 HDD General information This section describes the differences between the Thermo Pro 90 HDD and the Thermo Pro 90. Refer to the Thermo Pro 90 specifications in this document for specifications that are not referred to in this section. combustion air fan fuel connection coolant outlet... -
Page 38: Technical Data
Thermo Pro 90 9 Thermo Pro 90 HDD Technical data Thermo Pro 90 HDD Heater 24 V Approval mark ECE R122 (heating) 00 0443 ECE R10 (EMC) 04 7225 Design Water heater Heat flow Max. 9.1 kW Control range 1.8 to 7.6 kW Fuel Diesel DIN EN 590 PME DIN EN 14214... -
Page 39: Fig. 902 U4840 Coolant Pump With Emc Suppressor Module
Thermo Pro 90 9 Thermo Pro 90 HDD U4840 coolant pump with EMC Combustion air fan suppressor module Fig. 903 Thermo Pro 90 HDD combustion air fan Fig. 902 U4840 coolant pump with EMC suppressor NOTE module The Thermo Pro 90 HDD has a special combustion air fan (mo- tor connected to ground). -
Page 40: Fig. 904 Thermo Pro 90 Hdd Control Unit
9 Thermo Pro 90 HDD Control unit CAN-Offboard diagnostics Use similar to W-bus diagnostics with SAEJ1939-compliant diagnostic tools as per Webasto specification. Electrical components NOTE A minimum bending radius of 110 mm must not be exceeded when using the WDT wiring harness (ID: 9029629_). Avoid mechanical stress at the connection areas. -
Page 41: Fig. 1001 Preferred Position Of Thermo Pro 90 Heater For Storage And Transportation
Heaters should always be stored in the original or similar packaging in closed rooms! The heater or its components to be sent to Webasto for tes- After removing the delivery packaging, the heaters should ting or repair, must be cleaned and packed in such a way that only make contact at the aluminium parts. -
Page 42: Wiring Diagrams
Thermo Pro 90 11 Wiring diagrams Wiring diagrams The wiring diagrams show the possible connections for 12 or 24 volt heaters. 11.1 Thermo Pro 90 System wiring diagram for Thermo Pro 90 and control ele- Legend to wiring diagrams: ment: See: •... -
Page 43: Fig. 1102 System Wiring Diagram Thermo Pro 90, Multicontrol With Battery Disconnector
Thermo Pro 90 11 Wiring diagrams 11.3 System wiring diagram for Thermo Pro 90 with MultiControl control element with battery disconnector Fig. 1102 System wiring diagram Thermo Pro 90, MultiControl with battery disconnector 1102... -
Page 44: Fig. 1103 System Wiring Diagram Thermo Pro 90, Smartcontrol (Adr)
Thermo Pro 90 11 Wiring diagrams 11.4 System wiring diagram for Thermo Pro 90 with SmartControl control element (ADR) Fig. 1103 System wiring diagram Thermo Pro 90, SmartControl (ADR) 1103... -
Page 45: Fig. 1104 System Wiring Diagram Thermo Pro 90, On/Off Switch (Adr)
Thermo Pro 90 11 Wiring diagrams 11.5 System wiring diagram for Thermo Pro 90 with on/off switch (ADR) Fig. 1104 System wiring diagram Thermo Pro 90, on/off switch (ADR) 1104... -
Page 46: Fig. 1105 System Wiring Diagram Thermo Pro 90, Thermocall Tc4
Thermo Pro 90 11 Wiring diagrams 11.6 System wiring diagram for Thermo Pro 90 with ThermoCall TC4 Fig. 1105 System wiring diagram Thermo Pro 90, ThermoCall TC4 1105... -
Page 47: Fig. 1106 System Wiring Diagram Thermo Pro 90, Unibox
Thermo Pro 90 11 Wiring diagrams 11.7 System wiring diagram for Thermo Pro 90 with UniBox Fig. 1106 System wiring diagram Thermo Pro 90, UniBox 1106... -
Page 48: Fig. 1107 System Wiring Diagram Thermo Pro 90, Multicontrol (Analogue Connection)
Thermo Pro 90 11 Wiring diagrams 11.8 System wiring diagram for Thermo Pro 90 with MultiControl control element (analogue connection) Fig. 1107 System wiring diagram Thermo Pro 90, MultiControl (analogue connection) 1107... -
Page 49: Fig. 1108 System Wiring Diagram Thermo Pro 90 Hdd, Multicontrol
Thermo Pro 90 11 Wiring diagrams 11.9 System wiring diagram for Thermo Pro 90 HDD with MultiControl control element Fig. 1108 System wiring diagram Thermo Pro 90 HDD, MultiControl 1108... -
Page 50: Fig. 1109 System Wiring Diagram Thermo Pro 90 Hdd, Smartcontrol (Adr)
Thermo Pro 90 11 Wiring diagrams 11.10 System wiring diagram for Thermo Pro 90 HDD with SmartControl control element (ADR) Fig. 1109 System wiring diagram Thermo Pro 90 HDD, SmartControl (ADR) 1109... -
Page 51: Fig. 1110 System Wiring Diagram Thermo Pro 90 Hdd, On/Off Switch (Adr)
Thermo Pro 90 11 Wiring diagrams 11.11 System wiring diagram for Thermo Pro 90 HDD with on/off switch (ADR) Fig. 1110 System wiring diagram Thermo Pro 90 HDD, on/off switch (ADR) 1110... -
Page 52: Fig. 1111 Heater Connections
Thermo Pro 90 11 Wiring diagrams 11.12 Cable cross-sections 11.15 Plug assignments at control unit Cable < 7.5 m 7.5 - 15 m X6 X4 X7 0.75 mm 1.0 mm 1.0 mm 1.5 mm 1.5 mm 2.5 mm 2.5 mm 4.0 mm 4.0 mm 6.0 mm... -
Page 53: Legend To Wiring Diagrams
Thermo Pro 90 11 Wiring diagrams 11.16 Legend to wiring diagrams Item Description Remarks Heater Thermo Pro 90 / Thermo Pro 90 HDD Control unit – Exhaust gas temperature sensor PT2000 Room thermostat Optional Operating indicator Light 0.15 W to max 2 W Burner motor Combustion air fan Fuel pump... -
Page 54: Legend For Comments
Thermo Pro 90 11 Wiring diagrams Item Description Remarks 4-pin plug connection To item P or P1 W-bus, MultiControl / SmartControl connection, Telestart (12 V 4-pin plug connection only), ThermoCall or diagnosis 2-pin plug connection To item DP 2-pin plug connection To item UP Solenoid valve / pump Auxiliary drive / pumping device... - Page 55 Friedrichshafener Str. 9 82205 Gilching Germany The telephone number of each country can be found in the Webasto service centre leaflet or the website of the respective Webasto representative of your country. In multilingual versions the German language is binding.
Need help?
Do you have a question about the Thermo Pro 90 Series and is the answer not in the manual?
Questions and answers