Table of Contents
Advertisement
Quick Links
I
NTRODUCTION
Dear customer:
Thank you for purchasing a DECT telephone; we appreciate your trust in us.
This product was manufactured with the utmost care, should you encounter any difficulties during its use,
we recommend that you refer to this user guide.
For your comfort and safety, we ask that you read the following paragraph carefully:
Recommendations and safety instructions
Your DECT telephone must not be installed in a humid room (wash room, bathroom, laundry
room, kitchen, etc.) unless it is 1.50 m away from a water point, or outside. Your telephone
must be operated at temperatures ranging from 5°C to 45°C.
Only use the supplied power adapter, connect it to the base socket according to the
installation instructions provided in this booklet and the indications on the identification label
affixed to it (voltage, current, electric network frequency) .
power adaptors to cut off the 230V current in case of danger. They must be located near to the
device, and must be easily accessible.
This telephone was designed for use on the public switched telephone network (PSTN). In
case of a problem you must first contact your reseller. Only use the supplied telephone cord.
To avoid damaging your handset, only use certified rechargeable AAA batteries, never use
non rechargeable batteries. Insert the batteries in the handset battery compartment
respecting polarity.
For your personal safety, never place your handset on the base without the batteries, or
without the battery cover, you could get an electric shock.
At the end of their useful life, batteries must be disposed of according to the recycling
instructions presented in this booklet.
Your DECT telephone has an inside radio range of about 50 metres and up to 300 metres in
open space. The immediate presence of metal parts (of a television for example), or of any
electric appliance may result in range reduction.
Some sensitive medical equipment and safety equipment may be affected by the radio-
frequency transmissions of your telephone. In all cases, we ask that you respect the safety
recommendations.
In areas where storms are frequent, we recommend that you protect your telephone line using
a surge protection device.
This equipment does not function in the case of an electric network shutdown: For the
emergency calls, use a self-contained cord telephone.
The CE marking certifies that the product meets the essential requirements of Directive 1999/
5/CE of the European Parliament and of the Council pertaining to microwave radio equipment
and telecommunication terminal equipment, for the safety and health of users, for
electromagnetic interference. Furthermore, it efficiently uses the frequency spectrum
attributed to ground and spatial communication to prevent damaging interference.
As a safety measure, you can use the
Advertisement
Table of Contents

Related Manuals for BELGACOM Twist 587


Summary of Contents for BELGACOM Twist 587
- Page 1 NTRODUCTION Dear customer: Thank you for purchasing a DECT telephone; we appreciate your trust in us. This product was manufactured with the utmost care, should you encounter any difficulties during its use, we recommend that you refer to this user guide. For your comfort and safety, we ask that you read the following paragraph carefully: Recommendations and safety instructions Your DECT telephone must not be installed in a humid room (wash room, bathroom, laundry...
-
Page 2: Table Of Contents
Viewing the events log Installation guide Activate/deactivate the new events Making a call information screen Belgacom smart services Accessories Services when not in communication Receiving a call Alarm clock During a call Setting the alarm clock... - Page 3 ONTENTS Creating, modifying or deleting Record mode a forbidden prefix Number of rings Authorising three-way calling Appendix Settings Care and Maintenance Programming a key Problems Modifying the date and time Features Adjusting the contrast Environmental information Using the auto hang up and pick up Guarantee features Installation guide...
-
Page 4: Your Telephone
OUR TELEPHONE Unpacking Place the box in front of you, open it and make sure it contains the following items: • one base, • one handset, • one battery compartment cover, • one equipped power adapter, • one telephone line cord, •... -
Page 5: Your Base
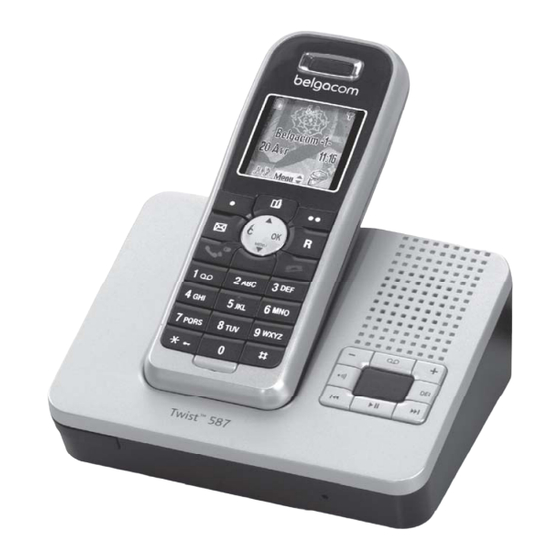
OUR TELEPHONE Your base It fits well into your family and professional environment. Twi st 1. Reduce the base loudspeaker volume 2. Switch answering machine on / off ON Simple recorder OFF: press and hold ON Recorder: short press ON Recorder ON Simple: short press ON Simple ON Recorder: short press... -
Page 6: Your Handset
OUR TELEPHONE Your handset With its user-friendly design, you will appreciate how easy it is to hold and its quality during conversations. Color graphics Speaker display Navigator Program keys R key Phonebook key Hang up Turn off the Direct SMS handset Pick up Turn on the... - Page 7 Message répondeur non lu In use Name of the base and handset (press OK) Icon showing Icon of operator the programmed function Services Silent mode Belgacom Services Agenda Timer Alarm clock Keypad lock Number Redial Enabling answering machine Answering machine...
-
Page 8: Connecting The Base
OUR TELEPHONE Connecting the base Before making any connections, please refer to the safety instructions presented at the beginning of this user guide. Place the base where it should be located. Telephone socket Power socket Plug the telephone line connector (as shown in the illustration) into the telephone socket on the underside of the base and connect the other end to the telephone wall socket. -
Page 9: Turning The Handset On And Off
Your handset is now off. To turn your handset back on, press the red key . BELGACOM is displayed on the screen. Information is displayed on the screen, including the name and number of the handset (for instance HANDSET -2 -), the date and the time. -
Page 10: Installation Of A Chart Sim
OUR TELEPHONE Installation of a chart SIM Take your base, remove the compartment of chart SIM (reference mark 2) located on the right side . Take your chart SIM (reference mark 3) and make slide it in the compartment by taking account of the direction of insertion (printed circuit of the visible chart and notch on the right). -
Page 11: Getting Started
ETTING STARTED navigator. Installation guide Belgacom smart services Once the handset has been turned on, press Your handset makes Comfort services OK and select your language. Set up simpler to use. Certain services are pre- assistance is automatically provided. -
Page 12: Receiving A Call
Ring Back OFF (#37#) - Deactivate the During call, numerous options Belgacom Ring Back service. accessible by pressing Menu Anon. ON (*31*) - Activation of refuse Select the desired option in the following list: display of your number for next call: enter this... -
Page 13: Handsfree
ETTING STARTED Handsfree To retake the call before it is picked While having a conversation with your up by the handset called, press contact, you can enable the handset. Press Option Menu Using the arrow, select Hanging up. Press Activate Select Handsfree or Base loudsp. -
Page 14: Accessing The Phonebook Or Call Log
ETTING STARTED Select Make 2nd Call using . Press Select 3-party conf. using . Press Confirm Activate then talk both parties Select your contact's telephone number in simultaneously. the phonebook by pressing or dial the If you want to end the conference, press number using the keypad. -
Page 15: Recording A Conversation
ETTING STARTED Recording a conversation The Microphone muted message will appear During communication, you can record an on the screen and the flashing icon will entire conversation or just a portion of it. be displayed on the communication screen. To deactivate secret mode: Tell the people you are speaking to that you are recording the conversation. -
Page 16: Communication Between Two Handsets
ETTING STARTED Using the keypad keys, enter the name of Your entry is created and is now in the your contact by pressing successively on the phonebook list. You can see the beginning of keypad keys (see page 17 for further details). your contact's name which is preceded by a number type icon. - Page 17 ETTING STARTED Use the keys to select either Common A confirmation screen appears. It indicates box or a personal box if one has been the type of transmission and the number to created. The SMS will be sent to the box which your message will be sent.
-
Page 18: Menu Structure
ENU STRUCTURE Phonebook View New entry Edit Delete Search Read SIM card Transm. Edit SMS Read SMS Memory Empty SMS Box Settings SMS Centers Sub-Address Private box Calls Incoming calls Outgoing calls Activate Events View Deactivat Accessories Alarm clock Organiser Birthday Timer Room monitor... - Page 19 ENU STRUCTURE Security Keypad lock Emergency Change Code Time limit Restriction Intrusion Settings Program keys Date/time Contrast Auto Hang up Auto Pick up Adv. Settings HS Settings Registration Help PreferredBase Reset HS Language Custom Handset name Base Settings Registr. Mode Reset Base Delete Handset Base name...
-
Page 20: Your Phonebook
OUR PHONEBOOK To enter text press successively on the OUR PHONEBOOK desired key until the letter is displayed on the screen. You can store 200 phonebook entries in your phonebook. Each phonebook entry can contain the name On the navigator key , press of your contact which can be a maximum of until the Phonebook screen is displayed,... -
Page 21: Viewing The Phonebook
OUR PHONEBOOK Select an icon for this number, using to specify the type of number: You can call the number that is associated to the entry directly by - For a home telephone number pressing the green key - For a work telephone number - For a mobile telephone number Once the entry appears on the screen, press - For a FAX number... -
Page 22: Deleting An Entry
OUR PHONEBOOK Select Edit using Press The edited entry appears on the screen. • To change this information, press Confirm Edit • The information is accurate. Press Select the entry with the keys or by entering the first letter of the name of the Confirm entry then with the keys. -
Page 23: Performing A Quick Search
OUR PHONEBOOK Performing a quick search Import part or all of a SIM card directory There are two ways to search: With this function, you can quickly and easily First method: transfer contacts from your SIM card to your handset's directory. Access your phonebook... -
Page 24: Transfer All Or Part Of The Phonebook
OUR PHONEBOOK Depending on the type of transfer you have Select By Intercom using . Press chosen, carry out one of the following Confirm procedures: • To import the entire directory, wait a few Choose to transfer: seconds. When the operation is finished, •... -
Page 25: Using A Phonebook Entry To Place A Call
OUR PHONEBOOK • If you have chosen to transfer several You have chosen to use the Search menu, numbers, take the sending handset and type the first letter of your correspondent; the do the following: phonebook position goes to the place on the - Select one of the numbers in the list with the name closest to the character phonebook using the... -
Page 26: Sms Service - Mini-Messages
(if your SMS operator enables it). Alphanumeric keypad key correspondence If your Twist 587 is the only SMS depending on the actived mode (capital appliance connected to your line, do letters or small letters). - Page 27 SERVICE Making a correction List of special characters: If you enter the wrong letter, press " Delete or C key on the navigator to delete letter-by-letter. You can also move through the text to delete characters or insert new ones. Go back into the entered text using the keys.
-
Page 28: Sending An Sms
SERVICE Enter your recipient terminal number (default The letters corresponding to the setting 0). press Confirm alphanumeric keypad key are displayed on the top left side of the A confirmation screen appears. It indicates screen (in the order respecting the the type of transmission and the number to successive presses on the which your message will be sent. -
Page 29: Reading A Message
SERVICE - Try again:to attempt a new delivery. transmitter personal - Delete SMS:to permanently delete your (page 30) selection menu only SMS. appears when at least one personal - See receiver: to check the phone number box is created. or send the SMS again. - Edit SMS:to change the delivery type and Press Yes to select a transmitter box. -
Page 30: Viewing The Memory Status
SERVICE Managing read messages If no personal box has been Once the message has been read, press created, only the shared box is displayed on the screen. Option and select: - Reply: to write an SMS in response to the To create a personal box, select message received (the receiver number of Perso Box Menu and press... -
Page 31: Emptying An Sms Folder
SERVICE Select Memory using . Press A delete confirmation screen appears. Confirm • Press No if you do not want to empty the folder. A screen informs you as to the number of • Press Yes to empty the folder. messages contained in each folder (new, inbox, sent and draft). -
Page 32: Sms Settings
This number is configured at the factory and Select Settings using . Press you do not usually need to modify it, if the Twist 587 terminal is the only compatible Confirm terminal connected on your telephone line. However, if several SMS terminals are Select SMS Centers using . -
Page 33: Sms Boxes
SETTINGS Select Sub-Address using . Press Telephone line Confirm 0123456789 An information screen shows the current Sub-Address number of the telephone SMS terminal. • To change the number, press Edit MOTHER Then select the number using Twist keys. Press Confirm •... -
Page 34: Creating A Personal Box
SETTINGS The sub-address is a number that must be Select using Press added at the end of your telephone number Confirm (11th digit) by those who wish to send you SMS. Enter the box name. Press Confirm If you use the same sub-address If you enter a name that already twice for the same telephone line, exists, a message tells you that the... -
Page 35: Viewing A Message From A Personal Box
SETTINGS Viewing a message from a personal Select Private box using . Press Confirm Select Cancel or Edit using keys. On the navigator key , press Press Confirm until the SMS screen is displayed, press OK to confirm. Select the name of the personal box you want to modify or delete using . -
Page 36: Call Log
ALL LOG calls are organized in chronological order, ALL LOG from the most recent call to the oldest call. This menu enables you to view the call or event lists of your telephone. By pressing Option , a list of various The dialed call log presents the calls you executable actions appears: made. -
Page 37: Calling A Number Listed In The Dialed And Received Call Log
ALL LOG Calling a number listed in the A summary screen appears. It informs you as to the various events that took place during dialed and received call log your absence: • the new SMS received, On the navigator key , press •... -
Page 38: Accessories
CCESSORIES CCESSORIES Managing alarms: This menu offers you numerous additional For the alarm clock, the timer, functionalities: birthdays and the organizer: • Alarm clock: to use your handset as an alarm clock. • Organiser: the handset will ring at the •... -
Page 39: Alarm Clock
CCESSORIES Alarm clock The alarm settings information screen appears showing the new status. Press The alarm function enables you to activate Confirm the handset ringer every day at a set time. Modifying the alarm clock time When the alarm is triggered the selected ring tone sounds for 60 seconds through the Select Set Time in the list using handset speaker and an alert screen is... -
Page 40: Timer
CCESSORIES Changing the programmed time of The alarm clock settings information screen the timer appears. Press Confirm In the timer options, select Set Time in the To exit the menu, press the red key list. Press Confirm Enter the desired time. Press Confirm Timer The timer activation screen appears with the The timer function activates the handset... -
Page 41: Displaying Or Hiding The Programmed Time Of The Timer
CCESSORIES Displaying or hiding the In the birthday (organiser) alarm list, select entry using Press programmed time of the timer Confirm To display (or hide) the time on the screen during its countdown, select View in the Enter the name of the person concerned Timer menu using... -
Page 42: Modifying Or Deleting A Birthday (Or Organiser) Alarm
CCESSORIES Modifying or deleting a birthday The sender handset rings, pick up using the (or organiser) alarm green key In the birthday (or organiser) alarm list On the sender handset: screen, select the alarm you wish to edit A screen invites you to activate the monitor using . -
Page 43: Games
AMES AMES Move the pieces using the navigator order to achieve the objectives. Action Taquin move the piece located This is a solitaire-type game, with three levels under the empty square of difficulty (9, 16 or 25 elements). The aim is upward to replace identical objects as seen. -
Page 44: Customizing The Handset
USTOMIZING THE HANDSET Select the ring tone of your choice using USTOMIZING THE keys. HANDSET Press Volume This menu allows you to modify the ring tones and the visual interface of the handset, Adjust the ringer volume using and particularly: press Confirm •... -
Page 45: Modify The Color Of The Menu Backgrounds
USTOMIZING THE HANDSET Modify the color of the menu backgrounds During a call the intensity of the backlight will be reduced after 20 This menu is for changing the menu seconds of inactivity. background color. - In normal mode (eco mode not activated), the intensity of the On the navigator key , press... -
Page 46: Activating Or Deactivating The Beeps
USTOMIZING THE HANDSET Activating or deactivating the Activating/deactivating the beeps silent mode When in silent mode, the telephone ringer On the navigator key , press and keypad beeps are inhibited. until the Personaliz. screen is displayed, press OK to confirm. On the navigator key , press Select Beeps using... - Page 47 USTOMIZING THE HANDSET Select Record using . Press Confirm The "Record tone" is displayed. Press Record Record your text or an audio sequence of up to 8 seconds. Press End to stop the recording before reaching the maximum time. The recording is played, and the message "Do you want to keep the recorded tone?"...
-
Page 48: Security
ECURITY Programming an emergency ECURITY number This menu enables you to change or This function allows you to define an customise the security parameters of your emergency number which can be enabled or telephone. You can: disabled. • lock the keypad, Once it is activated, the emergency number •... -
Page 49: Modifying The Base Code
ECURITY • Enter the new number using the keypad. To exit the menu, press the red key Press Confirm Carefully note down the base code • You can pick a number from the number. You will need this code to phonebook. -
Page 50: Defining Forbidden Prefixes - Call Barring
ECURITY You can change the status (activate/ Select Restriction using . Press deactivate) or modify the time limit. Confirm Select Edit time using . Press Confirm screen indicating number programmed prefixes as well as their status Enter the new time limit using the keypad appears. -
Page 51: Authorising Three-Way Calling
ECURITY For creating or modifying a prefix Select Intrusion using . Press Select an empty location (dashes) or a prefix Confirm to modify using . Press Edit A screen displays the current status (on The prefix input screen appears. or off). •... -
Page 52: Settings
ETTINGS Choose from the function list the function you ETTINGS want to assign to the key. Press select one of the following functions: This menu enables you to change or • Silence • Number customise the handset and base parameters. •... -
Page 53: Modifying The Date And Time
ETTINGS Modifying the date and time Adjusting the contrast The base manages the time On the navigator key , press displayed on the handset, so the until the Settings screen is displayed, press time indicated on your handset OK to confirm. should be re-verified after any loss of electric power. -
Page 54: Installation Guide
ETTINGS Select Auto Hang up (or Auto Pick up) Modifying the language using . Press Confirm This function enables you to change the screen display language. A screen displays the current status (on or off). • To change the status, press Edit On the navigator key , press The status is modified on the screen,... -
Page 55: Advanced Settings
Put the base to which you want to register the ANDSET SETTINGS handset in registration mode: • For the Twist 587, press on the Registering a new handset to a button on the base for a few seconds. base •... -
Page 56: Resetting The Handset
ETTINGS Select PreferredBase using . Press Select HS Settings using . Press Confirm Confirm An information screen presents the current Select Reset HS using . Press base preference for your handset. Confirm • To keep the preference, press Confirm A confirmation screen will prompt you to •... -
Page 57: Renaming The Handset
Put the base to which you want to register the name. Press Confirm handset in registration mode: • For the Twist 587, press on the To exit the menu, press the red key button on the base for a few seconds. •... -
Page 58: Advanced Settings/Base Settings
ETTINGS Re-initialising the base DVANCED SETTINGS When you re-initialise your base, all the base ASE SETTINGS parameters are reset to their initial values (factory settings). Using a handset to put the base in registration mode On the navigator key , press This function enables you to put the base in until the Settings screen is displayed, press registration mode so you can register a new... -
Page 59: De-Registering A Handset
ETTINGS De-registering a handset Renaming the base This function enables you to de-register a On the navigator key , press handset from your base. This may be necessary if you have lost a handset or if you until the Settings screen is displayed, press already have 6 handsets registered to the OK to confirm. -
Page 60: Advances Settings / Line Settings
ETTINGS Modifying the dialing mode DVANCES SETTINGS If you telephone is connected to an old INE SETTINGS PABX, you might have to change the number system. Before changing the settings of the telephone line, contact your The default dialing mode is tone. operator to obtain the parameters for your line. -
Page 61: Modifying The Flash Duration (R Key)
• prefix status (on or off). Contact your administrator, who will supply the appropriate time period, and proceed to the new settings. The value for Belgacom is On the navigator key , press 120 ms. until the Settings screen is displayed, press OK to confirm. -
Page 62: 2Nd Call
ETTINGS Set the settings and press Confirm • To change the status, press Edit The status is modified on the screen, The information screen presents the new PABX settings. press Confirm • To keep these settings, press • To keep the status, press Confirm Confirm •... - Page 63 ETTINGS If the function is inactive, the caller number is not visible when you receive a call. However, your correspondent's number is visible when you consult the log. To exit the menu, press the red key...
-
Page 64: Answering Machine
NSWERING MACHINE A screen displays the current status of the NSWERING MACHINE answering machine (answer only, answer and record or off). Your telephone's answering machine comes • To keep the displayed status, press with two answering modes: Confirm - Answer only: callers cannot leave you a message and an OGM informs them of your •... -
Page 65: Modifying The Ogm
NSWERING MACHINE Using a pre-recorded anonymous Modifying the OGM In order to modify an OGM, you If you select the anonymous mode, must first turn on the answering your personal outgoing message machine. The OGM that will be will be definitely replaced by the pre- modified will be that of the recorded outgoing message. -
Page 66: Deleting All Your Personal Ogms
NSWERING MACHINE Deleting all your personal OGMs icon on the handset If you delete all your personal screen notifies you that there are outgoing messages, the answering messages that have not been machine will automatically be played. deactivated. If you saved one or more played messages, the icon appears on the welcome screen. -
Page 67: Playing Messages Using The Handset
NSWERING MACHINE Playing messages using the handset Remote access to answering machine On the navigator key , press You can access your answering machine remotely. This function enables you to until the Ans.Mach screen is displayed. retrieve your messages and access your Press OK to confirm. -
Page 68: Deleting All The Old Messages
NSWERING MACHINE Deleting all the old messages Select Record memo using . Press Confirm To delete the old messages one Press OK to start recording. message at a time, refer to the previous paragraph and delete the At the sound of the beep transmitted through unwanted messages during their the handset, start talking into the handset play back. -
Page 69: Tam Setting
SETTING Modifying the remote access SETTING code The remote access code enables you to This menu enables you to modify the listen to the messages left on your answering advanced settings your answering machine via another telephone. machine (depending on the model) You can access the TAM setting menu through the Ans.Mach menu or through the Adv. -
Page 70: Privileged Access
SETTING Select TAM Settings using . Press Select TAM Settings using . Press Confirm Confirm Select Mess.Duration using . Press Select Priv. Access using . Press Confirm Confirm A screen indicating the maximum authorised The following information is displayed on the recording time for each message appears. -
Page 71: Number Of Rings
SETTING Select TAM Settings using . Press Modifying the message recording Confirm quality does not affect the quality of the outgoing message. Select No. of rings using . Press Confirm On the navigator key , press The programmed number of rings is until the Ans.Mach menu is displayed, press displayed on the screen. -
Page 72: Appendix
You cannot send or receive Make sure you have subscribed to a caller display service. SMSs Contact Belgacom to check if the SMS service is activated on your line. Make sure that the server number is 1717 for transmissions and 0717 for reception. - Page 73 230 V , 50/60 Hz Handset dimensions 138 x 150 x 28 mm Charging time 6 hours Handset weight 143 g All of this data is provided to you for information purposes only. Belgacom reserves the right to make any changes without notice.
- Page 74 NVIRONMENTAL INFORMATION • The equipment that you bought has required the extraction and use of natural resources for its production. It may content hazardous substances for the health and the environment. • In order to avoid the dissemination of those substances in our environment and to diminish the pressure on the natural resources, we encourage you to use the appropriate take-back systems.
-
Page 75: Guarantee
Customer removes or tampers with the manufacturer's serial numbers and/or brand names on the terminal Equipment. Belgacom shall not be liable for any indirect or immaterial loss sustained by the Customer as a result of the malfunctioning of the terminal Equipment, such as any loss of production, revenue or contracts.
Need help?
Do you have a question about the Twist 587 and is the answer not in the manual?
Questions and answers