
Subscribe to Our Youtube Channel
Related Manuals for Viega 8536.31


Summary of Contents for Viega 8536.31
- Page 1 Prevista Dry washbasin element 820 – 980 Instructions for Use for barrier-free WB with single-hole fitting Model Year built: 8536.31 from 03/2019 en_INT...
- Page 2 Prevista Dry washbasin element 820 – 980 mm 2 from 18...
-
Page 3: Table Of Contents
Table of contents Table of contents About these instructions for use Target groups Labelling of notes About this translated version Product information Standards and regulations Intended use 2.2.1 Areas of use Product description 2.3.1 Overview 2.3.2 Compatible components 2.3.3 Technical data Accessories Handling Assembly information... -
Page 4: About These Instructions For Use
This restriction does not extend to possible operating instructions. The installation of Viega products must take place in accordance with the general rules of engineering and the Viega instructions for use. -
Page 5: About This Translated Version
About these instructions for use About this translated version This instruction for use contains important information about the choice of product or system, assembly and commissioning as well as intended use and, if required, maintenance measures. The information about the products, their properties and application technology are based on the current standards in Europe (e.g. -
Page 6: Product Information
Product information 2 Product information Standards and regulations The following standards and regulations apply to Germany / Europe and are provided as a support feature. Regulations from section: Fields of application / Mounting conditions Scope / Notice Regulations applicable in Ger‐ many Suitable masonry walls EN 1996-1-1... -
Page 7: Product Description
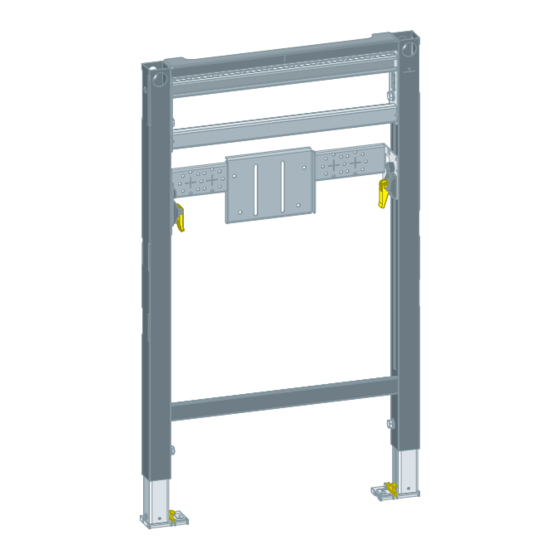
Product information Product description 2.3.1 Overview Fig. 1: Components and scope of delivery washbasin element Wall bracket for concealed odour trap Screws and nuts for concealed odour trap Screws and dowels for fixing in the floor Screws for fixing in support profile Assembly accessories wall plates threaded rods for fixing sanitary objects 2.3.2... -
Page 8: Technical Data
Product information 2.3.3 Technical data Drain elbow (outlet side) DN 40 / 50 Rubber nipple DN 50 / 30 Hole diameter for fixing in wooden 11 mm frame construction Construction height 820 — 980 mm Prevista Dry washbasin element 820 – 980 mm 8 from 18... -
Page 9: Accessories
Product information Accessories For mounting, Viega recommends to use the Prevista Dry fixing set. Prevista Dry fixing set model8570.36 for fixing the Prevista Dry elements in single / line mounting, single mounting directly onto the installation body or corner mounting on masonry or metal support profile. -
Page 10: Handling
Handling 3 Handling Assembly information 3.1.1 Mounting conditions Suitable walls Masonry walls Concreted walls Metal support profiles Prevista Dry Plus pre-wall constructions The wall constructions must comply with the regulations in section Ä „Regulations from section: Fields of application / Mounting condi‐ tions“... -
Page 11: Assembly
Mounting the element Masonry and concreted walls When mounting multiple washbasin elements with an interval of > 500 mm, Viega recommends to use a Pre‐ vista Dry support bracket (model 8570.48). Observe the instructions for use of the support bracket when mounting. - Page 12 Handling Mounting to a masonry wall For mounting, Viega recommends to use a Prevista Dry fixing set. Determine and mark the fixing points. X1 with construction height 820: 800 mm X1 with construction height 980: 960 mm X2: 460 mm Determine and mark the fixing points on the floor.
- Page 13 Handling Adjust the construction height of the element in accordance with the on-site marking of the upper edge of the finished floor. X with construction height 820: 800 mm X with construction height 980: 960 mm Tighten the feet of the element using a fork spanner. ð...
- Page 14 Handling Mounting in Prevista Dry Plus Mount the Prevista Dry Plus pre-wall construction pursuant to the instructions for use of the Prevista Dry Plus system. Position the element on the floor rail. Fix the feet on the floor rail using the clips. Set the height of the element by means of the feet.
- Page 15 Handling ð The element is fixed in the Prevista Dry Plus pre-wall construc‐ tion. Prevista Dry washbasin element 820 – 980 mm 15 from 18...
- Page 16 Handling Mounting in metal support profile Position the element on the floor rail. If necessary, adjust the foot depth from 50 mm (pre-mounted) to 75 Pull the foot out and turn by 90°. Screw the feet together with the support profile. Adjust the construction height of the element in accordance with the on-site marking of the upper edge of the finished floor.
-
Page 17: Set And Clad The Element
Handling 3.2.2 Set and clad the element Use the quick release to adjust the drain elbow to the desired height. Observe the instructions of the sanitary objects manufacturer. Set the ledges to the desired height. Mount the odour trap. Prevista Dry washbasin element 820 – 980 mm 17 from 18... -
Page 18: Disposal
Handling Turn in the threaded rods by hand. Tighten the nuts of the threaded rods with a fork spanner. Place the protective caps on the threaded rods. Make the water connections. Cut a suitable gypsum cardboard cladding panel to size. Clad the element with suitable gypsum cardboard cladding panels.
Need help?
Do you have a question about the 8536.31 and is the answer not in the manual?
Questions and answers