Table of Contents
Advertisement
Quick Links
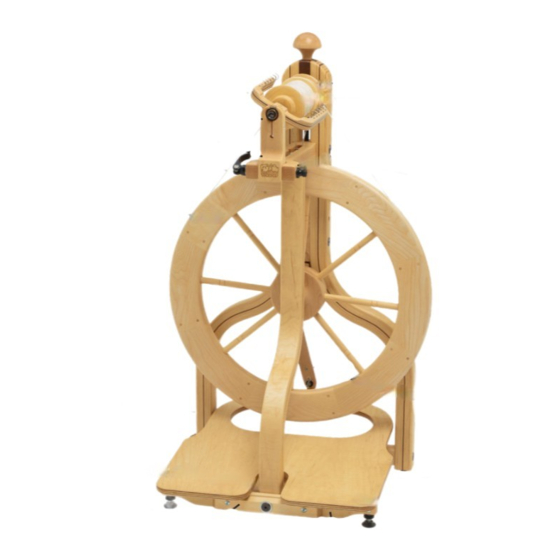
MATCHLESS SINGLE-
TREADLE SPINNING WHEEL
assembly
front maiden
quick-release
drive wheel
rear leg
front leg
adjustable
foot
Find out more at schachtspindle.com
Schacht Spindle Company 6101 Ben Place Boulder, CO 80301
p. 303.442.3212 f. 303.447.9273
© 2019 Schacht Spindle Company, Inc.
flyer
orifice
lever
treadle support
brace
,
maintenance
treadle support
bar
WS6501
warranty
drive band tension
knob
flyer whorl
bobbin
mother-of-all, including
Scotch tension peg
drive band
footman
rear leg
rear brace
treadle
adjustable
foot
TM
&
04.19
Advertisement
Table of Contents

Subscribe to Our Youtube Channel
Related Manuals for Schacht Matchless Spinning Wheel WS6501


Summary of Contents for Schacht Matchless Spinning Wheel WS6501
- Page 1 Find out more at schachtspindle.com Schacht Spindle Company 6101 Ben Place Boulder, CO 80301 p. 303.442.3212 f. 303.447.9273 © 2019 Schacht Spindle Company, Inc. 04.19...
- Page 2 We are pleased that you have chosen one of our Schacht spinning wheels and trust that it will give you many fruitful hours of spinning. We have taken great care in the design of our wheels to make them efficient and sturdy as well as aesthetically pleasing. Our wheels are constructed using traditional woodworking joinery, following the concept that form follows function.
- Page 3 ssembling heel ATTACHING THE FOOTMAN Locate the footman hardware assembly. Remove the cotter pin and nylon washers from the clevis pin. Attach the footman to the treadle yoke using the cotter pin, clevis pin, and nylon washers as shown in Figure 1. The clevis pin should be inserted through the footman footman...
- Page 4 sing heel maiden stop CHANGING BOBBINS Open the quick-release lever on the front maiden (Figure 3). Hold the flyer with one hand and pivot the front maiden forward until the flyer orifice comes out of the front maiden bearing. Hold the drive band front up and out of the way as you pull the flyer bearing...
- Page 5 Adjust the tension on the drive band by turning the drive band tension knob (Figure 4). Start with a loose drive band. Begin to treadle slowly, tightening the loop end rear bar tension knob until the flyer and bobbin both begin to turn. Now you can begin to scotch straight spin.
- Page 6 In Scotch tension mode, the yarn will wind to tie a separate drive cord following the onto the bobbin in the opposite direction instructions above. Several drive cords from double drive mode. This does not can be left on the wheel at the same affect your spinning unless you change time: simply fold up the ones not in use spinning modes in the middle of a bobbin:...
- Page 7 successfully cultivated in other parts of to spin. Use a drop of oil on the following the US and Canada. Black walnut’s deep parts every few hours while spinning: brown heartwood beautifully accents the ■ front maiden bearing design of your wheel. ■...
- Page 8 Spindle Company’s obligation under this Warranty shall be limited to the repair or replacement of any part or parts which may prove defective within two (2) years following the date of original purchase by the consumer, and which Schacht Spindle Company’s examination shall disclose to our satisfaction to be thus defective.
Need help?
Do you have a question about the Matchless Spinning Wheel WS6501 and is the answer not in the manual?
Questions and answers