
Related Manuals for golmar NEXA Series


Summary of Contents for golmar NEXA Series
- Page 1 NEXA Audio and Video Door Entry System Access control Coded panel Coded panel with display Code 50123681 TCODE/CA NEXA EN REV.0119...
- Page 2 AUDIO AND VIDEO DOOR ENTRY SYSTEM WITH NEXA CODED PANEL INTRODUCTION First and foremost we would like to thank you for purchasing this product. Our commitment to satisfying our customers can be seen from our ISO-9001 certification and from the manufacturing of products like this one.
- Page 3 AUDIO AND VIDEO DOOR ENTRY SYSTEM WITH NEXA CODED PANEL SYSTEM CHARACTERISTICS Microprocessed devices with simplified wiring (bus without call wires): Audio door entry system with 4 common wires. Video door entry system with 3 common wires plus coaxial cable Video door entry system with 4 common wires plus twisted pair Video door entry system with simplified wiring (non-polarised 2-wire bus Gtwin).
-
Page 6: Table Of Contents
AUDIO AND VIDEO DOOR ENTRY SYSTEM - ACCESS CONTROL CONTENTS Access control................................5 Contents..................................6 Characteristics................................6 Door panel installation..............................7 Location of the embedding box..........................7 Positioning the embedding box........................... Securing the frame and closing the panel........................7 Description of the module.............................8 Description of the N3301/AL - NX3301 module...................... -
Page 7: Access Control
AUDIO AND VIDEO DOOR ENTRY SYSTEM - ACCESS CONTROL DOOR PANEL INSTALLATION Location of the embedding box: 1850 1650 1450 Make a hole in the wall so that the top of the module is located at a height of 1.65m. Hole dimensions: NCEV-90CS embedding box: 99(W) x 13 .5(H) x... -
Page 8: Description Of The Module
AUDIO AND VIDEO DOOR ENTRY SYSTEM - ACCESS CONTROL MODULE DESCRIPTION Description of the N3301/AL - NX3301 module: The wiring terminals are located at the back of the module and correspond to the following connections: ~, ~ : power supply. NA1 : normally open output relay 1. -
Page 9: Description Of The Self-Testing Leds
AUDIO AND VIDEO DOOR ENTRY SYSTEM - ACCESS CONTROL DESCRIPTION OF THE MODULE Description of the self-testing LEDs: Red Green The self-testing LEDs are located on the upper right side of the front of the module. Operation Red LED Green LED Normal Lock Rapid blink... -
Page 10: Module Operation
AUDIO AND VIDEO DOOR ENTRY SYSTEM - ACCESS CONTROL MODULE OPERATION Description of module operation Module in standby mode. With the module in standby mode, the following operations can be performed: Activation of external push buttons: Allows activation of relay outputs 1 and 2 by means of external push buttons PL1 and PL2 respectively. -
Page 11: Module Programming
AUDIO AND VIDEO DOOR ENTRY SYSTEM - ACCESS CONTROL MODULE PROGRAMMING Programming mode entry and exit: * ( ) To enter programming mode, press the key button three times and then enter secret administrator pin “271800”. key button + key button + key button + administrator pin. -
Page 12: Programming Fields
AUDIO AND VIDEO DOOR ENTRY SYSTEM - ACCESS CONTROL MODULE PROGRAMMING Programming fields: The module comes programmed with factory settings except for the activation codes (user), which are left empty for security reasons. For system operation tailored to the needs of the user, check all of the values in all of the fields. The fields do not need to be programmed in numerical order. - Page 13 AUDIO AND VIDEO DOOR ENTRY SYSTEM - ACCESS CONTROL MODULE PROGRAMMING Programming fields: Continued from previous page Field “1”: Programming a new activation code (user). Allows new user pins (from “0000” to “9999”) to be created and outputs to be assigned for activation with the created codes.
- Page 14 AUDIO AND VIDEO DOOR ENTRY SYSTEM - ACCESS CONTROL MODULE PROGRAMMING Programming fields: Continued from previous page Field “2”: Changing special codes. Allows the current code of the special codes to be changed (see p. 10). The new special code must have the same number of digits as the current code.
- Page 15 AUDIO AND VIDEO DOOR ENTRY SYSTEM - ACCESS CONTROL MODULE PROGRAMMING Programming fields: Continued from previous page Field “3”: Deleting user pins Allows the deletion of existing user pins. Note: Possible memory positions: “001” to “999”. Steps: Field + memory position + key button + key button. (Step ) 1 Press “3”...
- Page 16 AUDIO AND VIDEO DOOR ENTRY SYSTEM - ACCESS CONTROL MODULE PROGRAMMING Programming fields: Continued from previous page Field “4”: Set the outputs. Enables the setting of the relay 1 and relay 2 outputs and the panic output (terminal “P” on the connector). The setting of the relay 1, relay 2 and panic outputs is common to all valid user pins.
- Page 17 AUDIO AND VIDEO DOOR ENTRY SYSTEM - ACCESS CONTROL MODULE PROGRAMMING Programming fields: Continued from previous page Field “5”: Configuring the external buttons. Allows external buttons PL1 and PL2 to be configured with the following modes: -Allows the button to: Always be enabled or, through button codes CP1 or CP2, enable/disable the functioning of the button.
- Page 18 AUDIO AND VIDEO DOOR ENTRY SYSTEM - ACCESS CONTROL MODULE PROGRAMMING Programming fields: Continued from previous page Field “6”: Configuring locking mode. Allows the access control module's locking mode to be configured. Steps: Field + locking mode + time between attempts + lock time + panic output + key button. (Step 1) Press “6”...
- Page 19 AUDIO AND VIDEO DOOR ENTRY SYSTEM - ACCESS CONTROL MODULE PROGRAMMING Programming fields: Continued from previous page Field “7”: Configure the identification ID of the access control module. (Not configure). Allows an identification code (ID) to be configured for the access control module. Note: Possible identification codes (ID): “000”...
- Page 20 AUDIO AND VIDEO DOOR ENTRY SYSTEM - ACCESS CONTROL MODULE PROGRAMMING Programming fields: Continued from previous page Field “9”: Configuring the keypad beep. Allows a beep to be heard when pressing the access control module's keypad buttons. Steps: Field + keypad beep + key button. (Step 1) Press “9”...
-
Page 21: Factory Setting
AUDIO AND VIDEO DOOR ENTRY SYSTEM - ACCESS CONTROL MODULE PROGRAMMING Factory setting: Special codes: Bear in mind the number of digits in the code (see p. 10). Administrator pin: 271800. 2718 if the number of digits configured = 4. CP1 button code: 111100. -
Page 22: Wiring Diagrams
AUDIO AND VIDEO DOOR ENTRY SYSTEM - ACCESS CONTROL WIRING DIAGRAMS Standalone operation: In the diagrams below, a TF-104 transformer (12Vac) is used to power the module. (*) If using an AC lock release, fit the varistor supplied to the terminals of the lock release. If connecting two lock releases, use an additional TF-104 transformer. -
Page 24: Contents
AUDIO AND VIDEO DOOR ENTRY SYSTEM - ACCESS CONTROL CONTENTS Access control with call buttons...........................23 Contents..................................24 Characteristics................................24 Description of the Nexa modular door panel......................25-26 Description of the sound modules..........................27 Description of the EL655 sound module........................27 Description of the EL651 sound module........................ - Page 25 AUDIO AND VIDEO DOOR ENTRY SYSTEM - ACCESS CONTROL DESCRIPTION OF THE DOOR PANEL Description of the Nexa modular door panel: Door panel component assembly drawing. Electronic Embedding boxes Frame modules Aluminium panel modules Description of the door panel. Fixing screws for clip-on covers (x4) Fixing screws for embedding box (x2) Clip-on covers: 60xx Side profile...
-
Page 26: Description Of The Nexa Modular Door Panel
AUDIO AND VIDEO DOOR ENTRY SYSTEM - ACCESS CONTROL DESCRIPTION OF THE DOOR PANEL Description of the Nexa modular door panel: Short link hose supplied with the EL610A module (length 8 cm). For connections between the EL655 sound module and the EL610A button module and between the EL610A button modules of the same embedding box. -
Page 27: Description Of The Sound Modules
AUDIO AND VIDEO DOOR ENTRY SYSTEM - ACCESS CONTROL DESCRIPTION OF THE SOUND MODULES Description of the EL655 sound module: Front. Speaker. Door panel speaker volume control potentiometer. Telephone speaker volume control potentiometer. Microphone. Sound module buttons (x2). Back. Label. ~ 2 ~ P 1 3 1 0 5... -
Page 28: Description Of The El651 Sound Module
AUDIO AND VIDEO DOOR ENTRY SYSTEM - ACCESS CONTROL DESCRIPTION OF THE SOUND MODULES Description of the EL651 sound module: Front. Speaker. Door panel speaker volume control potentiometer. Telephone speaker volume control potentiometer. Microphone Sound module buttons (x2). Back Door panel speaker volume control potentiometer. Telephone speaker volume control potentiometer. -
Page 29: Description Of The El620/2Plus Sound Module
AUDIO AND VIDEO DOOR ENTRY SYSTEM - ACCESS CONTROL DESCRIPTION OF THE SOUND MODULES Description of the EL620/2PLUS sound module: Front. Speaker Door panel speaker volume control potentiometer. Telephone speaker volume control potentiometer. Microphone Sound module buttons (x2) Back Configuration DIP switch. Button connector. -
Page 30: Description Of The Sw1 Dip Switch
AUDIO AND VIDEO DOOR ENTRY SYSTEM - ACCESS CONTROL DESCRIPTION OF THE SOUND MODULES Description of the SW1 DIP switch: The SW1 DIP switch is located on the top right-hand side of the back of the module. Set to OFF if it is a master door panel. Each system must have only one master door panel; the others must be slaves (ON). -
Page 31: Description Of The El632 Plus P/T - El642/Plus Sound Module
AUDIO AND VIDEO DOOR ENTRY SYSTEM - ACCESS CONTROL DESCRIPTION OF THE SOUND MODULES Description of the EL632 PLUS - EL642/PLUS sound module: Front. Colour camera. (Only the EL632 PLUS module) LEDs (visual indications for people with impaired hearing) LEDs. (Only function with EL632 Plus P/T module). Speaker. -
Page 32: Description Of The Sw1 - Sw2 Dip Switch
AUDIO AND VIDEO DOOR ENTRY SYSTEM - ACCESS CONTROL DESCRIPTION OF THE SOUND MODULES Description of the SW1 DIP switch: The SW1 DIP switch is located on the left-hand side of the back of the module. Dip switches 9 and 10 have no function. Leave in the OFF position if the sound module is configured as operating mode EL500 Set to ON to configure the sound module as operating mode EL501 (general entrance door panel). -
Page 33: Binary Coding Of The Sw2 Dip Switch
AUDIO AND VIDEO DOOR ENTRY SYSTEM - ACCESS CONTROL DESCRIPTION OF THE SOUND MODULES Description of the SW2 DIP switch: The SW2 DIP switch is located on the left-hand side of the back of the module. This enables the auto switch-on (audio and/or video communication without having been called) of the door panel if it has this switch set to the ON position. -
Page 34: Description Of The Cn3 Function Connector
AUDIO AND VIDEO DOOR ENTRY SYSTEM - ACCESS CONTROL DESCRIPTION OF THE SOUND MODULES Description of the CN3 function connector: The CN3 function connector is located on the top left-hand side of the back of the sound module. Connect the cable supplied with the module to perform the following functions: “AP”... -
Page 35: Description Of The El632 R5
AUDIO AND VIDEO DOOR ENTRY SYSTEM - ACCESS CONTROL DESCRIPTION OF THE SOUND MODULES Description of the EL632 R5 - EL642 5 sound module: Front. Colour camera. (Only the EL632 R5 module) LEDs (visual indications for people with impaired hearing). LEDs. -
Page 36: Description Of The Sw1 Dip Switch
AUDIO AND VIDEO DOOR ENTRY SYSTEM - ACCESS CONTROL DESCRIPTION OF THE SOUND MODULES Description of the SW1 DIP switch: The SW1 DIP switch is located on the top left-hand side of the back of the module. This enables the auto switch-on (audio and/or video communication without having been called) of the door panel if it has this switch set to the ON position. -
Page 37: Description Of The Button Modules
AUDIO AND VIDEO DOOR ENTRY SYSTEM - ACCESS CONTROL DESCRIPTION OF THE BUTTON MODULES Description of the EL610A button module: Front. Module buttons (x10). Back. Button connector input. Label. Button connector block (independent of calls) Button connector output. Button number. - I1 Call indicator button - I2... -
Page 38: Description Of The El610D Button Module
AUDIO AND VIDEO DOOR ENTRY SYSTEM - ACCESS CONTROL DESCRIPTION OF THE BUTTON MODULES Description of the EL610D button module: Front. Module buttons (x10). Back. Button connector input/output (x3). DIP switch (button call code). Button number. -
Page 39: Description Of The N3301/Al - Nx3301 Access Control Module
AUDIO AND VIDEO DOOR ENTRY SYSTEM - ACCESS CONTROL DESCRIPTION OF THE ACCESS CONTROL MODULE Description of the N3301/AL - NX3301 module Front. Green LED. Red LED. Numeric keypad. Key button. Cancel button. Back. Sw1 DIP switch. Jp1 tamper jumper. NEXA Bus connectors. -
Page 40: Description Of The Jp1 Jumper
AUDIO AND VIDEO DOOR ENTRY SYSTEM - ACCESS CONTROL DESCRIPTION OF THE ACCESS CONTROL MODULE Description of the JP1 jumper: The JP1 jumper, located on the right-hand side of the connection block, activates the tamper alarm. Normal operation, alarm not activated. Tamper alarm mode activated. -
Page 41: Description Of The Beeps
AUDIO AND VIDEO DOOR ENTRY SYSTEM - ACCESS CONTROL DESCRIPTION OF THE ACCESS CONTROL MODULE Description of the beeps: The access control module features an internal beeper for reproducing operation beeps. Operation Duration Programming rapid beeps Confirm field rapid beeps Confirm sequence rapid beeps Cancel... -
Page 42: Preparing The Cable Entry And Fitting The Embedding Box
AUDIO AND VIDEO DOOR ENTRY SYSTEM - ACCESS CONTROL INSTALLATION OF THE DOOR PANEL Preparing the cable entry: Break through the hole to allow entry of cables through the bottom part of the embedding box. In the case of door panels with more than one embedding box, break through the side holes and join the embedding boxes using cable grommets. -
Page 43: Fastening The Frame To The Embedding Box
AUDIO AND VIDEO DOOR ENTRY SYSTEM - ACCESS CONTROL INSTALLATION OF THE DOOR PANEL Fastening the frame to the embedding box: Insert the spring hinge which attaches to the product in the embedding box, as shown in the drawing. To fasten the frame to the embedding box, insert the spring hinge into the housings provided for this purpose in the frame, as shown in the drawing. -
Page 44: Installation Of The Fa-Plus And Fa-Plus/C Power Supply
AUDIO AND VIDEO DOOR ENTRY SYSTEM - ACCESS CONTROL INSTALLATION OF THE POWER SUPPLY UNIT FA-PLUS and FA-PLUS/C power supply installation drawing: Install the power supply unit in a dry and protected place free from the risk of water leaks or sprays. To prevent electric shock, do not remove the protective cover of the primary or handle the wiring. -
Page 45: Programming The Tekna Plus Se Monitors
AUDIO AND VIDEO DOOR ENTRY SYSTEM - ACCESS CONTROL PROGRAMMING THE MONITORS Programming the Tekna Plus monitors: Locate the SW2 DIP switch situated on the top left-hand side of the back of the EL632 PLUS module and set number 2 to ON. The door panel will reproduce a sound to advise that the system has entered into programming mode. - Page 46 AUDIO AND VIDEO DOOR ENTRY SYSTEM - ACCESS CONTROL PROGRAMMING THE MONITORS - GENERAL ENTRANCE DOOR PANEL ONLY Programming Tekna Plus monitors from a general entrance door panel (SW1-1 ON): Locate the SW2 DIP switch on the general entrance door panel situated on the top left-hand side of the back of the sound module.
-
Page 47: Programming Tekna R5 Col Su-R5 Monitors
AUDIO AND VIDEO DOOR ENTRY SYSTEM - ACCESS CONTROL PROGRAMMING THE MONITORS Programming Tekna R5 Col SU-R5 monitors: Locate the DIP switch situated at the back of the EL632/R5 sound module and set number 2 to ON, as described on p. 36. The door panel will reproduce a sound to advise that the system has entered into programming mode. -
Page 48: Programming T-540 Plus Se Telephones
AUDIO AND VIDEO DOOR ENTRY SYSTEM - ACCESS CONTROL PROGRAMMING THE TELEPHONES Programming T-540 Plus telephones: Locate the SW2 DIP switch situated on the top left-hand side of the back of the EL632 PLUS module and set number 2 to ON. The door panel will reproduce a sound to advise that the system has entered into programming mode. - Page 49 AUDIO AND VIDEO DOOR ENTRY SYSTEM - ACCESS CONTROL PROGRAMMING THE TELEPHONES - GENERAL ENTRANCE DOOR PANEL ONLY Programming T-540 Plus telephones from a general entrance door panel (SW1-1 ON): Locate the SW2 DIP switch on the general entrance door panel situated on the top left-hand side of the back of the sound module.
-
Page 50: Programming T-530 R5 Su R5 Te Lephones
AUDIO AND VIDEO DOOR ENTRY SYSTEM - ACCESS CONTROL PROGRAMMING THE TELEPHONES Programming T-530 R5 SU-R5 telephones: Locate the DIP switch situated at the back of the sound module and set number 2 to ON, as described on p. 36. The door panel will reproduce a sound to advise that the system has entered into programming mode. -
Page 51: Wiring Diagrams
AUDIO AND VIDEO DOOR ENTRY SYSTEM - ACCESS CONTROL WIRING DIAGRAMS Combined with Nexa Modular / Nexa Stainless Steel panels: The wiring of the access control module with 'Nexa Modular/Nexa Stainless Steel' p anels will vary depending on the type of installation. - Page 52 AUDIO AND VIDEO DOOR ENTRY SYSTEM - ACCESS CONTROL WIRING DIAGRAMS Combined with Nexa Modular / Nexa Stainless Steel panels: Audio door entry systems with one access door and 4+'n' installation. N3301 Door panels with TF-104 access control module EL655 sound module transformer PL1 PL2 I1 I2...
- Page 53 AUDIO AND VIDEO DOOR ENTRY SYSTEM - ACCESS CONTROL WIRING DIAGRAMS Combined with Nexa Modular / Nexa Stainless Steel panels: N3301 Door panels with EL620/2PLUS FA-Plus/C access control module sound module power supply unit PL1 PL2 PL1 PL2 Main...
-
Page 55: Contents
AUDIO AND VIDEO DOOR ENTRY SYSTEM - CODED DOOR PANEL CONTENTS Coded door panel.................................54 Contents..................................55 Characteristics................................55 Description of the Nexa modular door panel ......................56-57 Description of the sound module ..........................58 Description of the EL632 PLUS - EL642 PLUS sound module ............... - Page 56 AUDIO AND VIDEO DOOR ENTRY SYSTEM - CODED DOOR PANEL DESCRIPTION OF THE DOOR PANEL Description of the Nexa modular door panel: Door panel component assembly drawing. Electronic modules Embedding boxes Frame modules Aluminium panel Description of the door panel Fixing screws for clip-on covers (x8) Fixing screws for embedding box (x2) Clip-on covers: 60xx...
-
Page 57: Description Of The Nexa Modular Door Panel
AUDIO AND VIDEO DOOR ENTRY SYSTEM - CODED DOOR PANEL DESCRIPTION OF THE DOOR PANEL Description of the Nexa modular door panel (Gtwin) Door panel component assembly drawing. Electronic modules Embedding boxes Frame modules Aluminium panel Description of the door panel Fixing screws for clip-on covers (x8) Fixing screws for embedding box (x2) Clip-on covers: 60xx... -
Page 58: Description Of The Sound Module
AUDIO AND VIDEO DOOR ENTRY SYSTEM - CODED DOOR PANEL DESCRIPTION OF THE SOUND MODULE Description of the EL632 PLUS - EL642/PLUS sound module: Front. Colour camera. (Only the EL632 PLUS module) LEDs (visual indications for people with impaired hearing) LEDs. - Page 59 AUDIO AND VIDEO DOOR ENTRY SYSTEM - CODED DOOR PANEL DESCRIPTION OF THE SOUND MODULE Description of the SW1 DIP switch: The SW1 DIP switch is located on the left-hand side of the back of the module. Leave in the OFF position if the sound module is configured as operating mode EL500. Set to ON to configure the sound module as operating mode EL501 (general entrance door panel).
-
Page 60: Description Of The Sw1 - Sw2 Dip Switch
AUDIO AND VIDEO DOOR ENTRY SYSTEM - CODED DOOR PANEL DESCRIPTION OF THE SOUND MODULE Description of the SW2 DIP switch: The SW2 DIP switch is located on the left-hand side of the back of the module. This enables the auto switch-on (audio and/or video communication without having been called) of the door panel if it has this switch set to the ON position. -
Page 61: Description Of The Cn3 Function Connector
AUDIO AND VIDEO DOOR ENTRY SYSTEM - CODED DOOR PANEL DESCRIPTION OF THE SOUND MODULE Description of the CN3 function connector: The CN3 function connector is located on the top left-hand side of the back of the sound module. Connect the cable supplied with the module to perform the following functions: “AP”... -
Page 62: Description Of The El632 R5 P/T - El642 R5 Sound Module
AUDIO AND VIDEO DOOR ENTRY SYSTEM - CODED DOOR PANEL DESCRIPTION OF THE SOUND MODULES Description of the EL632/R5 - EL642/R5 sound module: Front. Colour camera. (Only the EL632 R5 module) LEDs (visual indications for people with impaired hearing) LEDs. (Only function with EL632 R5 P/T module). LEDs. -
Page 63: Description Of The Sw1 Dip Switch
AUDIO AND VIDEO DOOR ENTRY SYSTEM - CODED DOOR PANEL DESCRIPTION OF THE SOUND MODULES Description of the SW1 DIP switch: The SW1 DIP switch is located on the top right-hand side of the back of the module. This enables the auto switch-on (audio and/or video communication without having been called) of the door panel if it has this switch set to the ON position. -
Page 64: Description Of The El632 Gtwin
AUDIO AND VIDEO DOOR ENTRY SYSTEM - CODED DOOR PANEL DESCRIPTION OF THE SOUND MODULES Description of the EL632 /GTWIN sound module: Front. Colour camera. visual indications for people with impaired hearing). Speaker. Door panel speaker volume control potentiometer. Telephone speaker volume control potentiometer. Microphone. -
Page 65: Description Of The Sw1 Dip Switch
AUDIO AND VIDEO DOOR ENTRY SYSTEM - CODED DOOR PANEL DESCRIPTION OF THE SOUND MODULES Description of the SW1 DIP switch: The SW1 configuration dip-switch is located on the upper right side of the back of the sound module. Door panel code Set a code from to for master door panel r from to for slave door panel as shown in the table... -
Page 66: Description Of The Sw3 - Sw4 Rotary Switch
AUDIO AND VIDEO DOOR ENTRY SYSTEM - CODED DOOR PANEL DESCRIPTION OF THE SOUND MODULES Continued from previous page Camera lights: The camera lights may be turned off if illumination in the surrounding environment is sufficient at night. SW2 DIP-SWITCH: Door panel type Master Slave... -
Page 67: Description Of The N3301/Al - Nx3301 Coded Module
AUDIO AND VIDEO DOOR ENTRY SYSTEM - CODED DOOR PANEL DESCRIPTION OF THE CODED MODULE Description of the N3301/AL - NX3301 coded module: Front. Green LED. Red LED. Numeric keypad. Key button. Cancel button. Back. Sw1 DIP switch. Jp1 tamper jumper. Nexa BUS connectors. -
Page 68: Description Of The Jp1 Jumper, Sw1 Dip Switch And Self-Testing Leds
AUDIO AND VIDEO DOOR ENTRY SYSTEM - CODED DOOR PANEL DESCRIPTION OF THE CODED MODULE Description of the JP1 jumper: The JP1 jumper, located on the right-hand side of the connection block, activates the tamper alarm. Normal operation, alarm not activated Tamper alarm mode activated. -
Page 69: Description Of The Beeps
AUDIO AND VIDEO DOOR ENTRY SYSTEM - CODED DOOR PANEL DESCRIPTION OF THE CODED MODULE Description of the beeps: The access control module features an internal beeper for reproducing operation beeps. Operation Duration Programming rapid beeps Confirm field rapid beeps Confirm sequence rapid beeps Cancel... - Page 70 AUDIO AND VIDEO DOOR ENTRY SYSTEM - CODED DOOR PANEL INSTALLATION OF THE DOOR PANEL Preparing the cable entry: Break through the hole to allow entry of cables through the bottom part of the embedding box. In the case of door panels with more than one embedding box, break through the side holes and join the embedding boxes using cable grommets.
-
Page 71: Fastening The Frame To The Embedding Box
AUDIO AND VIDEO DOOR ENTRY SYSTEM - CODED DOOR PANEL INSTALLATION OF THE DOOR PANEL Fastening the frame to the embedding box: Insert the spring hinge which attaches to the product in the embedding box, as shown in the drawing. To fasten the frame to the embedding box, insert the spring hinge into the housings provided for this purpose in the frame, as shown in the drawing. -
Page 72: Closing The Door Panel
AUDIO AND VIDEO DOOR ENTRY SYSTEM - CODED DOOR PANEL INSTALLATION OF THE DOOR PANEL Closing the door panel: Fix the door panel to the embedding box using the screws supplied. To complete the fitting of the panel, attach the clip-on covers by positioning one end and then applying slight pressure to the other end until they clip into place. -
Page 73: Description Of Door Panel Operation
AUDIO AND VIDEO DOOR ENTRY SYSTEM - CODED DOOR PANEL DOOR PANEL OPERATION Description of door panel operation: Door panel in standby mode. With the door panel in standby mode, the following operations can be performed: Activation of external push buttons: Allows activation of relay outputs 1 and 2 by means of external push buttons PL1 and PL2 respectively. -
Page 74: Programming The Door Panel (Entry, Exit, Programming Structure And Sequence)
AUDIO AND VIDEO DOOR ENTRY SYSTEM - CODED DOOR PANEL PROGRAMMING THE DOOR PANEL Programming mode entry and exit: To enter programming mode, press the key button three times and then enter secret administrator pin “271800”. * ( ) Key button + key button + key button + administrator pin. * ( ) To exit programming mode, press the C button (cancel) once if it is in a programming field or twice if not. -
Page 75: Programming Fields
AUDIO AND VIDEO DOOR ENTRY SYSTEM - CODED DOOR PANEL PROGRAMMING THE DOOR PANEL Programming fields: The module comes programmed with factory settings except for the activation codes (user), which are left empty for security reasons. For system operation tailored to the needs of the user, check all of the values in all of the fields. The fields do not need to be programmed in numerical order. - Page 76 AUDIO AND VIDEO DOOR ENTRY SYSTEM - CODED DOOR PANEL PROGRAMMING THE DOOR PANEL Programming fields: Continued from previous page Field “1”: Programming a new activation code (user). Allows new user pins (from “0000” to “9999”) to be created and outputs to be assigned for activation with the created codes.
- Page 77 AUDIO AND VIDEO DOOR ENTRY SYSTEM - CODED DOOR PANEL PROGRAMMING THE DOOR PANEL Programming fields: Continued from previous page Field “2”: Changing special codes. Allows the current code of the special codes to be changed (see p. ). The new special code must have the same number of digits as the current code.
- Page 78 AUDIO AND VIDEO DOOR ENTRY SYSTEM - CODED DOOR PANEL PROGRAMMING THE DOOR PANEL Programming fields: Continued from previous page Field “3”: Deleting user pins Allows the deletion of existing user pins. Note: Possible memory positions: “001” to “999”. Steps: Field + memory position +key button +key button. Press “3”...
- Page 79 AUDIO AND VIDEO DOOR ENTRY SYSTEM - CODED DOOR PANEL PROGRAMMING THE DOOR PANEL Programming fields: Continued from previous page Field “4”: Setting the outputs. Enables the setting of the relay 1 + relay 2 outputs + panic output (terminal “P” on the terminal block). The setting of the relay 1, relay 2 and panic outputs is common to all valid user pins.
- Page 80 AUDIO AND VIDEO DOOR ENTRY SYSTEM - CODED DOOR PANEL PROGRAMMING THE DOOR PANEL Programming fields: Continued from previous page Field “5”: Configuring the external push buttons. Allows external push buttons PL1 and PL2 to be configured with the following modes: -Allows the button to: Always be enabled or, through button codes CP1 or CP2, enable/disable the functioning of the button.
- Page 81 AUDIO AND VIDEO DOOR ENTRY SYSTEM - CODED DOOR PANEL PROGRAMMING THE DOOR PANEL Programming fields: Continued from previous page Field “6”: Configuring locking mode. Allows the access control module's locking mode to be configured. Steps: Field + locking mode + time between attempts + lock time + panic output + key button. Step Press “6”...
- Page 82 AUDIO AND VIDEO DOOR ENTRY SYSTEM - CODED DOOR PANEL PROGRAMMING THE DOOR PANEL Programming fields: Continued from previous page Field “7”: Configure the identification ID of the access control module. Allows an identification code (ID) to be configured for the access control module. Note: Possible identification codes (ID): “000”...
- Page 83 AUDIO AND VIDEO DOOR ENTRY SYSTEM - CODED DOOR PANEL PROGRAMMING THE DOOR PANEL Programming fields: Continued from previous page Field “9”: Configuring the keypad beep. Allows a beep to be heard when pressing the access control module's keypad buttons. Steps: Field + keypad beep + key button.
-
Page 84: Factory Setting
AUDIO AND VIDEO DOOR ENTRY SYSTEM - CODED DOOR PANEL PROGRAMMING THE DOOR PANEL Factory setting: Special codes: Bear in mind the number of digits in the code (see p. Administrator pin: 271800. 2718 if the number of digits configured = 4. CP1 push button code: 111100. - Page 85 AUDIO AND VIDEO DOOR ENTRY SYSTEM - CODED DOOR PANEL PROGRAMMING THE MONITORS Programming the Tekna Plus monitors: From sound module: Locate the SW2 DIP switch situated on the top left-hand side of the back of the EL632 PLUS module and set number 2 to ON.
-
Page 86: Programming Tekna Plus Se Monitor
AUDIO AND VIDEO DOOR ENTRY SYSTEM - CODED DOOR PANEL PROGRAMMING THE MONITORS - GENERAL ENTRANCE DOOR PANEL ONLY Programming Tekna Plus monitors from a general entrance door panel (SW1-1 ON): Locate the SW2 DIP switch on the general entrance door panel situated on the top left-hand side of the back of the sound module. -
Page 87: Programming Tekna R5
AUDIO AND VIDEO DOOR ENTRY SYSTEM - CODED DOOR PANEL PROGRAMMING THE MONITORS Programming Tekna R5 Col SU-R5 monitors: From sound module: Locate the DIP switch situated at the back of the EL632 R5 sound module and set number 2 to ON, as described on p. -
Page 88: Programming (Tekna Gtwin/ Tekna-Hf Gtwin And Tekna -S Gtwin) Monitors And T-5924 Gtwin Telephones
AUDIO AND VIDEO DOOR ENTRY SYSTEM - CODED DOOR PANEL PROGRAMMING THE MONITORS / TELEPHONES Programming the monitors (Tekna Gtwin / Tekna-HF Gtwin & Tekna-S Gtwin ) & telephones T-5924): The user codes of the Gtwin monitors and telephones are made through the SW1 dip-switch, located on the back of the monitor and inside the telephone. - Page 89 AUDIO AND VIDEO DOOR ENTRY SYSTEM - CODED DOOR PANEL PROGRAMMING THE MONITORS / TELEPHONES Continued from previous page This user code also has the code address 126. Make a call to check that the monitor/ telephone has been succesfully programmed. Un monitor/ teléfono configurado con el código de usuario 10: Enter the user code of the monitor / telephone to call, followed by the key button.
-
Page 90: Programming T-540 Plus Se Telephones
AUDIO AND VIDEO DOOR ENTRY SYSTEM - CODED DOOR PANEL PROGRAMMING THE TELEPHONES Programming T-540 Plus telephones: From sound module: Locate the SW2 DIP switch situated on the top left-hand side of the back of the EL632 PLUS P/T module and set number 2 to ON. The door panel will reproduce a sound to advise that the system has entered into programming mode. - Page 91 AUDIO AND VIDEO DOOR ENTRY SYSTEM - CODED DOOR PANEL PROGRAMMING THE TELEPHONES - GENERAL ENTRANCE DOOR PANEL ONLY Programming T-540 Plus telephones from a general entrance door panel (SW1-1 ON): Locate the SW2 DIP switch on the general entrance door panel situated on the top left-hand side of the back of the sound module.
-
Page 92: Programming T-530 R5
AUDIO AND VIDEO DOOR ENTRY SYSTEM - CODED DOOR PANEL PROGRAMMING THE TELEPHONES Programming T-530 R5 SU-R5 telephones: From sound module: Locate the DIP switch situated at the back of the sound module and set number 2 to ON, as described on p. -
Page 93: Wiring Diagrams
AUDIO AND VIDEO DOOR ENTRY SYSTEM - CODED DOOR PANEL WIRING DIAGRAMS Combined with Nexa Modular / Nexa Stainless Steel panels: The connection of the access control module with EL632 and EL642 sound modules should be made by means of the Nexa Bus link hose supplied with the modules. - Page 94 AUDIO AND VIDEO DOOR ENTRY SYSTEM - CODED DOOR PANEL WIRING DIAGRAMS TF-104 TF-104 N3301 Door panels with EL632 GTWIN FA-Gtwin power supply unit transformer transformer access control module PL1 PL2 LINE LINE2 Main Main Main Vc.a Vc.a...
- Page 97 Connect the FA-Gtwin with filter Equipament/connection risers 2, 3 and 4 as the riser 1. AL-Gtwin and the surge protector PL-Gtwin, see "TGtwin System Manual" page 44. Connect (Golmar) a.c secondary door lock, see "TGtwin System Manual" page 45. LINE LINE...
-
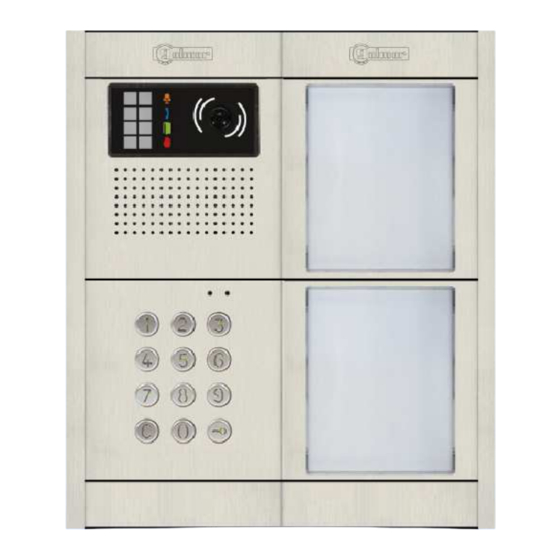
Page 99: Contents
AUDIO AND VIDEO DOOR ENTRY SYSTEM - CODED PANEL WITH DISPLAY CONTENTS Coded panel with display............................98 Contents .................................99 Characteristics................................99 Description of the Nexa modular door panel ....................100-101 Description of the sound modules ........................102 Description of the EL632 PLUS P/T - EL642/PLUS sound module..............102 Description of the SW1 - SW2 DIP switch......................103 Description of the CN8 Nexa Bus link connector .....................103 Description of the CN3 function connector .......................104... -
Page 100: Coded Panel With Display
AUDIO AND VIDEO DOOR ENTRY SYSTEM - CODED PANEL WITH DISPLAY DESCRIPTION OF THE DOOR PANEL Description of the Nexa modular door panel: Door panel component assembly drawing. Electronic modules Embedding boxes Frame modules Aluminium panel Description of the door panel. Fixing screws for clip-on covers (x4) Fixing screws for embedding box (x2) Clip-on covers: 60xx... - Page 101 AUDIO AND VIDEO DOOR ENTRY SYSTEM - CODED PANEL WITH DISPLAY DESCRIPTION OF THE DOOR PANEL Description of the Nexa modular door panel: Door panel component assembly drawing. Electronic modules Embedding boxes Frame modules Aluminium panel Description of the door panel. Fixing screws for clip-on covers (x8) Fixing screws for embedding box...
-
Page 102: Description Of The Sound Modules
AUDIO AND VIDEO DOOR ENTRY SYSTEM - CODED PANEL WITH DISPLAY DESCRIPTION OF THE SOUND MODULE Description of the EL632 PLUS - EL642/PLUS sound module: Front. Television camera. (Only the EL632/PLUS module) LEDs (visual indications for people with impaired hearing) EDs (Only function with EL632 Plus P/T module). -
Page 103: Description Of The Sw1 - Sw2 Dip Switch
AUDIO AND VIDEO DOOR ENTRY SYSTEM - CODED PANEL WITH DISPLAY DESCRIPTION OF THE SOUND MODULE Description of the SW1 DIP switch: The SW1 DIP switch is located on the left-hand side of the back of the module. Select the type of cabling for the video signal. Leave in the OFF position for coaxial cables RG-59 or RG-11. -
Page 104: Description Of The Cn3 Function Connector
AUDIO AND VIDEO DOOR ENTRY SYSTEM - CODED PANEL WITH DISPLAY DESCRIPTION OF THE SOUND MODULE Description of the CN3 function connector: The CN3 function connector is located on the top left-hand side of the back of the sound module. Connect the cable supplied with the module to perform the following functions: “AP”... -
Page 105: Description Of The El632 R5 P/T - El642/R5 Sound Module
AUDIO AND VIDEO DOOR ENTRY SYSTEM - CODED PANEL WITH DISPLAY DESCRIPTION OF THE SOUND MODULES Description of the EL632 R5 - EL642/R5 sound module: Front. Colour camera (Only the EL632 R5 module) LEDs (visual indications for people with impaired hearing) EDs (Only function with EL632 R5 P/T module). -
Page 106: Description Of The Sw1 Dip Switch
AUDIO AND VIDEO DOOR ENTRY SYSTEM - CODED PANEL WITH DISPLAY DESCRIPTION OF THE SOUND MODULES Description of the SW1 DIP switch: The SW1 DIP switch is located on the top right-hand side of the back of the module. To set the DIP switches, use the tool supplied with the sound module. -
Page 107: Description Of The El632 Gtwin Sound Module
AUDIO AND VIDEO DOOR ENTRY SYSTEM - CODED PANEL WITH DISPLAY DESCRIPTION OF THE SOUND MODULES Description of the EL632 /GTWIN sound module: Front. Colour camera. visual indications for people with impaired hearing). Speaker. Door panel speaker volume control potentiometer. Telephone speaker volume control potentiometer. -
Page 108: Description Of The Sw1 Dip Switch
AUDIO AND VIDEO DOOR ENTRY SYSTEM - CODED PANEL WITH DISPLAY DESCRIPTION OF THE SOUND MODULES Description of the SW1 DIP switch (no function) The SW1 configuration dip-switch is located on the upper right side of the back of the sound module. -
Page 109: Description Of The N3301/Al - Nx3301 Coded Module
AUDIO AND VIDEO DOOR ENTRY SYSTEM - CODED PANEL WITH DISPLAY DESCRIPTION OF THE CODED MODULE Description of the N3301/AL - NX3301 coded module: Front. Green LED. Red LED. Numeric keypad. Key button. Cancel button. Back. Sw1 DIP switch. (No function) Jp1 tamper jumper. -
Page 110: Description Of The Jp1 Jumper, Sw1 Dip Switch, Self-Diagnostic Leds And Beeps
AUDIO AND VIDEO DOOR ENTRY SYSTEM - CODED PANEL WITH DISPLAY DESCRIPTION OF THE CODED MODULE Description of the JP1 jumper: The JP1 jumper, located on the right-hand side of the connection block, activates the tamper alarm. Normal operation, alarm not activated Tamper alarm mode activated. -
Page 111: Description Of The N3403/Al - Nx3403 Display Modules
AUDIO AND VIDEO DOOR ENTRY SYSTEM - CODED PANEL WITH DISPLAY DESCRIPTION OF THE DISPLAY MODULE Description of the N3403/AL - NX3403 display module: Front. OLED screen. Bell button. Selection buttons Back. USB connector. Sw1 DIP switch. USB connection LED indicator. Nexa BUS connectors Description of the display module's SW1 DIP switch: The SW1 DIP switch is located at the bottom on the back of the module. -
Page 112: Description Of The Nexa Bus Link Connector
To do so, it is necessary to download the MEMEDIT 5 program from the documentation page https://doc.golmar.es. This program can be used to programme the door panel and back up installations to enable the restoring of devices whose memories, due to error or fault, have been damaged. -
Page 113: Preparing The Cable Entry, Fitting The Embedding Box And Mounting The Electronic Modules
AUDIO AND VIDEO DOOR ENTRY SYSTEM - CODED PANEL WITH DISPLAY INSTALLATION OF THE DOOR PANEL Preparing the cable entry: Break through the hole to allow entry of cables through the bottom part of the embedding box. In the case of door panels with more than one embedding box, break through the side holes and join the embedding boxes using cable grommets. -
Page 114: Fastening The Frame To The Embedding Box
AUDIO AND VIDEO DOOR ENTRY SYSTEM - CODED PANEL WITH DISPLAY INSTALLATION OF THE DOOR PANEL Fastening the frame to the embedding box: Insert the spring hinge which attaches to the product in the embedding box, as shown in the drawing. To fasten the frame to the embedding box, insert the spring hinge into the housings provided for this purpose in the frame, as shown in the drawing. -
Page 115: Closing The Door Panel
AUDIO AND VIDEO DOOR ENTRY SYSTEM - CODED PANEL WITH DISPLAY INSTALLATION OF THE DOOR PANEL Closing the door panel: Fix the door panel to the embedding box using the screws supplied. To complete the fitting of the panel, attach the clip-on covers by positioning one end and then applying slight pressure to the other end until they clip into place. -
Page 116: Description Of The Door Panel Operation
AUDIO AND VIDEO DOOR ENTRY SYSTEM - CODED PANEL WITH DISPLAY DOOR PANEL OPERATION Description of door panel operation: Door panel in standby mode. With the door panel in standby mode, the following operations can be performed: Activation of external push buttons: Allows activation of relay outputs 1, 2 and 3 by means of external push buttons PL1, PL2 and AP respectively. -
Page 117: Programming The Door Panel
AUDIO AND VIDEO DOOR ENTRY SYSTEM - CODED PANEL WITH DISPLAY PROGRAMMING THE DOOR PANEL Viewer module programming entry and exit: * ( ) To enter programming mode, press the key button three times and then enter secret administrator pin “271800”. Key button + key button + key button + administrator pin. -
Page 118: System Settings Menu
AUDIO AND VIDEO DOOR ENTRY SYSTEM - CODED PANEL WITH DISPLAY PROGRAMMING THE DOOR PANEL System settings menu To access the configuration menu, follow the steps described on p. 1 SYSTEM CONFIG press when the SYSTEM CONFIG message lights up. ACCESS CONTROL RESIDENT LIST LANGUAGE... - Page 119 AUDIO AND VIDEO DOOR ENTRY SYSTEM - CODED PANEL WITH DISPLAY PROGRAMMING THE DOOR PANEL Continued from previous page System settings menu monitor/telephone code To change the value, press , enter the and then press the button to save the changes. ENTER VALUE Press the button to restore the previous value.
- Page 120 AUDIO AND VIDEO DOOR ENTRY SYSTEM - CODED PANEL WITH DISPLAY PROGRAMMING THE DOOR PANEL Continued from previous page System settings menu SET TIME The screen message is displayed on the keypad screen when the device is CLOCK BATTERY in standby mode. DISPLAY CLOCK This message can be useful for displaying the name or address of the DISPLAY MESSAGE...
- Page 121 AUDIO AND VIDEO DOOR ENTRY SYSTEM - CODED PANEL WITH DISPLAY PROGRAMMING THE DOOR PANEL Continued from previous page System settings menu DISPLAY CLOCK DISPLAY CLOCK DISPLAY MESSAGE DISPLAY MESSAGE ADMIN PIN ADMIN PIN USER PIN 5432 DISPLAY MESSAGE Determines whether users from the RESIDENT LIST (see p. 1 ) can ADMIN PIN change their ACCESS CODES (see p.
- Page 122 AUDIO AND VIDEO DOOR ENTRY SYSTEM - CODED PANEL WITH DISPLAY PROGRAMMING THE DOOR PANEL Continued from previous page System settings menu ACCESS CONTROL Determines whether the door panel emits tones when the buttons are ACCESS ID pressed. CODE LENGTH To change, press KEYPAD BEEP ACCESS ID...
- Page 123 AUDIO AND VIDEO DOOR ENTRY SYSTEM - CODED PANEL WITH DISPLAY PROGRAMMING THE DOOR PANEL Continued from previous page System settings menu To indicate the starting code or the initial contact number, press and the message ENTER VALUE will appear; enter the monitor code to be ENTER VALUE assigned or the contact number, then press to save the code.
-
Page 124: Automatic Programming Mode For Monitors And Telephones (Plus Y Vista Plus)
AUDIO AND VIDEO DOOR ENTRY SYSTEM - CODED PANEL WITH DISPLAY PROGRAMMING THE DOOR PANEL Continued from previous page System settings menu AUTO PROGRAMMING PROGRAM USING Indicates the door panel's software version. START POSITION SOFTWARE VERSION PROGRAM USING Shows the QR code of the door panel's instruction manual. START POSITION To display, press SOFTWARE VERSION... -
Page 125: Access Control Menu
AUDIO AND VIDEO DOOR ENTRY SYSTEM - CODED PANEL WITH DISPLAY PROGRAMMING THE DOOR PANEL Access control menu SYSTEM CONFIG To access the access control menu, follow the steps described on p. 117 ACCESS CONTROL and press when the ACCESS CONTROL message lights up. RESIDENT LIST R1 OUTPUT MODE Determines whether the behaviour of relay 1 (located on the N3301/AL module) - Page 126 AUDIO AND VIDEO DOOR ENTRY SYSTEM - CODED PANEL WITH DISPLAY PROGRAMMING THE DOOR PANEL Continued from previous page Access control menu R1 OUTPUT TIME Determines the time in seconds that relay 3 (located on the EL632 / EL642 R2 OUTPUT MODE module) will be active.
- Page 127 AUDIO AND VIDEO DOOR ENTRY SYSTEM - CODED PANEL WITH DISPLAY PROGRAMMING THE DOOR PANEL Continued from previous page Access control menu R3 OUTPUT TIME R3 OUTPUT TIME P OUTPUT MODE P OUTPUT MODE P OUTPUT TIME P OUTPUT TIME P CODE 6789 P OUTPUT MODE...
- Page 128 AUDIO AND VIDEO DOOR ENTRY SYSTEM - CODED PANEL WITH DISPLAY PROGRAMMING THE DOOR PANEL Continued from previous page Access control menu C 1 TIME Determines the time in seconds that the output associated with the P2 C 2 CODE button (relay R2) will remain activated.
- Page 129 AUDIO AND VIDEO DOOR ENTRY SYSTEM - CODED PANEL WITH DISPLAY PROGRAMMING THE DOOR PANEL Continued from previous page Access control menu C 2 TIME C 2 TIME UNLOCKING CODE UNLOCKING CODE LOCKING MODE LOCKING MODE LOCKING TIME UNLOCKING CODE Determines the activation of panic output P (located on the N3301/AL module) LOCKING MODE while the door panel is locked (the output is activated for 3 seconds every...
-
Page 130: Residents List Menu
AUDIO AND VIDEO DOOR ENTRY SYSTEM - CODED PANEL WITH DISPLAY PROGRAMMING THE DOOR PANEL Resident list menu: To access the contacts resident list, follow the steps described on p. 1 SYSTEM CONFIG press when the CONTACTS RESIDENT LIST message lights up. ACCESS CONTROL RESIDENT LIST Enables a NEW contact to be added to the end of the residents list, which... - Page 131 AUDIO AND VIDEO DOOR ENTRY SYSTEM - CODED PANEL WITH DISPLAY PROGRAMMING THE DOOR PANEL Continued from previous page Resident list menu: RESIDENT NAME RESIDENT NAME BUS CODE BUS CODE CALL CODE 029105 VISIBLE VISIBLE RESIDENT NAME Enables the contact to be made visible in the CONTACTS RESIDENT LIST. BUS CODE The factory default setting is YES.
- Page 132 AUDIO AND VIDEO DOOR ENTRY SYSTEM - CODED PANEL WITH DISPLAY PROGRAMMING THE DOOR PANEL Continued from previous page Resident list menu: Enables a NEW contact to be inserted into a particular position in the INSERT resident list, which has a capacity for 1,990 contacts. To add a contact to MODIFY the end of the list, use CONTACTS RESIDENT LIST: NEW.
- Page 133 AUDIO AND VIDEO DOOR ENTRY SYSTEM - CODED PANEL WITH DISPLAY PROGRAMMING THE DOOR PANEL Continued from previous page R sident list menu: INSERT Enables all entries in the RESIDENT LIST to be deleted. Press to start the MODIFY process. When the message CONFIRM DELETION appears, press DELETE confirm or to cancel the process.
-
Page 134: Editing With The Keypad
AUDIO AND VIDEO DOOR ENTRY SYSTEM - CODED PANEL WITH DISPLAY PROGRAMMING THE DOOR PANEL Editing with the keypad: To enter or edit text during programming, use the keys as shown. The maximum number of characters in a line of text is 16. Characters are entered using the numeric keypad: press the key as many times as necessary to reach the required character according to the table. -
Page 135: Programming The Tekna Plus Se Monitors
AUDIO AND VIDEO DOOR ENTRY SYSTEM - CODED PANEL WITH DISPLAY PROGRAMMING THE MONITORS Programming Tekna Plus monitors: If it is a general entrance door panel in a residential complex, only programme the monitors from their inner door panels, as indicated in the instruction manuals supplied. -
Page 136: Programming The Tekna R5 Col Su-R5 Monitors
AUDIO AND VIDEO DOOR ENTRY SYSTEM - CODED PANEL WITH DISPLAY PROGRAMMING THE MONITORS Programming Tekna R5 Col SU-R5 monitors: To enter configuration mode, press the key button CONFIGURATION three times and then enter the secret administrator pin (factory code 2718) as described on p. 1 **** Bear in mind the number of digits in the configured code (factory setting 2718 = 4). -
Page 137: Programming The Gtwin Monitors And Telephones
AUDIO AND VIDEO DOOR ENTRY SYSTEM - CODED PANEL WITH DISPLAY PROGRAMMING THE MONITORS / TELEPHONES Programming the monitors (Tekna Gtwin / Tekna-HF Gtwin & Tekna-S Gtwin ) & T-5924 telephones): The user codes of the Gtwin monitors and telephones are made through the SW1 dip-switch, located on the back of the monitor and inside the telephone. - Page 138 AUDIO AND VIDEO DOOR ENTRY SYSTEM - CODED PANEL WITH DISPLAY PROGRAMMING THE MONITORS / TELEPHONES Continued from previous page This user code also has the code address 126. Make a call to check that the monitor/ telephone has been succesfully programmed. Un monitor/ teléfono configurado con el código de usuario 10: Enter the user code of the monitor / telephone to call, followed by the...
-
Page 139: Programming The T-540/Plus Se Telephones
AUDIO AND VIDEO DOOR ENTRY SYSTEM - CODED PANEL WITH DISPLAY PROGRAMMING THE TELEPHONES Programming T-540 Plus telephones: If it is a general entrance door panel in a residential complex, only programme the monitors from their inner door panels, as indicated in the instruction manuals supplied. - Page 140 AUDIO AND VIDEO DOOR ENTRY SYSTEM - CODED PANEL WITH DISPLAY PROGRAMMING THE TELEPHONES Programming T-530 R5 SU-R5 telephones: To enter configuration mode, press the key button three times and then enter the secret administrator CONFIGURATION pin (factory code 2718) as described on p. 1 **** Bear in mind the number of digits in the configured code (factory setting 2718 = 4).
-
Page 141: Wiring Diagrams
AUDIO AND VIDEO DOOR ENTRY SYSTEM - CODED PANEL WITH DISPLAY WIRING DIAGRAMS Combined with Nexa Modular / Nexa Stainless Steel panels: The connection of the access control module with EL632 and EL642 sound modules should be made by means of the Nexa Bus link hose supplied with the modules. - Page 142 AUDIO AND VIDEO DOOR ENTRY SYSTEM - CODED PANEL WITH DISPLAY WIRING DIAGRAMS Continued from previous page TF-104 TF-104 N3301 FA-Gtwin Door panels with EL632 GTWIN sound module transformer transformer access control module power supply unit PL1 PL2 LINE2 LINE Main Main Main...
- Page 145 Connect the FA-Gtwin with filter Equipament/connection risers 2, 3 and 4 as the riser 1. AL-Gtwin and the surge protector PL-Gtwin, see "TGtwin System Manual" page 44. Connect (Golmar) a.c secondary door lock, see "TGtwin System Manual" page 45. LINE LINE...
- Page 146 C/ Silici, 13 08940- Cornellá de Llobregat SPAIN Golmar se reserva el derecho a cualquier modificación sin previo aviso. Golmar se réserve le droit de toute modification sans préavis. Golmar reserves the right to make any modifications without prior notice.
Need help?
Do you have a question about the NEXA Series and is the answer not in the manual?
Questions and answers