Advertisement
Quick Links
Advertisement

Related Manuals for H-KING FOKKER-D7


Summary of Contents for H-KING FOKKER-D7
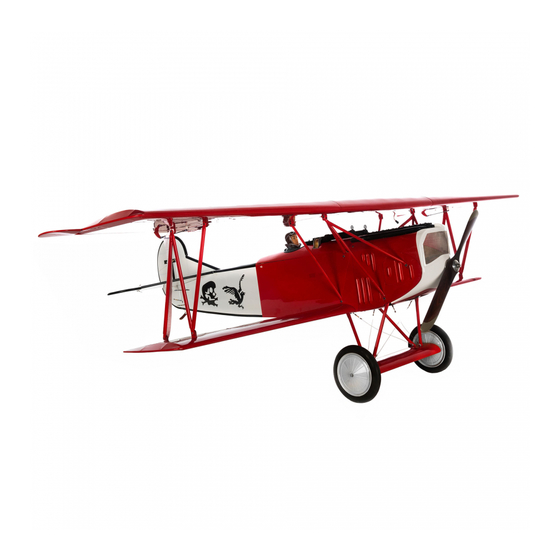
- Page 1 H•KING WORLD WAR 1 GERMAN FIGHTER PLANE INSTRUCTION MANUAl Made in China...
-
Page 2: Safety Instructions
SAFETY INSTRUCTIONS 1. Please read this manual carefully and follow the instructions before you use this product. 2. This airplane is not a toy, due to it's advanced flying qualities it is only suitable for experienced pilots. If you are a novice then please only operate with the assistance of an experienced pilot. 3. -
Page 3: Undercarriage Assembly
Features: Speci cations: Wing span: 925mm Lightweight balsa and plywood construction Fuselage length: 720mm High quality covering lm All up weight: (820-840 grams) Authentic undercarriage with scale WW1 wheels Servos: 9 grams x 4 pcs Large battery hatch for easy access Motor: A2212 KV1000 High quality hardware included ESC: Hobbyking 20 A with BEC... - Page 4 Self-tapping screws with washer x 2pcs, self-tapping screws x 16pcs, machine screws x 4pcs and nylon wing bolts x 2pcs. Undercarriage assembly.
- Page 5 the landing strut with two holes each side onto fairing and slide the axle through as shown. Use a 1.7mm self-tapping screw each side to secure the strut to the fairing.
- Page 6 Spring the 2nd wheel strut over the axle as shown.
- Page 7 Thread the supplied plain nuts onto the axle to secure the landing struts. Apply some Loctite glue to the threads to prevent them from loosening. Install the wheels on either side of the axle. do not overtighten to...
- Page 8 Rudder fin assembly. Installing the elevator onto the horizontal stabilizer.
- Page 9 A er the glue has set apply some CA glue between the fuselage and the stabilizer as shown. Set it aside to the glue dry. Install the fin onto the stab as shown, remove any covering where the glue is going to be applied. Trial t the n into the slots in the fuselage, ensure it will sit perpendicular to the stabilizer.
- Page 10 your ngers to the assembly. hinges into the slots in the rear of the n and the rudder post. Ensure the hinge gap is minimal but su cient to allow the rudder to move freely.
- Page 11 is is how the assembly looks at this point.
- Page 12 Inter-plane strut assembly. nother...
- Page 13 At this point you will also need to attach the inter-plane struts to the lower wing using the screws provided.
- Page 14 Note:...
- Page 15 WORLD WAR 1 GERMAN FIGHTER PLANE H•KING...
Need help?
Do you have a question about the FOKKER-D7 and is the answer not in the manual?
Questions and answers