Mio MiVue M760D User Manual
Hide thumbs
Also See for MiVue M760D:
- Manual (31 pages) ,
- Quick start manual (4 pages) ,
- Quick start manual (4 pages)
Table of Contents
Advertisement
Advertisement
Table of Contents

Related Manuals for Mio MiVue M760D


Summary of Contents for Mio MiVue M760D
- Page 1 User Manual MiVue M760D ™...
-
Page 2: Table Of Contents
Table of contents Precautions and notices ..............3 Getting to know your Mio ..............4 Main unit ..................4 GPS multi-function control box ...........5 Using a memory card ................5 Formatting a card ...............6 Installing the cameras ...............7 Cable connections ................8 Connecting the main unit, control box and cameras ....8 Connecting the main unit and waterproof power cable ....10... - Page 3 For more information ..............19 Caring for your device ..............19 About GPS ................20 Regulatory information .............20 Safety precautions ..............21 About the charger ..............21...
-
Page 4: Precautions And Notices
Precautions and notices • Never attempt to disassemble, repair or make any modifications to your device. Disassembly, modification or any attempt at repair could cause damage to the device and will void any warranty. • If you see or smell smoke from the device, stopping charging immediately. •... -
Page 5: Getting To Know Your Mio
The installation illustrations are for your reference only. The placement of the components may vary depending on the vehicle model. If you encounter any problems during installation, please contact a skilled installer (for example, the service personnel of the vehicle) for assistance. Getting to know your Mio ✎ Depending on the specific model purchased, the colour and look of your device and accessories may not exactly match the graphics shown in this document. -
Page 6: Gps Multi-Function Control Box
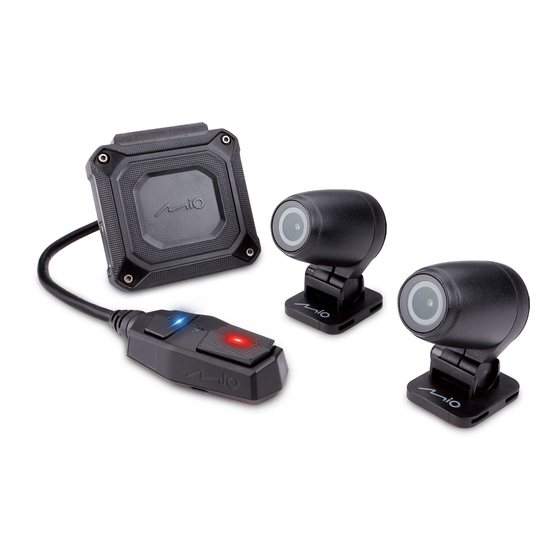
GPS multi-function control box ❶ ❹ ❷ ❸ GPS receiver ❶ Button 1, indicator ❷ Microphone ❸ Button 2, blue indicator ❹ Using a memory card You have to insert a memory card before you can start recording. Your device supports Class 10 memory cards with up to 128 GB capacity. -
Page 7: Formatting A Card
Formatting a card Before you start recording, please format the MicroSD card to avoid malfunction caused by files not created by your Mio. To format a memory card (all data will be erased), press and hold Button 1 on the GPS multi-function control box for about 10 seconds. -
Page 8: Installing The Cameras
Installing the cameras Clean the installation surface with rubbing alcohol and make sure that the installation area is free of dust, oil and grease. Secure the camera with the double-sided tape or cable tie. To adjust the angle of the camera lens: ❷... -
Page 9: Cable Connections
❹ Caution: When tightening the screw, do not use excessive force (no more than 2 kgf of torque) to avoid damage to the product. Cable connections Caution: Make sure that water will NOT flow down to your Mio's main unit along the cables. You are advised to tape the cables together, cover and secure them inside the motorbike to avoid damage or abnormal sound. Connecting the main unit, control box and cameras Connect the GPS multi-function control box to the control box connector on the main unit. - Page 10 To install the ferrite core on the camera cable: 1. Open the ferrite core. 2. Place the cable in the groove of the ferrite core. 3. Close the ferrite core. 4. The ferrite cores should be installed in the places as shown in the illustration. ✎ Ferrite cores are not required for all Mio models. The look of the ferrite core may differ from what is shown in this document.
-
Page 11: Connecting The Main Unit And Waterproof Power Cable
Connecting the main unit and waterproof power cable 1. Check and confirm the vehicle's voltage (12 V) by using the electrical tester as battery voltages varies by vehicle. 2. Choose one of the following connections: • Use the electrical tester to locate the fuse from which the power is not supplied when the vehicle is turned off. - Page 12 5. Check the installation: • Your Mio automatically turns on and starts continuous recording once the vehicle is turned on (ACC-ON). • Your Mio automatically turns off when the vehicle is turned off (ACC-OFF). ✎ Your Mio does not support power banks. Caution: • The waterproof power cable is designed specifically for your Mio. Do not use it for other purposes. • Do not use the waterproof power cable outside the limited voltage range. The waterproof power cable is only for DC 12 V motorcycles.
-
Page 13: Securing The Main Unit, Control Box And Cameras
MiVue Pro app The MiVue Pro app allows you to view, share and back up the videos recorded on a MiVue via WIFI. You can also change the settings of your Mio via the MiVue Pro app. -
Page 14: Setting Up A Wifi Connection
• The WIFI connection between your Mio and smartphone is not Internet-enabled. Setting up a WIFI connection The WIFI function of your Mio is enabled by default. On your smartphone, follow the steps to set up the WIFI connection. 1. Make sure that you have enabled the WIFI function on the smartphone. -
Page 15: Event Recording
✎ The recording may be divided into several video clips (approximately every minute for each video clip); recording will not stop between video clips. To stop recording, press Button 2 on the GPS multi-function control box. Your Mio will enter the standby mode, and the blue indicator on the GPS multi-function control box will flash briefly. To start recording, press Button 2 on the GPS multi-function control box. -
Page 16: Customising The Settings
Speed Stamp Displays the driving speed on the recorded video. Date / Time Sets the system date and time. By default, your Mio will acquire correct date and time settings after getting a GPS fix. Distance Unit Sets the preferred distance unit. -
Page 17: Mivue Manager
MiVue Manager™ MiVue Manager is a tool for you to view the videos recorded on a Mio. ✎ Not all features are available for every model. Installing MiVue Manager Download MiVue Manager from the Support page of Mio website (www.mio.com/ support) and follow the on-screen prompts to install it. Make sure to download the correct software version (Windows or Mac) according to your computer's operating system. - Page 18 ❶ ❷❸ ❹ ❺ ❻ ❼ Skips to the previous / next file on the list. ❶ Starts or pauses the playback. ❷ Changes the playback speed to 1/4x, 1/2x, 1x (default), 1.5x, or 2x. ❸ Mutes or unmutes the volume. ❹...
-
Page 19: Resetting Your Mio
Occasionally, you may need to perform a hardware reset when your Mio stops responding; or appears to be "frozen" or "locked-up." To reset your Mio, press and hold Button 1 and Button 2 on the GPS multi-function control box at the same time for about 5 seconds. -
Page 20: For More Information
For more information Caring for your device Taking good care of your device will ensure trouble-free operation and reduce the risk of damage. • Keep your device away from excessive moisture and extreme temperatures. • Avoid exposing your device to direct sunlight or strong ultraviolet light for extended periods of time. -
Page 21: About Gps
• The GPS positioning data is for reference only. Regulatory information For regulatory identification purposes, MiVue M760D series is assigned a model number of N594. Products with the CE marking comply with the Radio Equipment Directive (RED) (2014/53/EU) - issued by the Commission of the European Community. -
Page 22: Safety Precautions
• EN 62479 • IEC60950-1:2005 • IEC60950-1"2005/AMD1:2009 • IEC60950-1"2005/AMD2:2013 The manufacturer cannot be held responsible for modifications made by the User and the consequences thereof, which may alter the conformity of the product with the CE Marking. Declaration of conformity Hereby, MiTAC declares that this N594 is in compliance with the essential requirements and other relevant provisions of Directive 2014/53/EU. - Page 23 • Connect the charger to a proper power source. The voltage requirements are found on the product case and/or packaging. • Do not use the charger if the cord becomes damaged. • Do not attempt to service the unit. There are no serviceable parts inside. Replace the unit if it is damaged or exposed to excess moisture.
- Page 24 Revision: R00 (7/2019) Trademark All brand and product names are trademarks or registered trademarks of their respective companies. Disclaimer Specifications and documents are subject to change without notice. MiTAC does not warrant this document is error-free. MiTAC assumes no liability for damage incurred directly or indirectly from errors, omissions, or discrepancies between the device and the documents.
- Page 25 www.mio.com...
Need help?
Do you have a question about the MiVue M760D and is the answer not in the manual?
Questions and answers