Table of Contents
Advertisement
Quick Links
Advertisement
Table of Contents

Related Manuals for Bischoff & Bischoff Triton


Summary of Contents for Bischoff & Bischoff Triton
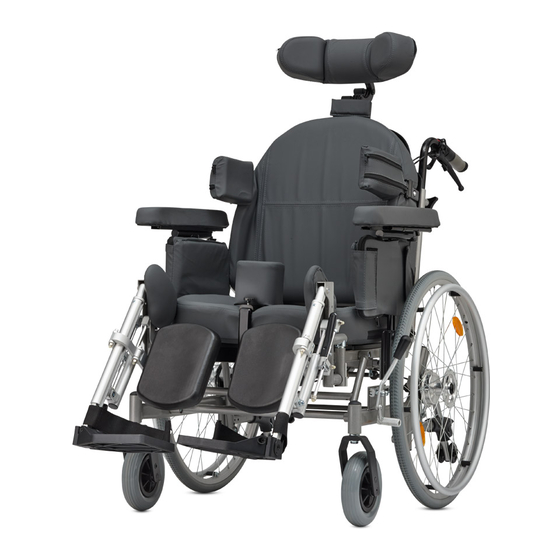
- Page 1 Bischoff & Bischoff Instruction manual Triton Enjoy mobility.
-
Page 2: Table Of Contents
Contents: 1| Preface 1.1. Signs and symbols 2| Important safety instructions 2.1. General safety instructions 2.2. Brakes 2.3. Anti-tilt wheels 2.4. Tyres 2.5. Obstacles 2.6. Ascents and descents 2.7. Safety in vehicles 2.8. Using public footpaths and roads 2.9. Purpose 2.10. - Page 3 Triton 4.9. Seat width 4.10. Seat depth 4.11. Seat back height 4.12. Seat angle 4.13. Seat back angle 4.14 Parking brake 4.15. Handle 4.16. Side shoulder pads 4.17. Drum brake (optional) 4.18. Anti-tilt wheels 4.19. Tilting aid 4.20. Head rest 4.21.
-
Page 4: Preface
Triton to the user's indi- vidual body size. The Triton is designed for use inside and outside. -
Page 5: Signs And Symbols
Triton 1.1. Signs and symbols You have selected a high-quality wheelchair from Bischoff & Bischoff. Thank you for your trust in our products. Caution! Indicates specially safety-relevant instructions. Follow instruction manual. Important! Indicates particularly useful information in the specific context. -
Page 6: Important Safety Instructions
2. Important safety instructions 2.1. General safety instructions Before using the wheelchair check that all attached com- ponents are correctly fastened. Practise using your new wheelchair on a small, flat area first to prevent falls and hazardous situations. We recommend having an assistant with you at this time. The wheelchair must not be used to transport more than one person or loads. -
Page 7: Brakes
Triton 2.2. Brakes Parking brake The brakes that actuate directly on the tyres of the wheels are to be used as parking brakes only, i.e. they must only be actuated when the wheelchair is at a standstill and must never be used to reduce the speed of the wheelchair. -
Page 8: Obstacles
2.5. Obstacles Always use ramps to negotiate obstacles (e.g. kerbs, steps etc.). Do not travel into an obstacle (step) without braking or jump down from steps. 2.6. Ascents and des- cents Please note that if the seat back is adjusted to an extreme tilt, your wheelchair may tip backwards on even a moderate slope. -
Page 9: Purpose
Triton 2.9. Purpose The wheelchair is designed exclusively to improve mobility and to transport handicapped persons for whom its use is indicated based on one of the specified indications. The maximum load capacity is 125 kg. 2.10. Indications Walking disability or serious difficulty in walking as a result of •... -
Page 10: Responsibility
2.13. Declaration of Conformity Bischoff & Bischoff as manufacturer declare in sole responsibility that the Triton wheelchair complies with the requirements of Directive 93/42/EEC. -
Page 11: Overview Of Product And Accessories
3. Overview of product and accessories 3.1. Checking the delivery The Triton wheelchair is supplied fully assembled in a carton. After unpacking the wheelchair, keep the carton if at all possible. It can be used for subsequent storage or return of the wheelchair. -
Page 12: Package
3.2. Package The package contains the following main components: • wheelchair, preassembled • 1 pair of leg rests (adjustable angle) • 1 head rest • 1 pair of side sections with arm rests • 1 pair of shoulder pads • 1 pair of lower leg and nee pads •... -
Page 13: Using The Wheelchair
Triton 4. Using the wheelchair 4.1. Setting up the wheelchair After unpacking the wheelchair it must be made ready for use. Fig. 2 • Lift the seat back to the upright position. • Lock the seat back to the gas cylinder for adjusting the seat back angle. -
Page 14: Transporting The Wheelchair
4.2. Transporting the wheelchair To prepare the wheelchair for transport in a car proceed as follows. • Remove the leg rests. • Release the seat back attachment to the gas cylinder. Fig. 4 • Fold the seat back forward. • Release the parking brakes on the right and left drive wheels. -
Page 15: Entering And Leaving From The Side
• If you wish to move from another wheelchair or room chair, lock it by setting the parking brakes. • Lock the Triton to prevent it from moving accidentally by setting the brake levers on the right and left sides. -
Page 16: Entering And Leaving From The Front
• First fold the foot plates up or remove the leg rests completely. • Move the Triton as close as possible to the present or future seat until they are front to front. • If you wish to move from another wheelchair or room chair, lock it by setting the parking brakes. -
Page 17: Foot Plates
Triton • When going down the bottom assistant brakes the wheelchair by pressing it down onto the steps. The top assistant holds the wheelchair by the handles to secure it and keep it in the correct position. The wheelchair should roll down the steps one by one. -
Page 18: Leg Rests
4.7. Leg rests To make it as easy as possible to enter and leave your wheelchair, the foot plates can be folded up or the leg rests can be swung to the side out of the way or removed. • Open the lock to swing the leg rest to the side. •... -
Page 19: Side Sections And Arm Rests
Triton 4.8. Side sections and arm rests • The height of the side sections with the arm rests is adjustable. • Push the locking button and adjust the desired height. • The side sections can be removed entirely for ease of Fig. -
Page 20: Seat Depth
4.10. Seat depth • The seat depth in both versions can be adjusted over a range of 12 cm. • Remove the seat cushion. • Loosen the Allen screws (6 mm) underneath on the frame. • Set the desired seat depth and then tighten the Fig. -
Page 21: Seat Angle
Triton 4.12. Seat angle • The seat angle of the Triton can be infinitely adjusted from 0° to 15°. • The angle between the seat back and seat remains unchanged. • There is a release lever on the handle for adjusting the Fig. -
Page 22: Parking Brake
4.14. Parking brake The Triton is fitted with a tyre brake that can be operated by the user. This must be used as a parking brake only. It is not suitable for use as a brake for stopping or slowing the wheelchair! This is done with the hand rims by the exercise of light pressure with the flat of the hands. -
Page 23: Handle
Triton 4.15. Handle • The handle of the Triton can be infinitely adjusted in height over a range of 17 cm. • Loosen the plastic screws on the back of the frame. • Set the handle to the desired height and tighten the plastic screws. -
Page 24: Drum Brake (Optional)
4.17. Drum brake (optional) The Triton can optionally be fitted with a drum brake, which can only be operated by an assistant with the brake levers mounted on the handles. The drum brake can be used as a parking brake and as a service brake. -
Page 25: Anti-Tilt Wheels
Triton 4.18. Anti-tilt wheels Always use the anti-tilt mechanism in pairs. • The anti-tilt wheels prevent the wheelchair from tipping Fig. 32 backwards. The wheels of the anti-tilt mechanism must be approx. 3-5 cm from the ground. • The anti-tilt wheels are particularly recommended for novice wheelchair users or those with amputated legs. -
Page 26: Head Rest
4.20. Head rest • The Triton can be fitted with a head rest, which can be adjusted in angle, height and depth. • Pull the lock on the back out. • Position the head rest at the desired height and release the lock. -
Page 27: Therapy Table
Triton 4.21. Therapy table • The Triton can be fitted with a therapy tray. • Loosen the T-screws on the therapy tray. • Set the fastening rails to the maximum width. • Place the therapy tray on the arm rest and push the retainers on the right and left to the arm support. -
Page 28: Lap Belt
4.22. Lap belt (optional) A lap belt is an optional extra for securing users who are cannot otherwise be securely held in the wheelchair • The Triton can be fitted with a safety belt attached to the back frame member. Fig. 39 •... -
Page 29: Technical Data
Triton 5. Technical data Dimensions and weights Max. load capacity (kg): 125 Seat width (cm): 34 to 46 / 39 to 51 (Variant II) Seat depth (cm): 42 - 48 Seat height (cm): Seat angle (°): 0 to 15 (infinitely adjustable) -
Page 30: Cleaning
6. Care instructions for the user 6.1. Cleaning • The frame sections of the wheelchair can be wiped with a damp cloth. Use a mild cleaning agent for stubborn dirt. • The wheels can be cleaned with a damp brush with plastic bristles (do not use a wire brush). -
Page 31: Inspection Of The Wheelchair By The User
Triton 6.2. Inspection of the wheelchair by the user Every time you use the wheelchair check • The tyres for damage. Check the tyre tread depth at least once a month. It should be at least 1 mm. Defective or worn tyres must be replaced by the dealer. -
Page 32: Repair And Maintenance Instructions
7. Repair and maintenance instructions We recommend having the Triton inspected by the dealer at least once a year. If faults or defects in the wheelchair are found, it must be returned to the medical supply dealer or specialist dealer for repair immediately. To find a dealer in your area please contact our customer service depart- ment at tel. -
Page 33: Disposal
Triton 8. Disposal If your Triton is no longer used and you wish to dispose of it, please contact your dealer. If you wish to dispose of it yourself, please contact a local recycling company for the disposal regula- tions of your jurisdiction. -
Page 34: Warranty
If you make a claim under the warranty, please submit the completed warranty certificate. Our manually operated Triton wheelchair is supplied with a warranty of five years for the frame. All other components are guaran- teed for two years. -
Page 35: Warranty Certificate
Triton Warranty certificate (Please note our general business terms and conditions) Model name: Triton Model number: Serial number:* (to be entered by dealer) Dealer Date and stamp * See the side frame for information stickers Bischoff & Bischoff GmbH • 03.01.2012... - Page 36 Bischoff & Bischoff GmbH Becker-Goering-Strasse 13 • D-76307 Karlsbad Tel.: +49 (0)700/6000 7070 • Fax: +49 (0)700/6000 8080 www.bischoff-bischoff.com info@bischoff-bischoff.de...
Need help?
Do you have a question about the Triton and is the answer not in the manual?
Questions and answers