Table of Contents
Advertisement
Quick Links
Advertisement
Table of Contents

Related Manuals for Bischoff & Bischoff Neo


Summary of Contents for Bischoff & Bischoff Neo
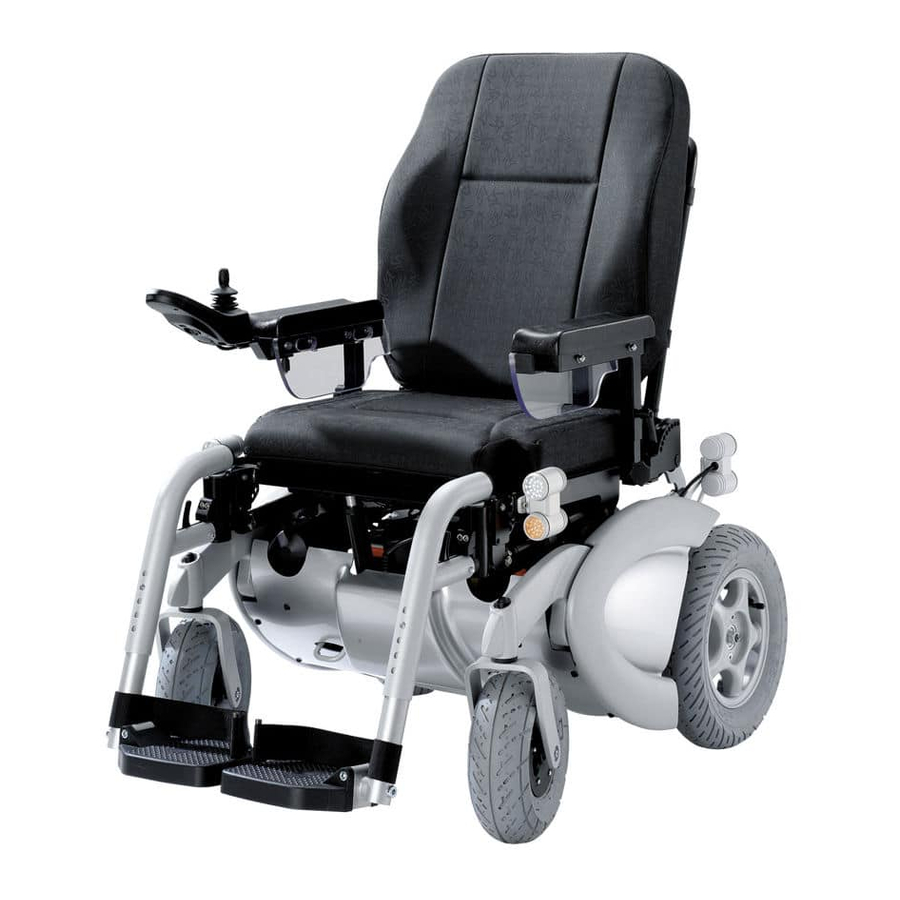
- Page 1 Bischoff & Bischoff Instruction manual Enjoy mobility.
-
Page 2: Table Of Contents
Contents: 1| Preface 1.1 Signs and symbols 2| Important safety instructions 2.1 General safety instructions 2.2 Information on EMC interference 2.3 Brakes 2.4 Safety in vehicles 2.5 Travelling in traffic 2.6 Purpose 2.7 Indications 2.8 Contraindications 2.9 Declaration of Conformity 3| Overview of product and accessories 3.1 Checking the delivery 3.2 Package... - Page 3 4| Using the wheelchair 4.1 Description of controls 4.1.1 VR2 control 4.1.2 R-net control 4.1.3 LCD display and the most important symbols 4.1.4 Electrical adjustments 4.1.5 Diagnostic display 4.2 Entering and leaving 4.3 Moving with the wheelchair 4.4 Leg rests 4.5 Pushing the scooter 5| Technical Data 6| User care instructions...
-
Page 4: Preface
1. Preface You have selected a high-quality electric wheelchair from Bischoff & Bischoff. Thank you for your trust in our products. The electric wheelchair has been designed to give you many advantages and to meet your needs. The wide range of adjust- ments for lower-leg length, knee angle, seat width, seat and seat-back angle and the option of placing the control on the right or left make it easy to adjust the wheelchair to the user's... -
Page 5: Signs And Symbols
1.1 Signs and symbols Caution! Indicates specially safety-relevant instructions. Follow instruction manual. Important! Indicates particularly useful information in the specific context. Bischoff & Bischoff GmbH • 04.05.2011... -
Page 6: Important Safety Instructions
2. Important safety instructions 2.1 General safety instructions Practise using your new wheelchair on a small, flat area first to prevent falls and hazardous situations. We recommend having an assistant with you at this time. Before using the wheelchair check that all attached compo- nents are correctly fastened. -
Page 7: Information On Emc Interference
Wear bright, conspicuous clothing as much as possible. You will be more visible in traffic. Please note that padding that is ex- posed to direct sunlight may become hot and burn your skin if it comes into contact with it. Cover these parts or protect the wheelchair from direct sunlight. -
Page 8: Safety In Vehicles
Do not endanger pedestrians or other traffic by careless driving, particularly on footpaths. 2.6 Purpose The Neo electric wheelchair is designed for use inside and outdoors for persons who are unable to walk. It is sufficiently compact and manoeuvrable for indoor use and can also cover medium distances and minor obstacles outdoors. -
Page 9: Indications
• with reduced and inadequate vision • with serious cognitive restrictions 2.9 Declaration of Conformity B+B as the manufacturer of the product declares in sole responsibility that the Neo electric wheelchair fully complies with the requirements of Directive 93/42/EEC. Bischoff & Bischoff GmbH • 04.05.2011... -
Page 10: Overview Of Product And Accessories
3. Overview of product and accessories 3.1 Checking the delivery All B+B products are inspected before they leave our factory and the CE mark is applied. The wheelchair is supplied in a special carton. After unpacking the wheelchair, keep the carton if at all possible. -
Page 11: Package
3.2 Package Check the contents of the package for completeness immediately on receipt. The package contains: • packaging material • electric wheelchair (ready for use with 2 batteries) • VR2 control (R-net with electrical adjustment of components) • battery charger •... -
Page 12: Leg Rests
3.4 Adjustment Before using the wheelchair for the first time it must be adjusted for your body size. This is the only way to ensure extended use without fatigue in a physiologically correct posture. The basic adjustments of the wheelchair are described below. -
Page 13: Seat
Knee angle • The angle of the leg rests can be adjusted by a perforated plate. • Release the red locking clip on the inside and pull the pin out. • Move the leg rest to the desired position. • Insert the pins and lock them with the locking clip Fig. -
Page 14: Back Rest
Seat angle • Loosen the clamping lever until the seat angle can be adjusted (do not pull out). • Set the required seat angle. • Tighten the clamping lever again. Fig. 7 3.4.3 Back rest The angle the seat back of the electric wheelchair can be adjusted very simply and without requiring force. -
Page 15: Arm Rests
3.4.4 Arm rests The arm rests can be removed completely to allow the user to enter and leave the wheelchair from the side. The height of the arm rests and the distance to the seat back can also be adjusted, and they can also be moved to the side when the seat width is adjusted. -
Page 16: Side Section
3.4.5 Side section The height of the side sections can be adjusted with the arm rests and they can be moved sideways to adjust the seat width. • For side adjustment see the section on adjusting the seat width. • For height adjustment see the section on adjusting the arm rests. -
Page 17: Using The Wheelchair
4. Using the wheelchair Once you have adjusted the wheelchair to your satisfaction, familiarise yourself with the functions of the controls. 4.1 Description of functions of controls If the wheelchair has been ordered without electrical adjust- ment of seat back, seat angle and knee angle, the VR-2 control made by PG Drives Technology is installed. - Page 18 4.1.1 VR-2 control Joystick Control panel Charging and programming jack Fig. 14 Fig. 15...
- Page 19 Battery status display The battery status display shows the charge status. If the display is in the green range, the battery is sufficiently charged. If the display is in the red range, the wheelchair can only be used for a short distance and the battery should be charged as soon as possible (see charging procedure).
- Page 20 Light Use this button to switch on the active lighting system of your wheelchair when darkness falls or when travelling through dark areas such as tunnels. This will make you more visible to other traffic. Fig. 20 Warning indicators Press this button to switch on the warning indicators in emer- gency situations, such as inability to move the wheelchair.
-
Page 21: R-Net Control
4.1.2 R-net control Joystick Charging and programming jack Fig. 23 LCD Display Fig. 24 Bischoff & Bischoff GmbH • 04.05.2011... - Page 22 On/Off button Press this button to switch on the wheelchair. The electrical components are also active at this stage. Fig. 25 Horn Press this button to sound the horn. Fig. 26 Setting the mode Press these buttons to change the mode, i.e. increase (right) or reduce (left) the maximum available speed.
- Page 23 Profile Press this button to select the profiles.The profiles depend on the programming and the installed electrical components. The profiles are set with the authorised service technician. Fig. 29 Warning indicators Press this button to switch on the warning indicators in emer- gency situations, such as inability to move the wheelchair.
-
Page 24: Lcd Display And The Most Important Symbols
4.1.3 LCD display and the most important symbols Current profile Battery status display Current profile Speed Fig. 33 Battery status display The battery status display shows the charge status. • Continuous light means: the charge is adequate. • Slow flashing means: all functions still operate correctly but a battery charge is recommended. - Page 25 Profiles The profile number shows which profile is currently selected for the wheelchair. The text also describes the current profile. Fig. 36 Error This symbol appears if an error in the control that causes the system to shut down has occurred. Have the system checked by an authorised service technician as soon as possible.
-
Page 26: Electrical Adjustments
4.1.4 Electrical adjustments The seating position display must be enabled. Press the Mode button and scroll (joystick left or right) until you have reached the seating position display. There you can select every single electrical adjustment. Back rest The seat back adjustment is now enabled. Move the joystick in the direction of travel or the opposite direction to adjust the angle of the seat back. -
Page 27: Diagnostic Display
4.1.5 Diagnostic Display If the controller detects an error in the system while the wheel- chair is in use, the diagnostic display automatically opens. The display shows the error code, a short description of the error and the module in which the error has occurred. Identified modules Error description Error code... -
Page 28: Entering And Leaving
Entering and leaving from the front: • First fold the foot plates up or remove the leg rests. • Move the Neo as close as possible to the present or future seat front to front. • If you wish to move from another wheelchair or room chair, lock it by setting the parking brakes. -
Page 29: Moving With The Wheelchair
Make sure that you are comfortably and securely seated. Press the On/Off button to switch on the Neo. All electrical driving functions are now available. Driving functions... -
Page 30: Leg Rests
4.4 Leg rests To make it as easy as possible to enter and leave your wheel- chair, the foot plates can be folded up or the leg rests can be swung to the side out of the way or removed. •... -
Page 31: Pushing The Wheelchair
4.5 Pushing the wheelchair If you wish to push the wheelchair in some situations, the brakes must be unlocked. The wheelchair is easy to push in freewheel mode. Caution! The electromechanical brake is disabled in this mode. • Move the unlocking levers down. •... -
Page 32: Technical Data
5. Technical data Dimensions and weights Max. load capacity (kg): Seat width (cm): 45 (effectively 40 to 51) Seat height (cm): Seat depth (cm): 42 to 51 Seat angle (°): 2 to +19 (optional electrical adjustment) Seat back height (cm): Seat back angle (°): -5 to 75 (optional electrical adjustment) Knee angle (°):... -
Page 33: User Care Instructions
6. Care instructions for the user 6.1 Cleaning and disinfection Make sure that the wheelchair is switched off before starting to clean it. • The frame sections and panels of the wheelchair can be wiped with a damp cloth. A mild cleaning agent can be used for stubborn dirt. -
Page 34: Inspection Before Use
6.2 Inspection before use 6.2.1 Brake check Every time you use the wheelchair check the brake system. Move forward slowly and release the joystick. The wheelchair must come to a stop in the normal manner. When it is at a standstill the mechanical brake must lock with an audible click. - Page 35 6.3 Batteries Your wheelchair is fitted with maintenance-free gel batteries that do not require checking of levels and are electronically protected from deep discharge. If you do not use your wheel- chair for an extended period, the batteries should be charged every two months, otherwise they may be destroyed by deep discharge.
-
Page 36: Charging
6.3.1 Charging Charging for the first time: To charge the batteries to their maximum capacity proceed as follows: • Discharge the factory-charged batteries until the LED dis- play shows two bars. • Charge the batteries as described below (approx. 16 h). •... -
Page 37: Maintenance Instructions For Dealers
Use only batteries approved for this wheelchair (see Technical Data). Make sure that the wheelchair is switched off before starting to replace batteries. • First remove the battery cover. • Loosen the screws on the right and left. • Now the belts that hold the battery can be released. •... -
Page 38: Disposal
8. Disposal If the wheelchair is no longer used and you wish to dispose of it, please contact your dealer. If you wish to dispose of it yourself, please contact a local recycling company for the disposal regulations of your jurisdiction. 9. -
Page 39: Warranty-Certificate
Warranty-certificate (Please note our general business terms and conditions) Model: Neo Serial number* (to be entered by dealer) Dealer Date and stamp *See the side frame for information stickers Bischoff & Bischoff GmbH • 04.05.2011... - Page 40 Bischoff & Bischoff GmbH Becker-Goering-Strasse 13 • D-76307 Karlsbad Tel.: +49 (0)700/6000 7070 • Fax: +49 (0)700/6000 8080 www.bischoff-bischoff.com info@bischoff-bischoff.de...
Need help?
Do you have a question about the Neo and is the answer not in the manual?
Questions and answers