Table of Contents

Related Manuals for Woodway PPS Medical Series


Summary of Contents for Woodway PPS Medical Series
- Page 1 PPS Medical Series User Manual: 09/2019, UM-PP-EN-03 PPS 43 Bari-Mill PPS 55 Bari-Mill PPS 70 Bari-Mill PPS 43 Med PPS 55 Med PPS 70 Med PPS 43 Med-i PPS 55 Med-i PPS 70 Med-i PPS 43 Ortho PPS 55 Ortho PPS 70 Ortho User’s Manual...
- Page 2 Manufacturer European Representative WOODWAY GmbH WOODWAY USA, Inc. Steinackerstr. 20 W229 N591 Foster Ct. 79576 Weil am Rhein Waukesha, WI 53186 Germany Tel.: +49 (0) 7621-940 999-0 Tel.: 1 - 262 - 548 - 6235 Fax.: +49 (0) 7621-940 999-40 Fax.:...
-
Page 3: Table Of Contents
Table of Contents Safety ........................... 2 Important Safety Information ..................... 2 Description of Warning Notices ....................5 1.2.1 Sample of a Warning Notice .......................... 5 1.2.2 Classification ..............................5 Safety Notices on Device ......................6 Personnel Qualifications and Responsibilities ................7 1.4.1 Representative .............................. - Page 4 Incline System ............................. 32 5.4.4 Power Console ............................33 Control and Display Elements ....................34 5.5.1 WOODWAY User-System ..........................34 5.5.2 WOODWAY Data Monitor ........................... 34 5.5.3 WOODWAY User-System, External ......................35 5.5.4 Keypad................................. 36 Safety Equipment ........................37 5.6.1 Emergency Stop Button ..........................
- Page 5 Before Each Use ........................60 Switching Device On/Off ......................61 Using the Keypad ........................63 7.6.1 Button Functions ............................63 Operating the Data Monitor (DaMo) ..................64 Operation with WOODWAY User-System (WUS)................ 67 7.8.1 Manual Operation ............................69 7.8.2 Start Program .............................. 72 7.8.3 Edit Program ..............................
- Page 6 Lubrication ..........................99 Adjustments and Calibration ....................99 Disabling the Treadmill ......................100 Device Fuses........................... 103 Warranty Information ....................104 Troubleshooting ......................105 11.1 Unusual Noises ........................105 11.2 No Display .......................... 106 11.3 Belt Does Not Move ......................106 11.4 Free Moving Running Surface Belt ..................
- Page 7 As WOODWAY moves forward, attention to product quality, innovation, and customer service are at the forefront of our efforts. Along with our treadmills, other products, services, and strategic relationships are being developed so as to keep WOODWAY on the leading edge as we meet fitness training, testing, and rehabilitation needs.
-
Page 8: Safety
Warnings attached directly to the device must be observed and kept in a legible condition. Replace the stickers if they become damaged or illegible. Inappropriate use will result in the rejection of any liability or guarantee by WOODWAY. Read all instructions before using the treadmill. -
Page 9: Iii | Um-Pp-En
• article of clothing while training. This is for the user’s safety in case of an emergency. WOODWAY treadmills are built to handle runners weighing up to 800 lbs. (360 kg) at speeds • between 0-4 MPH (0-6.5 km/h) and 400 lbs. (180 kg) at speeds up to 18 MPH (29 km/h). - Page 10 Care should be taken when mounting and dismounting the treadmill. Never mount or • dismount the treadmill while the running belt is moving. Use the handrails and handlebar whenever practical or necessary. Wear proper athletic shoes with rubber or high-traction soles. Do not use shoes with heels or •...
-
Page 11: Description Of Warning Notices
Description of Warning Notices Warning notices indicate potential hazards or safety risks. They are indicated in this manual by a color-coded signal word panel (symbol with the appropriate signal word). All warning notices have the same design and the same standardized content design. 1.2.1 Sample of a Warning Notice SIGNAL WORD Warning Text, Type, and Source of Danger... -
Page 12: Safety Notices On Device
Safety Notices on Device Safety relevant information is identified on the device using the following symbols: Protective Ground Wire Connection PPS Series devices are electrical devices with protection class I. This symbol indicates operational ground connections inside the device. It is located inside the base of the treadmill. -
Page 13: Personnel Qualifications And Responsibilities
The representative of the treadmill is responsible for the regular maintenance and testing as required by law. They are also obligated to provide adequate training/instruction to the operating personnel. WOODWAY recommends the training be carried out by a trained and authorized WOODWAY dealer or service partner. -
Page 14: Intended Use
Intended Use WARNING Danger due to Improper Use! Any improper use and/or other use of the device can lead to dangerous situations with significant personal injury and/or property damage. ► Only use treadmill for its intended use. Read and strictly adhere to all information in the operating instruc- ►... -
Page 15: Locomotion Therapy
It is forbidden to use the treadmill without its side rails or with walking poles. • The operation of WOODWAY slat belt treadmills outside of the named ambient conditions • in the section "Setup and Installation" (temperature, humidity, air pressure) as well as outdoors, (i.e. -
Page 16: Contraindications
Contraindications There are a number of contraindications in the context of the relevant fields of the treadmill use. In rehabilitation, only the medical staff can determine the form and extent of therapy. Medications can have an influence on the rehabilitation (e.g. -
Page 17: Electromagnetic Compatibility (Emc)
Electromagnetic Compatibility (EMC) It is expressly noted that ELECTRICAL MEDICAL EQUIPMENT is subject to special precautions regarding electromagnetic compatibility (EMC). They must be installed and operated accordingly. The PPS Series treadmills meet the requirements of EN 60601-1-2:2014 (Group 1, CISPR 11 Class A), EN 61000-3-2, and EN 61000-3-3. -
Page 18: Introduction
Introduction Operating Instructions Information This manual provides information on the safe operation of the WOODWAY slat belt treadmill. The only condition for safe operation is compliance with all safety and operating instructions. CAUTION Improper Operation Can Cause Accidents! Not using the slat belt treadmill as intended according to the manu- facturer's instructions can cause accidents and equipment damage. -
Page 19: Limitation Of Liability
• Unauthorized modifications to the device or accessories • WOODWAY general terms and conditions and delivery conditions apply, as well as the legal regulations valid at the time of contract conclusion. Copyright The release of the operating instructions to third parties without the written permission of WOODWAY is prohibited. -
Page 20: Replacement Parts
Replacement Parts WOODWAY recommends the use of original replacement parts. Original replacement parts have particular qualities and ensure reliable and safe operation. Developed for specific use with the device • Manufactured for high quality and excellence • Ensure the legal warranty period (excluding wear parts) or other reached agreements •... -
Page 21: Customer Service
Customer Service For service questions contact the following: WOODWAY USA, Inc. W229 N591 Foster Ct. Waukesha, WI 53186 Tel: 1 (262) 548-6235 Fax: 1 (262) 522-6235 Email: service@woodway.com Web: www.woodway.com For faster processing of your request please have the following data and information available: Information on the name plate (specific model/serial number) •... -
Page 22: Ec Declaration Of Conformity
EC Declaration of Conformity Fig. 1 EC Declaration of Conformity 16 | UM-PP-EN-03... -
Page 23: Technical Data
Technical Data Turning the Treadmill ON/OFF The main power switch with the universal power symbol ( ) is located at the base of the • treadmill near the treadmill’s power cord. “I” position: Treadmill is turned on and the belt is held tight. Turn the display on to operate •... -
Page 24: Interface
RS-232 Interface The treadmill's RS-232 interface may only be used for approved medical devices. 3.3.1 Control Lines The control only needs TxD and RxD lines. The RS-232 control lines are bridged in such a way that there should not be any problems in communicating with a PC running under DOS or Windows. Galvanic separation rules out the risk of any interference in the PC from the treadmill. -
Page 25: Technical Specifications
The total equipment weight can increase by adding more options (e.g. fall protection, railing variations depending on model etc.). For performance tests, intense intervals, or sprint training, runner's additional safety measures must be provided. In this case WOODWAY strongly recommends the use of the all protection option with chest strap and emergency stop function to minimize the risk of injury. -
Page 26: Dimensions
Dimensions Fig. 3 Device dimensions, PPS Bari-Mill 43 Fig. 4 Device dimensions, PPS Bari-Mill 55 20 | UM-PP-EN-03... - Page 27 Fig. 5 Device dimensions, PPS Bari-Mill 70 Fig. 6 Device dimensions, PPS Med 43 21 | UM-PP-EN-03...
- Page 28 Fig. 7 Device dimensions, PPS Med 55 Fig. 8 Device dimensions, PPS Med 70 Note: The PPS Ortho is structurally identical to the PPS Med with the exceptions of the color (PPS Ortho is standard black) and handrail. 22 | UM-PP-EN-03...
-
Page 29: Electrical Connection
DO NOT BEND OR REMOVE PRONGS. The plugs are polarized, meaning the prongs are different sizes and the plug can only fit in the outlet one way. If other power cord plugs are required, please contact WOODWAY. Before connecting the treadmill to the power supply, the information on main voltage and frequency (found on the name plate) is to be compared with the on-site connection values. -
Page 30: Germany
3.6.1 Germany Description Parameters 230 VAC Voltage Requires at least 230 V from wall outlet. If voltage falls 10% below 230 V, treadmill will shut off and reset. Frequency 50 Hz Current 16 Amp Dedicated line required (cannot share neutral line) Wall Outlet Requirements Outlet Compatibility F / ”Schuko”... -
Page 31: North America
3.6.3 North America Description Parameters 115 VAC 208/230 VAC Voltage Requires at least 208/230 V from wall Requires at least 115 V from wall outlet. outlet. If voltage falls 10% below 115 V, tread- mill will shut off and reset. If voltage falls 10% below 208/230 V, treadmill will shut off and reset. -
Page 32: Transportation And Storage
The manufacturer is not liable for damages and missing parts if this information was not recorded in writing on the delivery note upon delivery of the unit. Damage or defects must be reported to the carrier and to the responsible WOODWAY dealer immediately. WARNING... -
Page 33: Transportation With Carrying Poles
Transportation with Carrying Poles Four carrying poles (square steel pipes) are included as treadmill accessories. The carrying poles can be inserted into the front and back openings in the treadmill frame (see Fig. 9 and Fig. 10). Fig. 9 Carrying poles 1. -
Page 34: Storage
Storage The device may only be stored in closed, dry rooms. Direct contact with moisture (rain, fog, etc.) can cause serious damage to the electronics of the treadmill and must be strictly avoided. The following environmental conditions are prescribed for transportation and storage: Temperature: 0°F to 120°F (-18°C to +49°C) •... -
Page 35: Product Description
Product Description Overview of Models Figure Description WOODWAY PPS Med / PPS Med-i First choice for use in hospitals around the • world Long-standing and proven use in the fields of • medical diagnostics and therapy, therapy clin- ics, and rehabilitation centers Continuous development and optimization of •... -
Page 36: Equipment And Options
Equipment and Options WOODWAY slat belt treadmills are available in the following walking surface widths: 17” (43 cm) • 22” (55 cm) • 28” (70 cm) • Due to the fact that several options are available, the devices can be individually adapted. -
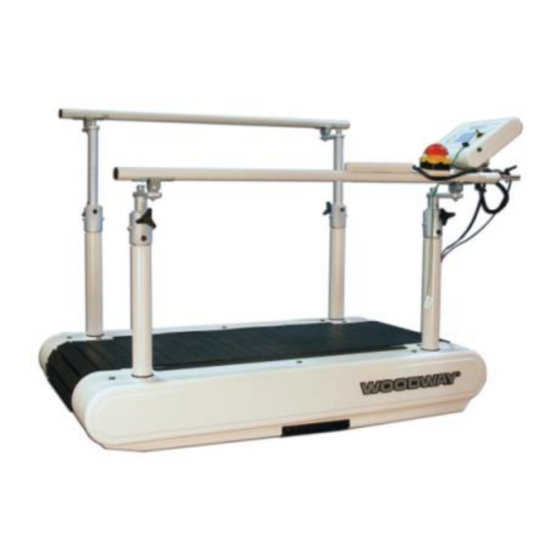
Page 37: Main Components
Main Components The main components are shown using the PPS Bari-Mill model: Fig. 11 Device components, PPS Bari-Mill model 1. Wooden parallel rails, adjustable 2. Emergency stop button, magnetic mount (PPS Med mounted to railing) 3. Display (WUS or DaMo) 4. -
Page 38: Description Of Components
The approx. ½” (1.2 cm) thick rubber surface significantly reduces the impact energy, thus making WOODWAY treadmills much easier on the joints than conventional treadmills. 5.4.2 Transport Systyem The support system consists of 2 supporting/secondary rails, which are equipped with high- performance bearings. -
Page 39: Power Console
5.4.4 Power Console The main power switch, the fuses, and the terminals for optional controls (manual keyboard and display) are located on the power console. Fig. 12 Power console 1. Power cord 2. 2 x fuses (to change, see Section 0 Page 103) 3. -
Page 40: Control And Display Elements
Control and Display Elements 5.5.1 WOODWAY User-System The WOODWAY User-System (WUS) is equipped with an LCD touch panel, which provides convenient operation of all treadmill and program functions. Creating your own training programs is also possible. The 5'' (12.5 cm) screen (diagonal) clearly displays current training information. -
Page 41: Woodway User-System, External
Fig. 14 WOODWAY Data Monitor (DaMo) 5.5.3 WOODWAY User-System, External The external WOODWAY User-System (WUS), with emergency stop switch, is an optional WUS display as a desktop unit for the supervisor (therapist, sports physician, or other supervisor). The external WOODWAY User-System is also available as a supplement to the PPS Ortho. -
Page 42: Keypad
5.5.4 Keypad Keypad for PPS Ortho (spiral wire for PPS Med or PPS Bari-Mill) The hand keyboard enables use of the treadmill's elementary functions: Speed [+][-] • Incline [][] • Stop the treadmill • Fig. 16 WOODWAY keypad 36 | UM-PP-EN-03... -
Page 43: Safety Equipment
Safety Equipment The PPS Medical Series treadmills are equipped with different safety equipment depending on model and design. When needed, they serve to prevent dangerous situations and reduce the risk of injury to a minimum. The following safety equipment is available: Emergency stop button(s) on the railing or emergency stop button on display •... -
Page 44: Emergency Stop Button
5.6.1 Emergency Stop Button The emergency stop button (mushroom type) is mounted on the right-hand railing (as seen from walking direction) of all PPS Series devices. Activating the emergency stop system causes immediate power disconnection to the drive system. The running surface comes to a stop in a reasonably short time, without causing further danger to the runner by braking too suddenly. -
Page 45: Emergency Stop Pull-Cord
After pressing the emergency stop button, it initially remains locked and the treadmill cannot be used for 10 to 15 seconds. For further use of the treadmill the button or mushroom must be released again. For this, pull the red mushroom sharply upwards until the release can be heard and felt. 5.6.2 Emergency Stop Pull-Cord The emergency stop switch is a magnetic contact switch, which is attached in the running direction on the display (WUS or DaMo) or on the railing (Ortho). -
Page 46: Chest Harness And Waist Strap
Fig. 18 Emergency stop magnet, WUS display 1. Clothing clip 2. Emergency stop magnet 3. Pull-cord, adjustable length Fig. 19 Emergency stop magnet, railing emergency stop button Depending on the model, the magnet is either fixed in the position indicated on the display (Fig. 18 Pos. -
Page 47: Fall Protection With Emergency Stop
5.6.6 Dismounting in Emergency Situations WOODWAY PPS Series treadmills have a slip-resistant surface alongside the running surface. This offers additional grip when dismounting and prevents the feet from slipping off of the side panels. -
Page 48: Setup And Installation
Read these operating instructions completely before installing. Before installing the device, operational and functional safety are to be tested. This includes correct installation, electrical connection, and operator training. In most cases, your WOODWAY treadmill will be delivered completely assembled. ATTENTION Installing after Storage or Transport The formation of condensation on the cooled electronic parts may cause the treadmill to malfunction and damage the electronics. -
Page 49: Installation
It is recommended that transport, installation, and assembly of the treadmill are carried out by WOODWAY or by an authorized dealer or service provider. Otherwise, shipping damage or improper installation and assembly of the treadmill could cause a hazard when using the device. -
Page 50: Safe Fall Area
6.3.1 Safe Fall Area When using the treadmill, especially fast movements (fast running, etc.) increase the risk of falling. For this reason, a safe fall area of at least 3 ft. x 6.5 ft. (1 x 2 m) must be maintained behind the treadmill (see Fig. -
Page 51: Adjust Leveling Feet
6.3.2 Adjust Leveling Feet After positioning the device at the installation site, adjust the horizontal height using a level. The height of the 4 leveling feet can be adjusted. Fig. 21 Adjusting leveling feet 1. Loosen the counter nut with a ¾” (19 mm) open-end wrench. 2. -
Page 52: Checklist For Before Starting Operation
• 6.5.3 Side Handrails In most cases the WOODWAY is delivered completely assembled. In some cases, the conditions at the intended location do not allow for assembly-free delivery (doors, stairs, elevators, etc.) and the treadmill needs to be partially disassembled. -
Page 53: Remove Handrails
6.5.4 Remove Handrails Side Panels Loosen the screws on both side panels (3 per side) with a Phillips screwdriver. On PPS Bari-Mill models, the cutout for the railing is covered with an additional panel. Loosen the fixing screws on the panels (2 per side). See the following figure for the placement of side panel fixing screws and note that there are fixing screws on both sides of the device. - Page 54 Disconnect Cables Once the metal cover has been removed, disconnect cables from display cable, emergency stop cable, and ground. Remove the cable ties that secure the wiring harness to the frame. • Ensure that the wires are not damaged. • Loosen the nut of the grounded star point.
- Page 55 Fig. 25 Treadmill controls (WLS) 1. 25-pin D-SUB plugs, x 2 2. Grounding wires (should already have been disconnected) Carefully pull the wiring harness through the hole below the toroidal transformer. • Fig. 26 Wiring harness layout 1. Wiring harness 2.
- Page 56 Removing the Railing Mount PPS Med or PPS Ortho • Loosen the upper fixing screw (front and rear) with a 13/64” (5 mm) Allen wrench. • Remove the fixing screw at the bottom with a ½” (13 mm) box wrench. The screws engage small metal plates (inserted into the railing stabilizer).
-
Page 57: Transportation Notes
Fig. 28 Fixing screws in railing mount, PPS Bari-Mill Mounting the Railing 1. Mounting of the railing is carried out in the opposite order. 2. The following points must be checked during mounting: Are all cables in good condition? • Are all bolts tight? •... -
Page 58: Manual Display
6.5.6 Manual Display Required Tools Cross-recess wrench, 10 mm • Ring forked wrench, 10 mm • Removal If the manual display on the treadmill is damaged and needs to be replaced, remove the display by the following steps: 1. Unscrew the fastening screws on the back of the plastic housing until the front section can be removed and lift the entire unit out of the housing. - Page 59 8. Turn the treadmill ON and let it run at various speeds. If any unusual vibrations or noises occur, switch the treadmill OFF and check the dimensions. If noises and/or vibrations persist, contact the WOODWAY Service Center or your local representative. 9. Replace the outer covers.
-
Page 60: Individual Slats
6.5.8 Individual Slats Required Tools T20 TORX element, 10” • And/or electric screwdriver • Removal If individual slats on the running belt need to be replaced, remove the slat(s) by the following steps: 1. Disconnect the treadmill from the power supply and remove the side cover. 2. -
Page 61: Bearing Guide
6.5.9 Bearing Guide Required Tools Socket wrench with 3” extension, #17 • Wrench, ½” • Ring fork wrench, #17 • Removal If the bearing guide is damaged and needs to be replaced, remove the guide by the following steps: 1. Disconnect the treadmill from the power source. 2. -
Page 62: Incline Motor
2. Disconnect the cable from the old end switch unit (switch to be replaced). 3. Remove the bracket and end switch. Replacement Once the bracket and end switch have been removed, an authorized replacement switch can be installed as follows: 1. -
Page 63: Operation
Using Fall Protection For intense sprints of about 12.5 MPH (20 km/h) and prolonged high-stress runs where the runner is subject to increased fatigue/exhaustion, WOODWAY strongly recommends the use of fall protection with fall stop. WARNING... - Page 64 Training Frequency At the beginning of training, allow yourself enough time to get into shape. After a break from training, you should also allow sufficient time to rebuild physical condition. The priority is regularity and persistence of training- not intensity. Fitness experts recommend in the beginning training 3 - 4 times per week within your target heart rate for at least 20 minutes per workout.
-
Page 65: Calculating Maximum Heart Rate
During training it is recommended to not exceed a value of 85% of your maximum heart rate. WOODWAY programs are designed so that the heart rate remains within the target range. Your target heart rate should be between 60 and 75% of your max. heart rate. If you find that your heart rate is above 75%, you are probably running too fast. -
Page 66: Application Options For Children
Application Options for Children Due to their design and operation, PPS Series slat belt treadmills are only for limited use by children. An exception can be made using special accessories and in compliance with strict safety regulations, especially within the scope of movement therapy in rehabilitation. WARNING Special Hazards Associated with Treadmill Use by Children! There is an increased risk of injury through the use of treadmills... -
Page 67: Switching Device On/Off
) switch, after 5-6 • seconds the display will switch on. Switching the WOODWAY User System (WUS) on: Press the green ON button on the right • side of the WUS housing, after 5-6 seconds the display will switch on. - Page 68 WARNING Danger Through Speeding-Up of the Running Surface! If the drive motor is stopped (e.g. by pressing the STOP button, emergency stop, or by power failure) when set at an incline, the weight of the user (gravity) may cause the running surface to ac- celerate.
-
Page 69: Using The Keypad
Using the Keypad The keypad can be attached to a suitable point on the handrail so that the controls are easily accessible to the runner. The magnetic mount makes it possible to remove the keypad from the railing. In this way the runner's supervisor can use the keypad as a remote control. Fig. -
Page 70: Operating The Data Monitor (Damo)
Operating the Data Monitor (DaMo) The data monitor has 4 multi-digit displays to indicate the current training parameters, as well as several LEDs to indicate the control mode. On the data panel the following values are shown: Treadmill speed in meters per second (m/s) or kilometers per hour (km/h) •... - Page 71 The LEDs to the right of the display (Pos. 9 to 11) indicate the unit of measurement of the displayed value. It is also possible to choose between parameters that are displayed on the same screen. The data monitor is a display device without the ability to control the treadmill. Speed The 3-digit display (Pos.
- Page 72 The button in Pos. 1 is used to select the unit of measurement. With the button in Pos. 7, all indicators are reset after pressing the RESET button. With the button in Pos. 6 (symbol: ) the treadmill is switched off. If pressed during training, the treadmill will stop, i.e.
-
Page 73: Operation With Woodway User-System (Wus)
Operation with WOODWAY User-System (WUS) The WOODWAY User-System (WUS) is used to display the current parameters and control modes and to operate the treadmill. In addition, the WUS housing contains the STAND-BY button (on the right side of the housing), the contact surface for the emergency stop magnet with integrated pull- cord and clip, or an emergency stop button (external display), which the operator can trigger. - Page 74 Fig. 32 WUS control panel 1. Quick start guide 2. Contrast control for touch screen 3. Touch screen 4. Emergency stop pull-cord magnetic switch 5. Emergency stop pull-cord 6. ON/STAND-BY button The touch screen is used as an input keypad. Information can be read and, at the same time, the treadmill will be operated.
-
Page 75: Manual Operation
The device is now ready for operation. By pressing the START button the main menu is opened. Fig. 34 WUS main menu 7.8.1 Manual Operation For manual input of speed and incline press the MANUAL OPERATION button at the top left. In MANUAL mode the following values appear in the display: Speed: km/h, MPH, or m/s •... - Page 76 In the initial status, SPEED and INCLINE are both set to zero. Current time and distance are maintained (set to zero when restarting). To return to initial status of WOODWAY standard protocol from all RUN modes: Enter command “treadmill STOP”.
- Page 77 (effective STOP button). TIME-OUT can be changed via RS-232. • Functionality is initially inactive in WOODWAY standard protocol. • Mode can be activated at any time by entering a time greater than zero seconds (0.1 to •...
-
Page 78: Start Program
7.8.2 Start Program With this function, the treadmill programs can be called up. Treadmill programs can be permanently installed WOODWAY fixed programs or customized programs. A program is called up directly from the main menu via the "START PROGRAM" (see Fig. - Page 79 CANCEL Pressing the CANCEL button will return you to the main menu. After the program starts, the following information is displayed on the screen: Fig. 37 WUS program information A vertical line moves from left to right and shows you your position in the program. In addition, the following information is displayed: Speed: km/h, MPH, or m/s •...
-
Page 80: Edit Program
By pressing the STOP button on the railing, by touching the touch screen, or exceeding a predetermined pulse limit, the treadmill is stopped and the program is interrupted. The following information is displayed: Fig. 38 WUS program interruption CONTINUE PROGRAM Program continues exactly where it was interrupted. - Page 81 EDIT PROGRAM The selected program can be edited here: Fig. 39 WUS edit program [+] [-] Buttons These buttons change the respective program steps. SPEED The parameter to be changed is selected. The new values are entered as shown below: Fig.
-
Page 82: Create Program
7.8.4 Create Program The process for creating a new program corresponds to the process for editing an existing program. Select the EDIT PROGRAM button in the main menu (see Fig. 34). Then select the CREATE PROGRAM button. Now proceed exactly as when editing a program by changing the individual parameters. The program name can be freely defined by pressing the NAME button. -
Page 83: Pulse Control
7.8.5 Pulse Control The treadmill is equipped with a pulse control function. This function enables the treadmill operation to be pulse controlled. After selecting a program, the following screen appears: WARNING Danger of Injury Through Improper Application! The pulse measurement device provides exact data. However, the heart rate monitor is only a rough orientation and is not intended for diagnosis or medicinal purposes. -
Page 84: Edit/Show Parameters
7.8.6 Edit/Show Parameters EDIT PARAMETERS To change parameters, select the EDIT PARAMETERS option in the start menu. Fields with adjustable parameters will be displayed: Fig. 43 WUS edit parameters The desired values can be set by pressing the respective buttons. The set values appear on the screen, for example, Language: English, speed in km/h. -
Page 85: Adjustment Of Bar Rails
Adjustment of Bar Rails PPS Bari-Mill type treadmills are equipped with a bar railing. The PPS Ortho and PPS Med models are optionally available with a bar railing. Depending on the design, the flexible handrail allows it to be adapted to the height and width needs of the individual user. -
Page 86: Reverse Directionality
If the treadmill is equipped with the reverse mode, it can be activated in two different ways. Either the WOODWAY User-System (WUS) is required or a PC / laptop with installed WOODWAY Treadmill Control Software, with which the PPS treadmill is connected via the serial communication interface (RS-232, COM port). -
Page 87: Body Weight Support Systems
For more information, see the separate operating manual for the LokoStation Body Weight Support System. For information on the use of body weight support systems please contact your local WOODWAY dealer or Service Center. ATTENTION When using the body weight support system, PPS Series treadmills must be equipped with an additional brake (retrofitting possible). -
Page 88: Options And Accessories
Options and Accessories Order Numbers The following accessories and options can be obtained from a WOODWAY dealer or WOODWAY Service Center. Suitable Accessories Depending on the year and equipment, it should be determined in advance whether the particular unit is suitable for the selected accessories/options. For this, contact an authorized WOODWAY dealer or WOODWAY Service Center before ordering. -
Page 89: Video Railing For Pps Ortho
Video Railing for PPS Ortho If necessary, the crossbar on the front part of the PPS Ortho handrail can be removed using two quick releases. The unblocked view/video analysis of patients is possible from the front and from behind. WARNING Danger of Injury by Falling! In the event of a fall in reverse mode when the crossbar is mounted serious injury can occur. - Page 90 Installation The quick disconnects must be open before installation. Only unscrew the clamp to the extent that the opening is slightly larger than the diameter of the railing tube, but that the screw does not fall out. Place the crossbar diagonally between both handrails so that both clamps grip the railing. The quick disconnects must face outwards.
-
Page 91: Mounting Aid
Mounting Aid To ensure safe mounting on the treadmill, patients with physical limitations may have to depend on medical personnel for support. Mounting the device may be further facilitated using a commercial climbing aid. Fig. 49 Mounting aid WARNING Danger of Injury from Using Mounting Aid! When mounting aids are not removed from the device before training, it can lead to serious injury. -
Page 92: Heart Rate Monitors
Heart Rate Monitors WOODWAY treadmills are equipped with a heart rate measurement system. This can be used with numerous compatible heart rate transmitters, i.e. POLAR ® measuring device (GymLink compatible). In order to display the user’s heart rate accurately, the built-in receiver must receive a stable heart rate signal from the transmitter. -
Page 93: Transmitter Function
Cleaning The chest strap can be washed. Remove belt from the transmitter, taking care not to bend the electrodes. Wash the strap and electrodes with warm water and mild soap. Do not machine wash the electrodes and do not use alcohol or other harsh cleaning solvents. Since the transmitter can be activated by moisture, it should be wiped dry after cleaning. -
Page 94: Usb-To-Serial Converter
PC/notebook and the treadmill. The industrial USB-to-Serial converter of the brand ATEN (Model UC-232A), which can be obtained from WOODWAY Customer Service, can be recommended as a reliable model. Fig. 51 USB-to-Serial converter, ATEN model UC-232A Technical data (USB-to-Serial converter, brand ATEN, model UC-232A): USB specification v1.1... -
Page 95: Interface Wire
A typical configuration is shown in the following table. For controlling a WOODWAY treadmill usually only the signals GND, TxD, and RxD are required. If a minimal null-modem cable is used, within the respective connector the pins 1, 4, 6, as well as 7 and 8 should be connected (see Fig. -
Page 96: Cleaning And Maintenance
Cleaning Periodic cleaning and inspection of your WOODWAY treadmill will help lengthen its life while keeping it looking like new. With this preventative maintenance it will be easier to identify possible issues that might otherwise be overlooked. -
Page 97: Maintenance Intervals
Cleaning Notes Do not use abrasive brushes or abrasive cleaners, as the paint and plastic surfaces can be • scratched. Do not use sharp tools (e.g. knife, metal scraper) or aggressive cleaning solvents for • cleaning. Clean all surfaces with a mild, non-abrasive detergent. •... - Page 98 ATTENTION If there are defects or deviations in the control function, notify WOODWAY Customer Service immediately. The device must be taken out of service and disabled until repaired. Repairs may only be carried out by trained and authorized personnel.
- Page 99 A repair must take place in the following situations: Liquid has gotten into the device • Damaged power cord (cable, plug) • Defective drive system toothed belt • Suspected bearing damage • Suspected/established device defect • Bucking, sudden stopping, or accelerating of the running surface •...
-
Page 100: Technical Safety Checks (Tsc)
Technical Safety Checks (TSC) PPS Medical Series treadmills are devices in protection class I and have an application part in type B (railing). The power cord is normally not removable. Permanent Connection PPS Series devices are usually not intended for permanent connection. The installation of a permanent connection must be performed by suitably trained personnel. - Page 101 Inspection Intervals A Technical Safety Check (TSC) must be performed annually by qualified personnel (electricians). These are "repeated safety checks" in accordance with Section 4.3 of EN 62353:2008. If the treadmill is rarely used, under certain conditions, the test interval of 18 months may be increased to a max.
- Page 102 Visual Inspection According to Section 5.2 of the standard EN 62353, a visual inspection is to be carried out prior to the measurements. The following points must be checked on PPS Series devices: Treadmill Operating Manual: Is the operating manual for the device immediately available for users and it is valid for the tested treadmill model? Accessory Operating Manuals: Are the operating manuals for acces-...
- Page 103 Measurements i.a. EN 62353:2008 The values determined in these tests are to be documented together with the measurement method and evaluated as the basis for comparison for future standards. Measurements are to be carried out in accordance with Section 5.3 of the standard. The protective conductor resistance (Section 5.3.2), and device leakage current (Section 5.3.3) are to be measured.
- Page 104 The third copy should be sent to WOODWAY Customer Service (WOODWAY maintains a file on each treadmill). In this way, the representative can provide efficient and reliable support.
-
Page 105: Lubrication
Incline System The incline systems on WOODWAY treadmills are greased at the factory. If utilized for many hours or in a very dusty environment, the system will need to be checked. If necessary, apply a small amount of grease on the chains. -
Page 106: Disabling The Treadmill
Other symptoms/situations which could cause danger to the user/operator • Disabling can also be requested of WOODWAY Customer Service by telephone. In this case, the treadmill representative is obliged to carry out the disabling and to confirm with WOODWAY Customer Service in writing. - Page 107 The following measures must therefore be taken to disable a PPS Series treadmill: 1. The unit must be turned off and the power plug must be unplugged from the wall socket (disconnected). 2. The treadmill must be marked "disabled" in a clear manner such as: "CAUTION DANGER OF INJURY"...
- Page 108 Labels for Disabling a Treadmill CAUTION DANGER OF INJURY! This device has been disabled due to safety defects. THE USE OF THIS DEVICE IS STRICTLY FORBIDDEN! Device was disabled on (date) : ________________ By (name): ________________________________ Only the following person may put this device back ______________________________ into operation: ...
-
Page 109: Device Fuses
Device Fuses The fuses must comply with the published technical specifications (see Section 3.5 Page 20). Bridging the fuses is prohibited, due to the risk of electric shock and fire. When replacing a fuse, turn off the power using the main power switch and unplug the power cord from the outlet. -
Page 110: Warranty Information
[5] years after original installation. A direct payment, or credit toward the purchase of a new WOODWAY, of 20% of the purchase price of the treadmill will be made to the original owner of a WOODWAY treadmill. This guarantee is limited to the original owner. Contact WOODWAY for further details. -
Page 111: Troubleshooting
With the exception of the maintenance work described in this chapter, the treadmill can only be checked and repaired by qualified personnel. If necessary, contact an authorized WOODWAY dealer or WOODWAY Service Center. If you have problems with your treadmill, please consider the answers to the following questions... -
Page 112: No Display
11.2 No Display If the display is not lit when you turn on the treadmill, check the following points: Is the emergency stop mushroom released (or emergency stop button on the external • display)? Is the treadmill connected to the power source? •... -
Page 113: Faulty Or Flashing Display
11.6 Faulty or Flashing Display Probable causes: Power supply too low • Too much load on same line • Defective display power supply on interface board • Possible static problem (to correct, spray with staticide) • An excessive load or excessive consumption on the same line may be causing problems. Connect the device to a specially fused power supply line or remove the other power-consuming devices from the mains. -
Page 114: Maintenance Report
Maintenance Report DATE MAINTENANCE MEASURES FROM REMARKS 108 | UM-PP-EN-03... -
Page 115: Record Of Instruction
Once the slat belt treadmill is delivered, installed, and a function test takes place, instruction is to be carried out by a competent WOODWAY employee or authorized WOODWAY dealer. All persons who will work with the device in the future must participate in the instruction. As soon as the installation and training have taken place, the instruction record must be signed by the instructor and all participants, and a copy must be sent back to WOODWAY. - Page 116 When cleaning the unit always pull the power plug before the start. • Maintenance and repair of medical devices and electrical equipment • may only be performed by authorized personnel (WOODWAY service technicians, authorized WOODWAY service partner, or medical techni- cian). Notice on regular/recurring maintenance intervals with regard to safety ...
- Page 117 Step Description Done Explanation of possible malfunctions that must lead to a disabling of the treadmill: Bucking, sudden stopping, or sudden acceleration of the treadmill • Failure of buttons • Burning smell, smoke, or unusual noises • Damage/loss of the emergency stop magnet with pull-cord •...
- Page 118 Please fill out the instruction protocol completely and return it to WOODWAY. WOODWAY Slat Belt Treadmill Serial No.: ____________________________...
-
Page 119: Declaration Of Conformity With Technical Regulations
Declaration of Conformity with Technical Regulations WOODWAY hereby confirms that the medical device “WOODWAY PPS Series Medical Slat Belt Treadmill" complies with the applicable generally accepted rules of technology and the requirements of occupational safety and is designed and manufactured so that users, patients, and third parties are protected against all kinds of hazards to health and safety. -
Page 120: Disposal
Disposal Electrical and electronic devices must be disposed of separately from normal household waste. An appropriate waste disposal company should be contacted. Properly dispose of the device at the end of its service life (e.g. the local collection point for waste separation): The device packaging is disposed of through resource recycling. -
Page 121: Table Of Figures
Fig. 11 Device components, PPS Bari-Mill model ..........31 Fig. 12 Power console ....................33 Fig. 13 WOODWAY User-System (WUS) ............... 34 Fig. 14 WOODWAY Data Monitor (DaMo) ............35 Fig. 15 WOODWAY User-System (WUS) ............... 35 Fig. 16 WOODWAY keypad..................36 Fig. - Page 122 Fig. 44 WUS show parameters .................. 78 Fig. 45 Adjustment of gas-spring parallel bar rails ........... 79 Fig. 46 Manual operation with WOODWAY Treadmill Control Software . 81 Fig. 47 Video railing, PPS Ortho ................83 Fig. 48 Video railing lever position, PPS Ortho ..........84 Fig.
Need help?
Do you have a question about the PPS Medical Series and is the answer not in the manual?
Questions and answers