Midland BTNEXT PRO Instruction Manual
Bluetooth, dual core intercom system
Hide thumbs
Also See for BTNEXT PRO:
- User manual ,
- Instruction manual (116 pages) ,
- Instruction manual (58 pages)

Related Manuals for Midland BTNEXT PRO


Summary of Contents for Midland BTNEXT PRO
- Page 1 › MANUALE D’USO › INSTRUCTION GUIDE › BEDIENUNGSANLEITUNG › MANUAL DE INSTRUCCIONES › GUIDE D’UTILISATION › MANUAL DE INSTRUÇOES › マニュアル...
-
Page 2: Table Of Contents
Technical specifications of Midland BTNEXT PRO .......................................... 21 Charging batteries ....................................................22 Unit and fixing system description ..............................................22 Switching ON and OFF your Midland BTNEXT PRO ........................................24 How to pair two Midland BTNEXT PRO units ..........................................25 Set up of the AGC system .................................................. 26 Conference mode with one Bluetooth device on “VOL-”... -
Page 3: Main Features
› 2 BTNEXT PRO communication units on the front of the unit. Midland BTNEXT PRO is fixed on the helmet using the adhesive › 2 Slide-in mounting kit with two stereo speakers plate or the screw mounting clamp. -
Page 4: Charging Batteries
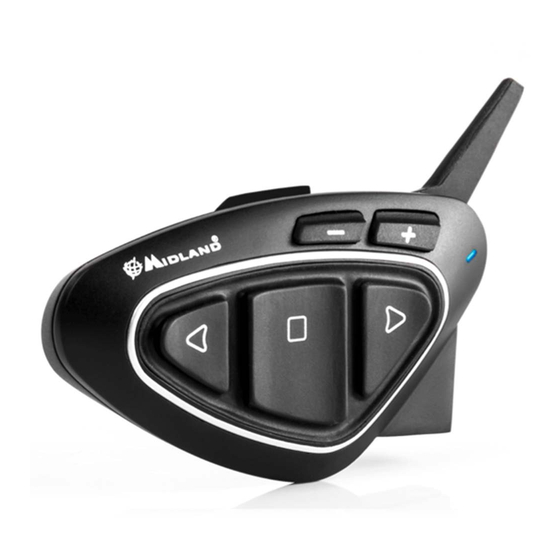
The two stereo speakers have a Velcro/adhesive strip that aids their fixing into your hel- The BTNEXT PRO has five buttons on the front; the main three big button are multi met. Beware not to keep the volume too high, you must always be able to listen to the functions buttons: the Forward (on the left), the middle button and the Backward (on traffic sound. - Page 5 By either using the plate with bi-adhesive strip, or the screw plate. These methods allow you to safely “fix” the BTNext PRO unit onto your helmet and to remove it at any time in order to recharge or store it.
-
Page 6: Switching On And Off Your Midland Btnext Pro
Step 3.Then, tighten more the two screws in order to firmly fix the clamp in place on the left side of the helmet. The BTNEXT PRO can be easily fitted onto the helmet by sliding it downwards on the sliding mounting kit. BTNEXT PRO is maintained in position thanks to the fixing clip located on the upper section (A). -
Page 7: How To Pair Two Midland Btnext Pro Units
To pair the Midland BTNEXT PRO to another Midland BTNEXT PRO unit The 3 multi function buttons can have different functionality depending on which mode To pair the Midland BTNEXT PRO to another Midland BTNEXT PRO unit, you must first the unit is at that moment. -
Page 8: Set Up Of The Agc System
40 seconds. If needed you can close the intercom manually without waiting The Midland BTNEXT PRO has three main buttons (Forward, Middle and Rear). It is up to 40 seconds (just press the middle button). you which button to use to pair and activate the intercom, you are totally free to choose the If needed, you can disable the VOX feature simply by pressing the Backward button for button you like more. - Page 9 5. When successfully paired, each unit will have the Blue light on for one second and then go back to the setup mode (Red light always on). 6. Now the unit is ready for another pairing procedure, and you can pair another Midland BTNEXT PRO unit following the same procedure, but using a different button.
-
Page 10: Conference Mode With One Bluetooth Device On "Vol
Conference mode with one Bluetooth device on “VOL-” The first and the last unit must not be paired together (the chain must stay open). The unit number 1 can talk to the last unit (number 4) only “through” the unit number When the conference mode is active the Bluetooth device connected on VOL- is still 2 and number 3. -
Page 11: Talk 2 All - Universal Intercom With Different Brand Unit
How to pair an Intercom device on the “VOL-” button: › On the BTNext Pro go in “Setup mode”, press the “VOL-” button for 3 sec. The Blue and Red Led lights will start flashing › On the other device, follow the procedure to pair as an Universal Intercom How to open the Conference for the “VOL-”... -
Page 12: Pairing The Midland Btnext Pro To Bluetooth Devices
How to pair the Midland BTNEXT PRO to a Phone To pair the Midland BTNEXT PRO to a Phone, you must first enter the setup mode: 1. Turn off the unit When a device is paired to the “Vol +” or “Vol –“ buttons the “Phone” mode is activated. - Page 13 After pairing your phone to the Midland BTNEXT PRO unit you must switch to the “Pho- Phone on Vol-: Briefly press“Backward”button. If your mobile phone supports voice calls, ne”...
- Page 14 How to pair the Midland BTNEXT PRO to a GPS If you are listening to A2DP music from the VOL- and you move from “Phone” mode In general it is possible to pair the Midland BTNEXT PRO to all the GPS for motorbike that www.midlandeurope.com...
-
Page 15: How To Listen To The Fm Radio
How to listen to the FM Radio support Bluetooth headset connection. To pair the Midland BTNEXT PRO to a GPS, you must first enter the setup mode: The FM Radio receiver is integrated inside the unit. You just need to switch to the “FM Radio”... -
Page 16: Wired Audio Input
“Backward” and “Forward” button together while in “Phone” or “Intercom” mode Your Midland BTNEXT PRO can be connected to a wired audio source, like an iPod (or (a voice announcement will confirm the status). The unit will re- any other MP3 Player). - Page 17 Setting mode by double clicking the “Middle” button. Once the red light manently. turns off, the blue led starts blinking. Now you can use your Midland BTNEXT PRO › Then simultaneously press and hold down all the three buttons “Forward”-“Midd- le”-“Backward”...
-
Page 18: Warranty
This product is CE marked according to the RED Directive and is free use 2014/53/UE It is possible to configure and update the firmware of your Midland BTNEXT PRO using in all the EU countries. the USB connection to your PC. On the Midland web site www.midlandeurope.com in Users are not permitted to make any changes or modifications to the device. - Page 19 • INFORMAZIONE AGLI UTENTI: i sensi dell’art. 13 del decreto legislativo 25 luglio • Alle Artikel, die auf der Verpackung oder der Gebrauchanweisung dieses Symbol tragen, dürfen nicht in den normalen Mülltonnen entsorgt werden, sondern müssen an gesonder- 2005, n.151 “Attuazione delle Direttive 2002/95/CE, 2002/96/CE e 2003/108/CE, ten Sammelstellen abgegeben werden.
- Page 20 Prodotto o importato da: CTE INTERNATIONAL srl Via. R.Sevardi 7 42124 Reggio Emilia - Italia. Prima dell’uso leggere attentamente le istruzioni. Produced or imported by: CTE INTERNATIONAL srl Via. R.Sevardi 7 42124 Reggio Emilia - Italy. Read the instructions carefully before installation and use. Vertrieb durch: ALAN ELECTRONICS GmbH Daimlerstraße 1K - D-63303 Dreieich Deutschland.
- Page 21 www.midlandeurope.com...
Need help?
Do you have a question about the BTNEXT PRO and is the answer not in the manual?
Questions and answers