Motorola AXH01 User Manual
Wireless home telephone with alexa built-in
Hide thumbs
Also See for AXH01:
- Quick start manual (23 pages) ,
- User manual (59 pages) ,
- Quick start manual (25 pages)

Subscribe to Our Youtube Channel
Related Manuals for Motorola AXH01


Summary of Contents for Motorola AXH01
- Page 1 Motorola AXH01 Wireless Home Telephone with Alexa Built-In Warning: Charge the handset for 16 hours before use.
- Page 2 Make internal calls, transfer external calls and hold 3-way conversation. Need help? If you have any problems setting up or using your Motorola AXH01, please contact Customer services: xxxxxxxx Alternatively, you may find the answer in the ‘Help’ section at the back of this guide.
- Page 3 This User Guide provides you with all the information you need to get the most from your phone. Before you make your first call or use Alexa you will need to set up your phone. Follow the simple instructions in ‘Getting Started’, on the next few pages.
-
Page 4: Table Of Contents
Getting to know your phone .........11 Alexa ..................16 Download the Amazon Alexa app and sign in ........16 Download the Motorola AXH01 App and log into Alexa ....16 To activate Alexa ....................17 Using the phone ..............18 Switch the handset on / off .................18 Calls ........................18... - Page 5 Predial an entry in the calls list ..............24 Clock & alarm ..............25 Set the date and time ..................25 Set the alarm .....................25 Call settings ..............26 Auto hang-up ....................26 Auto answer ......................26 Add a speed dial number................26 Edit / Delete a speed dial number ............27 Handset settings ..............28 Sound ........................28 9.1.1...
- Page 6 10.3.2 Line ID ....................33 10.4 Line selection ....................34 10.5 Default settings ....................34 11. Technical Specifications ..........35 12. Help ..................36 13. General information ............38...
-
Page 7: Getting Started
Location Important Do not place your Motorola AXH01 in the bathroom or other humid areas. Place your Motorola AXH01 base within reach of the AC power outlet, telephone wall socket and router. The AC outlet should be installed near the equipment and should be easily accessible. - Page 8 Plug the telephone line cord into the socket marked on the rear of the base and plug the other end into the telephone wall socket. 2. Plug the AC power adaptor into the socket marked on the rear of the base and plug the other end into the AC outlet.
- Page 9 Important Warning! Use only the approved rechargeable Ni-MH battery cells (2 x AAA Ni- MH 750mAh rechargeable batteries) supplied with your Motorola AXH01. Battery low warning If you hear a warning beep every 60 seconds during a call, you will need to recharge the handset before you can use it again.
- Page 10 7. Press to return to standby. Setting up Alexa In order to set-up the Motorola AXH01 to work with Alexa, landline and Alexa2Alexa (A2A) calling you need the following: An active landline home telephone service. 2. An active Caller Display subscription.
-
Page 11: Getting To Know Your Phone
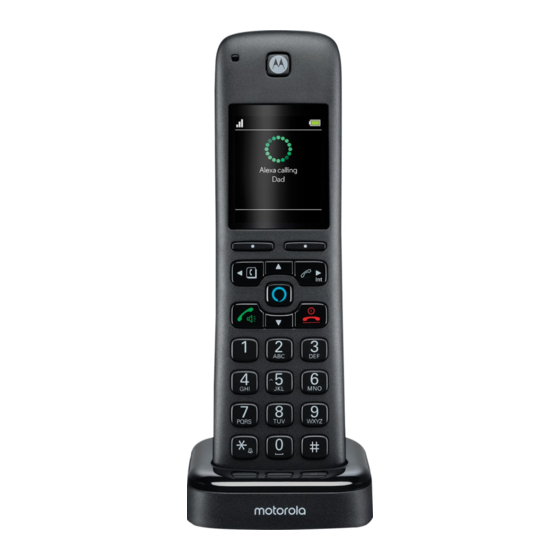
Getting to know your phone Overview of your handset A Ring indicator LED Flashes when the phone rings. B Display For display icons, see “Display” on page 13. C Left softkey / Menu / OK Enter the main menu. Select the option displayed on screen. Confirm a menu option. - Page 12 Talk / Hands-free / Line selection Make or answer a call. Activate and deactivate hands-free during a call. Press and hold to open the Line selection menu. G Scroll down / Volume down Scroll down through lists and settings. During a call, press to decrease the earpiece and hands-free volume. In standby, when you have entered the handset ringer volume setting, press to decrease the handset ringer volume.
- Page 13 Display overview Signal icon Displays when in hands-free mode Mute is activated Ringer is switched off Indicates a missed call Indicates a message has been left Alexa Notification icon Alarm is set Batteries are fully charged Batteries are partially charged Batteries are running low Batteries are almost fully discharged Batteries are empty...
- Page 14 Overview of the charger A Charging contacts Navigating the menus Your Motorola AXH01 has an easy to use menu system on the handset. Each menu has a list of options, which you can see on the menu map on the following page.
- Page 15 Menu map Contacts Handset Settings Advance Settings Press B to enter the Sound DECT Settings phonebook. Ringer Volume Change PIN View Ringtone Clock Master Predial Key Beep ECO + Call List Out Range Tone Base Version Missed Calls Cradle Tone Base Setback Received Calls Display...
-
Page 16: Alexa
You will then be asked to log into Amazon Alexa through the hello voice app. Amazon Alexa Login, you will then be asked to log using your Amazon Select account details. After you get the “Login success” page you can start using your AXH01. Alexa... -
Page 17: To Activate Alexa
To activate Alexa Alexa Press to activate Alexa, the display will show listening... and a beep will be heard. 2. You can then ask Alexa what you need. For example: Alexa what’s the weather today. The screen will display Alexa thinking.. -
Page 18: Using The Phone
Using the phone Switch the handset on / off To power the handset off, press and hold for about 5 seconds. Confirm? is displayed, press to confirm or to cancel. 3. Press to turn the handset back on. Calls 4.2.1 Make a call When making calls you can pre set the line selection to auto, manual or individual line selection, see page 35. -
Page 19: Receive A Call
Note You can end calls simply by placing the handset on the charger. To turn this feature off, see Auto hang-up, see page 26 . 4.2.5 Receive a call When you receive an external call, the phone rings, , the line information and the phone number (or name if stored in the contact list) is displayed. -
Page 20: Making A Second Call
4.7.3 Making a second call When on an internal or external call you can make a second internal or external call without ending the first call. Second internal call During a call: Press Option and scroll Intercom and press Select. 2. -
Page 21: Transferring Calls
4.7.5 Transferring calls If when transferring a call the second handset doesn’t answer, then you can press Option, Transfer is highlighted, press Select to transfer the call to the second handset unannounced. 4.7.6 Receiving a second call (call waiting) When on an internal or external call you can receive a second internal or external call without ending the first call. -
Page 22: Contacts
Contacts You can enter the contacts list by pressing The list is stored in the base and you cannot add, edit or delete contacts from the list., View the details or dial an entry Press to enter the contacts list. 2. -
Page 23: Calls List
Calls List Provided the identity of the caller is not withheld, the number of the caller will be displayed together with the date and time of the call (if provided by the network). You can either enter the calls list by pressing or through the handset menu. -
Page 24: View The Details Of An Entry
View the details of an entry Press , scroll to highlight the Calls list (Missed Calls, Received Calls, Outgoing Calls, Accepted Calls, Call) you want. 2. Press Select, the most recent number (or name if stored in the contact list) is displayed. -
Page 25: Clock & Alarm
Clock & alarm The date and time is set automatically when registered to the base. You can change the date and time format to show MM/DD or DD/MM and 12 hours or 24 hours. Note The phone can be set so that the base or handset can be the clock master, once set this will sync across all handset. -
Page 26: Call Settings
Call settings Auto hang-up The phone is set to end calls by placing the handset on the charger. This feature can be switched off so that calls can only be ended by pressing Press Menu, scroll Call Settings and press Select. Auto Hang-up is highlighted. -
Page 27: Edit / Delete A Speed Dial Number
Edit / Delete a speed dial number Press Menu, scroll Call Settings and press Select. Speed Dial and press Select. 2. Scroll 3. Scroll to select the key where the number is stored, press Select. Name Clear is highlighted, press to delete a character, or press and hold Clear to delete all characters. -
Page 28: Handset Settings
5. Press to return to standby. 9.1.3 Key beep When you press a button on the Motorola AXH01 handset, you will hear a beep. You can switch this beep on or off. Press Menu, scroll Handset Settings and press Select. -
Page 29: Out Of Range Tone
9.1.4 Out of range tone When on a call if you move out of range of the base, you will hear a beep. You can switch this tone on or off. Press Menu, scroll Handset Settings and press Select. Sound is highlighted. -
Page 30: Display Backlight
9.2.3 Display backlight You can set the amount of time before the backlight turns off. Press Menu, scroll Handset Settings and press Select. Display and press Select. 2. Scroll 3. Scroll Backlight Timeout and press Select. 4. Scroll to the time you require and press Select. 5. -
Page 31: De-Registering A Handset
De-registering a handset A handset can cancel any handset registered to the same base. This allows the handset to end the wireless connection with the system. Press Menu, scroll Handset Settings and press Select. Registration and press Select. 2. Scroll Unregister and press Select. -
Page 32: Advanced Settings
Advanced settings Advanced settings availability are dependent on the CAT-iq base that is being used. 10.1 DECT settings 10.1.1 Change PIN Some functions are protected by a 4 digit PIN code which must be entered if the settings are changed. The default depends on the base. The PIN can be changed to a preferred number. -
Page 33: Restore To Default Settings
4. The Firmware, EEPROM and Hardware Versions will be displayed. 5. Press to return to standby. 10.1.5 Restore to default settings Press Menu, scroll Advance Settings and press Select. DECT Settings is highlighted. Press Select. 3. Scroll Base Setback and press Select. Confirm? is displayed, Press to confirm or... -
Page 34: Line Selection
7. Press to return to standby. 10.4 Line selection When making calls you can pre set the line selection to auto, manual or individual line selection. Press Menu, scroll Advance Settings and press Select. Line Selection and press Select. 2. Scroll to select Manual, Auto 3. -
Page 35: Technical Specifications
Technical Specifications RF frequency band 1921.536 - 1928.448MHz Channels Operation temperature 10 - 40 Base voltage (AC voltage, 100V - 230V AC 50Hz/60Hz) Base voltage (Adaptor output) 5VDC/1A Handset voltage 750mAh 1.2Vx2 AAA Ni-MH battery Charger voltage (Adaptor output) 6VDC/0.4A Technical Specifications... -
Page 36: Help
Help Unable to open the Alexa App • Force close the app. • Restart your cell phone. • Uninstall and reinstall the app. • For further help you can go to Apple or Google support. iOS - https://getsupport.apple.com/ Android - https://support.google.com/android/ No dial tone •... - Page 37 Handset does not ring • The handset ringer volume may be set to Off. • Check the handset is saved as an attached handset for the line being called. Noise interference on my phone or on other electrical equipment nearby •...
-
Page 38: General Information
General information Important This equipment is not designed to make emergency telephone calls when the power fails. Alternative arrangements should be made for access to emergency services. This product is intended for connection to analogue public switched telephone networks and private switchboards in the US. Important safety instructions Follow these safety precautions when using your phone to reduce the risk of fire, electric shock, and injury to persons or property:... - Page 39 Installation Guidelines • Read and understand all instructions and save them for future reference. • Follow all warnings and instructions marked on the product. • Do not install this product near a bath tub, sink, or shower. • Operate this phone using only the power source that is indicated on the marking label.
- Page 40 (“MZGW”) What Does this Warranty Cover? Subject to the exclusions contained below, MZGW warrants that this Motorola branded product (“Product”) or certified accessory (“Accessory”) sold for use with this product that it manufactured to be free from defects in materials and workmanship under normal consumer usage for the period outlined below.
- Page 41 PROVIDED UNDER THIS EXPRESS LIMITED WARRANTY IS THE EXCLUSIVE REMEDY OF THE CONSUMER, AND IS PROVIDED IN LIEU OF ALL OTHER WARRANTIES, EXPRESS OF IMPLIED. IN NO EVENT SHALL MOTOROLA OR MZGW BE LIABLE, WHETHER IN CONTRACT OR TORT (INCLUDING...
- Page 42 (c) use of the Products or Accessories for commercial purposes or subjecting the Product or Accessory to abnormal usage or conditions; or (d) other acts which are not the fault of Motorola or MZGW are excluded from coverage.
- Page 43 FCC, ACTA and IC regulations FCC Part 15 This equipment has been tested and found to comply with the requirements for a Class B digital device under Part 15 of the Federal Communications Commission (FCC) rules. These requirements are intended to provide reasonable protection against harmful interference in a residential installation.
- Page 44 FCC Part 68 and ACTA This equipment complies with Part 68 of the FCC rules and with technical requirements adopted by the Administrative Council for Terminal Attachments (ACTA). This Product Complies With 47CFR PART 68. The plug and jack used to connect this equipment to premises wiring and the telephone network must comply with applicable Part 68 rules and technical requirements adopted by ACTA.
- Page 45 Industry Canada Operation is subject to the following two conditions: (1) this device may not cause harmful interference, and (2) this device must accept any interference, including interference that may cause undesired operation. The term “IC: “ before the certification/registration number only signifies that the Industry Canada technical specifications were met.
- Page 46 FCC Exposure to Radio Frequency (RF) Signals For Handset This is a radio transmitter and receiver. It is designed and manufactured not to exceed the emission limitsfor exposure to radio frequency (RF) energy set by the Federal Communications Commission (FCC) of the U.S.Government.
- Page 47 Wall mounting Important Before you wall mount your AXH base, check that you are not drilling into any hidden wiring or pipes. Before you drill, make sure all the cables will reach the router, telephone socket and AC outlet. Use the following templates to mark the drilling locations. 6.6cm •...
- Page 48 2. Insert the wall plugs if necessary, then insert the screws leaving about 5mm protruding from the wall on which to hang the phone. 3. Slot the holes on the back of the base over the screw heads and gently pull the base/charger down to make sure it is securely in place.
- Page 49 MOTOROLA and the Stylized M Logo are trademarks or registered trademarks of Motorola Trademark Holdings, LLC. and are used under license. All other trademarks are the property of their respective owners. © 2018 Motorola Mobility LLC. All rights reserved. Version Draft.3 (EN_US)
Need help?
Do you have a question about the AXH01 and is the answer not in the manual?
Questions and answers