Table of Contents
Advertisement
Quick Links
Advertisement
Table of Contents

Related Manuals for Tiffen Steadicam Steadimate


Summary of Contents for Tiffen Steadicam Steadimate
- Page 1 P/N: LIT-816790 Rev. A...
- Page 2 Steadimate Operator's Manual Rev. A P/N: LIT-816790 Steadicam ® and Steadimate are trademarks of The Tiffen Company. Other trademarks are the property of their respective owners. All specifications stated within this manual are subject to change without notice.
- Page 3 © 2016 The Tiffen Company. Written by E. Barthelman.
-
Page 4: Table Of Contents
Balancing Inverted Mode The Vest Vest components Fitting the Vest The Arm Arm components Connecting the Arm and Vest Steadimate Operating Lifting the system Adjusting the Arm Check your threads Operating modes, tips and tricks Accessories Maintenance and Cleaning Contact Tiffen... -
Page 5: A Word From Garrett Brown
A word from Garrett Brown Hello and congratulations on your new Steadimate™. You’re now equipped to ‘fly’ your motorized stabilizer on a Steadicam® arm and vest; so get set for a new, ‘hybrid’ experience. If you’re a longtime Steadicam operator who now has occasion to carry around a MōVI or RONIN Ⓡ the Steadimate restores the weightless, fingertip moves you’re used to: those graceful translations in space that are nearly impossible when your outstretched arms are heavily burdened. If you’re already a Movi/Ronin owner/operator, welcome to our world! You’re in for a treat— a taste of what Steadicam aces have known and enjoyed for decades. Not just angular stability and classically smooth moves, but a chance to tirelessly ‘operate’ moving shots with improved precision and style. Motorized gimbals have uncanny roll stability and anyone can pick one up and instantly move it around. But of course the stabilizer mechanism plus camera, lens, battery, etc. must be held out in front and moved through space by your heavily loaded arms—often for minute after minute—and the increasing fatigue can make your work look jerky and irregular as you pass foreground objects. Steadimate floats your gimbal like a Steadicam sled, so the inherent inertia of the rig in space is fingertip detectable and your booming and traveling moves are Steadicam smooth. In addition, Steadimate is the only support mechanism that is neutrally balanced in two isolated axes for effortless pan and tilt (all others make the rig extremely bottom heavy and tough to tilt). If you’re operating solo, in what Movi calls ‘Majestic’ mode—without a second person controlling camera angle by joystick or wheels—the mushy operating initiated by the support handles can now be significantly improved. With Steadimate, you can tighten the tuning parameters so your pans and tilts are more instantaneous and precise, like the dynamic and responsive operation that Steadicam is known for. So enjoy your new Steadimate™! It will not only relieve up to 25 lbs of outstretched burden, it will smooth the spatial component of moves as well as the angular bit that gimbals do so well. …and don’t forget to read The Steadicam Operator’s Handbook by Jerry Holway and Laurie Hayball, with its vast amount of moving camera lore to help you accomplish what we all strive for—to make effective and memorable shots! Best, Steadicam® Inventor Philadelphia USA... -
Page 7: The Steadimate System
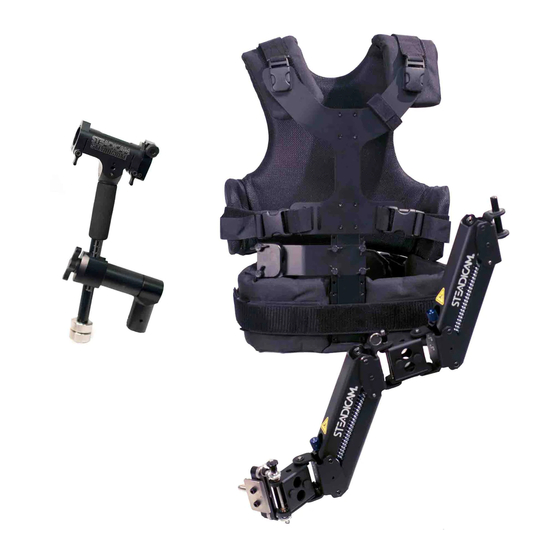
The Steadimate System The Steadicam Steadimate is the link between motorized gimbals and the traditional Steadicam Arm and Vest. Together, the Steadimate System provides additional stabilization and neutrally balanced tilting which result in smoother shots and less work for the operator. -
Page 8: Steadimate Components
Steadimate Components Tilt Balance Mechanism Handlebar Clamp Adjusts tilt alignment precisely Attaches Steadimate to handlebar of your motorized gimbal Balance Nut Tilt Balance Knob Handlebar Clamp Locks Tilt Balance Lock Screw Secures Steadimate to handlebar 4mm Allen key included for tightening Hand Grip Post Block Connection point for the Steadicam Arm... -
Page 9: Setting Up
Setting Up Prepare the Steadimate: Loosen the Handlebar Clamp Locks and Tilt Balance Lock Screw. Center the Balance Nut within the Tilt Balance Mechanism by turning the Tilt Balance Knob. This gives us the maximum range of adjustability in either direction. You may need to turn the Knob in either direction, depending on how the Steadimate was stored. -
Page 10: Preparing The Steadimate
Prepare the Steadimate Install two Balance Weights at the bottom of the Steadimate Post. The weights can be used for fine tuning the top-to-bottom or tilt CG of the Steadimate later. Great when adding or removing small accessories or swapping lenses. Loosen the Post Clamp and slide it all the way up until it reaches the 0 position and then retighten the Post Clamp. - Page 11 Setting Up Is your motorized gimbal dialed in? Proper setup of your motorized gimbal is critical to accurately balancing the Steadimate System. Refer to the manual from your motorized gimbal manufacturer for directions on proper tuning. Test handheld in single operator mode before going any further. Add ALL required accessories and build a compact setup without loose components.
-
Page 12: Installing The Steadimate
Installing the Steadimate Slide the Steadimate onto the handlebar in place of the handle. Note: For optimum performance and safer operation, keep the space between the Handlebar Clamp and the base of the pan motor as narrow as your build will allow. From the profile, visually align the Steadimate with the central axis of the pan motor. -
Page 13: Balancing
Balancing Balancing the Steadimate system for the first time requires patience and attention to detail, just as you experience while setting up a motorized gimbal or traditional Steadicam for the first time. Read through the process and take your time. Note: always balance the Steadimate with the motorized gimbal powered on and performing properly. - Page 14 Upright or Inverted? If the Steadimate remains upright, within 0-45˚ of vertical, you’ll be balancing in Upright Mode. Most setups will be upright, just like operating a traditional motorized gimbal. Flip to the next page to start Upright Mode Balancing. If the Steadimate is between 45˚...
-
Page 15: Balancing Upright Mode
Balancing The Steadimate has two adjustments which we use to balance the Steadimate system; the Tilt Balance Knob and the Post Clamp. The Tilt Balance adjustment enables us to precisely center the Steadimate with the motorized gimbal along the vertical axis. And by adjusting the location of the Post Clamp on the Post, we can place the center of gravity of the motorized gimbal just below the tilt axis of the Post Block. - Page 16 Upright Mode: Centering Turn the Tilt Balance Knob in either direction until the handle stays vertical. The direction you turn depends on which side the Steadimate is tilting. You’ll be able to feel the weight on the grip getting lighter when you turn the correct direction.
- Page 17 Balancing The next step is where the magic happens. By moving the Post Block down the Post, we can adjust where the system’s center of gravity is located relative to the Steadimate pivot. We use a simple method of guess and check to find that sweet spot. The lighter we can make the tilt axis, the less work you have to do tilting and the better isolated the camera will be from the operator’s walking motion.
- Page 18 Upright Mode: Balancing If the tilt behavior is heavy, that means your system is too bottom heavy. But instead of removing the weights, which you can use later for fine tuning, we’ll move the pivot point down the Post. Dock the Steadimate System on the tuning stand. Loosen the Post Clamp and slide the Post Block one number down the Post scale and re- tighten the Post Clamp.
- Page 19 Balancing The closer your balance is to perfect, the more sensitive the Tilt Balance becomes. Check that the system can remain vertical with a light touch. Is it tilting slightly again? If necessary, go back and re-center the Steadimate using the Tilt Balance Knob as previously described in this manual.
- Page 20 Upright Mode: Balancing With the Post Block height set correctly, you can later add or remove weights when accessories, lens swaps or personal preference require small, quick changes to the CG of the system. After repeating these steps a few times, you’ll have found that ideal balance which reduces tilt and panning effort and also further isolates your camera.
-
Page 21: Balancing Inverted Mode
Balancing The Steadimate has two adjustments which we use to balance the Steadimate system: the Tilt Balance Knob and the Post Clamp. The Tilt Balance adjustment enables us to precisely center the Steadimate with the motorized gimbal along the vertical axis. And by adjusting the location of the Post Clamp on the Post, we can place the center of gravity of the motorized gimbal just below the tilt axis of the Post Block. - Page 22 Inverted Mode: Centering Tilt your monitor for ease of viewing with the handlebar at the bottom. Center the Steadimate: Place the system on the Balance Pin and hold the Steadimate handle vertical. Slowly loosen your grip to test whether it will remain vertical on its own, or if it tries to tilt fore or aft. Usually, the Steadimate will tilt one way or the other.
- Page 23 Balancing While still on the Balance Pin, hold the Steadimate handle vertical and loosen the two Handlebar Clamp Locks. Note: DO NOT loosen the Tilt Balance Lock Screw. It will act as a safety and works with the Tilt Balance Mechanism in the next step. Turn the Tilt Balance Knob one way or the other until the handle stays vertical.
- Page 24 Inverted Mode: Balancing The next step is where the magic happens. By moving the Post Block up or down the Post, we can adjust where the system’s center of gravity is located relative to the Steadimate pivot. The good news is that we use a simple method of guess and check to find that sweet spot. The lighter we can make the tilt axis, the less work you have to do tilting and the better isolated the camera will be from the operator’s walking motion.
- Page 25 Balancing If the tilt behavior is heavy, that means your system is too bottom heavy. But instead of removing the weights, which you can use later for fine tuning, we’ll move the pivot point down the Post. Dock the Steadimate System on the tuning stand. Loosen the Post Clamp and slide the Post Block one number down the Post scale and re-tighten the Post Clamp.
- Page 26 Inverted Mode: Balancing The closer your balance is to perfect, the more sensitive the Tilt Balance becomes. Check that the system can remain vertical with a light touch. Is it tilting slightly again? If necessary, go back and re-center the Steadimate using the Tilt Balance Knob as previously described in this manual.
- Page 27 Balancing With the Post Block height set correctly, you can later add or remove weights when accessories, lens swaps or personal preference require small, quick changes to the CG of the system. After repeating these steps a few times, you’ll have found that ideal balance which reduces tilt and panning effort and also further isolates your camera.
- Page 28 Inverted Mode: Balancing...
- Page 29 The Steadicam Vest The Steadicam Vest is the major connection between your body and the Steadimate System. It’s adjustable to fit most body types via Velcro straps and micro-adjustable buckles. Just like setting up the Steadimate, taking your time to properly fit the vest will ensure you get the highest performance and most comfort out of the system.
-
Page 30: Fitting The Vest
Fitting the Vest Proper Vest fit: Open all buckles on the • left side of the vest and slip the vest on. The length of the Vest Close the Shoulder should place the waist low • Connector. over the hip bones yet still Leave all other Buckles allow your legs to lift for •... -
Page 31: The Arm
The Steadicam Arm The Steadicam Arm supports the weight of the Steadimate System while helping isolate the camera from the operator’s movements and facilitates booming up and down. The lifting strength of the arm is adjustable to accommodate a wide range in payload. It also incorporates Side-to-Side Adjustment Wheels which help align the lifting axis to your body. -
Page 32: Connecting The Arm And Vest
Connecting the Arm and Vest Set the “Threads” to start: The top Adjustment Wheel should be turned all the way in, so no threads are showing and then back out 2 full turns. The bottom Adjustment Wheel should be turned all the way in until it stops. This will put the lifting axis in line for most operators and probably won’t change more than ½... - Page 33 Steadimate Operating 101 We’re almost there! Let’s learn to pick up the rig and get the arm adjusted for your body and the weight of the Steadimate System. You’ll have to be wearing the weight of the system to make these adjustments. With the tuning stand raised so the Handlebar of your motorized gimbal is roughly at your chin level, bow to the...
-
Page 34: Adjusting The Arm
Adjust the Lift: Important: The Lift adjustment knobs can only be adjusted when the arm segments are slightly above horizontal. Do not force the knobs when the arm is unloaded or boomed too far up or down. At the correct angle, the knobs turn very easily. If the arm floats too high or too low for your payload, it will be necessary to lift or lower it to find that sweet spot to make adjustments. -
Page 35: Check Your Threads
Steadimate Operating 101 Testing your threads: Stand up straight and look straight ahead. Is the Steadimate System comfortably staying in one place in front of you? Note: it’s helpful to remember your thread settings so you can return to the ideal settings quickly next time. -
Page 37: Steadimate Operating
Steadimate Operating The Steadimate System is now capable of helping you create dynamic, endless, moving shots all day long. It is truly a hybrid machine with its own unique strengths. And yet, you can still quickly take advantage of handheld opportunities when needed and then go right back to Steadimate mode with the Arm and Vest without losing a beat. - Page 38 Similar to traditional Steadicam operating, we start and finish every move with the arm. At the start of a shot, before taking a step, move the Steadimate System in the direction of travel and then follow along on foot. At the completion of the shot, stop walking first and bring the camera to rest with only your arm movement.
- Page 39 Steadimate Operating If you’re walking through a skinny door, here’s a trick: Go one handed while approaching the door and use the free hand to force the center hinge of the Arm inward, making you narrow. Important: DO NOT to place your fingers inside the arm mechanism or it might bite! It is possible to do handoffs with an operating partner for trick shots like going through...
- Page 40 You may wish to operate with the Steadimate inverted even with a light system. You may find it more comfortable for certain shots, or you wish to raise the lens a little. Reverse the motorized gimbal orientation on the handlebar so the camera faces forward. Adjust the Post Block height so the Steadimate tilts with that familiar fingertip control.
-
Page 41: Accessories
Steadimate Accessories Here are a few Tiffen accessories you might want to add to your Steadimate System. Check our website at www.Steadicam.com for the latest innovations in camera stabilization. Flipped Bridge Plate Arm Post Inserts Allows the arm to cross your body Available For ½”... -
Page 42: Maintenance And Cleaning
Visually check the arm for any damage, especially if it’s experienced rough use. DO NOT lubricate any part of the arm! It should be silent, free moving and consistent. If for any reason it’s not, contact Tiffen for service. -
Page 44: Contact Tiffen
Contact Tiffen Tiffen International Ltd. Pinewood Studios Pinewood Road Iver Heath SL0 0NH United Kingdom Tel: (44) 1753 783 960 Email: info@tiffen.com...
Need help?
Do you have a question about the Steadicam Steadimate and is the answer not in the manual?
Questions and answers