Table of Contents
Advertisement
Quick Links
Advertisement
Table of Contents

Related Manuals for Tiffen Steadicam Zephyr


Summary of Contents for Tiffen Steadicam Zephyr
- Page 1 Contents Operating Manual p/n LIT-807000...
- Page 2 90 Oser Avenue Hauppauge, New York 11788 631 273-2500 800 645-2522 631 273-2557 fax www.steadicam.com steadicam@tiffen.com www.tiffen.com Technical Support 1-818-843-4600 ext.17 Manufactured in the United States of America © 2011 The Tiffen Company, LLC. Written by J. Holway & L. Hayball...
-
Page 3: Table Of Contents
Use a second video camera to record your exercises – how you stand and move is critical for great operating. ® ® 2® ™ STEADICAM , UltraBrite , Ultra and Scout are trademarks of the Tiffen Company, LLC. ®... -
Page 4: Overview
The Tiffen Company takes great pride in producing the world’s ™ best stabilizers. The Zephyr Overview stabilizer continues our tradition of excellence and innovation, performance, lightweight, and low-cost rig. ™ Like all our models, the Zephyr stabilizer is designed to be... - Page 5 24 volts, and a compact vest, plus batteries, chargers, cases, stands, power and video cables, low-mode kits, vehicle mounts, and other professional accessories. Visit www.tiffen.com for more details. The monitor and the batteries are adjustable in and out, which, along with the add-on Merlin ™...
-
Page 6: The Zephyr ™ Sled
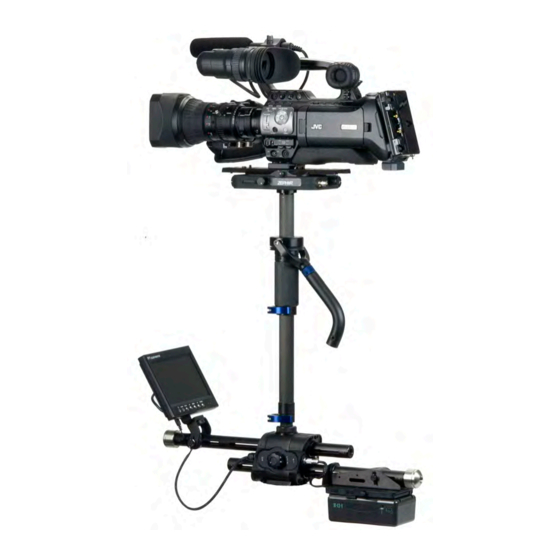
The Zephyr ™ sled The Zephyr Sled ™ Camera mounting platform Stage connectors Side to side adjustment knob Fore-aft adjustment Dovetail knob lock Gimbal clamp Post Add-on Post clamp weights Add-on weights Clamp for sliding monitor and battery rods... - Page 7 Gimbal Gimbal handle Battery mount additional LEMO power connector 1/4-20 threads for mounting accessory weights Registration pin HD BNC for monitor rod connector Registration pin for battery rod...
-
Page 8: Getting Started
Prepare the stand and docking bracket Set up the stand and docking bracket: Getting Started Prepare the sled for the camera Adjust the monitor position: Adjust the gimbal position:... - Page 9 Adjust the battery position and Remove the dovetail from the attach the batteries: stage and set aside: dovetail lock V-lock battery side to side adjustment fore-aft knob adjustment AB battery knob Dock the sled in the docking bracket:...
-
Page 10: Attaching The Camera
Attaching the camera to the sled ™ We attach the camera to the sled via a dovetail plate. With the Zephyr stabilizer, Attaching the this plate has safety stops on the ends, and several holes for mounting screws. We want to attach the dovetail to the camera so that we have the widest possible range of Camera adjustment, both fore-aft and side to side. - Page 11 Mounting the camera on the sled: Connect the power and video cables and test that everything works: ® Now proceed to static balance the sled.
-
Page 12: Balancing
Balancing the sled ® ™ The Steadicam Zephyr stabilizing system works, in part, by the careful balancing of components (camera, monitor, accessories, and battery). We always balance the sled Balancing to help us get the shot, so that the operator does the least amount of work to aim the balance, where we balance the sled in all three axes (top-to-bottom, side to side, and fore-aft), so that the sled hangs upright and is not too bottom heavy. - Page 13 Look at the sled from the side. If the sled is tipped up or down: First we position the gimbal, which acts as a pivot point, just a bit above the center of gravity on the center post, and here’s how we do that: balance point of the gimbal Fine tune the side to side balance:...
-
Page 14: The Vest
The vest Shoulder The Vest connector Shoulder Use an allen key to unlock Adjustable and adjust the angle of the shoulder shoulder connector. connector (see insert) Adjustable spar Chest pad Chest plate Chest release pin connectors Socket block height adjustment Socket block Note: Shorten or extend the shoulder straps so that the clip is high on your... - Page 15 Putting on the vest Please read the vest instructions completely before you try to put the vest on. It is very helpful to have a friend help Otherwise use a full-length mirror. Open the vest ® Pay close attention to the good above.
-
Page 16: The Arm
The arm The Arm Arm post Forearm section Lift adjustment knob Double action hinge Upper arm section Steel springs Lift adjustment Socket quick knob release pin Socket Rod ends Mounting the arm to the vest The arm mates with the vest via an adjustable socket in the arm and a female socket block on the vest. -
Page 17: Setting Your Threads
Determining your threads is part of basic operating technique Adjusting your threads For almost all operators, regardless of body type, the typical adjustment for the “side to side” screws (the rod ends in the arm) is 1.5 to 2 turns out on the top screw and ALWAYS all the way in on the bottom screw. -
Page 18: Picking Up The Sled
Picking up the sled Picking Up the Sled Undocking, setting your threads, and docking the sled With the vest on and the arm attached to the vest, undock the rig:... - Page 19 Practice replacing the sled in – you will gain control and endurance rapidly as you the docking bracket because there are so many adjustments to make before it all falls into place and “magically” works with you. It may be that you will want to adjust the lift capacity of the Eventually you must adjust them both.
-
Page 20: Adjusting The Lift
Setting the lift capacity of the arm Now it’s time to adjust the arm for the weight of your camera. Adjusting the Lift Adjusting the arm Important: The lift adjustment knobs can only be turned when the arm segments are slightly above horizontal. - Page 21 CAUTION: IF YOU REST YOUR RIGHT HAND ON THE CONNECTING ARM, KEEP YOUR FINGERS OUT OF THE SPACE BETWEEN THE ELBOW AND THE ARTICULATING ARM. A SUDDEN RISE OF THE CAMERA COULD INJURE YOUR FINGERS IF THEY ARE IN THIS SPACE. Boom the sled all the way up and down while watching the arm sections.
-
Page 22: Basic Operating
Hand grips The two-handed technique was invented by Garrett Brown while working on The Basic Operating Shining, and it has been the preferred method of operating ever since. Basically, the right hand does the work of positioning the sled in space (moving horizontally and vertically relative to the body), and the left hand aims the sled (and therefore the camera) by panning... - Page 23 Basic movement More Practice and Training Try moving around and get used to the For operators who have not yet taken a workshop, we (once again!) strongly urge you way it feels. Pay attention to how your to do so, as it is the quickest way to learn how to operate properly. movements and posture affect the sled.
-
Page 24: Advanced Techniques Dynamic Balancing
® Dynamic Balancing the Steadicam Sled A sled is in dynamic balance when the statically and dynamically. There is some center post remains vertical as the sled is leeway as to the required precision of Advanced Techniques panned (and this is critical) at any and all dynamic balance. - Page 25 We put the rig in dynamic balance by Each time you lock the battery in a new In practice, it’s a lot easier than it sounds position, you must rebalance the sled on the page, and luckily, there’s one statically with the camera. Do not move great gift in all this: it doesn’t matter for position.
-
Page 26: Low Mode
Advanced Techniques low mode operating, you must: Low Mode The camera will need some means of attaching a second dovetail to the top of low mode brackets and 100% video the camera. mode bracketry might also provide a means of mounting motor rods (or a dovetail with motor rods), and this system should not interfere with camera functions or working with the camera in... - Page 27 adaptors – do not have a proper way to mount a dovetail above the camera. We suggest you use the “bottom” dovetail for low mode, shooting upside down. You will need before you shoot. You can either leave the monitor upside Flip the monitor by unscrewing the monitor mount, turn the monitor over and replace the screw.
-
Page 28: Accessory For Lightweight Cameras
Accessory for lightweight cameras When using very lightweight cameras, it’s often better to add weight to the camera or stage, so that the gimbal position remains close to the stage. ™ It’s very easy to use the Merlin Stage Weight Bracket and any number of Merlin ™... -
Page 29: Zephyr ™ Sled Connectors And Pin-Outs
Zephyr ™... -
Page 30: Accessories
IDX VL-2SPlus battery charger FFR-000005 PowerCube battery hard case 011-0368 ™ Anton Bauer Dionic HC (Li-Ion) battery FFR-000151 Anton Bauer dual charger FFR-900152 Anton Bauer quad charger w/ LCD display FGS-900059 Visit www.tiffen.com for a complete list of Steadicam accessories. ®... -
Page 31: Cases And Packing
Also recommended Wireless follow focus system and brackets Video transmitting and receiving system Wired zoom control system Inertial augmentation (Antlers or Gyros) ™ Video recording system Cases & packing When repacking the sled into the case, make sure the gear gets wiped down and not put away wet. - Page 32 The Tiffen Company, 90 Oser Avenue, Hauppauge, NY 11788 ®...
Need help?
Do you have a question about the Steadicam Zephyr and is the answer not in the manual?
Questions and answers