Table of Contents
Advertisement
Quick Links
Advertisement
Table of Contents

Related Manuals for Tiffen steadicam solo


Summary of Contents for Tiffen steadicam solo
- Page 1 User ’s Manual Solo User’s Manual v. 01.01 p/n LIT-821000...
-
Page 2: Table Of Contents
Beyond the Basics of STEADICAM STEADICAM Training MONOPOD MODE Monopod Operation Maintenance Useful Accessories, Contact TIFFEN NOTE: It’s important to read this manual thoroughly, so you can have your SOLO up and running (maybe literally) in just a few minutes. Let’s get started! -
Page 3: Getting To Know The Solo
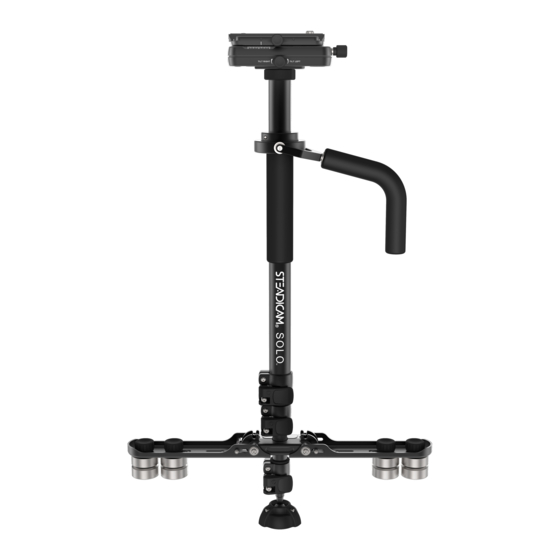
A letter from Steadicam® inventor, Garrett Brown. Dear Friends, Congratulations! Your Steadicam SOLO™ is a professional shooting instrument. It’s also a brand new critter -- a radical hybrid that crosses-over seamlessly from Steadicam to monopod and performs tricks in between that neither can do alone. - Page 4 User’s Manual Top Stage Quick Release (QR) Plate, Lock Knob and Release Button. Balance Adjuster Knobs. Gimbal Handle and Post Grip One to support and one to control the rig. Yes, the handle is supposed to be loose! 4-section post Post Locks.
-
Page 5: Mounting Your Camera
User’s Manual Wings With 8x Weights. They’re folded now, but you’ll spread them and be flying soon. Swivel Foot For use in MONOPOD MODE. Or for resting the rig after a long STEADICAM shot. Tools Allen Wrenches. Next: Mounting your camera... - Page 6 User’s Manual Build the camera exactly as you plan to use it Install the battery and media card (or tape or film!) Attach ALL camera accessories, in a compact setup with no loose wires. Make sure the LCD screen is flipped open and positioned for easy viewing.
- Page 7 User’s Manual Mark the point with a piece of tape on the side of the camera. Rotate the camera 90° and find the Side-to-Side balance point. Mark this point as well.
- Page 8 User’s Manual NOTE: Some cameras (like DSLRS) may have balance points OUTSIDE of the camera body. In that case, you would mount the QR Plate to the camera FIRST and use the pen to find and mark the balance points. Fasten QR Plate to your camera Remove QR Plate from the Top Stage and remove the 2 camera...
- Page 9 User’s Manual Fasten with the appropriate camera screw. Do not over tighten, but ensure the camera will not rotate. NOTE: The QR plate will work in either direction, but make sure to mount it parallel to the lens. Mount camera to Top Stage with QR Plate Slide the QR Plate into the Top Stage, position your Fore-and-...
-
Page 10: Steadicam Mode
User’s Manual Using the Side-to-Side Adjuster Knob, align your Side-to-Side mark with the CENTER of the Post. Don’t pick it up just yet! We’ll learn how to set up the SOLO to fly in the next section. Next: STEADICAM MODE... -
Page 11: Balancing The Solo
User’s Manual Now for the fun part! - Page 12 User’s Manual Quick reference guide to SOLO setup: Camera is 2-5 lbs Start with 1 Weight 23” Post extension Camera is 5-8 lbs Start with 3 Weights 25” Post extension Camera is 8-10 lbs Start with 4 Weights 27” Post extension Rest the SOLO With your camera mounted, rest the Swivel Foot on a solid surface.
- Page 13 User’s Manual The Tabs should *click* into place. Picking up the SOLO. Carefully pick up the SOLO, support it by the Gimbal Handle alone and allow the Post to hang without touching anything. Observe how the SOLO is balanced Fore-and-Aft and Side- to-Side (both axes.)
- Page 14 User’s Manual Use the Fore-and-Aft Adjuster Knob to balance the Post vertically. Use the Side-to-Side Adjuster Knob to balance the Post vertically. When the Post is vertical in BOTH axes, move on to test your Drop Time. TIP: Always move the weight UPHILL to balance.
- Page 15 User’s Manual Test for Drop time Support the SOLO firmly with the Gimbal Handle. With your other hand, rotate the Post so it’s horizontal. Release the Post and observe how fast the SOLO drops. Count the number of seconds until the Post passes vertical.
- Page 16 User’s Manual If your Drop Time is MORE than 2 seconds, is completely neutral or the SOLO inverts when held by the Gimbal Handle: Extend Post #2 by an inch or so (if possible.) OR add 2 more weights to the Wings.
- Page 17 User’s Manual If your Drop Time is LESS than 2 seconds (the SOLO drops too fast): Retract Post #2 by an inch or so (if possible.) OR remove 2 of the weights from the Wings. Unscrew locking nut and remove the weight.
-
Page 18: Basic Steadicam Operation
User’s Manual Repeat the Fore-and-Aft and Side-to-Side balance. The slower the Drop Time, the more critical the Balance Adjusters will be to get the Post PERFECTLY vertical. TIP: To ensure accurate leveling, you may want to attach a tiny bubble level on the gimbal, on the camera or another horizontal surface of the SOLO. - Page 19 User’s Manual The Grip The Hand on Gimbal Handle supports weight of rig. A STRONG grip controls where the SOLO goes and how it flies. Use either hand and alternate if necessary. Post Grip hand guides the rig, preventing unwanted movement.
- Page 20 User’s Manual Use this hand for panning and tilting the camera. Don’t LIFT the SOLO with the Post Grip, do your lifting with the Gimbal Handle only. The Posture Stand upright, don’t bend over. Hold the SOLO as close as possible without contacting your body.
-
Page 21: What Not To Do
User’s Manual The Walk Walk normally, don’t bend your knees too much and use gentle footsteps. It’s best to know where you’re going before you start. Adjust your grip on the Post when starting/stopping to prevent the SOLO from swaying. Finesse the beginning and end of each move with your arms. - Page 22 User’s Manual What NOT to do! Bend over. Hold POST away from the Gimbal. Contact rig with body.
-
Page 23: Beyond The Basics Of Steadicam
User’s Manual What NOT to do! Support rig by the Post Hand. Contact Top Stage with Gimbal Handle. Touch the Camera while operating. Next: Beyond the basics of STEADICAM... - Page 24 User’s Manual Gimbal Placement. Why? With the Gimbal CLOSER to the camera, you can remove weights from the Wings which makes the SOLO lighter. Or you can use the same weights with a more compact Post. With the Gimbal FURTHER from the camera, you can lengthen the Post for additional lens height or to go lower in Low Mode.
- Page 25 User’s Manual Slide the Gimbal. And then RE-TIGHTEN THE GIMBAL LOCK SCREW before testing. Careful! Don’t over-tighten this screw. Move the Gimbal CLOSER to the camera for a faster Drop Time. Move the Gimbal FURTHER from the camera for a slower Drop Time.
- Page 26 User’s Manual Make BIG Gimbal Placement changes until you’re close to the 2 second Drop Time and then make smaller changes to get it perfect. Tip: Once you have the Drop Time CLOSE to your target, you might choose to make small changes to the Post length to fine tune your Drop Time without using any tools.
- Page 27 User’s Manual For the SLOWEST panning, ADD more weights equally to the Wings, but place them as FAR from the Post as possible. For the FASTEST panning, TAKE AWAY more weights equally from the Wings, and place the remaining weights as CLOSE to the Post as possible.
- Page 28 User’s Manual Long Mode Why? For additional lens height, additional tilt and roll resistance and to reach lower in Low Mode (that’s next.) Again, leave the camera and weights where you have them Dynamically Balanced. Extend the 2nd Post section with the Wings.
- Page 29 User’s Manual Adjust for Static Balance if necessary. Low Mode Why? To get closer to the ground or fly over a surface. Re-adjust your LCD screen so you can see it with the SOLO inverted, make sure all accessories are locked down tight.
-
Page 30: Steadicam Training
User’s Manual Pick up the SOLO inverted and check your Static Balance with a 2 second drop time. Once the SOLO is balanced, go chase your dog or kids! You should still operate with your POST hand below the Gimbal, not on the foam grip. - Page 31 User’s Manual Starting out Start with the camera system OFF and get used to walking with the SOLO. Later, power up the camera and start framing shots. Use your peripheral vision to watch your footing while looking at the camera screen. Practice on smooth, level surfaces at first.
- Page 32 User’s Manual Walk the SOLO along the line so the crosshair is centered in the frame the entire time. The SOLO should remain centered over the line as if it’s on tracks. Walk forward and backwards with the frame centered on the crosshair. Concentrate on maintaining a level horizon, the camera shouldn’t look like you’re on a boat!
- Page 33 User’s Manual Practice with a wide lens and then try a telephoto lens. See how each have their own challenges? Tilting Well Why? To improve your accuracy when Tilting the SOLO. Hand position can change from traditional operating: Tilting UP: slide your Post hand down a LITTLE, and use your finger tips to support the Post.
- Page 34 User’s Manual Add a long vertical line through the eye-level crosshair and put crosshairs on either end. Practice Tilting from top to bottom and back again without walking. Walk the line and Tilt from one mark to the other. Begin on one mark, start walking and end your walk centered on the 2nd mark.
- Page 35 User’s Manual Stand at the far end of the line and try panning from one end of the Panning line to the other while maintaining your horizon. Now, walk the line and pan along the Panning line, keeping it parallel and center of frame.
-
Page 36: Monopod Mode
User’s Manual Now walk the line and keep your BOTTOM crosshair at the bottom of the frame. Congratulations!!! You now have taken your first step in making beautiful, smooth, STEADICAM shots. Though, don’t forget it takes practice to become skilled with the SOLO, and only with continued practice can you become a SOLO professional. -
Page 37: Monopod Operation
User’s Manual NEXT: MONOPOD Operation... - Page 38 User’s Manual Looks easy, and it is! Unlock the Wings by pulling the Tabs and folding each Wing to the Post, there’s no need to move the Weights. Extend the Post by opening each Section Lock and extending the SOLO to your desired height. Operate with the Swivel Foot on the ground for stability.
-
Page 39: Maintenance
User’s Manual Hold the camera as you would hold it handheld, with one hand on the grip, the other on the lens. There’s no need to use the Gimbal Handle in MONOPOD MODE. Lean forward to tilt down. Lean backwards to tilt up. Take your shot. -
Page 40: Useful Accessories, Contact Tiffen
CAUTION: Over-tightening the Post Lock screws may DAMAGE the Post. Surface cleaning Use a soft, damp cloth to remove dust and fingerprints. DON’T use aggressive solvents or abrasives! Next: Useful Accessories and contact TIFFEN... - Page 41 Tel: (44) 870 1001220 Fax: (44) 1869 321766 email: info@tiffen.com www.tiffen.com ©2014 The Tiffen Company. All rights reserved. STEADICAM is a registered trademark and SOLO is a trademark of The Tiffen Company. vPatent pending. Specifications subject to change without notice.
Need help?
Do you have a question about the steadicam solo and is the answer not in the manual?
Questions and answers