Table of Contents
Advertisement
Quick Links
Advertisement
Table of Contents

Related Manuals for First Degree Fitness POWER CLIM


Summary of Contents for First Degree Fitness POWER CLIM
- Page 1 USER GUIDE...
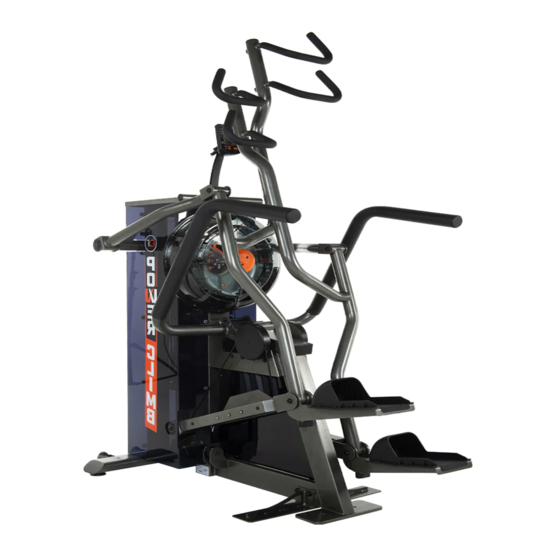
- Page 3 Introduction WELCOME TO YOUR POWER CLIMB Congratulations on your purchase – the POWER CLIMB is a fluid resistance climbing machine, challenging users to a high intensity workout with tremendous full body muscle activation. Founded on compound, multi-joint movement the POWER CLIMB builds core stability and demands contralateral integration of the upper and lower extremity.
-
Page 4: Table Of Contents
Contents Safety ................... 5 Assembly ................6 POWER CLIMB Box 1 & 2 Contents ..........7 Assembly Instructions ............... 8 Operating Instructions ............11 Bluetooth Auto-Adjust Monitor ..........13 Calibration Procedure ............14 Maintenance & Troubleshooting ........... 15 International Warranty ............16... -
Page 5: Safety
Safety All users should read the operating instructions contained within this manual and understand how to use the POWER CLIMB before use. Visit www.firstdegreefitness.com for additional information on technique and training instruction. NOTE THE FOLLOWING SAFETY PRECAUTIONS: 1. CAUTION: As with all fitness programs 6. -
Page 6: Assembly
Assembly Product Highlights Product Specifications Product Class: Multiple hand positions for different body types Braking System: and recruitment patterns Speed Independent Product Net Weight: 144.6kg (318.79lb) Auto-level, Bluetooth Product Gross Weight: monitor - real time 171.2kg (377.43lb) power in watts per Minimum Safe Operating Surface Area: repetition 2750mm (108.27”) Length... -
Page 7: Power Climb Box 1 & 2 Contents
POWER CLIMB Box 1 & 2 Contents Box 1 Contents Box 2 Contents Item Qty. Description Item Qty. Description Main Frame M10 Washer Left Pedal Assembly M10 Nyloc Nut Right Pedal Assembly 8mm Allen Key Left Handrail Multi-Tool Right Handrail Water Treatment Tablet Shaft 30x68mm D Cell Duracell Battery... -
Page 8: Assembly Instructions
Assembly Instructions STEP 1 Install the Right Pedal Assembly REQUIRED Assemble the 2xShaft 30x68mm[6] to the Right Pedal Assembly[3]. 1 x Right Pedal Assembly [3] 2 x Shaft 30x68mm [6] STEP 2 REQUIRED Secure both sides of the Right Pedal Assembly using the 4 x M12x20mm [8] 4x M12x20mm Bolt [8], M12 Washer [10] and tighten 4 x M12 Washer [10]... - Page 9 Assembly Instructions STEP 3 Install the Left Pedal Assembly REQUIRED Assemble the 2xShaft 30x68mm[6] to the Left Pedal Assembly[2]. 1 x Left Pedal Assembly [2] 2 x Shaft 30x68mm [6] STEP 4 Secure both sides of the Right Pedal Assembly using the REQUIRED 4x M12x20mm Bolt [8], M12 Washer [10] and tighten 4 x M12x20mm [8]...
- Page 10 Assembly Instructions STEP 5 Install the Left/Right Handrail Assembly REQUIRED Secure both sides of Left/Right Handrail Assembly using the Bushing 16x100mm[7], 3x M10x130mm Bolt [9], 6x M10 1 x Left Handrail [4] Washer [11], 3x M10 Nyloc Nut[12] as shown. 1 x Right Handrail [5] 1 x Bushing 16x100 mm[7] 3 x M10x130mm Bolt [9]...
- Page 11 (rechargeable via USB) available as an option. We recommend this to any commercial facility, with multiple units, that has a need to drain and refill Tanks from time to time. To purchase, contact your nearest First Degree Fitness distributor or go to our website on www.firstdegreefitness.com for details.
-
Page 12: Operating Instructions
Operating Instructions CHANGING RESISTANCE LEVEL Changing resistance on your Power CLIMB is simple. The level of resistance is determined by the level indicator located on the front of the tank. Level one indicates lightest resistance, level ten represents heaviest resistance. The tank‟s variable fluid resistance technology ensures an instant catch and constant resistance throughout each movement. -
Page 13: Bluetooth Auto-Adjust Monitor
Bluetooth Auto-Adjust Monitor Auto Start: Commence exercise to activate. Reset all values: Press and hold RESET button for 3 seconds. Auto Power Down: Over 5 minutes. All values revert to zero after restart. WATT: Power measured in watts WORK: Duration of exercise segment REST: Duration of rest period POWER GRAPH: Press RESET to change display from Power Curve to Cumulative Power Graph... -
Page 14: Calibration Procedure
Calibration Procedure Press and hold 「RESET」and「REST」for 5 seconds. Display will show “ - - - - “ Turn handle to Level 1. Press Reset. Display will now show Level 2. Level 1 Calibration is complete. Turn handle to Level 2. Press Reset. -
Page 15: Maintenance & Troubleshooting
Tanks from time to time. To purchase, contact your nearest First Degree Fitness distributor or go to our website on www.firstdegreefitness.com for details. The computer display is erratic and It is possible that there is a loose connection. -
Page 16: International Warranty
Metal Frame – 10 Year Limited Warranty FIRST DEGREE FITNESS will repair or replace the Metal Main Frame of the Rower should it fail due to any defect in materials or workmanship within 10 years of the original purchase. Warranty does not apply to frame coating. - Page 20 CONTACT US For customer support please visit firstdegreefitness.com/support TAIWAN T: +886 3 478 3306 764 Chung Shan South Rd Yangmei Taoyuan Taiwan R.O.C.
Need help?
Do you have a question about the POWER CLIM and is the answer not in the manual?
Questions and answers