
Related Manuals for HMS Ixxat CAN@net NT 420


Summary of Contents for HMS Ixxat CAN@net NT 420
- Page 1 C C A A N N @ @ n n e e t t N N T T 2 2 0 0 0 0 a a n n d d 4 4 2 2 0 0 USER MANUAL 4.01.0332.20000 1.6 en-US ENGLISH...
- Page 2 Important User Information Liability Every care has been taken in the preparation of this document. Please inform HMS Industrial Networks of any inaccuracies or omissions. The data and illustrations found in this document are not binding. We, HMS Industrial Networks, reserve the right to modify our products in line with our policy of continuous product development. The information in this document is subject to change without notice and should not be considered as a commitment by HMS Industrial Networks.
-
Page 3: Table Of Contents
Table of Contents Page User Guide ........................... 3 Target Audience.......................3 Related Documents ......................3 Document History ......................3 Trademark Information .....................3 Conventions........................4 Safety Instructions ......................5 General Safety Instructions ....................5 Intended Use........................5 Scope of Delivery ........................ 5 Product Description ......................6 Features .........................6 Operational Modes ......................6 Installation........................... - Page 4 Default Network Settings ....................24 Default TCP/UPD Ports ..................... 24 10 Technical Data ........................24 11 Support/Return Hardware....................25 11.1 Support ........................25 11.2 Return Hardware ......................25 12 Disposal..........................25 Regulatory Compliance ..................... 27 EMC Compliance (CE) ..................... 27 FCC Compliance Statement ....................
-
Page 5: User Guide
New CAN-Gateway-Configurator version March 2019 Layout changes Trademark Information Ixxat is a registered trademark of HMS Industrial Networks. All other trademarks mentioned in ® this document are the property of their respective holders. 4.01.0332.20000 1.6 en-US CAN@net NT User Manual... -
Page 6: Conventions
This is a cross-reference within this document: Conventions, p. 4 This is an external link (URL): www.hms-networks.com Safety advice is structured as follows: Cause of the hazard! Consequences of not taking remediate action. -
Page 7: Safety Instructions
Technical Data, p. 24). ► Protect product from fire. ► Do not paint the product. Do not modify or disassemble the product. Service must be carried out by HMS Industrial ► Networks. ► Store products in dry and dust-free place. Intended Use The components are used to connect computer systems to CAN and CAN FD networks and to connect the networks with each other. -
Page 8: Product Description
Product Description 6 (30) Product Description The CAN@net NT hardware provides connectivity to Ethernet and CAN networks with various operational modes. The CAN@net NT 420 additionally is capable of CAN FD. The application firmware provides functions to access a CAN bus from virtually every Ethernet TCP/IP host. The CAN@net NT provides message filtering, based on CAN identifiers, for Bridge and Gateway mode in the direction from CAN system to TCP/IP network. - Page 9 Product Description 7 (30) For information about the communication in Gateway mode and commands that are used to exchange CAN messages see Software Design Guide CAN@net NT 200/420 Generic Protocol for Gateway Mode on www.ixxat.com. 4.2.2 Bridge Modes With the CAN@net NT the Bridge mode allows to connect CAN systems over an Ethernet TCP/IP network, for example the local intranet or the internet (firewall needed).
-
Page 10: Installation
Installation 8 (30) Installation Installing the Software 5.1.1 Installing the Driver For the operation of the CAN-Gateway Configurator and the CAN@net VCI mode a driver is needed. The VCI driver is constantly improved and expanded! Check if a newer version is available within the support area on www.ixxat.com. - Page 11 Installation 9 (30) The shield of the CAN connector is connected to the device ground and the PE on the back of the device (DIN rail) via a 1 MΩ resistor and a 10 nF capacitor. To achieve highest interference immunity, ground the shield of the CAN cable.
-
Page 12: Checking And Updating The Firmware
Installation 10 (30) Checking and Updating the Firmware 5.3.1 Checking the Device Firmware ► Make sure, that the latest VCI driver is installed. Make sure, that the device is correctly connected to the host computer and to power supply. ► Make sure that the latest CAN-Gateway Configurator is installed (check within support area ►... - Page 13 Installation 11 (30) ► Select the update file. → Firmware of the connected device is updated. ► In the status window check if the update is completed successfully. ► Write the saved configuration to the device. 4.01.0332.20000 1.6 en-US CAN@net NT User Manual...
-
Page 14: Configuration
Configuration 12 (30) Configuration The security settings set via the CAN-Gateway Configurator define if changing the configuration via Ethernet is possible and if a password is needed to change to configuration. The default password is IXXAT. For more information see user manual CAN-Gateway Configurator. -
Page 15: Basic Configuration
Configuration 13 (30) Basic Configuration CAN@net NT 200 and CAN@net NT 420 can not be combined. For CAN-Ethernet-CAN Bridges use either NT 200 devices or NT 420 devices. 5 6 7 8 9 10 13 14 15 Fig. 8 CAN-Gateway Configurator Information about target device (STS reflects Power LED of device) Drop-down list Select device type Drop-down list Select device version... - Page 16 Make sure, that device type and firmware version are selected according to the connected device. HMS Industrial Networksrecommends to use a static IP address. ► Select the type of CAN@net NT in use in drop-down list Select device type (2).
- Page 17 Configuration 15 (30) ► Select the desired device in the drop-down list Target device. ► If necessary define a new IP address. ► Make sure that the IP address is in the range of the network in which the device is integrated.
- Page 18 Connect the device again in CAN-Gateway Configurator (see Connecting the Device in CAN- Gateway Configurator, p. 15). HMS Industrial Networks recommends to change the default password. See User Manual CAN-Gateway Configurator for more information. 4.01.0332.20000 1.6 en-US CAN@net NT User Manual...
-
Page 19: Ascii Gateway Configuration
Configuration 17 (30) ASCII Gateway Configuration Fig. 11 ASCII Gateway Mode Make sure, that the device is connected (see Connecting Possibilities, p. 12) and that the ► basic configurations are set (see Basic Configuration, p. 13). Make sure, that ASCII Gateway Mode is selected in drop-down list (2). ►... -
Page 20: Bridge Configuration
Configuration 18 (30) Bridge Configuration In the Bridge configuration each device can be configured differently, but all devices must be configured in one configuration file. The configuration can be set for one device and then downloaded to the other devices (Master, Slave 1 to 3). In the Local CAN Bridge mode only one device is connected and has to be configured. -
Page 21: Vci Interface Configuration
Configuration 19 (30) ► For the CAN-Ethernet-CAN Bridge connect the devices one after another and download the configuration to each device. Observe that for the configuration of a CAN-Ethernet-CAN Bridge each device must be ► configured with the same configuration file. If the configuration is changed, the new configuration file has to be downloaded again to all devices. -
Page 22: Reset To Factory Settings
Configuration 20 (30) Reset to Factory Settings It is possible to reset a connected device to factory settings. Fig. 14 Menu Reset to factory settings Make sure that the device is connected via USB. ► Open menu Target and select Reset to Factory Settings. ►... -
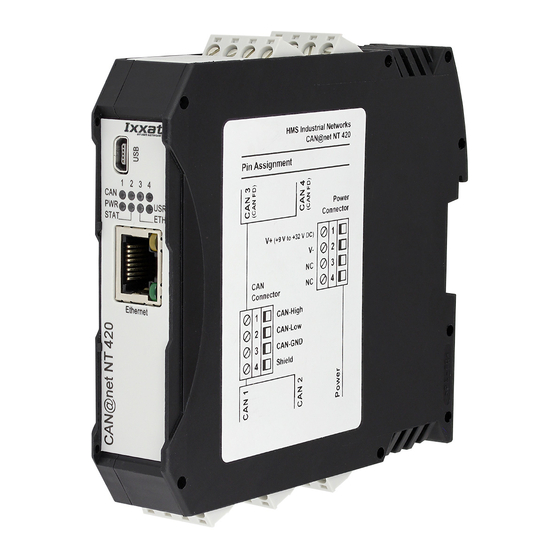
Page 23: Operation
Operation 21 (30) Operation Fig. 15 Ports and LEDs Status LED Power LED Mini USB port CAN LEDs 1 to 4 User LED Ethernet LED Link speed LED Ethernet port Link/Activity LED Ethernet Port Designed as standard RJ45 port with pin allocation according to Ethernet standard. Because of the Ethernet PHY auto-crossover feature the device can be connected with a crossover cable or with a one-to-one network cable. -
Page 24: Indicators
Operation 22 (30) Indicators 7.3.1 Power LED Indicates the status of the power supply. LED state Comments Description No power Possible causes: device not connected to power supply, fuse of device damaged, internal power supply damaged, power supply not sufficient Green Power Device fully functional... - Page 25 Operation 23 (30) 7.3.4 Ethernet LED Indicates the Ethernet communication status. LED state Description Comments No Ethernet communication Possible causes: device unsuccessfully initialized, device not connected to Ethernet or no communication Green flashing TCP/IP packet transmitted Communication was successful successfully Orange flashing TCP/IP packet not transmitted Bad or slow TCP/IP connection, messages can not be...
-
Page 26: Default Network Settings
Default Network Settings 24 (30) Default Network Settings Network parameter Default setting Remark Static IP Mode IP Address 169.254.y.x Like APIPA if no DHCP server is available. By y = ((device serial number - 800 000) DIV 254) MOD 256 scanning the network, all x = ((device serial number - 800 000) MOD 254) +1 available devices can be... -
Page 27: Support/Return Hardware
25 (30) Support/Return Hardware Support/Return Hardware Observe the following information in the support area on www.ixxat.com: • information about products • FAQ lists • installation notes • updated product versions • updates 11.1 Support For problems or support with the product request support at www.ixxat.com/support. ►... - Page 28 This page intentionally left blank...
-
Page 29: A Regulatory Compliance
Phone +1 312 829 0601 Any changes or modifications not expressly approved by HMS Industrial Networks could void the user's authority to operate the equipment. This equipment has been tested and found to comply with the limits for a Class B digital device, pursuant to Part 15 of the FCC rules. -
Page 30: Disposal And Recycling
When this product reaches its end of life, contact local authorities to learn about disposal and recycling options, or simply drop it off at your local HMS office or return it to HMS. For more information, see www.hms-networks.com. - Page 31 This page intentionally left blank...
- Page 32 © 2019 HMS Industrial Networks Box 4126 300 04 Halmstad, Sweden info@hms.se 4.01.0332.20000 1.6 en-US / 2019-03-04 / 12139...
Need help?
Do you have a question about the Ixxat CAN@net NT 420 and is the answer not in the manual?
Questions and answers