
Related Manuals for StarTech.com SV431DHD4KU


Summary of Contents for StarTech.com SV431DHD4KU
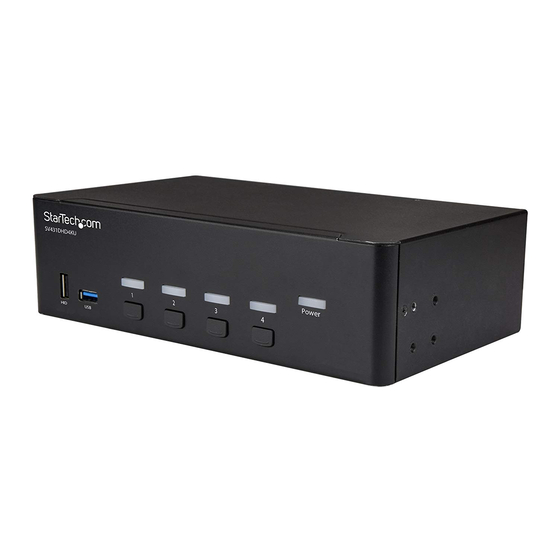
- Page 1 4-Port Dual HDMI KVM Switch|4K 30Hz Actual product may vary from photos User Manual SKU#: SV431DHD4KU For the latest information and specifications visit www.startech.com/SV431DHD4KU Manual Revision: 03/29/2019...
-
Page 2: Compliance Statements
This manual may make reference to trademarks, registered trademarks, and other protected names and/or symbols of third-party companies not related in any way to StarTech.com. Where they occur these references are for illustrative purposes only and do not represent an endorsement of a product or service by StarTech.com, or an endorsement of the product(s) to which this manual... -
Page 3: Safety Statements
• I cavi (inclusi i cavi di alimentazione e di ricarica) devono essere posizionati e stesi in modo da evitare pericoli di inciampo, rischi di scosse elettriche o pericoli per la sicurezza. To view manuals, videos, drivers, downloads, technical drawings, and more visit www.startech.com/support... -
Page 4: Warning Statements
• Make sure to assemble this product according to the instructions. Failure to do so might result in personal injury or property damage. • Never use this product if parts are missing or damaged. To view manuals, videos, drivers, downloads, technical drawings, and more visit www.startech.com/support... -
Page 5: Table Of Contents
Push Button Control ..........................13 EDID Copy ....................14 Copying EDID Settings ..........................14 Auto Learning EDID Settings ........................ 14 Resetting EDID Settings .......................... 15 About the LED indicators ..............16 To view manuals, videos, drivers, downloads, technical drawings, and more visit www.startech.com/support... - Page 6 Troubleshooting ..................17 PC BIOS Change ............................17 EDID ................................18 Keyboard and Mouse ..........................19 Connected USB Device ........................... 19 Functionality ............................... 20 Display Device ............................21 To view manuals, videos, drivers, downloads, technical drawings, and more visit www.startech.com/support...
-
Page 7: Product Diagram
Product Diagram Actual product may vary from photos. Front View USB HID Port Port LEDs USB 3.0 Hub Port Port Selection Buttons Power LED To view manuals, videos, drivers, downloads, technical drawings, and more visit www.startech.com/support... -
Page 8: Rear View
Console HDMI Ports (2) EDID Copy Buttons (2) PC HDMI Ports (8) USB HID Ports (3) Console Audio Port PC USB Ports (4) PC Audio Port (4) USB 3.0 Hub Port To view manuals, videos, drivers, downloads, technical drawings, and more visit www.startech.com/support... -
Page 9: Product Information
Computer system enabled with USB • Display device (e.g. monitor, projector, TV, and so on) enabled • with HDMI Standard USB keyboard and mouse (wired or wireless) • To view manuals, videos, drivers, downloads, technical drawings, and more visit www.startech.com/support... -
Page 10: Installation
Connect a USB peripheral’s Connector to the USB Hub • Port on the KVM Switch. Connect additional HID Devices (touch pads, • touchscreens, number pads, etc.) to an available HID Port on the KVM Switch. To view manuals, videos, drivers, downloads, technical drawings, and more visit www.startech.com/support... -
Page 11: Connect A Computer To The Kvm Switch
Turn on any devices or peripherals that are connected to the KVM Switch. Turn on the connected Computer(s) and wait for the Computer(s) to finish loading. Test the functionality of the Keyboard and Mouse connected to the Computer. To view manuals, videos, drivers, downloads, technical drawings, and more visit www.startech.com/support... -
Page 12: Installing The Feet
Notes: Your Keyboard must be connected to one of the HID Ports on the KVM Switch to use hotkey commands. The Scroll Lock key can be used as an alternative to the Left Ctrl key. To view manuals, videos, drivers, downloads, technical drawings, and more visit www.startech.com/support... - Page 13 Press Left Ctrl, Left Ctrl, A to move the audio function to the selected port. The audio will remain on the selected port until Audio Stick is disabled or the audio is moved to another port. To view manuals, videos, drivers, downloads, technical drawings, and more visit www.startech.com/support...
-
Page 14: Push Button Control
4 beeps indicating the duration of the scan rate 1 beep = 3 seconds, 2 beeps = 8 seconds, 3 beeps = 15 seconds, and 4 beeps = 30 seconds. To view manuals, videos, drivers, downloads, technical drawings, and more visit www.startech.com/support... -
Page 15: Edid Copy
Console HDMI Port for the Display Device you want to use to copy EDID settings from, for 12 seconds. Release the EDID Copy Button once the HDMI LED starts to To view manuals, videos, drivers, downloads, technical drawings, and more visit www.startech.com/support... -
Page 16: Resetting Edid Settings
Release the EDID Copy Button once the HDMI LED starts to flash quickly. Note: The HDMI LED will flash 3 times indicating that it has successfully reset the EDID settings. To view manuals, videos, drivers, downloads, technical drawings, and more visit www.startech.com/support... -
Page 17: About The Led Indicators
KVM Switch is Power LED Illuminated receiving power Illuminated Connected Computer is turned green Illuminated red Connected Port LEDs Computer is currently selected Auto Scan process is Blinking in progress To view manuals, videos, drivers, downloads, technical drawings, and more visit www.startech.com/support... -
Page 18: Troubleshooting
Installed field to Yes. By setting the PNP OS Installed field to Yes, only critical devices required for the system boot process are configured during boot up. Change the USB IRQ field to Enabled. To view manuals, videos, drivers, downloads, technical drawings, and more visit www.startech.com/support... -
Page 19: Edid
Release the EDID Copy Button once the Power LED starts to flash. The Power LED will flash twice indicating that it has successfully copied the EDID settings from the connected Display Device. To view manuals, videos, drivers, downloads, technical drawings, and more visit www.startech.com/support... -
Page 20: Keyboard And Mouse
Double check USB cable connecting the device to the KVM Switch. Disconnect the USB device and move it to an available USB port. Disconnect all USB devices and cables and power cycle the KVM Switch. To view manuals, videos, drivers, downloads, technical drawings, and more visit www.startech.com/support... -
Page 21: Functionality
Note: There must be at least two connected and powered systems for the Auto Scan feature to work. Power up or reboot any systems which are currently powered off or not detected correctly. Re-enable Auto Scan. To view manuals, videos, drivers, downloads, technical drawings, and more visit www.startech.com/support... -
Page 22: Display Device
Console HDMI Port or when switching ports. Make sure that you have plugged a Display Device to the • Console HDMI Port and reboot the Computer while the KVM Switch is on. To view manuals, videos, drivers, downloads, technical drawings, and more visit www.startech.com/support... - Page 23 Limitation of Liability In no event shall the liability of StarTech.com Ltd. and StarTech.com USA LLP (or their officers, directors, employees or agents) for any damages (whether direct or indirect, special, punitive, incidental, consequential, or otherwise), loss of profits, loss of business, or any pecuniary loss, arising out of or related to the use of the product exceed the actual price paid for the product.
- Page 24 StarTech.com is an ISO 9001 Registered manufacturer of connectivity and technology parts. StarTech.com was founded in 1985 and has operations in the United States, Canada, the United Kingdom and Taiwan servicing a worldwide market.
Need help?
Do you have a question about the SV431DHD4KU and is the answer not in the manual?
Questions and answers