Table of Contents
Advertisement
Quick Links
a513-11, Sangdaewon-dong, Jungwon-gu, Seongnam-si, Gyeonggi-do, Korea
Int'l Business Dept. : Tel.; +82-31-7393-540~550 Fax.; +82-31-745-2133
Web site : www.commax.com
COLOR VIDEO
DOOR PHONE
Printed In Korea/ 2007.08
Model No. CDV-72BE
Thank you for purchasing our COMMAX product.
Please carefully read this User's Guide (in particular, precautions for safety)
before using the product and follow the instructions to use your productexactly.
The company is not responsible for any safety accidents caused in abnormal
operation of the product.
Advertisement
Table of Contents

Related Manuals for Commax CDV-72BE


Summary of Contents for Commax CDV-72BE
- Page 1 COLOR VIDEO DOOR PHONE Model No. CDV-72BE Thank you for purchasing our COMMAX product. a513-11, Sangdaewon-dong, Jungwon-gu, Seongnam-si, Gyeonggi-do, Korea Please carefully read this User’s Guide (in particular, precautions for safety) Int’l Business Dept. : Tel.; +82-31-7393-540~550 Fax.; +82-31-745-2133 before using the product and follow the instructions to use your productexactly.
-
Page 2: Table Of Contents
Warnings and caution 1. Parts Name & Functions 2. Features and Main Functions 3. CDT-180 (Parts Name & Functions) 4. Package contents 5. System Layout 6. Wiring Diagram 7. Installation Method 8. Operating Description Door Answering & Monitoring Image Recording Review images recorded in the Memory Time setup Camera setup... - Page 3 It may cause an electric shock. It may cause a fire, an electric shock Otherwise, it may not function plug immediately and contact or an injury due to malfunction of the properly. Commax service center. product.
- Page 4 1) Features 7” Wide TFT-LCD Surface mount type Free voltage power source OSD (On screen Display) 2) Main function Door Answering & Monitoring Image Max of recording 128 cuts : Auto & Manual record Door Open function CCTV Camera connectable 4 Door camera units (Inter-mixture with door cameras or CCTV cameras) Name...
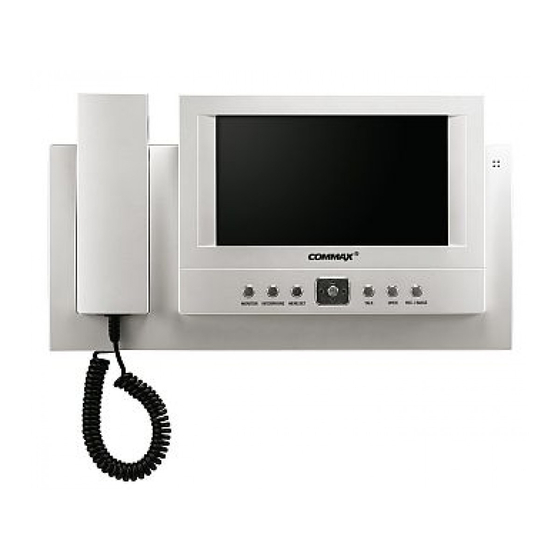
- Page 5 Receiver Color LCD -Receiving incoming call -Receiving new message message Function display Monitor & Handset User manual Wall Mount Bracket Fixing Screw -Flash at new message Redial / Back / Clear Up/Down Key Menu button -Menu Up/Down Menu/ OK/ Option -Setting change Connector 4P(4EA) Connector 2P(1EA)
-
Page 6: Wiring Diagram
Installation method of monitor Please carefully connect wiring terminal on polarity Notes for installing -Please keep the product away from magnetism, severe moisture, direct sun rays and nearby heater, which may influence on the product. -Suitable height for main unit is 1450 ~ 1500mm from the bottom to the screen. Wiring diagram for CCTV Camera -Please arrange the handset after installation is completed Please connect CCTV camera to one of the 4 channels... -
Page 7: Door Answering & Monitoring
6 Recorded images are shown on a screen from the last recorded one. button to record an image automatically. 2-2. Auto image recording Automatically record the visitor s pictures the memory of CDV-72BE when you set the units on away mode. Press the [MENU] button Select the “AUTO RECORD SET”... -
Page 8: Time Setup
5. Screen Adjustment 2007-01-28 11:12:33 1-1/4 Move to a previous image or a next image using [LEFT ], [RIGHT ] buttons Press the [REVIEW] again to go back to standby mode When it comes to full records with 128 cuts, the first recorded image will be deleted automatically in order. -
Page 9: Camera Setup
(Refer to setting related page) If the phone fails to register, wait 1 minute before trying to register it again. 7. Camera setup CDV-72BE is connectable up to 4 camera units. Press [MENU]button 1. The connector on the 1.Please put the... - Page 10 ITEM CONTENTS (CDV-72BE) Wiring number Camera : 4 lines on polarity Rated voltage AC100-240V~, 50/60Hz Power consumption CDV-72BE : 25W (Max.) (On operating) Display 7” TFT-LCD Door(individual door):ring/ Call sound electronic chime 3 sounds twice repeatedly/ Time for 30sec (On call : for 60sec)
Need help?
Do you have a question about the CDV-72BE and is the answer not in the manual?
Questions and answers